目录
一、安装环境
二、前置依赖包
三、安装前准备1
四、安装前准备2
五、安装
一、安装环境
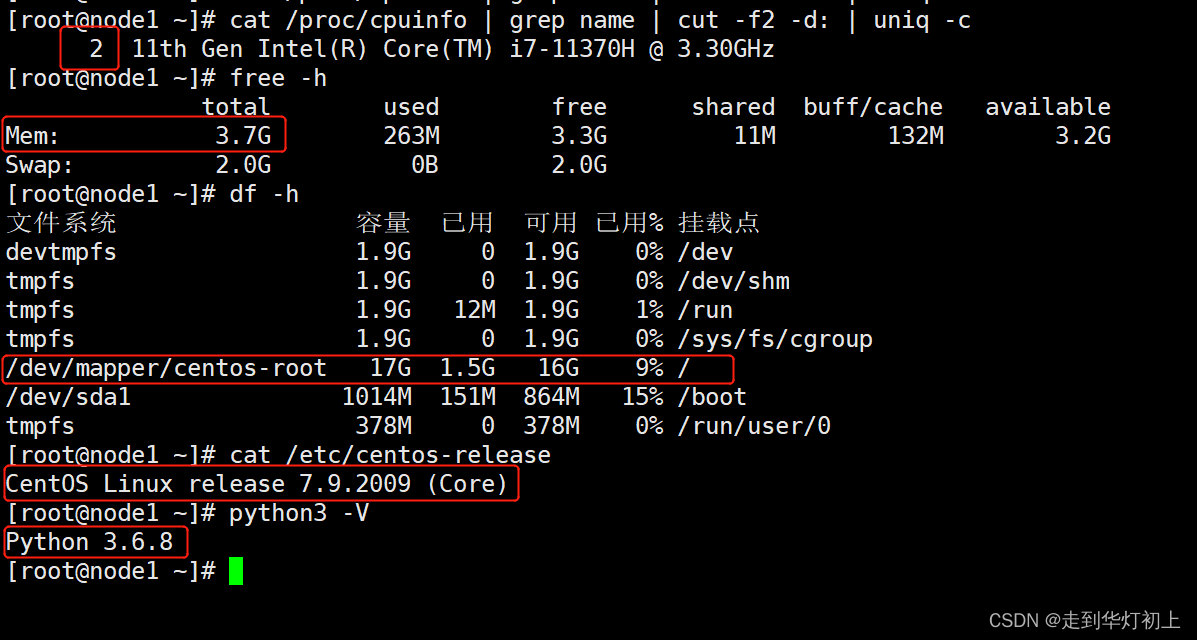
CPU:2核
内存:4G
磁盘:20G
操作系统:CentOS 7.9
python版本:Python 3.6.8
二、前置依赖包
| libaio-devel | 建议版本:0.3.109-13 |
| flex | 要求版本:2.5.31 以上 |
| bison | 建议版本:2.7-4 |
| ncurses-devel | 建议版本:5.9-13.20130511 |
| glibc-devel | 建议版本:2.17-111 |
| patch | 建议版本:2.7.1-10 |
| redhat-lsb-core | 建议版本:4.1 |
| readline-devel | 建议版本:7.0-13 |
| libnsl(openEuler+x86环境中) | 建议版本:2.28-36 |
同时还需要:expect和bzip2
1、安装依赖包
yum install -y libaio-devel flex bison ncurses-devel glibc-devel patch lsb_release readline-devel expect bzip2
2、检查是否已安装
rpm -qa libaio-devel flex bison ncurses-devel glibc-devel patch lsb_release readline-devel expect bzip2

注:redhat-lsb-core系统默认已安装
三、安装前准备1
1、修改操作系统参数
cat >>/etc/sysctl.conf<<EOF
net.ipv4.tcp_fin_timeout=60
net.ipv4.tcp_retries1=5
net.ipv4.tcp_syn_retries=5
#net.sctp.path_max_retrans=10
#net.sctp.max_init_retransmits=10
EOF

# 检查
cat /etc/sysctl.conf
使其生效
sysctl -p
如果有提示不存在的直接注释掉,再执行
2、关闭透明大页
-- openGauss默认关闭使用transparent_hugepage服务,并将关闭命令写入操作系统启动文件
cat >> /etc/rc.d/rc.local<<EOF
if test -f /sys/kernel/mm/transparent_hugepage/enabled;
    then
	echo never > /sys/kernel/mm/transparent_hugepage/enabled
	fi
	if test -f /sys/kernel/mm/transparent_hugepage/defrag;
    then
	echo never > /sys/kernel/mm/transparent_hugepage/defrag
	fi
EOF

-- 查看是否关闭:
cat /sys/kernel/mm/transparent_hugepage/enabled
cat /sys/kernel/mm/transparent_hugepage/defrag

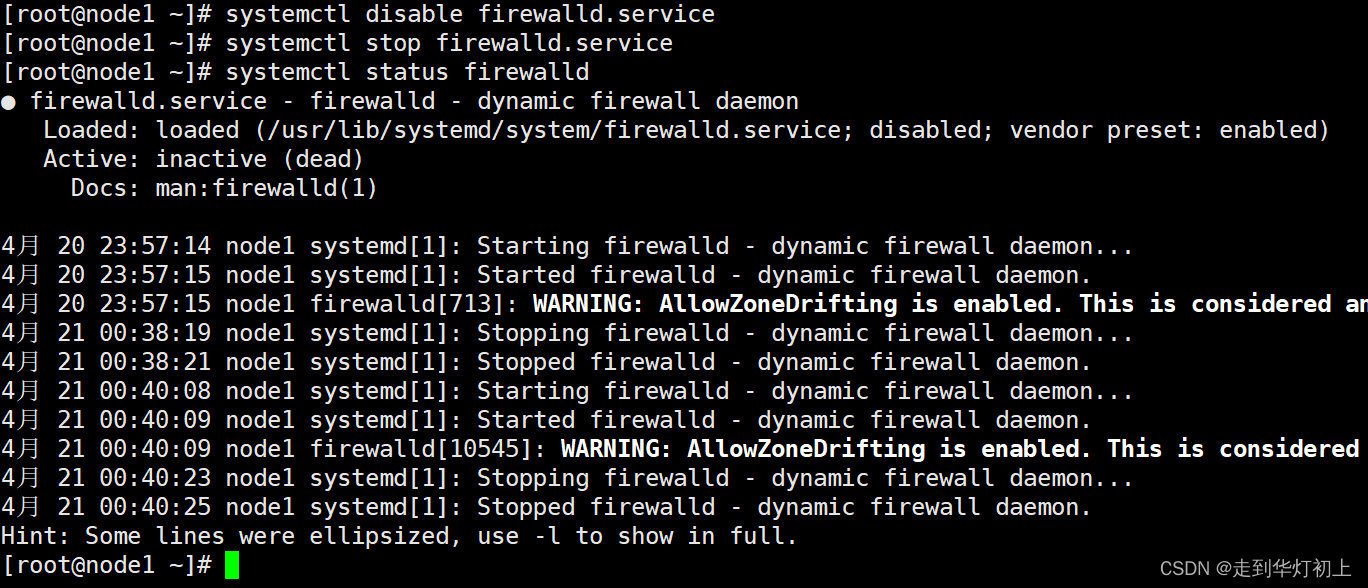
3、关闭防火墙
systemctl disable firewalld.service
systemctl stop firewalld.service

# 检查防火墙状态
systemctl status firewalld
4、关闭SELINUX
sed -i 's/^SELINUX=enforcing/SELINUX=disabled/g' /etc/selinux/config

setenforce 0

# 检查
cat /etc/selinux/config | grep SELINUX
5、修改字符集
cat>> /etc/profile<<EOF
export LANG=en_US.UTF-8
EOF

source /etc/profile
# 检查
cat /etc/profile | grep LANG
6、修改时区
cp /usr/share/zoneinfo/Asia/Shanghai /etc/localtime

-- 查看
date
如果出现情况,说明时区正常,可跳过

7、关闭swap
# 临时关闭
swapoff -a

# 永久关闭注释 swap 行
# vim /etc/fstab

# 查看swap一行全是 0 表示swap关闭
free -h

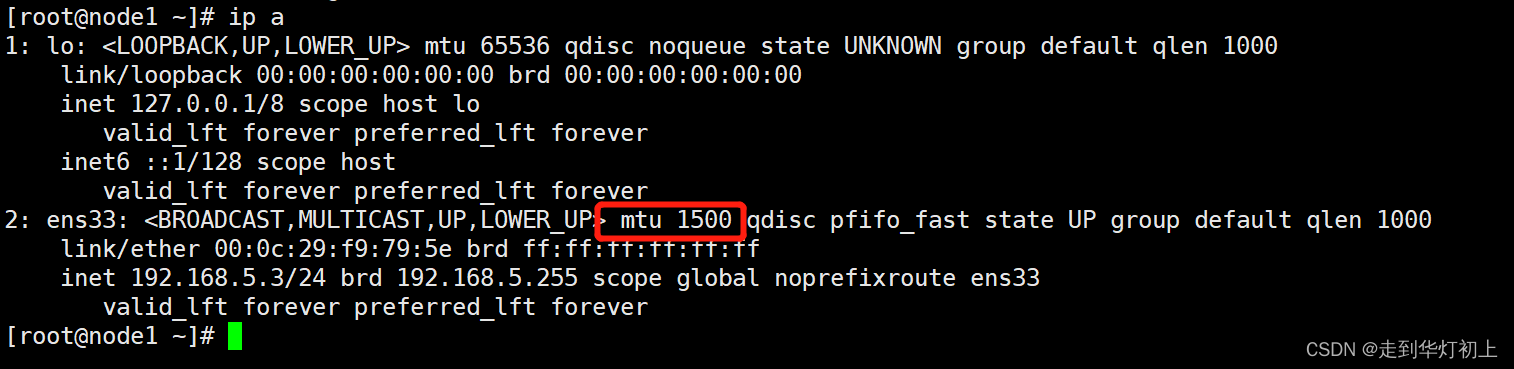
8、设置网卡MTU,要求数据库各节点的网卡MTU值设置为相同大小。MTU值推荐8192,要求不小于1500,使用默认值 1500 满足要求即可
-- 设置网卡为1500
ifconfig 网卡名 mtu 1500
 9、设置root用户远程登录
cat >>/etc/ssh/sshd_config<<EOF
PermitRootLogin yes
EOF

# 检查
cat /etc/ssh/sshd_config |grep PermitRootLogin
10、修改Banner配置
cat >>/etc/ssh/sshd_config<<EOF
Banner none
EOF
# 检查
cat /etc/ssh/sshd_config | grep Banner
# 重启生效
systemctl restart sshd.service
11、修改DNS,IP为网关IP,需要根据实际情况填写
# 节点一
cat >>/etc/resolv.conf<<EOF
nameserver 114.114.114.114
EOF

# 检查
cat /etc/resolv.conf
四、安装前准备2
1、修改hostname,local_host替换为本机IP
# 主机名修改
cat > /etc/hostname<<EOF
node1
EOF

# 检查
cat /etc/hostname
2、创建目录
# 创建存放安装包的目录
mkdir -p /opt/software/openGauss
chmod 755 -R /opt/software

# 创建数据库软件相关目录
mkdir -p /opt/openGauss
chmod -R 755 /opt/openGauss
3、下载安装包
# 下载地址:openGauss
openGauss
或者直接命令行执行
wget https://opengauss.obs.cn-south-1.myhuaweicloud.com/5.0.0/x86/openGauss-5.0.0-CentOS-64bit-all.tar.gz
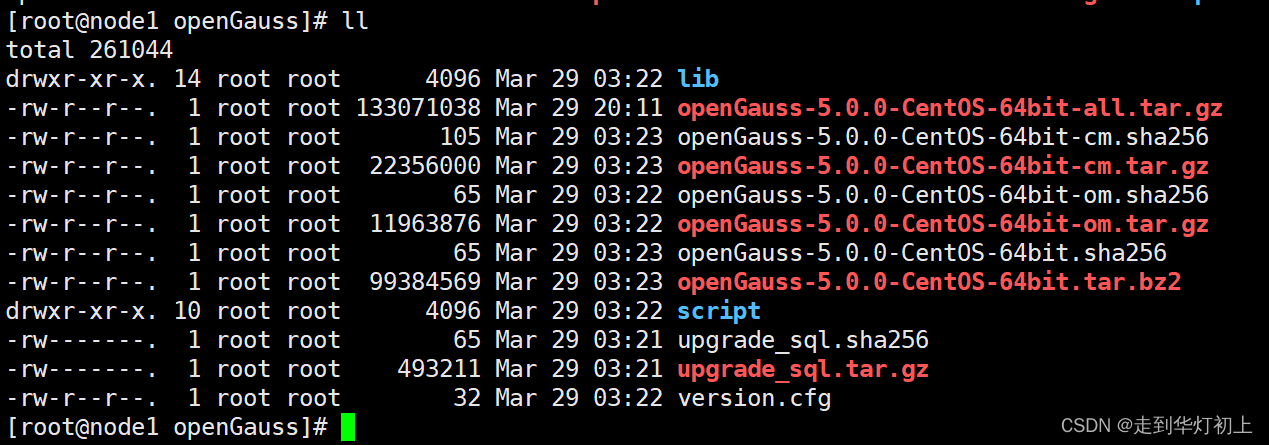
4、解压安装包
# 将下载的安装包移到安装目录
mv openGauss-5.0.0-CentOS-64bit-all.tar.gz /opt/software/openGauss/

cd /opt/software/openGauss
tar -zxvf openGauss-5.0.0-CentOS-64bit-all.tar.gz
tar -zxvf openGauss-5.0.0-CentOS-64bit-om.tar.gz
五、安装
1、xml配置
安装openGauss前需要创建cluster_config.xml文件。cluster_config.xml文件包含部署openGauss的服务器信息、安装路径、IP地址以及端口号等。 用于告知openGauss如何部署。用户需根据不同场景配置对应的XML文件。
# 查找xml配置模板
find / -name cluster_config_template.xml

# 移动到安装目录

# 编辑xml文件
vi /opt/software/openGauss/cluster_config.xml

<?xml version="1.0" encoding="UTF-8"?>
<ROOT>
    <!-- openGauss整体信息 -->
    <CLUSTER>
        <!-- 数据库名称 -->
        <PARAM name="clusterName" value="opengauss" />
        <!-- 数据库节点名称(hostname) -->
        <PARAM name="nodeNames" value="node1" />
        <!-- 数据库安装目录-->
        <PARAM name="gaussdbAppPath" value="/opt/openGauss/app" />
        <!-- 日志目录-->
        <PARAM name="gaussdbLogPath" value="/opt/openGauss/log/omm" />
        <!-- 临时文件目录-->
        <PARAM name="tmpMppdbPath" value="/opt/openGauss/tmp"/>
        <!-- 数据库工具目录-->
        <PARAM name="gaussdbToolPath" value="/opt/openGauss/om" />
        <!-- 数据库core文件目录-->
        <PARAM name="corePath" value="/opt/openGauss/corefile"/>
        <!-- 节点IP,与数据库节点名称列表一一对应 -->
        <PARAM name="backIp1s" value="192.168.5.3"/>
    </CLUSTER>
    <!-- 每台服务器上的节点部署信息 -->
    <DEVICELIST>
        <!-- 节点1上的部署信息 -->
        <DEVICE sn="node1">
            <!-- 节点1的主机名称 -->
            <PARAM name="name" value="node1"/>
            <!-- 节点1所在的AZ及AZ优先级 -->
            <PARAM name="azName" value="AZ1"/>
            <PARAM name="azPriority" value="1"/>
            <!-- 节点1的IP,如果服务器只有一个网卡可用,将backIP1和sshIP1配置成同一个IP -->
            <PARAM name="backIp1" value="192.168.5.3"/>
            <PARAM name="sshIp1" value="192.168.5.3"/>

	    <!--dn-->
            <PARAM name="dataNum" value="1"/>
	    <PARAM name="dataPortBase" value="15400"/>
	    <PARAM name="dataNode1" value="/opt/openGauss/data/dn"/>
            <PARAM name="dataNode1_syncNum" value="0"/>
        </DEVICE>
    </DEVICELIST>
</ROOT>
2、创建omm用户和用户组,并授权
# 创建用户组
groupadd dbgrp

# 在用户组下创建用户,并设置密码
useradd -g dbgrp omm
passwd
# 授权
chown -R omm:dbgrp /opt/software
chown -R omm:dbgrp /opt/openGauss
3、预安装
cd /opt/software/openGauss/script/

./gs_preinstall -U omm -G dbgrp -X /opt/software/openGauss/cluster_config.xml

# 或者直接
/opt/software/openGauss/script/gs_preinstall -U omm -G dbgrp -X /opt/software/openGauss/cluster_config.xml
异常情况1:
[GAUSS-51405] : You need to install software:expect

原因没有安装expect,执行:
yum install -y expect

异常情况2:
Parsing the configuration file.
Successfully parsed the configuration file.
[GAUSS-50217] : Failed to decompress version.cfg.The cmd is cd /opt/software/openGauss/script/.. && tar -xpf `ls openGauss*.tar.bz2|tail -1` ./version.cfg ./bin/encrypt && \mv ./bin/encrypt /opt/software/openGauss/script/../script/gspylib/clib && cd /opt/software/openGauss/script/.. && rm -rf bin. The output is tar (child): lbzip2: Cannot exec: No such file or directory
tar (child): Error is not recoverable: exiting now
tar: Child returned status 2
tar: Error is not recoverable: exiting now.

原因:没安装bzip2,执行:
yum -y install bzip2

异常3:
[GAUSS-50202] : The /opt/openGauss must be empty. Or user [omm] has write permission to directory /opt/openGauss. Because it will create symbolic link [/opt/openGauss/app] to install path [/opt/openGauss/app_a07d57c3] in gs_install process with this user.

原因:之前预安装失败,产生的文件,需要删除,也可能是omm没有文件权限
rm -rf /opt/openGauss/*
chown omm:dbgrp -R /opt/openGauss
chown omm:dbgrp -R /opt/software/openGauss
[root@node1 openGauss]# ./script/gs_preinstall -U omm -G dbgrp -X /opt/software/openGauss/cluster_config.xml
Parsing the configuration file.
Successfully parsed the configuration file.
Installing the tools on the local node.
Successfully installed the tools on the local node.
Setting host ip env
Successfully set host ip env.
Are you sure you want to create the user[omm] (yes/no)? yes
Preparing SSH service.
Successfully prepared SSH service.
Checking OS software.
Successfully check os software.
Checking OS version.
Successfully checked OS version.
Creating cluster's path.
Successfully created cluster's path.
Set and check OS parameter.
Setting OS parameters.
Successfully set OS parameters.
Warning: Installation environment contains some warning messages.
Please get more details by "/opt/software/openGauss/script/gs_checkos -i A -h node1 --detail".
Set and check OS parameter completed.
Preparing CRON service.
Successfully prepared CRON service.
Setting user environmental variables.
Successfully set user environmental variables.
Setting the dynamic link library.
Successfully set the dynamic link library.
Setting Core file
Successfully set core path.
Setting pssh path
Successfully set pssh path.
Setting Cgroup.
Successfully set Cgroup.
Set ARM Optimization.
No need to set ARM Optimization.
Fixing server package owner.
Setting finish flag.
Successfully set finish flag.
Preinstallation succeeded.
3、安装
切换到omm用户,设置数据库初始账号omm密码要求
最少包含8个字符,最多包含16个字符。
不能和用户名、当前密码(ALTER)、或当前密码反序相同。
至少包含大写字母(A-Z)、小写字母(a-z)、数字、非字母数字字符(限定为~!@#$%^&*()-_=+\|[{}];:,<.>/?)四类字符中的三类字符
[omm@node1 openGauss]$ su omm

[omm@node1 openGauss]$ gs_install -X /opt/software/openGauss/cluster_config.xml
Parsing the configuration file.
Check preinstall on every node.
Successfully checked preinstall on every node.
Creating the backup directory.
Last time end with Install cluster.
Continue this step.
Successfully created the backup directory.
begin deploy..
Rolling back.
Rollback succeeded.
Installing the cluster.
begin prepare Install Cluster..
Checking the installation environment on all nodes.
begin install Cluster..
Installing applications on all nodes.
Successfully installed APP.
begin init Instance..
encrypt cipher and rand files for database.
Please enter password for database:
Please repeat for database:
[GAUSS-50306] : The password of database is incorrect.The two passwords are different, please enter password again.
Please enter password for database:
Please repeat for database:
begin to create CA cert files
The sslcert will be generated in /opt/openGauss/app/share/sslcert/om
NO cm_server instance, no need to create CA for CM.
Non-dss_ssl_enable, no need to create CA for DSS
Cluster installation is completed.
Configuring.
Deleting instances from all nodes.
Successfully deleted instances from all nodes.
Checking node configuration on all nodes.
Initializing instances on all nodes.
Updating instance configuration on all nodes.
Check consistence of memCheck and coresCheck on database nodes.
Configuring pg_hba on all nodes.
Configuration is completed.
The cluster status is Normal.
Successfully started cluster.
Successfully installed application.
end deploy..
[omm@node1 openGauss]$
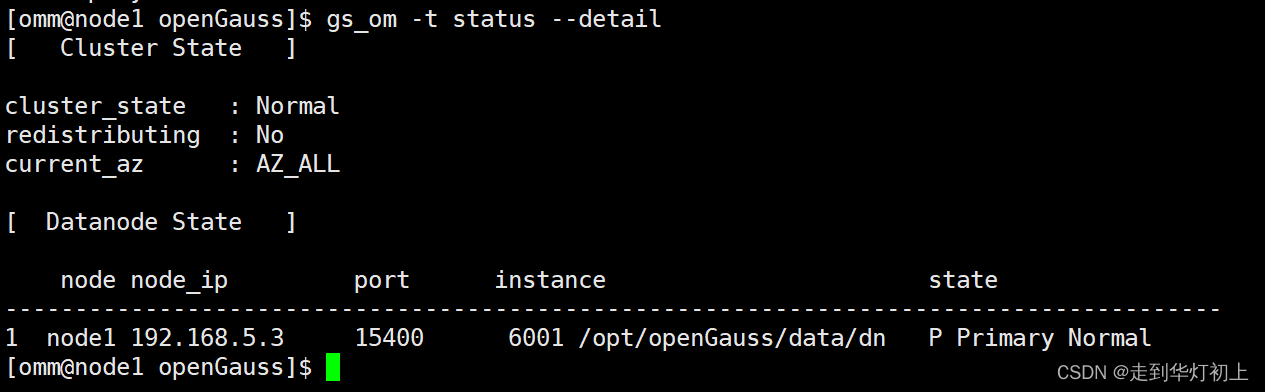
8、安装验证
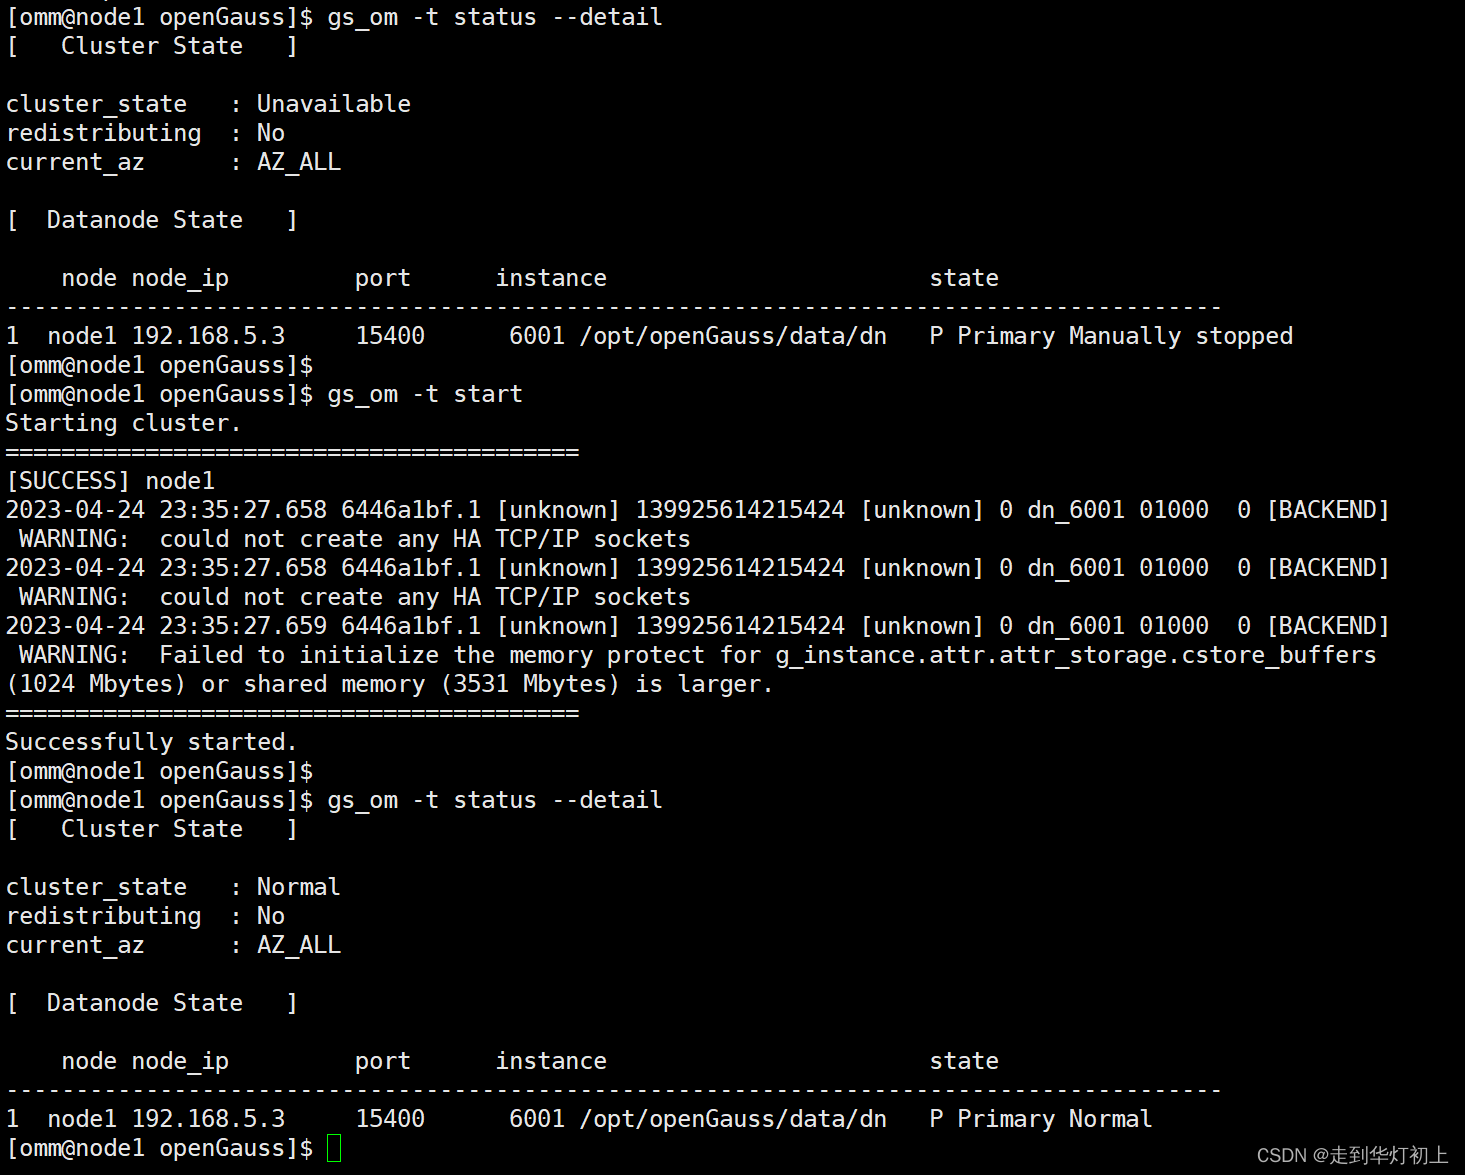
gs_om -t status --detail
4、数据库基本操作
# 关闭服务
gs_om -t stop

# 启动服务
gs_om -t start
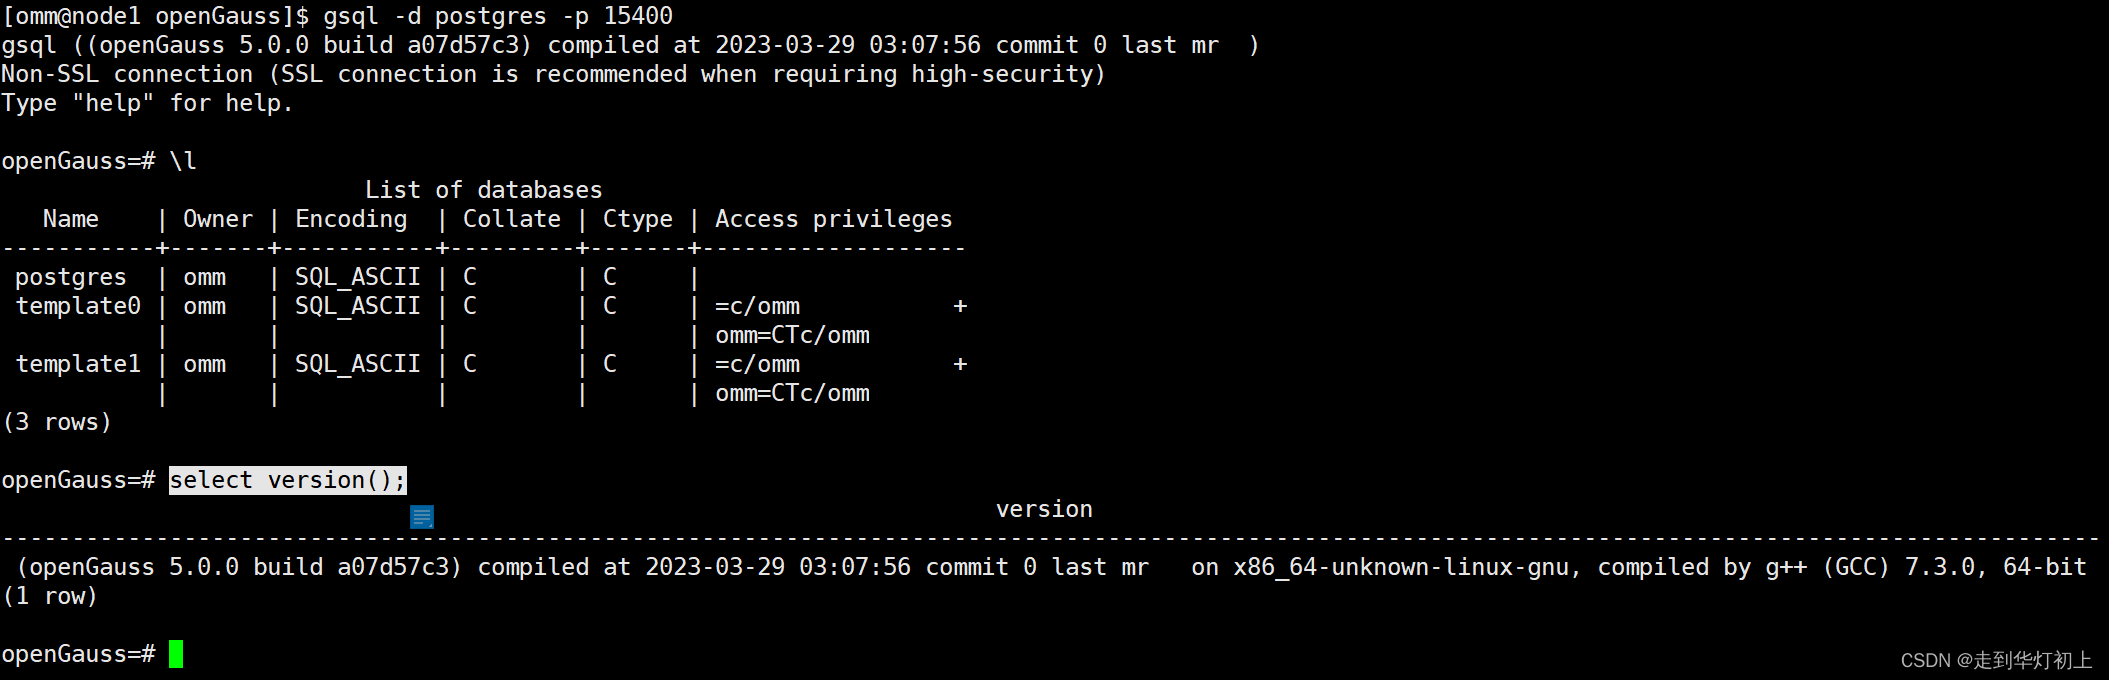
# 登录数据库
gsql -d postgres -p 15400

# 查看数据库版本
select version();
本文内容由网友自发贡献,版权归原作者所有,本站不承担相应法律责任。如您发现有涉嫌抄袭侵权的内容,请联系:hwhale#tublm.com(使用前将#替换为@)