憨批的语义分割3——unet模型详解以及训练自己的unet模型(划分斑马线)
学习前言
在这一个BLOG里,我会跟大家讲一下什么是unet模型,以及如何训练自己的unet模型,其训练与上一篇的segnet模型差距不大,但是结构上有一定的差距。如果想要先有语义分割的基础,可以看我的博文憨批的语义分割2——训练自己的segnet模型(划分斑马线)

模型部分
什么是unet模型
unet是一个语义分割模型,其主要执行过程与其它语义分割模型类似,首先利用卷积进行下采样,然后提取出一层又一层的特征,利用这一层又一层的特征,其再进行上采样,最后得出一个每个像素点对应其种类的图像。
看如下这幅图我们大概可以看出个所以然来:
在进行segnet的详解的时候我们知道,其只选了一个hw压缩了四次的特征层进行三次上采样得到最后的结果。
但是unet不一样,其利用到了压缩了二、三、四次的特征层,最后输出图像分割的结果(可以选择是否需要压缩了一次的特征层)。
具体的网络结构如下,左边的顺序从上向下传播,右边的顺序从下向上传播:

其主要的过程就是,将hw被压缩了四次的f4进行一次上采样后与f3进行concatenate,然后再进行一次上采样与f2进行concatenate,然后再进行一次上采样(这里可以选择是否与f1进行concatenate),最后利用卷积输出filter为nclasses的图像。(一共进行三次上采样)
unet模型的代码实现
unet模型的代码分为两部分。
1、主干模型Mobilenet。
该部分用于特征提取,实际上就是常规的mobilenet结构,想要了解mobilenet结构的朋友们可以看看我的另一篇博客神经网络学习小记录23——MobileNet模型的复现详解:
from keras.models import *
from keras.layers import *
import keras.backend as K
import keras

IMAGE_ORDERING = 'channels_last'

def relu6(x):
	return K.relu(x, max_value=6)

def _conv_block(inputs, filters, alpha, kernel=(3, 3), strides=(1, 1)):

	channel_axis = 1 if IMAGE_ORDERING == 'channels_first' else -1
	filters = int(filters * alpha)
	x = ZeroPadding2D(padding=(1, 1), name='conv1_pad', data_format=IMAGE_ORDERING  )(inputs)
	x = Conv2D(filters, kernel , data_format=IMAGE_ORDERING  ,
										padding='valid',
										use_bias=False,
										strides=strides,
										name='conv1')(x)
	x = BatchNormalization(axis=channel_axis, name='conv1_bn')(x)
	return Activation(relu6, name='conv1_relu')(x)

def _depthwise_conv_block(inputs, pointwise_conv_filters, alpha,
													depth_multiplier=1, strides=(1, 1), block_id=1):

	channel_axis = 1 if IMAGE_ORDERING == 'channels_first' else -1
	pointwise_conv_filters = int(pointwise_conv_filters * alpha)

	x = ZeroPadding2D((1, 1) , data_format=IMAGE_ORDERING , name='conv_pad_%d' % block_id)(inputs)
	x = DepthwiseConv2D((3, 3) , data_format=IMAGE_ORDERING ,
														 padding='valid',
														 depth_multiplier=depth_multiplier,
														 strides=strides,
														 use_bias=False,
														 name='conv_dw_%d' % block_id)(x)
	x = BatchNormalization(
			axis=channel_axis, name='conv_dw_%d_bn' % block_id)(x)
	x = Activation(relu6, name='conv_dw_%d_relu' % block_id)(x)

	x = Conv2D(pointwise_conv_filters, (1, 1), data_format=IMAGE_ORDERING ,
										padding='same',
										use_bias=False,
										strides=(1, 1),
										name='conv_pw_%d' % block_id)(x)
	x = BatchNormalization(axis=channel_axis,
																name='conv_pw_%d_bn' % block_id)(x)
	return Activation(relu6, name='conv_pw_%d_relu' % block_id)(x)

def get_mobilenet_encoder( input_height=224 ,  input_width=224 , pretrained='imagenet' ):

	alpha=1.0
	depth_multiplier=1
	dropout=1e-3


	img_input = Input(shape=(input_height,input_width , 3 ))


	x = _conv_block(img_input, 32, alpha, strides=(2, 2))
	x = _depthwise_conv_block(x, 64, alpha, depth_multiplier, block_id=1)
	f1 = x

	x = _depthwise_conv_block(x, 128, alpha, depth_multiplier,
														strides=(2, 2), block_id=2)
	x = _depthwise_conv_block(x, 128, alpha, depth_multiplier, block_id=3)
	f2 = x

	x = _depthwise_conv_block(x, 256, alpha, depth_multiplier,
														strides=(2, 2), block_id=4)
	x = _depthwise_conv_block(x, 256, alpha, depth_multiplier, block_id=5)
	f3 = x

	x = _depthwise_conv_block(x, 512, alpha, depth_multiplier,
														strides=(2, 2), block_id=6)
	x = _depthwise_conv_block(x, 512, alpha, depth_multiplier, block_id=7)
	x = _depthwise_conv_block(x, 512, alpha, depth_multiplier, block_id=8)
	x = _depthwise_conv_block(x, 512, alpha, depth_multiplier, block_id=9)
	x = _depthwise_conv_block(x, 512, alpha, depth_multiplier, block_id=10)
	x = _depthwise_conv_block(x, 512, alpha, depth_multiplier, block_id=11)
	f4 = x

	x = _depthwise_conv_block(x, 1024, alpha, depth_multiplier,
														strides=(2, 2), block_id=12)
	x = _depthwise_conv_block(x, 1024, alpha, depth_multiplier, block_id=13)
	f5 = x

	return img_input , [f1 , f2 , f3 , f4 , f5 ]
2、unet的Decoder解码部分
这一部分对应着上面unet模型中的解码部分。
其关键就是把获得的特征重新映射到比较大的图中的每一个像素点,用于每一个像素点的分类。
from keras.models import *
from keras.layers import *
from nets.mobilenet import get_mobilenet_encoder


IMAGE_ORDERING = 'channels_last'
MERGE_AXIS = -1


def _unet( n_classes , encoder , l1_skip_conn=True,  input_height=416, input_width=608  ):

	img_input , levels = encoder( input_height=input_height ,  input_width=input_width )
	[f1 , f2 , f3 , f4 , f5 ] = levels

	o = f4
	# 26,26,512
	o = ( ZeroPadding2D( (1,1) , data_format=IMAGE_ORDERING ))(o)
	o = ( Conv2D(512, (3, 3), padding='valid', data_format=IMAGE_ORDERING))(o)
	o = ( BatchNormalization())(o)

	# 52,52,512
	o = ( UpSampling2D( (2,2), data_format=IMAGE_ORDERING))(o)
	# 52,52,768
	o = ( concatenate([ o ,f3],axis=MERGE_AXIS )  )
	o = ( ZeroPadding2D( (1,1), data_format=IMAGE_ORDERING))(o)
	# 52,52,256
	o = ( Conv2D( 256, (3, 3), padding='valid', data_format=IMAGE_ORDERING))(o)
	o = ( BatchNormalization())(o)

	# 104,104,256
	o = ( UpSampling2D( (2,2), data_format=IMAGE_ORDERING))(o)
	# 104,104,384
	o = ( concatenate([o,f2],axis=MERGE_AXIS ) )
	o = ( ZeroPadding2D((1,1) , data_format=IMAGE_ORDERING ))(o)
	# 104,104,128
	o = ( Conv2D( 128 , (3, 3), padding='valid' , data_format=IMAGE_ORDERING ) )(o)
	o = ( BatchNormalization())(o)
	# 208,208,128
	o = ( UpSampling2D( (2,2), data_format=IMAGE_ORDERING))(o)

	if l1_skip_conn:
		o = ( concatenate([o,f1],axis=MERGE_AXIS ) )

	o = ( ZeroPadding2D((1,1)  , data_format=IMAGE_ORDERING ))(o)
	o = ( Conv2D( 64 , (3, 3), padding='valid'  , data_format=IMAGE_ORDERING ))(o)
	o = ( BatchNormalization())(o)

	o =  Conv2D( n_classes , (3, 3) , padding='same', data_format=IMAGE_ORDERING )( o )

	# 将结果进行reshape
	o = Reshape((int(input_height/2)*int(input_width/2), -1))(o)
	o = Softmax()(o)
	model = Model(img_input,o)

	return model


def mobilenet_unet( n_classes ,  input_height=224, input_width=224 , encoder_level=3):

	model =  _unet( n_classes , get_mobilenet_encoder ,  input_height=input_height, input_width=input_width  )
	model.model_name = "mobilenet_unet"
	return model
代码测试
将上面两个代码分别保存为mobilenet.py和unet.py。按照如下方式存储:

此时我们运行test.py的代码:
from nets.unet import mobilenet_unet
model = mobilenet_unet(2,416,416)
model.summary()
如果没有出错的话就会得到如下的结果:

其模型比segnet稍微大一点。
到这里就完成了基于Mobile模型的unet的搭建。
训练部分
训练的是什么
虽然把代码贴上来大家就会点运行然后就可以训练自己的模型,但是我还是想要大家知道,语义分割模型训练的是什么。
1、训练文件详解
这个要从训练文件讲起。
语义分割模型训练的文件分为两部分。
第一部分是原图,像这样:

第二部分标签,像这样:

当你们看到这个标签的时候你们会说,我靠,你给我看的什么辣鸡,全黑的算什么标签,其实并不是这样的,这个标签看起来全黑,但是实际上在斑马线的部分其RGB三个通道的值都是1。
其实给你们换一个图你们就可以更明显的看到了。
这是voc数据集中语义分割的训练集中的一幅图:
这是它的标签。
为什么这里的标签看起来就清楚的多呢,因为在voc中,其一共需要分21类,所以火车的RGB的值可能都大于10了,当然看得见。
所以,在训练集中,如果像本文一样分两类,那么背景的RGB就是000,斑马线的RGB就是111,如果分多类,那么还会存在222,333,444这样的。这说明其属于不同的类。
2、LOSS函数的组成
关于loss函数的组成我们需要看两个loss函数的组成部分,第一个是预测结果。
	# 此时输出为h_input/2,w_input/2,nclasses
	o =  Conv2D( n_classes , (3, 3) , padding='same', data_format=IMAGE_ORDERING )( o )
	# 将结果进行reshape
	o = Reshape((int(input_height/2)*int(input_width/2), -1))(o)
	o = Softmax()(o)
	model = Model(img_input,o)
其首先利用filter为n_classes的卷积核进行卷积,此时输出为h_input/2,w_input/2,nclasses,对应着每一个hw像素点上的种类。
之后利用Softmax估计属于每一个种类的概率。
其最后预测y_pre其实就是每一个像素点属于哪一个种类的概率。
第二个是真实值,真实值是这样处理的。
# 从文件中读取图像
img = Image.open(r".\dataset2\png" + '/' + name)
img = img.resize((int(WIDTH/2),int(HEIGHT/2)))
img = np.array(img)
seg_labels = np.zeros((int(HEIGHT/2),int(WIDTH/2),NCLASSES))
for c in range(NCLASSES):
    seg_labels[: , : , c ] = (img[:,:,0] == c ).astype(int)
seg_labels = np.reshape(seg_labels, (-1,NCLASSES))
Y_train.append(seg_labels)
其将png图先进行resize,resize后其大小与预测y_pre的hw相同,然后读取每一个像素点属于什么种类,并存入。
其最后真实y_true其实就是每一个像素点确实属于哪个种类。
最后loss函数的组成就是y_true和y_pre的交叉熵。
训练代码
大家可以在我的github上下载完整的代码。
https://github.com/bubbliiiing/Semantic-Segmentation
数据集的链接为:
链接:https://pan.baidu.com/s/1uzwqLaCXcWe06xEXk1ROWw
提取码:pp6w
1、文件存放方式
如图所示:

其中img和img_out是测试文件。
2、训练文件
训练文件如下:
from nets.unet import mobilenet_unet
from keras.optimizers import Adam
from keras.callbacks import TensorBoard, ModelCheckpoint, ReduceLROnPlateau, EarlyStopping
from PIL import Image
import keras
from keras import backend as K
import numpy as np

NCLASSES = 2
HEIGHT = 416
WIDTH = 416

def generate_arrays_from_file(lines,batch_size):
    # 获取总长度
    n = len(lines)
    i = 0
    while 1:
        X_train = []
        Y_train = []
        # 获取一个batch_size大小的数据
        for _ in range(batch_size):
            if i==0:
                np.random.shuffle(lines)
            name = lines[i].split(';')[0]
            # 从文件中读取图像
            img = Image.open(r".\dataset2\jpg" + '/' + name)
            img = img.resize((WIDTH,HEIGHT))
            img = np.array(img)
            img = img/255
            X_train.append(img)

            name = (lines[i].split(';')[1]).replace("\n", "")
            # 从文件中读取图像
            img = Image.open(r".\dataset2\png" + '/' + name)
            img = img.resize((int(WIDTH/2),int(HEIGHT/2)))
            img = np.array(img)
            seg_labels = np.zeros((int(HEIGHT/2),int(WIDTH/2),NCLASSES))
            for c in range(NCLASSES):
                seg_labels[: , : , c ] = (img[:,:,0] == c ).astype(int)
            seg_labels = np.reshape(seg_labels, (-1,NCLASSES))
            Y_train.append(seg_labels)

            # 读完一个周期后重新开始
            i = (i+1) % n
        yield (np.array(X_train),np.array(Y_train))

def loss(y_true, y_pred):
    crossloss = K.binary_crossentropy(y_true,y_pred)
    loss = 4 * K.sum(crossloss)/HEIGHT/WIDTH
    return loss

if __name__ == "__main__":
    log_dir = "logs/"
    # 获取model
    model = mobilenet_unet(n_classes=NCLASSES,input_height=HEIGHT, input_width=WIDTH)
    # model.summary()
    BASE_WEIGHT_PATH = ('https://github.com/fchollet/deep-learning-models/'
										'releases/download/v0.6/')
    model_name = 'mobilenet_%s_%d_tf_no_top.h5' % ( '1_0' , 224 )

    weight_path = BASE_WEIGHT_PATH + model_name
    weights_path = keras.utils.get_file(model_name, weight_path )
    print(weight_path)
    model.load_weights(weights_path,by_name=True,skip_mismatch=True)

    # model.summary()
    # 打开数据集的txt
    with open(r".\dataset2\train.txt","r") as f:
        lines = f.readlines()

    # 打乱行,这个txt主要用于帮助读取数据来训练
    # 打乱的数据更有利于训练
    np.random.seed(10101)
    np.random.shuffle(lines)
    np.random.seed(None)

    # 90%用于训练,10%用于估计。
    num_val = int(len(lines)*0.1)
    num_train = len(lines) - num_val

    # 保存的方式,1世代保存一次
    checkpoint_period = ModelCheckpoint(
                                    log_dir + 'ep{epoch:03d}-loss{loss:.3f}-val_loss{val_loss:.3f}.h5',
                                    monitor='val_loss',
                                    save_weights_only=True,
                                    save_best_only=True,
                                    period=1
                                )
    # 学习率下降的方式,val_loss三次不下降就下降学习率继续训练
    reduce_lr = ReduceLROnPlateau(
                            monitor='val_loss',
                            factor=0.5,
                            patience=3,
                            verbose=1
                        )
    # 是否需要早停,当val_loss一直不下降的时候意味着模型基本训练完毕,可以停止
    early_stopping = EarlyStopping(
                            monitor='val_loss',
                            min_delta=0,
                            patience=10,
                            verbose=1
                        )

    # 交叉熵
    model.compile(loss = loss,
            optimizer = Adam(lr=1e-3),
            metrics = ['accuracy'])
    batch_size = 2
    print('Train on {} samples, val on {} samples, with batch size {}.'.format(num_train, num_val, batch_size))

    # 开始训练
    model.fit_generator(generate_arrays_from_file(lines[:num_train], batch_size),
            steps_per_epoch=max(1, num_train//batch_size),
            validation_data=generate_arrays_from_file(lines[num_train:], batch_size),
            validation_steps=max(1, num_val//batch_size),
            epochs=50,
            initial_epoch=0,
            callbacks=[checkpoint_period, reduce_lr])

    model.save_weights(log_dir+'last1.h5')
3、预测文件
预测文件如下:
from nets.unet import mobilenet_unet
from PIL import Image
import numpy as np
import random
import copy
import os

random.seed(0)
class_colors = [[0,0,0],[0,255,0]]
NCLASSES = 2
HEIGHT = 416
WIDTH = 416


model = mobilenet_unet(n_classes=NCLASSES,input_height=HEIGHT, input_width=WIDTH)
model.load_weights("logs/ep015-loss0.070-val_loss0.076.h5")

imgs = os.listdir("./img")

for jpg in imgs:

    img = Image.open("./img/"+jpg)
    old_img = copy.deepcopy(img)
    orininal_h = np.array(img).shape[0]
    orininal_w = np.array(img).shape[1]

    img = img.resize((WIDTH,HEIGHT))
    img = np.array(img)
    img = img/255
    img = img.reshape(-1,HEIGHT,WIDTH,3)
    pr = model.predict(img)[0]

    pr = pr.reshape((int(HEIGHT/2), int(WIDTH/2),NCLASSES)).argmax(axis=-1)

    seg_img = np.zeros((int(HEIGHT/2), int(WIDTH/2),3))
    colors = class_colors

    for c in range(NCLASSES):
        seg_img[:,:,0] += ( (pr[:,: ] == c )*( colors[c][0] )).astype('uint8')
        seg_img[:,:,1] += ((pr[:,: ] == c )*( colors[c][1] )).astype('uint8')
        seg_img[:,:,2] += ((pr[:,: ] == c )*( colors[c][2] )).astype('uint8')

    seg_img = Image.fromarray(np.uint8(seg_img)).resize((orininal_w,orininal_h))

    image = Image.blend(old_img,seg_img,0.3)
    image.save("./img_out/"+jpg)
训练结果
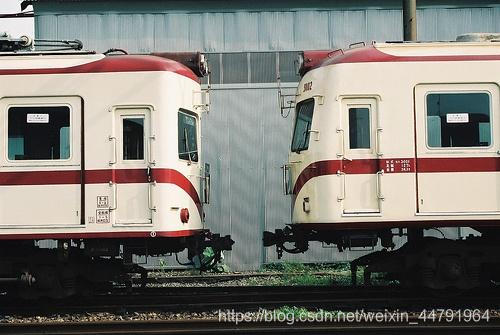
原图:

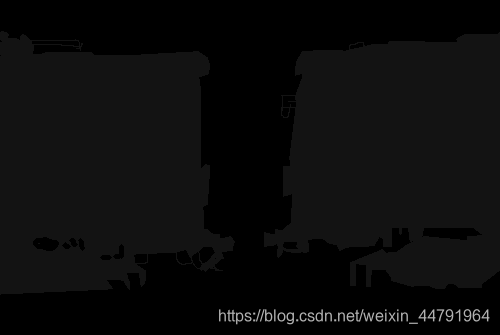
处理后:

按照道理到说,unet模型相比于segnet模型更加复杂,提取的特征层更多,应该效果会更好,不过由于我用的图片比较少,可能过拟合了,几个测试图片的效果都一般,不过在更复杂的图片上,应该是unet效果更好才对……