Lab3将在Lab2的基础上使用随机约束和环境结构来改进完善实验代码。Lab3中将对generator和initiator之间的数据生成和数据传输的处理进行改进,还将完善何时结束测试,将其主动权交于generator而不再是test组件。在组件结构方面,在原有的initiator、generator、agent、test组件的基础上,再加上monitor和checker,并且使其构成一个有机的整体,最终可以通过在线比较数据的方式完成对MCDT的测试。
一、随机约束
实验要求:
- 继承Lab2的大部分代码,基于Lab2对需要生成的数据包有了新的约束要求。数据类
chnl_trans不再只局限于包含一个数据,而是多个数据,同时跟数据之间时间间隔的控制变量也在该类中声明为随机成员变量。
- 将原本在
chnl_root_test类中用来结束仿真的$finish()变迁到generator中。
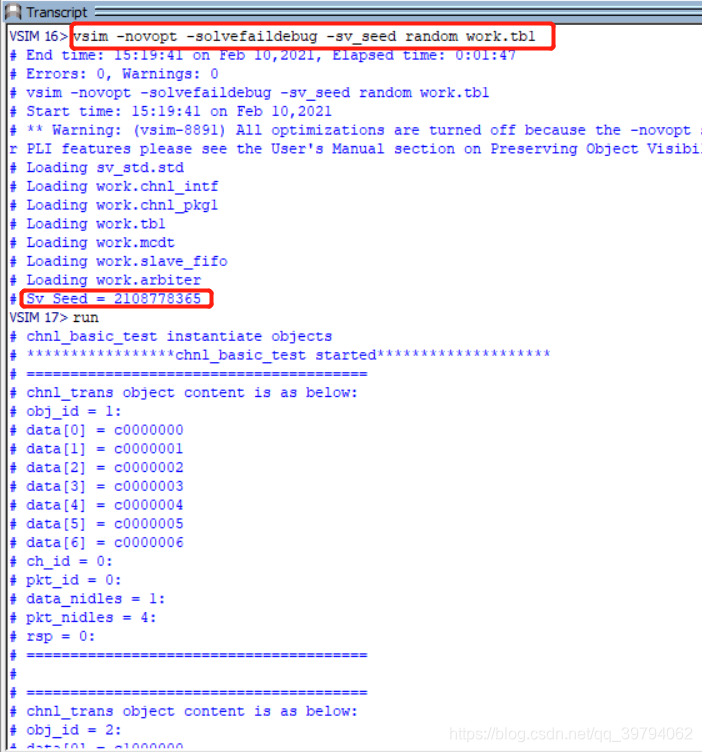
- 使用“restart”命令多次重启,比对连续两次生成的随机数据。然后再在仿真器命令行处使用“vsim -novopt -solvefaildebug -sv_seed 0 work.tb1”来加载仿真。仿真参数“-solvefaildebug”是为了调试随机变量的,而“-sv_seed NUM”则是为了传递随机的种子。最后再使用“vsim -novopt -solvefaildebug -sv_seed random work.tb1”命令加载仿真,对比前后两次的数据是否相同。
二、更加灵活的测试控制
如果要实现不同的test类,例如chnl_basic_test、chnl_burst_test、chnl_fifo_full_test,那么对于不同的test需要对chnl_generator的随机变量做出不同的控制,继而进一步控制其内部随机的chnl_trans对象。也就是说,随机化也是可以分层次的,例如在test层可以随机化generator层,而依靠generator被随机化的成员变量,再来利用它们进一步随机化generator中的chnl_trans对象,由此达到顶层到底层的随机化灵活控制。从这个角度出发,需要将generator从agent单元中搬迁出来,并且搁置在test层中来方便test层的随机控制。
实验要求:
- 将generator搬迁到test层次中,需要将gen和agent中组件的mailbox连接起来,方便gen与agent中init的数据通信。
- 实现在test中使用
do_config()对gen进行随机化控制。
- 使用仿真时传递的参数来完成测试的选择。在以后的递归测试,即创建脚本命令,由仿真器读入,分别传递不同的随机种子和测试名称即可完成对应的随机测试。在之前的仿真命令添加额外的命令“+TESTNAME=testname”。
三、测试平台的结构
新增monitor和checker两个组件,在顶层环境中,将checker置于test层中,而不是agent中。
实验要求:
- 在
chnl_monitor类和mcdt_monitor类各自的mon_trans()方法中需要采集正确的数据,将它们写入mailbox缓存,同时将捕捉的数据打印出来,便于调试。
- 在
chnl_agent中,对chnl_monitor对象开始例化、传递虚接口和使其运行。
- 在
chnl_checker的任务do_compare()中,需要从checker自己的数据缓存mailbox中分别取得一个输出端的采集数据和一个输入端的采集数据,进而将它们的内容比较。
- 在顶层环境
chnl_root_test类中,需要对mdct_monitor和chnl_checker进行例化、传递虚接口,并且将chnl_monitor、mcdt_monitor的邮箱句柄分别指向chnl_checker中的信箱实例。
四、代码实现
随机约束
实验要求1:
chnl_trans类实现随机化
  class chnl_trans;
    rand bit[31:0] data[];		//动态数组
    rand int ch_id;				//发送到哪一个channel
    rand int pkt_id;			//第几个数据包,即第几个trans
    rand int data_nidles;		//data之间空闲间隔周期
    rand int pkt_nidles;		//数据包之间空闲间隔周期
    bit rsp;					//响应标志位
    local static int obj_id = 0;

    // Specify constraint to match the chnl_basic_test request
    constraint cstr{
      data.size inside {[4:8]};
      foreach(data[i]) data[i] == 'hC000_0000 + (this.ch_id<<24) + (this.pkt_id<<8) + i;
      soft ch_id == 0;
      soft pkt_id == 0;
      data_nidles inside {[0:2]};
      pkt_nidles inside {[1:10]};
    };

    function new();
      this.obj_id++;
    endfunction

    function chnl_trans clone();
      chnl_trans c = new();
      c.data = this.data;
      c.ch_id = this.ch_id;
      c.pkt_id = this.pkt_id;
      c.data_nidles = this.data_nidles;
      c.pkt_nidles = this.pkt_nidles;
      c.rsp = this.rsp;

      // Could we put c.obj_id = this.obj_id here? and why?
      return c;
    endfunction

    function string sprint();
      string s;
      s = {s, $sformatf("=======================================\n")};
      s = {s, $sformatf("chnl_trans object content is as below: \n")};
      s = {s, $sformatf("obj_id = %0d: \n", this.obj_id)};
      foreach(data[i]) s = {s, $sformatf("data[%0d] = %8x \n", i, this.data[i])};
      s = {s, $sformatf("ch_id = %0d: \n", this.ch_id)};
      s = {s, $sformatf("pkt_id = %0d: \n", this.pkt_id)};
      s = {s, $sformatf("data_nidles = %0d: \n", this.data_nidles)};
      s = {s, $sformatf("pkt_nidles = %0d: \n", this.pkt_nidles)};
      s = {s, $sformatf("rsp = %0d: \n", this.rsp)};
      s = {s, $sformatf("=======================================\n")};
      return s;
    endfunction
  endclass: chnl_trans
chnl_generator类
 class chnl_generator;
    rand int pkt_id = -1;				//
    rand int ch_id = -1;
    rand int data_nidles = -1;
    rand int pkt_nidles = -1;
    rand int data_size = -1;
    rand int ntrans = 10;

    mailbox #(chnl_trans) req_mb;
    mailbox #(chnl_trans) rsp_mb;

    constraint cstr{
      soft ch_id == -1;
      soft pkt_id == -1;
      soft data_size == -1;
      soft data_nidles == -1;
      soft pkt_nidles == -1;
      soft ntrans == 10;
    }

    function new();
      this.req_mb = new();
      this.rsp_mb = new();
    endfunction

    task run();
      repeat(ntrans) send_trans();
    endtask

    // generate transaction and put into local mailbox
    task send_trans();
      chnl_trans req, rsp;
      req = new();
      assert(req.randomize with {local::ch_id >= 0 -> ch_id == local::ch_id;
                                 local::pkt_id >= 0 -> pkt_id == local::pkt_id;
                                 local::data_nidles >= 0 -> data_nidles == local::data_nidles;
                                 local::pkt_nidles >= 0 -> pkt_nidles == local::pkt_nidles;
                                 local::data_size >0 -> data.size() == local::data_size;
                               })
        else $fatal("[RNDFAIL] channel packet randomization failure!");
      this.pkt_id++;
      $display(req.sprint());
      this.req_mb.put(req);
      this.rsp_mb.get(rsp);
      $display(rsp.sprint());
      assert(rsp.rsp)
        else $error("[RSPERR] %0t error response received!", $time);
    endtask

    function string sprint();
      string s;
      s = {s, $sformatf("=======================================\n")};
      s = {s, $sformatf("chnl_generator object content is as below: \n")};
      s = {s, $sformatf("ntrans = %0d: \n", this.ntrans)};
      s = {s, $sformatf("ch_id = %0d: \n", this.ch_id)};
      s = {s, $sformatf("pkt_id = %0d: \n", this.pkt_id)};
      s = {s, $sformatf("data_nidles = %0d: \n", this.data_nidles)};
      s = {s, $sformatf("pkt_nidles = %0d: \n", this.pkt_nidles)};
      s = {s, $sformatf("data_size = %0d: \n", this.data_size)};
      s = {s, $sformatf("=======================================\n")};
      return s;
    endfunction

    function void post_randomize();
      string s;
      s = {"AFTER RANDOMIZATION \n", this.sprint()};
      $display(s);
    endfunction
  endclass: chnl_generator
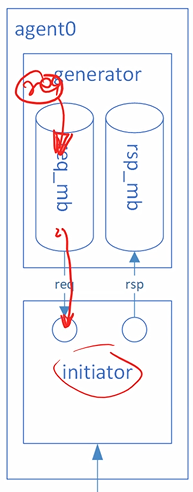
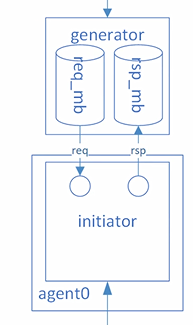
generator的send_trans()任务结构图
chnl_initiator类的drive()任务
task drive();
      chnl_trans req, rsp;
      @(posedge intf.rstn);
      forever begin
        this.req_mb.get(req);
        this.chnl_write(req);
        rsp = req.clone();
        rsp.rsp = 1;
        this.rsp_mb.put(rsp);
      end
    endtask
chnl_initiator类的drive()任务的结构图

chnl_agent类的run()任务负责连接信箱
  task run();
      this.init.req_mb = this.gen.req_mb;
      this.init.rsp_mb = this.gen.rsp_mb;
      fork
        gen.run();
        init.run();
      join_any
  endtask
总结:
将Lab3中的chnl_initiator和chnl_generator与Lab中的作对比,可以看出发送数据的逻辑发生了很大的改变。Lab2中是generator通过get_trans()获得一个句柄,然后立马返回给initiator的chnl_write(),而在Lab3中,generator产生了一个对象,并把句柄写入到req_mb这个信箱中,然后initiator会拿到这个句柄,并把它消化掉,消化掉以后会重新克隆一个一模一样的对象,发送之前会把变量rsp置为1,表示已经响应,然后把这个已响应的对象放到rsp_mb信箱中,generator就可以通过变量rsp来判断initiator是否已经消化掉了这个数据。
实验要求2:
generator实现了数据的随机化,并且能够控制仿真的结束,即当调用chnl_root_test类中的run()任务的时候,会进一步调用agent的run()和generator的run(),然后generator会调用send_trans()产生数据,当generator随机化完成以后,agent就会执行$finish,所以说通过generator产生数据以及随机化完成,来实现了仿真的结束,相当于控制权在于generator。
chnl_root_test类中的run()任务
virtual task run();
      $display($sformatf("*****************%s started********************", this.name));
      this.do_config();
      fork
        agent[0].run();
        agent[1].run();
        agent[2].run();
      join_none
      fork
        gen[0].run();
        gen[1].run();
        gen[2].run();
      join
      $display($sformatf("*****************%s finished********************", this.name));
      // USER TODO 1.3
      // Please move the $finish statement from the test run task to generator
      // You woudl put it anywhere you like inside generator to stop test when
      // all transactions have been transfered
      $finish();
    endtask
generator的send_trans()方法
// generate transaction and put into local mailbox
    task send_trans();
      chnl_trans req, rsp;
      req = new();
      assert(req.randomize with {local::ch_id >= 0 -> ch_id == local::ch_id;
                                 local::pkt_id >= 0 -> pkt_id == local::pkt_id;
                                 local::data_nidles >= 0 -> data_nidles == local::data_nidles;
                                 local::pkt_nidles >= 0 -> pkt_nidles == local::pkt_nidles;
                                 local::data_size >0 -> data.size() == local::data_size;
                               })
        else $fatal("[RNDFAIL] channel packet randomization failure!");
      this.pkt_id++;
      $display(req.sprint());
      this.req_mb.put(req);
      this.rsp_mb.get(rsp);
      $display(rsp.sprint());
      assert(rsp.rsp)
        else $error("[RSPERR] %0t error response received!", $time);
    endtask
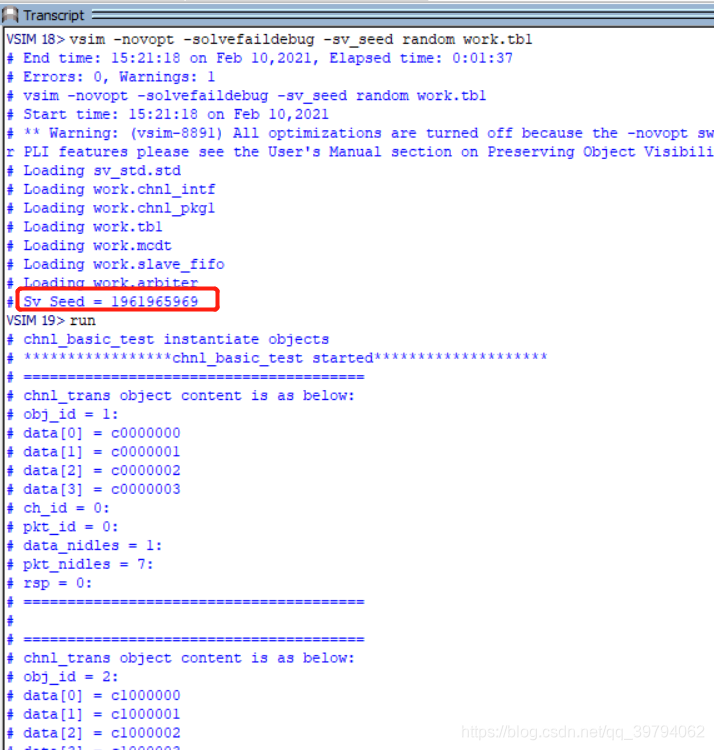
实验要求3:
编译chnl_pkg1.sv和tb1.sv并运行仿真,然后在restart重启,你会发现多次运行的仿真产生的数据是相同的。而使用“vsim -novopt -solvefaildebug -sv_seed random work.tb1”命令进行仿真是,两次的仿真波形如下图所以,会发现每一次的仿真都产生了不同的随机种子seed,所以产生了不同的随机化的数据。
更加灵活的测试控制
实验要求1:
结构图
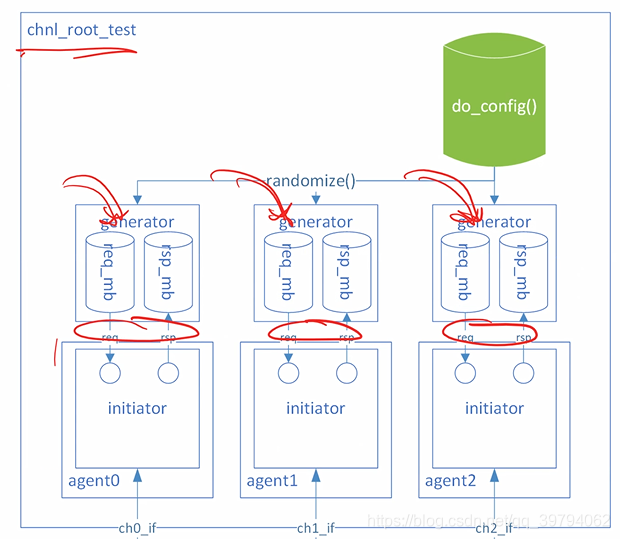
chnl_agent类,将generator拿到了test,这样可以通过do_config()事先对generator进行随机化,generator调用自己的run(),通过调用send_trans()来随机化chnl_trans,进而控制产生多少个数据,产生什么样的数据,然后通过信箱将数据发送给initiator,initiator拿到随机化的数据,通过接口进行激励。
chnl_agent类,里面只剩下了initiator
class chnl_agent;
    chnl_initiator init;
    local virtual chnl_intf vif;
    function new(string name = "chnl_agent");
      this.init = new(name);
    endfunction
    function void set_interface(virtual chnl_intf vif);
      this.vif = vif;
      init.set_interface(vif);
    endfunction
    task run();
      fork
        init.run();
      join
    endtask
endclass: chnl_agent
chnl_root_test类
  class chnl_root_test;
    chnl_generator gen[3];
    chnl_agent agents[3];
    ...
    function new(string name = "chnl_root_test");
	  ...
      foreach(agents[i]) begin
        this.agents[i] = new($sformatf("chnl_agent%0d",i));
        this.gen[i] = new();

        // Connect the mailboxes handles of gen[i] and agents[i].init
        this.agents[i].init.req_mb = this.gen[i].req_mb;
        this.agents[i].init.rsp_mb = this.gen[i].rsp_mb;
  		...
      end
      ...
    endfunction
    ...
  endclass
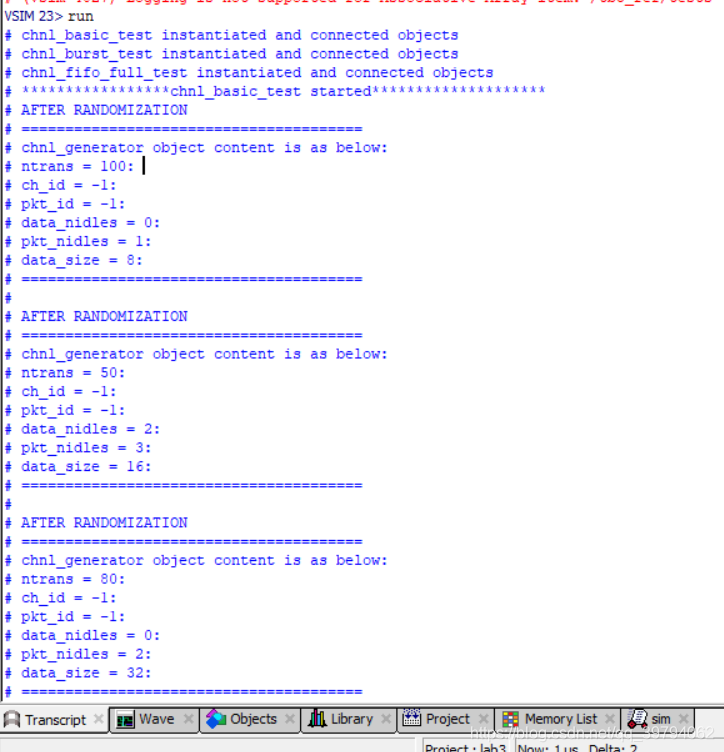
实验要求2:
do_config()方法,其他的test都是继承chnl_root_test,根据不同的测试要求改写do_config()方法。
virtual function void do_config();
      super.do_config();
      assert(gen[0].randomize() with {ntrans==100; data_nidles==0; pkt_nidles==1; data_size==8;})
        else $fatal("[RNDFAIL] gen[0] randomization failure!");


      // To randomize gen[1] with
      // ntrans==50, data_nidles inside [1:2], pkt_nidles inside [3:5],
      // data_size == 6
      assert(gen[1].randomize() with {ntrans==50; data_nidles inside {[1:2]}; pkt_nidles inside {[3:5]}; data_size==16;})
        else $fatal("[RNDFAIL] gen[1] randomization failure!");


      // ntrans==80, data_nidles inside [0:1], pkt_nidles inside [1:2],
      // data_size == 32
      assert(gen[2].randomize() with {ntrans==80; data_nidles inside {[0:1]}; pkt_nidles inside {[1:2]}; data_size==32;})
        else $fatal("[RNDFAIL] gen[2] randomization failure!");
endfunction
实验要求3:
之前运行不同的测试需要在initial块里面修改,然后再次编译。
  initial begin
    basic_test = new();
    basic_test.set_interface(chnl0_if, chnl1_if, chnl2_if);
    basic_test.run();
  end
现在可以通过仿真的参数来选择想要运行的测试。可以先把三个测试创建好句柄,然后例化,把三个这三个句柄都赋值给父类句柄数组tests。通过命令“+TESTNAME=testname”来运行指定的测试。
  chnl_basic_test basic_test;
  chnl_burst_test burst_test;
  chnl_fifo_full_test fifo_full_test;
  chnl_root_test tests[string];
  string name;

  initial begin
    basic_test = new();
    burst_test = new();
    fifo_full_test = new();
    tests["chnl_basic_test"] = basic_test;
    tests["chnl_burst_test"] = burst_test;
    tests["chnl_fifo_full_test"] = fifo_full_test;
    if($value$plusargs("TESTNAME=%s", name)) begin
      if(tests.exists(name)) begin
        tests[name].set_interface(chnl0_if, chnl1_if, chnl2_if);
        tests[name].run();
      end
      else begin
        $fatal($sformatf("[ERRTEST], test name %s is invalid, please specify a valid name!", name));
      end
    end
    else begin
      $display("NO runtime optiont TEST=[testname] is configured, and run default test chnl_basic_test");
      tests["chnl_basic_test"].set_interface(chnl0_if, chnl1_if, chnl2_if);
      tests["chnl_basic_test"].run();
    end
  end
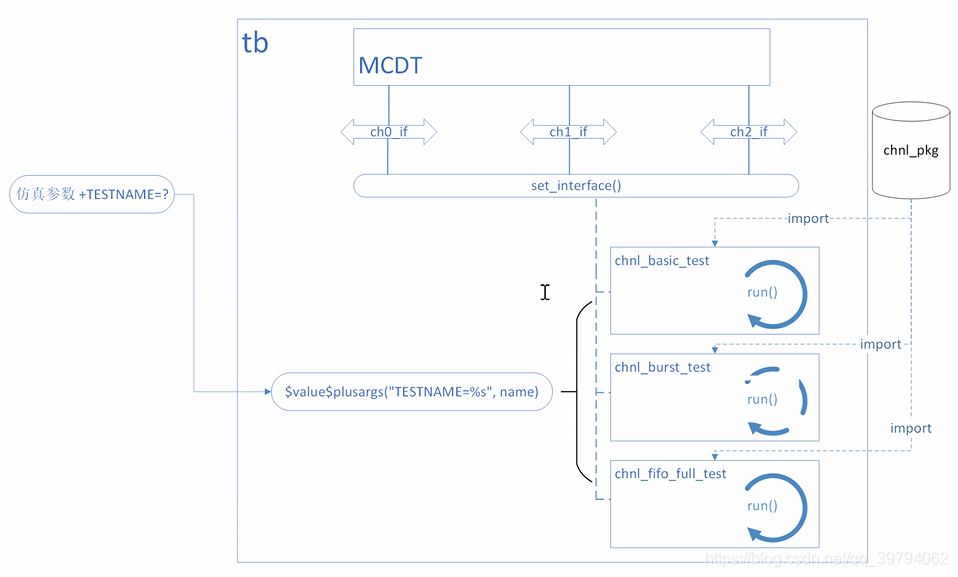
测试平台的结构
添加monitor和check组件之后,最终的验证结构框图

首先定义一个监测到的数据类
 typedef struct packed {
    bit[31:0] data;		//监测到的数据
    bit[1:0] id;		//来自哪个channel
  } mon_data_t;
chnl_monitor类
  class chnl_monitor;
    local string name;
    local virtual chnl_intf intf;
    mailbox #(mon_data_t) mon_mb;
    function new(string name="chnl_monitor");
      this.name = name;
    endfunction
    function void set_interface(virtual chnl_intf intf);
      if(intf == null)
        $error("interface handle is NULL, please check if target interface has been intantiated");
      else
        this.intf = intf;
    endfunction
    task run();
      this.mon_trans();
    endtask

    task mon_trans();
      mon_data_t m;
      forever begin
        @(posedge intf.clk iff (intf.mon_ck.ch_valid==='b1 && intf.mon_ck.ch_ready==='b1));

        // Put the data into the mon_mb and use $display() to print the stored
        // data value with monitor name
        m.data = intf.mon_ck.ch_data;
        mon_mb.put(m);
        $display("%0t %s monitored channle data %8x", $time, this.name, m.data);
      end
    endtask
  endclass
chnl_monitor会在chnl_agent中例化,同时还要设置monitor的接口以及调用monitor的run()
  class chnl_agent;
    local string name;
    chnl_initiator init;
    chnl_monitor mon;

    // Refer to how we create, set virtual interface and run the initiator
    // object, use do the similar action to the monitor object
    virtual chnl_intf vif;
    function new(string name = "chnl_agent");
      this.name = name;
      this.init = new({name, ".init"});
      this.mon = new({name, ".mon"});
    endfunction

    function void set_interface(virtual chnl_intf vif);
      this.vif = vif;
      init.set_interface(vif);
      mon.set_interface(vif);
    endfunction
    task run();
      fork
        init.run();
        mon.run();
      join
    endtask
  endclass: chnl_agent
mcdt_monitor在chnl_root_test中例化,而且还要例化agent中channel的monitor,然后调用set_interface()设置相应的接口。
  // Create, set interface and run the object mcdt_mon and checker
  // and also connect the mailbox of checker and chnl_mon/mcdt_mon
  class chnl_root_test;
    chnl_generator gen[3];
    chnl_agent agents[3];
    mcdt_monitor mcdt_mon;
    chnl_checker chker;
    protected string name;

    function new(string name = "chnl_root_test");
      this.name = name;
      foreach(agents[i]) begin
        this.agents[i] = new($sformatf("chnl_agent%0d",i));
        this.gen[i] = new();
        // USER TODO 2.1
        // Connect the mailboxes handles of gen[i] and agents[i].init
        this.agents[i].init.req_mb = this.gen[i].req_mb;
        this.agents[i].init.rsp_mb = this.gen[i].rsp_mb;
      end
      $display("%s instantiated and connected objects", this.name);
    endfunction

    virtual task run();
      $display($sformatf("*****************%s started********************", this.name));
      this.do_config();
      fork
        agents[0].run();
        agents[1].run();
        agents[2].run();
      join_none
      fork
        gen[0].run();
        gen[1].run();
        gen[2].run();
      join
      $display($sformatf("*****************%s finished********************", this.name));

      // Please move the $finish statement from the test run task to generator
      // You woudl put it anywhere you like inside generator to stop test when
      // all transactions have been transfered
      $finish();
    endtask

    virtual function void set_interface(virtual chnl_intf ch0_vif
                                        ,virtual chnl_intf ch1_vif
                                        ,virtual chnl_intf ch2_vif
                                        ,virtual mcdt_intf mcdt_vif
                                      );
      agents[0].set_interface(ch0_vif);
      agents[1].set_interface(ch1_vif);
      agents[2].set_interface(ch2_vif);
    endfunction

    virtual function void do_config();
    endfunction

  endclass
chnl_checker类,通过run()任务调用do_compare()方法,do_compare()方法会先从out_mb信箱中拿数据,根据数据的id判断数据来自哪个channel,然后根据id从对应的in_mb拿数据,二者进行比较。
  class chnl_checker;
    local string name;
    local int error_count;
    local int cmp_count;
    mailbox #(mon_data_t) in_mbs[3];
    mailbox #(mon_data_t) out_mb;

    function new(string name="chnl_checker");
      this.name = name;
      foreach(this.in_mbs[i]) this.in_mbs[i] = new();
      this.out_mb = new();
      this.error_count = 0;
      this.cmp_count = 0;
    endfunction

    task run();
      this.do_compare();
    endtask


    task do_compare();
      mon_data_t im, om;
      forever begin

        // compare data once there is data in in_mb0/in_mb1/in_mb2 and out_mb
        // first, get om from out_mb, and im from one of in_mbs
        out_mb.get(om);
        case(om.id)
          0: in_mbs[0].get(im);
          1: in_mbs[1].get(im);
          2: in_mbs[2].get(im);
          default: $fatal("id %0d is not available", om.id);
        endcase

        if(om.data != im.data) begin
          this.error_count++;
          $error("[CMPFAIL] Compared failed! mcdt out data %8x ch_id %0d is not equal with channel in data %8x", om.data, om.id, im.data);
        end
        else begin
          $display("[CMPSUCD] Compared succeeded! mcdt out data %8x ch_id %0d is equal with channel in data %8x", om.data, om.id, im.data);
        end
        this.cmp_count++;
      end
    endtask
  endclass
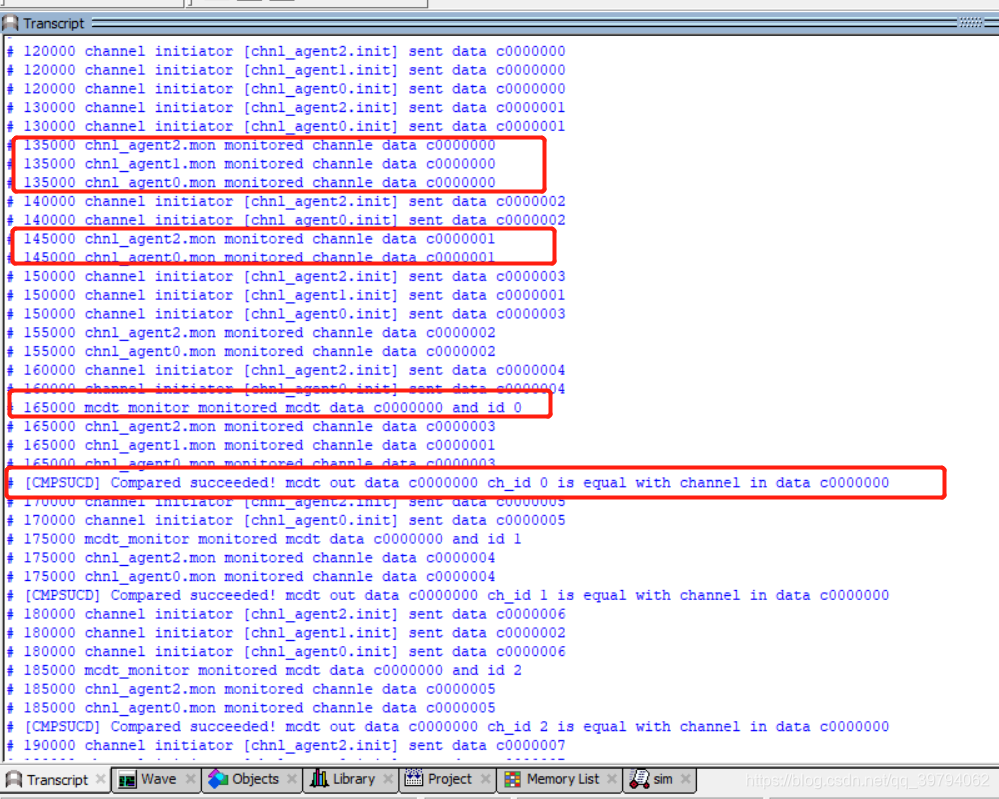
整个Lab3结束!运行仿真打印日志如下
使用脚本命令运行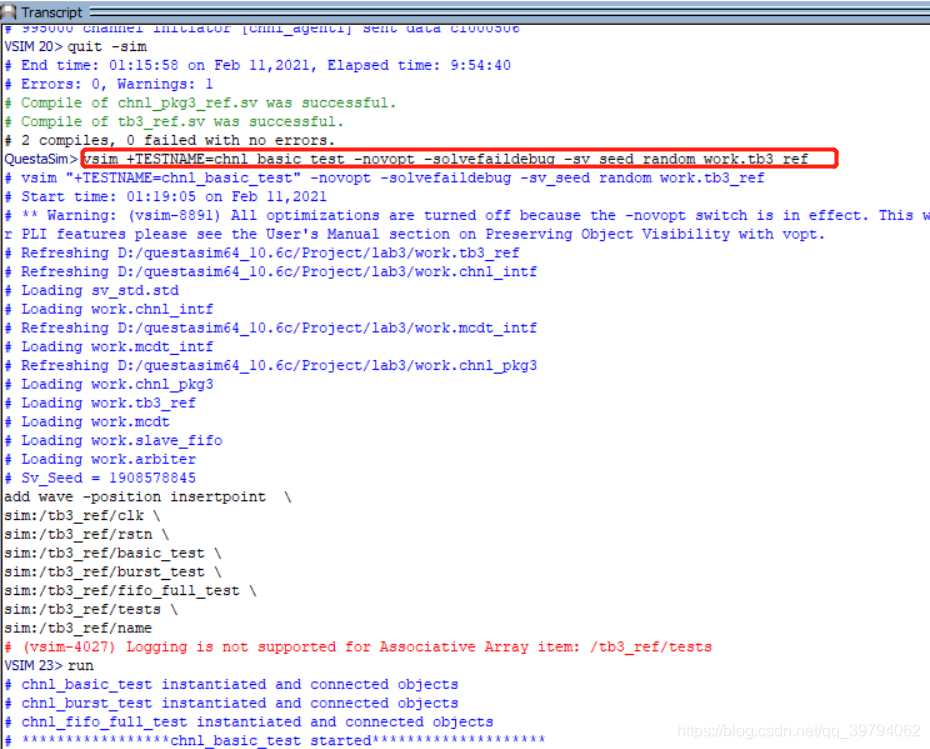
生成的数据

monitor和check