python实现车牌识别系统

2023-11-09

车牌识别系统

算法参考:http://www.zengqiang.club/blog/34
GUI参考:https://blog.csdn.net/wzh191920/article/details/79589506

基于opencv的模板识别来实现的车牌识别功能。用pycharm写的。
车牌识别的步骤:定位车牌,矫正车牌,识别颜色,分割字符,识别字符。

算法:

定位车牌

通过对输出图片进行一系列的处理后,筛选出矩形区域
        if type(car_pic) == type(""):
            img = imreadex(car_pic)
        else:
            img = car_pic
        pic_hight, pic_width = img.shape[:2]

        if pic_width > MAX_WIDTH:
            resize_rate = MAX_WIDTH / pic_width
            img = cv2.resize(img, (MAX_WIDTH, int(pic_hight * resize_rate)), interpolation=cv2.INTER_AREA)

        blur = self.cfg["blur"]
        # 高斯去噪
        if blur > 0:
            img = cv2.GaussianBlur(img, (blur, blur), 0)  # 图片分辨率调整
        oldimg = img
        gray_image = cv2.cvtColor(img, cv2.COLOR_BGR2GRAY)  #灰度处理
        Sobel_x = cv2.Sobel(gray_image, cv2.CV_16S, 1, 0)   #sobel算子边缘检测
        absX = cv2.convertScaleAbs(Sobel_x)   #转回uint8
        image = absX
        ret, image = cv2.threshold(image, 0, 255, cv2.THRESH_OTSU)  #自适应阈值处理
        kernelX = cv2.getStructuringElement(cv2.MORPH_RECT, (14, 5))  #闭运算,白色部分练成整体
        image = cv2.morphologyEx(image, cv2.MORPH_CLOSE, kernelX, iterations=1)
        kernelX = cv2.getStructuringElement(cv2.MORPH_RECT, (20, 1))  #去除小白点
        kernelY = cv2.getStructuringElement(cv2.MORPH_RECT, (1, 19))
        image = cv2.dilate(image, kernelX)  #膨胀
        image = cv2.erode(image, kernelX)   #腐蚀
        image = cv2.erode(image, kernelY)   #腐蚀
        image = cv2.dilate(image, kernelY)  #膨胀
        image = cv2.medianBlur(image, 15)  #中值滤波去除噪点
        contours, hierarchy = cv2.findContours(image, cv2.RETR_EXTERNAL, cv2.CHAIN_APPROX_SIMPLE)#轮廓检测
        # 一一排除不是车牌的矩形区域
        car_contours = []  #筛选车牌位置的轮廓
        for cnt in contours:
            rect = cv2.minAreaRect(cnt)
            area_width, area_height = rect[1]
            if area_width < area_height:
                area_width, area_height = area_height, area_width
            wh_ratio = area_width / area_height
            # print(wh_ratio)
            # 要求矩形区域长宽比在25.5之间,25.5是车牌的长宽比,其余的矩形排除
            if wh_ratio > 2 and wh_ratio < 5.5:
                car_contours.append(rect)
                box = cv2.boxPoints(rect)
                box = np.int0(box)
        print("精确定位")

矫正矩形

card_imgs = []
        # 矩形区域可能是倾斜的矩形,需要矫正,以便使用颜色定位
        for rect in car_contours:
            if rect[2] > -1 and rect[2] < 1:  # 创造角度,使得左、高、右、低拿到正确的值
                angle = 1
            else:
                angle = rect[2]
            rect = (rect[0], (rect[1][0] + 5, rect[1][1] + 5), angle)  # 扩大范围,避免车牌边缘被排除

            box = cv2.boxPoints(rect)
            heigth_point = right_point = [0, 0]
            left_point = low_point = [pic_width, pic_hight]
            for point in box:
                if left_point[0] > point[0]:
                    left_point = point
                if low_point[1] > point[1]:
                    low_point = point
                if heigth_point[1] < point[1]:
                    heigth_point = point
                if right_point[0] < point[0]:
                    right_point = point

            if left_point[1] <= right_point[1]:  # 正角度
                new_right_point = [right_point[0], heigth_point[1]]
                pts2 = np.float32([left_point, heigth_point, new_right_point])  # 字符只是高度需要改变
                pts1 = np.float32([left_point, heigth_point, right_point])
                M = cv2.getAffineTransform(pts1, pts2)
                dst = cv2.warpAffine(oldimg, M, (pic_width, pic_hight))
                point_limit(new_right_point)
                point_limit(heigth_point)
                point_limit(left_point)
                card_img = dst[int(left_point[1]):int(heigth_point[1]), int(left_point[0]):int(new_right_point[0])]
                card_imgs.append(card_img)
            elif left_point[1] > right_point[1]:  # 负角度

                new_left_point = [left_point[0], heigth_point[1]]
                pts2 = np.float32([new_left_point, heigth_point, right_point])  # 字符只是高度需要改变
                pts1 = np.float32([left_point, heigth_point, right_point])
                M = cv2.getAffineTransform(pts1, pts2)
                dst = cv2.warpAffine(oldimg, M, (pic_width, pic_hight))
                point_limit(right_point)
                point_limit(heigth_point)
                point_limit(new_left_point)
                card_img = dst[int(right_point[1]):int(heigth_point[1]), int(new_left_point[0]):int(right_point[0])]
                card_imgs.append(card_img)

颜色定位

 colors = []
        for card_index, card_img in enumerate(card_imgs):
                    green = yello = blue = black = white = 0
                    card_img_hsv = cv2.cvtColor(card_img, cv2.COLOR_BGR2HSV)
                    # 有转换失败的可能,原因来自于上面矫正矩形出错
                    if card_img_hsv is None:
                        continue
                    row_num, col_num = card_img_hsv.shape[:2]
                    card_img_count = row_num * col_num

                    for i in range(row_num):
                        for j in range(col_num):
                            H = card_img_hsv.item(i, j, 0)
                            S = card_img_hsv.item(i, j, 1)
                            V = card_img_hsv.item(i, j, 2)
                            if 11 < H <= 34 and S > 34:  # 图片分辨率调整
                                yello += 1
                            elif 35 < H <= 99 and S > 34:  # 图片分辨率调整
                                green += 1
                            elif 99 < H <= 124 and S > 34:  # 图片分辨率调整
                                blue += 1

                            if 0 < H < 180 and 0 < S < 255 and 0 < V < 46:
                                black += 1
                            elif 0 < H < 180 and 0 < S < 43 and 221 < V < 225:
                                white += 1
                    color = "no"

                    limit1 = limit2 = 0
                    if yello * 2 >= card_img_count:
                        color = "yello"
                        limit1 = 11
                        limit2 = 34  # 有的图片有色偏偏绿
                    elif green * 2 >= card_img_count:
                        color = "green"
                        limit1 = 35
                        limit2 = 99
                    elif blue * 2 >= card_img_count:
                        color = "blue"
                        limit1 = 100
                        limit2 = 124  # 有的图片有色偏偏紫
                    elif black + white >= card_img_count * 0.7:  # TODO
                        color = "bw"
                    print(color)
                    colors.append(color)
                    print(blue, green, yello, black, white, card_img_count)

                    if limit1 == 0:
                        continue

识别车牌字符

predict_result = []
                    word_images = []
                    roi = None
                    card_color = None
                    for i, color in enumerate(colors):
                        if color in ("blue", "yello", "green"):
                            card_img = card_imgs[i]  # 定位的车牌
                            gray_img = cv2.cvtColor(card_img, cv2.COLOR_BGR2GRAY)
                            # 黄、绿车牌字符比背景暗、与蓝车牌刚好相反,所以黄、绿车牌需要反向
                            if color == "green" or color == "yello":
                                gray_img = cv2.bitwise_not(gray_img)
                            ret, gray_img = cv2.threshold(gray_img, 0, 255, cv2.THRESH_BINARY + cv2.THRESH_OTSU)
                            # 查找水平直方图波峰
                            x_histogram = np.sum(gray_img, axis=1)
                            x_min = np.min(x_histogram)
                            x_average = np.sum(x_histogram) / x_histogram.shape[0]
                            x_threshold = (x_min + x_average) / 2
                            wave_peaks = find_waves(x_threshold, x_histogram)
                            if len(wave_peaks) == 0:
                                print("peak less 0:")
                                continue
                            # 认为水平方向,最大的波峰为车牌区域
                            wave = max(wave_peaks, key=lambda x: x[1] - x[0])
                            gray_img = gray_img[wave[0]:wave[1]]
                            # 查找垂直直方图波峰
                            row_num, col_num = gray_img.shape[:2]
                            # 去掉车牌上下边缘1个像素,避免白边影响阈值判断
                            gray_img = gray_img[1:row_num - 1]
                            y_histogram = np.sum(gray_img, axis=0)
                            y_min = np.min(y_histogram)
                            y_average = np.sum(y_histogram) / y_histogram.shape[0]
                            y_threshold = (y_min + y_average) / 5  # U0要求阈值偏小,否则U0会被分成两半

                            wave_peaks = find_waves(y_threshold, y_histogram)

                            # for wave in wave_peaks:
                            #	cv2.line(card_img, pt1=(wave[0], 5), pt2=(wave[1], 5), color=(0, 0, 255), thickness=2)
                            # 车牌字符数应大于6
                            if len(wave_peaks) <= 6:
                                print("peak less 1:", len(wave_peaks))
                                continue

                            wave = max(wave_peaks, key=lambda x: x[1] - x[0])
                            max_wave_dis = wave[1] - wave[0]
                            # 判断是否是左侧车牌边缘
                            if wave_peaks[0][1] - wave_peaks[0][0] < max_wave_dis / 3 and wave_peaks[0][0] == 0:
                                wave_peaks.pop(0)

                            # 组合分离汉字
                            cur_dis = 0
                            for i, wave in enumerate(wave_peaks):
                                if wave[1] - wave[0] + cur_dis > max_wave_dis * 0.6:
                                    break
                                else:
                                    cur_dis += wave[1] - wave[0]
                            if i > 0:
                                wave = (wave_peaks[0][0], wave_peaks[i][1])
                                wave_peaks = wave_peaks[i + 1:]
                                wave_peaks.insert(0, wave)

                            # 去除车牌上的分隔点
                            point = wave_peaks[2]
                            if point[1] - point[0] < max_wave_dis / 3:
                                point_img = gray_img[:, point[0]:point[1]]
                                if np.mean(point_img) < 255 / 5:
                                    wave_peaks.pop(2)

                            if len(wave_peaks) <= 6:
                                print("peak less 2:", len(wave_peaks))
                                continue
                            part_cards = seperate_card(gray_img, wave_peaks)
                            for i, part_card in enumerate(part_cards):
                                # 可能是固定车牌的铆钉
                                if np.mean(part_card) < 255 / 5:
                                    print("a point")
                                    continue
                                part_card_old = part_card
                                w = abs(part_card.shape[1] - SZ) // 2

                                part_card = cv2.copyMakeBorder(part_card, 0, 0, w, w, cv2.BORDER_CONSTANT,
                                                               value=[0, 0, 0])
                                part_card = cv2.resize(part_card, (SZ, SZ), interpolation=cv2.INTER_AREA)
                                word_images.append(part_card)
                            word_images_ = word_images.copy()
                            predict_result = template_matching(word_images_)
                            roi = card_img
                            card_color = color
                            print(predict_result)
                            break

GUI界面:
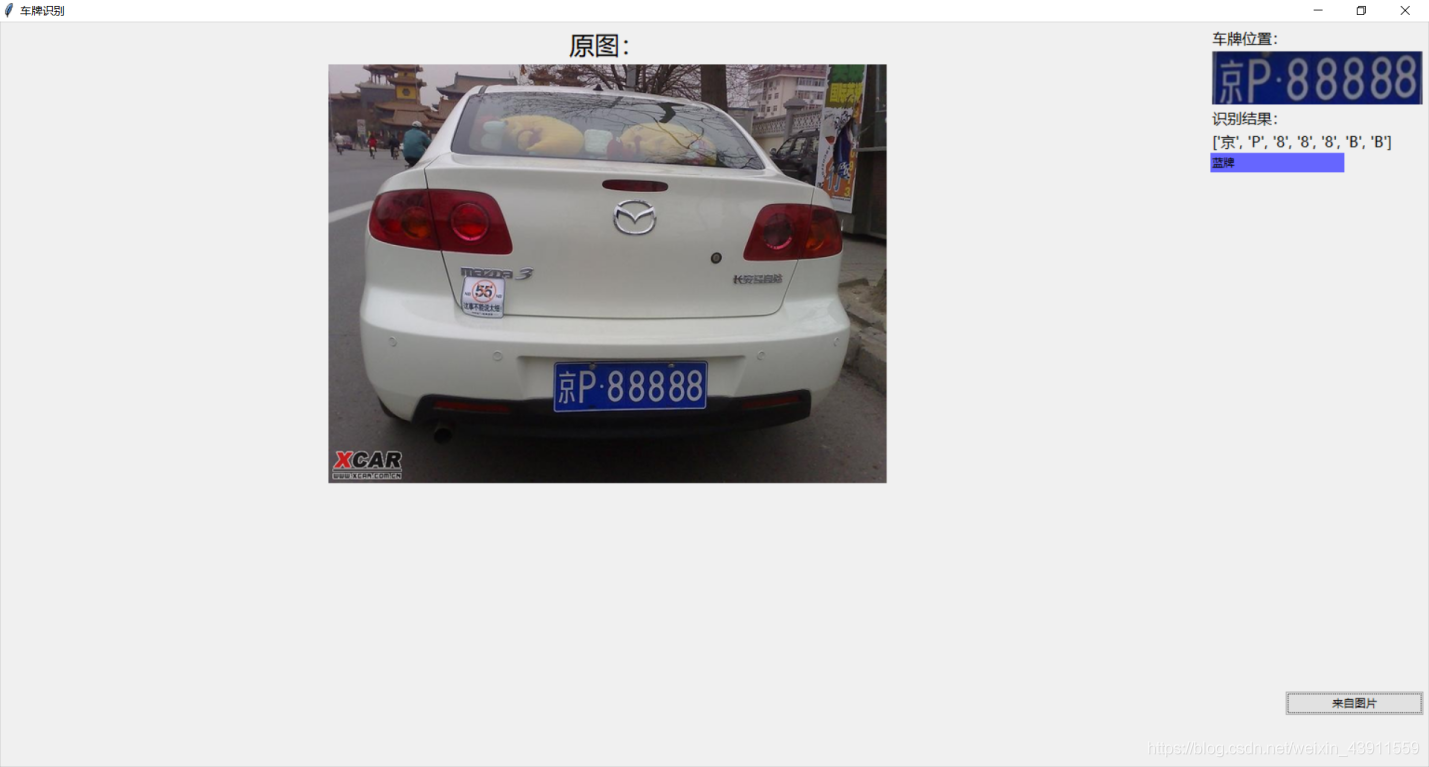
在这里插入图片描述
在这里插入图片描述

总结

这是一个比较简单粗糙的车牌识别系统,由于采用的是模板识别,模板数量越大,识别速度越慢,差不多识别一次要20s,并且受图片的质量影响,识别准确度不高甚至会出现无法识别的情况。但应付课程设计的话应该是足够了。要想做的更好的话建议识别字符采用opencv的SVM或者用tesseract.
算法和界面都参考了别人的博客,自己做了些整合和改动。
全部代码和模板放在github:https://github.com/panboshui/-

测试图片:
在这里插入图片描述
在这里插入图片描述

本文内容由网友自发贡献,版权归原作者所有,本站不承担相应法律责任。如您发现有涉嫌抄袭侵权的内容,请联系:hwhale#tublm.com(使用前将#替换为@)

python实现车牌识别系统 的相关文章

随机推荐

  • Linux安装negix

    本文章介绍了在CentOS7 9 64位系统下 安装neginx 1 20 2版本 注意红色字体都是我踩的坑 目录 第一步 下载negix和安装依赖 第二步 解压安装 第三步 执行配置命令 第四步 编译和安装 第五步 启动nginx 第六步
  • security与cas的集成(serviceProperties中的sendRenew的设置)

    在spring于security的集成中 serviceProperties的配置如下
  • File类的知识1

    File类 递归 java io File 类是文件和目录路径名的抽象表示 主要用于文件和目录的创建 查找和删除等操作 java io File类 文件和目录路径名的抽象表示形式 java把电脑中的文件和文件夹 目录 封装为了一个File类
  • python数据可视化毕业设计题目_基于Python的数据可视化

    基于 Python 的数据可视化 杨凯利 1 山美娟 2 期刊名称 现代信息科技 年 卷 期 2019 000 005 摘要 在大数据快速发展的今天 Python 丰富的工具包在科学计算 文件处 理 数据可视化等领域越来越凸显其价值 能够发
  • UWB信号对服务器有没有干扰,UWB组网定位的系统及方法技术方案

    技术实现步骤摘要 本专利技术涉及一种UWB组网定位的系统 更具体地 涉及一种UWB组网定位的系统及方法 技术介绍 UWB UltraWideband 是一种无载波通信技术 利用纳秒至微微秒级的非正弦波窄脉冲传输数据 通过在较宽的频谱上传送极
  • DEDECMS调用指定ID文章内容

    备忘自用 dede arclist idlist 113 114 115 116 channelid 1 addfields body li a href div class show h2 field shorttitle h2 p fi
  • 【华为OD】 最佳对手_贪心思维

    目录 一 题目描述 二 输入描述 三 输出描述 3 1 用例 四 题目解析 五 Java玩法 六 JavaScript玩法 一 题目描述 游戏里面 队伍通过匹配实力相近的对手进行对战 但是如果匹配的队伍实力相差太大 对于双方游戏体验都不会太
  • 1330. 翻转子数组得到最大的数组值

    贪心法 1 翻转中间 则使用 最小区间最大值 最大区间最小值 2 基准为数组值 这里不一定为正收益 2 翻转头或者尾 则位基准重新计算翻转点 基准 sum abs num i num i 1 1 lt i
  • 一阶系统的时域和频域分析

    文章目录 1 一阶系统传递函数的标准形式 2 一阶系统动态性能指标 2 1 时域响应下的性能指标 2 2 系统单位阶跃响应 2 2 其他典型输入下一阶系统的响应和动态性能 3 惯性环节 4 一阶系统的频域分析 1 一阶系统传递函数的标准形式
  • yaml for java_java操作yaml文件

    前言 YAML YAML Ain t Markup Language 也可以叫做YML 是一种人性化的数据序列化的语言 类似于XML JSON SpringBoot的配置文件就支持yaml文件 官网 语法 大小写敏感 使用缩进表示层级关系
  • 快速上手笔记,PyTorch模型训练实用教程(附代码)

    前言 自 2017 年 1 月 PyTorch 推出以来 其热度持续上升 一度有赶超 TensorFlow 的趋势 PyTorch 能在短时间内被众多研究人员和工程师接受并推崇是因为其有着
  • JAVA程序员预备知识&初识JAVA

    JAVA程序员预备知识 什么是计算机 能够按照程序运行 自动 高速处理海量数据的现代化智能电子设备 由硬件和软件组成 广泛应用在 科学计算 数据处理 自动控制 人工智能等 计算机硬件 一些物理装置按系统结构的要求构成一个有机整体 组成 CP
  • Linux 快捷键

    Linux 快捷键 文章目录 linux控制台快捷键 linux控制台快捷键 ctrl a e Ctrl Shift n 新终端 Shift Ctrl T 打开新的标签页 Shift Ctrl W 关闭标签页 Alt 数字 切换至对应的标签
  • Hive--HiveQL:查询

    4 查询 4 1 select from语句 4 1 1 基本操作 select是SQL的射影算子 from子句标识了从哪个表 视图或嵌套查询中选择记录 回顾之前创建的employees表 hive mydb gt create table
  • 【Detectron2】入门05 Schedules Faster R-CNN

    Detectron2的Learning Rate和Schedules 1x and 3x schedules 1x 16 images iterations 90 000 iterations in total with the LR re
  • 14 - Spring5 学习笔记 - 整合日志框架、@Nullable 注解

    Spirng5 框架新功能 1 整个 Spring5 框架基于 Java8 运行时兼容 JDK9 许多不建议使用的类和方法在代码库中删除 2 Spring5 框架自带了通用的日志封装 1 Spring5 已经移除了 Log4jConfigL
  • c++ 不插入重复元素但也不排序_十大经典排序算法,看这篇文章就够了

    微信公众号 小超说 如果你觉得对你有帮助 欢迎分享 如果你想系统地学习 建议在电脑端阅读 我想大家学习算法之旅的开端就是各种排序算法吧 的确 排序算法广泛的应用性以及它的简洁基础等性质是初学者的不二之选 那今天我就带着你复习回顾以下各种经典
  • Docker镜像相关操作有哪些?

    什么是Docker Docker是一个开源的应用容器引擎 它让开发者可以打包他们的应用以及依赖包到一个可移植的容器中 然后发布到安装了任何 Linux 发行版本的机器上 Docker基于LXC来实现类似VM的功能 可以在更有限的硬件资源上提
  • 2020年第十一届蓝桥杯省赛javab组寻找2020

    简单的模拟 向右 向下 向右下 package 算法 import java util Scanner public class 寻找20 static int N 100000 4 5 static int M 1000 5 static
  • python实现车牌识别系统

    车牌识别系统 算法参考 http www zengqiang club blog 34 GUI参考 https blog csdn net wzh191920 article details 79589506 基于opencv的模板识别来实