前言
这是一个基于 Android 10 源码,全面分析 Android通知系统实现原理 的系列,这是第三篇,全系列将覆盖:
这一篇我们将全面分析通知发送在框架层(服务端)的一系列处理
说明:
NM -> NotificationManager
NMS -> NotificationManagerService
Sysui -> SystemUI
- 2.通知整体发送流程:Android 通知的发送涉及到两个进程:System进程(NMS所在的进程) 和 SystemUI, 流程如下:
服务端(System进程):NM发送 -> NMS处理 -> NMS 将通知post给监听器 ->
客户端(SystemUI):Sysui接收 -> 根据通知类型加载对应通知布局 -> 显示
这一篇我们分析的是服务端的实现,由于 服务端的整个处理流程非常复杂,故细分为如下几个小节:
- 1.NotificationManager 预处理通知
- 2.入列预处理
- 3.通知入列
- 4.通知post流程
- 4.1 通知post预处理
- 4.2 通知排序预处理
- 4.3 通知排序
- 4.4 通知震动、音效和呼吸灯处理
- 4.5 通知post
一、NotificationManager 预处理通知
通知发送的入口是NotificationManager.notify(...)方法,所以我们从这里开始阅读源码,在我们调用notify发送通知后,NotificationManager先调用了fixNotification(Notification notification)对通知做了预处理,然后直接调用了NMS的enqueueNotificationWithTag()函数去处理我们的请求:
/*frameworks/base/core/java/android/app/NotificationManager.java*/
    public void notifyAsUser(String tag, int id, Notification notification, UserHandle user)
    {
        INotificationManager service = getService();
        String pkg = mContext.getPackageName();
        try {
            service.enqueueNotificationWithTag(pkg, mContext.getOpPackageName(), tag, id,
                    fixNotification(notification), user.getIdentifier());
        }
    }

    private Notification fixNotification(Notification notification) {
        // 修正 sound
        ......
        // 兼容旧版本smallIcon设置接口
        fixLegacySmallIcon(notification, pkg);
        // 步骤1:异常处理
        if (mContext.getApplicationInfo().targetSdkVersion > Build.VERSION_CODES.LOLLIPOP_MR1) {
            if (notification.getSmallIcon() == null) {
                throw new IllegalArgumentException("Invalid notification (no valid small icon): "
                        + notification);
            }
        }
        // 裁剪通知中包含的图片的大小,避免用户设置的图片太大
        notification.reduceImageSizes(mContext);
        // 低内存设备兼容
        ActivityManager am = (ActivityManager) mContext.getSystemService(Context.ACTIVITY_SERVICE);
        boolean isLowRam = am.isLowRamDevice();
        return Builder.maybeCloneStrippedForDelivery(notification, isLowRam, mContext);
    }
fixNotification方法对通知做了简单修正,如 smallIcon 处理,图片资源裁剪处理,低内存兼容等,说明下步骤1:在SDK版本大于22之后,Android强制要求用户设置 smallIcon 了,否则会报异常,所以我们发送通知的时候,smallIcon必须设置。
做完简单修正处理后,NotificationManager就直接将流程交给NMS了,接下来看NMS的处理流程。
二、入列预处理
前面NotificationManager中调用了NMS的enqueueNotificationWithTag(...)方法,这个方法最终会走到NMS.enqueueNotificationInternal(...)方法,这个方法挺长的,下面给出简化后的代码,说明几个开发者需要注意的问题:
/*frameworks/base/services/core/java/com/android/server/notification/NotificationManagerService.java*/
void enqueueNotificationInternal(final String pkg, final String opPkg, final int callingUid,final int callingPid, final String tag, final int id, final Notification notification,int incomingUserId) {
        // 权限检查
        ......
        // 步骤1
        try {
            fixNotification(notification, pkg, userId);
        }
        // 步骤2
        String channelId = notification.getChannelId();
        final NotificationChannel channel = mPreferencesHelper.getNotificationChannel(pkg,notificationUid, channelId, false);
        if (channel == null) {
            ......
            return;
        }
        // 步骤3
        final StatusBarNotification n = new StatusBarNotification(pkg, opPkg, id, tag, notificationUid,callingPid, notification,user, null, System.currentTimeMillis());
        final NotificationRecord r = new NotificationRecord(getContext(), n, channel);
        // 前台服务channel处理
        if ((notification.flags & Notification.FLAG_FOREGROUND_SERVICE) != 0) {
            ......
        }
        // 步骤4
        if (!checkDisqualifyingFeatures(userId, notificationUid, id, tag, r,r.sbn.getOverrideGroupKey() != null)) {
            return;
        }
        ......
        // 步骤5
        mHandler.post(new EnqueueNotificationRunnable(userId, r));
    }
这个方法进一步做了各种权限检查、应用设置检查、应用通知发送速率限制等,下面分别解释:
/*frameworks/base/services/core/java/com/android/server/notification/NotificationManagerService.java*/
    protected void fixNotification(Notification notification, String pkg, int userId) throws NameNotFoundException {
        // 将通知发送方的 ApplicationInfo 存进 notification.extras 中,key = Notification.EXTRA_BUILDER_APPLICATION_INFO
        final ApplicationInfo ai = mPackageManagerClient.getApplicationInfoAsUser(pkg, PackageManager.MATCH_DEBUG_TRIAGED_MISSING, (userId == UserHandle.USER_ALL) ? USER_SYSTEM : userId);
        Notification.addFieldsFromContext(ai, notification);
        // 通知着色权限 android.Manifest.permission.USE_COLORIZED_NOTIFICATIONS 处理
        int canColorize = mPackageManagerClient.checkPermission(android.Manifest.permission.USE_COLORIZED_NOTIFICATIONS, pkg);
        if (canColorize == PERMISSION_GRANTED) {
            notification.flags |= Notification.FLAG_CAN_COLORIZE;
        } else {
            notification.flags &= ~Notification.FLAG_CAN_COLORIZE;
        }
        // fullScreenIntent 的处理
        if (notification.fullScreenIntent != null && ai.targetSdkVersion >= Build.VERSION_CODES.Q) {
            int fullscreenIntentPermission = mPackageManagerClient.checkPermission(
                    android.Manifest.permission.USE_FULL_SCREEN_INTENT, pkg);
            if (fullscreenIntentPermission != PERMISSION_GRANTED) {
                notification.fullScreenIntent = null;
                Slog.w(TAG, "Package " + pkg +
                        ": Use of fullScreenIntent requires the USE_FULL_SCREEN_INTENT permission");
            }
        }
    }
- 步骤1:
fixNotification(...)方法进一步修正通知,需要我们特别关注的有android.Manifest.permission.USE_FULL_SCREEN_INTENT这个权限,当我们在Android Q(29)及以上给通知设置fullScreenIntent时,需要声明该权限,否则我们设置的fullScreenIntent将是无效的,不是报错,而是fullScreenIntent被置为null了
/*NotificationManagerService.enqueueNotificationInternal()*/
        // 步骤2
        String channelId = notification.getChannelId();
        final NotificationChannel channel = mPreferencesHelper.getNotificationChannel(pkg,
                notificationUid, channelId, false /* includeDeleted */);
        if (channel == null) {
            ......
            return;
        }
- 步骤2:前面我们说过。Android 8.0之后不设置
channel的通知是无法发送的,源码就是在这里做的限制
/*NotificationManagerService.enqueueNotificationInternal()*/
        // 步骤3
        final StatusBarNotification n = new StatusBarNotification(pkg, opPkg, id, tag, notificationUid,callingPid, notification,user, null, System.currentTimeMillis());
        final NotificationRecord r = new NotificationRecord(getContext(), n, channel);
- 步骤3:这里说明两个数据结构:
-
StatusBarNotification是一个面向客户端的Notification的包装类,仅包含用户需要知道的通知相关的信息,如通知包名、id、key等信息,最终NMS将新通知回调给监听者的时候,给客户端的就是该对象
-
NotificationRecord是面向服务端的Notification的包装类,除了持有StatusBarNotification实例外,还封装了各种通知相关的信息,如channel、sound(通知铃声)、vibration(震动效果)等等,这些信息在服务端处理通知的时候需要用到,但客户端并不需要关心这些
/*NotificationManagerService.enqueueNotificationInternal()*/
        // 步骤4
        if (!checkDisqualifyingFeatures(userId, notificationUid, id, tag, r,r.sbn.getOverrideGroupKey() != null)) {
            return;
        }
        private boolean checkDisqualifyingFeatures(int userId, int uid, int id, String tag, NotificationRecord r, boolean isAutogroup) {
            ......
            if (!isSystemNotification && !isNotificationFromListener) {
                synchronized (mNotificationLock) {
                    // 限制更新类型通知的更新速率
                    if (mNotificationsByKey.get(r.sbn.getKey()) != null && !r.getNotification().hasCompletedProgress() && !isAutogroup) {
                        final float appEnqueueRate = mUsageStats.getAppEnqueueRate(pkg);
                        if (appEnqueueRate > mMaxPackageEnqueueRate) {
                            ......
                            return false;
                        }
                    }
                    // 限制普通应用可发送的通知数
                    int count = getNotificationCountLocked(pkg, userId, id, tag);
                    if (count >= MAX_PACKAGE_NOTIFICATIONS) {
                        return false;
                    }
                }
            }
            // 不发送Snoozed类型的通知
            if (mSnoozeHelper.isSnoozed(userId, pkg, r.getKey())) {
                return false;
            }
            // blocked检查
            if (isBlocked(r, mUsageStats)) {
                return false;
            }
            return true;
        }
- 步骤4:进一步处理通知:
- 限制更新类型通知的更新速率(如显示下载进度的通知)
- 限制普通应用可发送的通知数,Android Q上每个应用最多允许发送25条,因Android版本而异
- 不发送Snoozed类型的通知
- 当用户在设置中设置了不允许显示某应用的通知(blocked)时,不再发送
/*NotificationManagerService.enqueueNotificationInternal()*/
        // 步骤5
        mHandler.post(new EnqueueNotificationRunnable(userId, r));
- 步骤5:通知入列,将通知发送流程交给
EnqueueNotificationRunnable
在进入下一节之前这里先解释几个概念:
1.下文会出现 旧通知 和 新通知 这两个说法,指的是两条"相同"的通知,这里的相同指的是StatusBarNotification.key相同,NMS中维护了一个mNotificationsByKey数据集合,该集合以StatusBarNotification.key为key,以NotificationRecord为value,维护者当前的通知列表,其中key的构造是在StatusBarNotification的构造函数中完成的,构造过程如下:
/*frameworks/base/core/java/android/service/notification/StatusBarNotification.java*/
    private String key() {
        String sbnKey = user.getIdentifier() + "|" + pkg + "|" + id + "|" + tag + "|" + uid;
        if (overrideGroupKey != null && getNotification().isGroupSummary()) {
            sbnKey = sbnKey + "|" + overrideGroupKey;
        }
        return sbnKey;
    }
也就是我们前后以相同的key发送一条通知时,系统根据这个key就可以从mNotificationsByKey中获取到旧通知,例如更新类型的通知(微信同个人的消息,音乐软件的通知等);而新通知自然就是新来的这条要更新的通知了。
2.NMS维护了几个主要的数据结构,分别用在不同的场景下,先说明下,后续阅读源码的时候如果困惑就回头再来看看这个总结吧:
/*frameworks/base/services/core/java/com/android/server/notification/NotificationManagerService.java*/
// 服务端维护的 已排序 的通知
    final ArrayList<NotificationRecord> mNotificationList = new ArrayList<>();
// 服务端维护的 未排序 的通知
    final ArrayMap<String, NotificationRecord> mNotificationsByKey = new ArrayMap<>();
//  "入列通知",通知入列的时候被记录,当某通知成功发送后则会被从该集合中移除,所以最终该集合记录的是所有入列成功但发送不成功的通知
    final ArrayList<NotificationRecord> mEnqueuedNotifications = new ArrayList<>();
// 前面我们说过,当应用未主动为通知设置组别时,系统也会去做这件事,该集合记录的就是这些系统成组的父通知,
// 也就是每次系统帮某用户的某个应用创建了一条父通知,则该父通知会被记录进该集合,
// key - value 为:ArrayMap<userId, ArrayMap<pkg, summarySbnKey>>
    final ArrayMap<Integer, ArrayMap<String, String>> mAutobundledSummaries = new ArrayMap<>();
// 服务端根据groupKey,维护着所有用户主动成组的父通知,主要在`EnqueueNotificationRunnable`中处理分组通知的时候使用
    final ArrayMap<String, NotificationRecord> mSummaryByGroupKey = new ArrayMap<>();
3.分组的概念: Android允许应用主动将发送出来的多条通知以组的形式显示在一起,并通过goupKey区分组别,这样可以避免同个应用的多条通知占据了通知面板的大量显示空间,同时,如果应用未主动将多条通知成组,则系统也会去做这个事情,例如Android Q上面在同个应用的通知数达到4条的时候就会将其成组显示。
三、通知入列
前面 入列预处理 enqueueNotificationInternal(...)方法的最后将通知的发送进一步交给EnqueueNotificationRunnable这个Runable去处理,我们来看看它的run方法,同样是做过精简的:
/*frameworks/base/services/core/java/com/android/server/notification/NotificationManagerService$EnqueueNotificationRunnable.java*/
        public void run() {
            synchronized (mNotificationLock) {
                // 存进集合,后续会用到
                mEnqueuedNotifications.add(r);
                // 当用户设置了 Builder.setTimeoutAfter(long durationMs) 则会在这里做处理
                scheduleTimeoutLocked(r);
                // 从集合mNotificationsByKey中取出旧通知
                final StatusBarNotification n = r.sbn;
                NotificationRecord old = mNotificationsByKey.get(n.getKey());
                ......
                // 分组处理
                handleGroupedNotificationLocked(r, old, callingUid, callingPid);
                ......
                // 准备工作做好了,下一步准备post通知
                if (mAssistants.isEnabled()) {
                    mAssistants.onNotificationEnqueuedLocked(r);
                    mHandler.postDelayed(new PostNotificationRunnable(r.getKey()), DELAY_FOR_ASSISTANT_TIME);
                } else {
                    mHandler.post(new PostNotificationRunnable(r.getKey()));
                }
            }
        }
重点关注下分组处理的内容:
/*frameworks/base/services/core/java/com/android/server/notification/NotificationManagerService.java*/
    private void handleGroupedNotificationLocked(NotificationRecord r, NotificationRecord old,
            int callingUid, int callingPid) {
        StatusBarNotification sbn = r.sbn;
        Notification n = sbn.getNotification();
        // 步骤1
        if (n.isGroupSummary() && !sbn.isAppGroup())  {
            n.flags &= ~Notification.FLAG_GROUP_SUMMARY;
        }

        String group = sbn.getGroupKey();
        boolean isSummary = n.isGroupSummary();
        Notification oldN = old != null ? old.sbn.getNotification() : null;
        String oldGroup = old != null ? old.sbn.getGroupKey() : null;
        boolean oldIsSummary = old != null && oldN.isGroupSummary();
        boolean oldIsSummary = old != null && oldN.isGroupSummary();
        // 步骤2
        if (oldIsSummary) {
            NotificationRecord removedSummary = mSummaryByGroupKey.remove(oldGroup);
            if (removedSummary != old) {
                String removedKey =
                        removedSummary != null ? removedSummary.getKey() : "<null>";
                Slog.w(TAG, "Removed summary didn't match old notification: old=" + old.getKey() +
                        ", removed=" + removedKey);
            }
        }
        if (isSummary) {
            mSummaryByGroupKey.put(group, r);
        }
        // 步骤3
        if (oldIsSummary && (!isSummary || !oldGroup.equals(group))) {
            cancelGroupChildrenLocked(old, callingUid, callingPid, null, false /* sendDelete */,null);
        }
    }
- 步骤1:修正处理,当用户调用
Builder setGroupSummary(boolean isGroupSummary)设置了Notification.FLAG_GROUP_SUMMARY这个flag,但是没调用 Builder.setGroup(String groupKey)设置对应的groupKey,则Notification.FLAG_GROUP_SUMMARY这个flag会被去掉,否则会导致后续系统的自动成组出错。这个处理纠正了一些用户的错误操作,例如用户希望发送一条父通知,但是只调用了Builder setGroupSummary(boolean isGroupSummary)而忘了设置相应的groupKey;
- 步骤2:如果必要的话更新集合
mSummaryByGroupKey,这个集合我们前面总结过,忘记的回头看吧
- 步骤3:如果旧通知是一条父通知,新通知变成了非父通知;或者旧通知新通知均是父通知,但是
group key已经发生了变化,则原来父通知下的所有子通知会被移除
可以看到,EnqueueNotificationRunnable只是对通知做进一步的处理和纠偏,重点处理了通知成组相关的内容,该Runnable的最后是将通知发送流程进一步交给了PostNotificationRunnable去处理,这个Runnable真正做了通知在服务端的发送(post)操作,下一节~
四、通知post流程
PostNotificationRunnable.run(),这个方法处理的事情非常多,主要是做通知发送前的最后处理,先给出这一步的代码,后面再一一分析:
/*frameworks/base/services/core/java/com/android/server/notification/NotificationManagerService$PostNotificationRunnable.java*/
        public void run() {
            synchronized (mNotificationLock) {
                try {
                    NotificationRecord r = null;
                    int N = mEnqueuedNotifications.size();
                    for (int i = 0; i < N; i++) {
                        final NotificationRecord enqueued = mEnqueuedNotifications.get(i);
                        if (Objects.equals(key, enqueued.getKey())) {
                            r = enqueued;
                            break;
                        }
                    }
                    // 步骤1
                    if (r == null) { return; }
                    // 步骤2
                    if (isBlocked(r)) { return; }
                    // 步骤3:
                    final boolean isPackageSuspended = isPackagePausedOrSuspended(r.sbn.getPackageName(), r.getUid());
                    r.setHidden(isPackageSuspended);
                    NotificationRecord old = mNotificationsByKey.get(key);
                    final StatusBarNotification n = r.sbn;
                    final Notification notification = n.getNotification();
                    int index = indexOfNotificationLocked(n.getKey());
                    // 步骤4
                    if (index < 0) {
                        mNotificationList.add(r);
                    } else {
                        old = mNotificationList.get(index);
                        mNotificationList.set(index, r);
                        // 避免通知更新过程中前台服务标志丢失
                        notification.flags |=
                                old.getNotification().flags & FLAG_FOREGROUND_SERVICE;
                        // 记录通知是更新类型的,后续决定是否播放通知声音、震动等提醒的时候会用到
                        r.isUpdate = true;
                    }
                    // 步骤5 记录 未排序 通知
                    mNotificationsByKey.put(n.getKey(), r);
                    // 步骤6
                    if ((notification.flags & FLAG_FOREGROUND_SERVICE) != 0) { notification.flags |= FLAG_ONGOING_EVENT | FLAG_NO_CLEAR; }
                    // 步骤7
                    mRankingHelper.extractSignals(r);
                    // 步骤8
                    mRankingHelper.sort(mNotificationList);
                    // 步骤9
                    if (!r.isHidden()) { buzzBeepBlinkLocked(r); }
                    // 步骤:10
                    if (notification.getSmallIcon() != null) {
                        StatusBarNotification oldSbn = (old != null) ? old.sbn : null;
                        // 步骤10.2
                        mListeners.notifyPostedLocked(r, old);
                        if ((oldSbn == null || !Objects.equals(oldSbn.getGroup(), n.getGroup())) && !isCritical(r)) {
                            mHandler.post(new Runnable() {
                                @Override
                                public void run() {
                                    // 步骤10.3
                                    mGroupHelper.onNotificationPosted(n, hasAutoGroupSummaryLocked(n));
                                }
                            });
                        }
                    } else {
                        // 步骤10.1
                        if (old != null && !old.isCanceled) {
                            mListeners.notifyRemovedLocked(r, NotificationListenerService.REASON_ERROR, r.getStats());
                            mHandler.post(new Runnable() {
                                @Override
                                public void run() {
                                    mGroupHelper.onNotificationRemoved(n);
                                }
                            });
                        }
                    }
                } finally {
                    // 将前面入列的通知从 mEnqueuedNotifications 移除,所以最终该集合记录的是所有入列成功但发送不成功的通知
                    int N = mEnqueuedNotifications.size();
                    for (int i = 0; i < N; i++) {
                        final NotificationRecord enqueued = mEnqueuedNotifications.get(i);
                        if (Objects.equals(key, enqueued.getKey())) {
                            mEnqueuedNotifications.remove(i);
                            break;
                        }
                    }
                }
            }
        }
4.1 通知post预处理
/*PostNotificationRunnable.run()*/
                    // 步骤1
                    if (r == null) { return; }
- 步骤1:若通知已入列但是没走到这里的时候就被取消了,则停止发送处理,因为存在通知处理一半就被取消的情况,而取消通知时会从
mEnqueuedNotifications将通知移除,所以将入列期间的通知存在mEnqueuedNotifications中可以让我们在处理通知的不同阶段去检查通知是否已经被移除
/*PostNotificationRunnable.run()*/
                    // 步骤2
                    if (isBlocked(r)) { return; }
- 步骤2:前面
enqueueNotificationInternal 已经做过一次 blocked 检查,这里再次检查是避免在中间处理过程中 blocked 属性发生了改变,所以整个通知发送过程中存在两次 blocked 状态检查
/*PostNotificationRunnable.run()*/
                    // 步骤3:
                    final boolean isPackageSuspended = isPackagePausedOrSuspended(r.sbn.getPackageName(), r.getUid());
                    r.setHidden(isPackageSuspended);
- 步骤3:该应用是否被系统限制了,是的话hidden为true,这个属性在后面决定是否播放通知声音、震动等提醒的时候会用到
/*PostNotificationRunnable.run()*/
                    NotificationRecord old = mNotificationsByKey.get(key);
                    final StatusBarNotification n = r.sbn;
                    final Notification notification = n.getNotification();
                    int index = indexOfNotificationLocked(n.getKey());
                    // 步骤4
                    if (index < 0) {
                        mNotificationList.add(r);
                    } else {
                        old = mNotificationList.get(index);
                        mNotificationList.set(index, r);
                        // 避免通知更新过程中前台服务标志丢失
                        notification.flags |=
                                old.getNotification().flags & FLAG_FOREGROUND_SERVICE;
                        // 记录通知是更新类型的,后续决定是否播放通知声音、震动等提醒的时候会用到
                        r.isUpdate = true;
                    }
- 步骤4:前面我们总结过,
mNotificationList是存储 已排序 的通知,这里判断新来的通知是不是更新类型的,不是的话就直接add进mNotificationList,是的话则会将旧的通知替换掉,排序不变
/*PostNotificationRunnable.run()*/
                    // 步骤5 记录 未排序 通知
                    mNotificationsByKey.put(n.getKey(), r);
- 步骤5:将即将发送的通知存进集合
mNotificationsByKey,这也是为什么前面我们可以通过mNotificationsByKey获取到某通知是否存在旧通知的原因
/*PostNotificationRunnable.run()*/
                    // 步骤6
                    if ((notification.flags & FLAG_FOREGROUND_SERVICE) != 0) { notification.flags |= FLAG_ONGOING_EVENT | FLAG_NO_CLEAR; }
- 步骤6:前台服务通知是强制常驻通知面板的,不管你发送的时候是否设置了相关的常驻标志(
FLAG_ONGOING_EVENT / FLAG_NO_CLEAR),系统都会帮你加上
4.2 通知排序预处理
这一步是在对通知进行排序前利用各种规则更新通知的各种属性, 这里涉及到几个类:
frameworks/base/services/core/java/com/android/server/notification/RankingConfig.java
frameworks/base/services/core/java/com/android/server/notification/PreferencesHelper.java

frameworks/base/services/core/java/com/android/server/notification/NotificationChannelExtractor.java
frameworks/base/services/core/java/com/android/server/notification/BadgeExtractor.java
frameworks/base/services/core/java/com/android/server/notification/ZenModeExtractor.java
frameworks/base/services/core/java/com/android/server/notification/XXXExtractor.java
......
RankingConfig,接口类,定义了各种通知属性的操作接口,例如:
public interface RankingConfig {
    void setImportance(String packageName, int uid, int importance);
    int getImportance(String packageName, int uid);
    void setShowBadge(String packageName, int uid, boolean showBadge);
    boolean createNotificationChannel(String pkg, int uid, NotificationChannel channel,boolean fromTargetApp, boolean hasDndAccess);
    void updateNotificationChannel(String pkg, int uid, NotificationChannel channel, boolean fromUser);
    ......
}
而接口的实现类为PreferencesHelper,我们挑两个来看看:
/*frameworks/base/services/core/java/com/android/server/notification/PreferencesHelper.java*/
    @Override
    public boolean canShowBadge(String packageName, int uid) {
        synchronized (mPackagePreferences) {
            return getOrCreatePackagePreferencesLocked(packageName, uid).showBadge;
        }
    }
    @Override
    public void setShowBadge(String packageName, int uid, boolean showBadge) {
        synchronized (mPackagePreferences) {
            getOrCreatePackagePreferencesLocked(packageName, uid).showBadge = showBadge;
        }
        updateConfig();
    }
badge表示通知圆点,也就是应用桌面图标右上角上那个 告诉你该应用来通知了的小圆点,当我们在设置中设置某应用的圆点开关的时候,请求会被从 设置 跨应用发送到 NMS,NMS则调用 PreferencesHelper.setShowBadge(String packageName, int uid, boolean showBadge)来执行该更新事件,更新结果保存在PreferencesHelper中一个叫PackagePreferences的数据结构中,并在更新完成的时候调用updateConfig去更新配置,以便我们后续使用RankingConfig时能读到最新的状态
/*frameworks/base/services/core/java/com/android/server/notification/PreferencesHelper$PackagePreferences.java*/
    private static class PackagePreferences {
        String pkg; // 包名
        int uid = UNKNOWN_UID;
        int importance = DEFAULT_IMPORTANCE; // 通知重要程度
        int priority = DEFAULT_PRIORITY; // 通知优先级
        int visibility = DEFAULT_VISIBILITY; // 通知可见性
        boolean showBadge = DEFAULT_SHOW_BADGE; // 通知圆点
        boolean allowBubble = DEFAULT_ALLOW_BUBBLE; // 气泡通知
        int lockedAppFields = DEFAULT_LOCKED_APP_FIELDS;
        boolean oemLockedImportance = DEFAULT_OEM_LOCKED_IMPORTANCE;
        List<String> futureOemLockedChannels = new ArrayList<>();
        boolean defaultAppLockedImportance = DEFAULT_APP_LOCKED_IMPORTANCE;
        Delegate delegate = null;
        ArrayMap<String, NotificationChannel> channels = new ArrayMap<>();
        Map<String, NotificationChannelGroup> groups = new ConcurrentHashMap<>();
        public boolean isValidDelegate(String pkg, int uid) {
            return delegate != null && delegate.isAllowed(pkg, uid);
        }
    }
NotificationChannelExtractor,规则处理器抽象类,定义各种规则的抽象接口,具体规则则由各种类型的子类去实现,后面会举例,先看看这个接口:
public interface NotificationSignalExtractor {
    // 初始化接口
    public void initialize(Context context, NotificationUsageStats usageStats);
    // 每次通知发送或更新的时候调用,如果`process`方法处理完之后还有其他东西需要做进一步处理,则返回一个`RankingReconsideration`
    public RankingReconsideration process(NotificationRecord notification);
    // 让规则处理器持有规则`RankingConfig`
    void setConfig(RankingConfig config);
    // 让规则处理器持有免打扰辅助类`ZenModeHelper`
    void setZenHelper(ZenModeHelper helper);
}
该接口有多个实现类,一套规则一个实现类,我们挑一个来看看:
public class BadgeExtractor implements NotificationSignalExtractor {
    private RankingConfig mConfig;
    public void initialize(Context ctx, NotificationUsageStats usageStats) { }
    public RankingReconsideration process(NotificationRecord record) {
        if (record == null || record.getNotification() == null) { return null; }
        if (mConfig == null) { return null; }
        boolean userWantsBadges = mConfig.badgingEnabled(record.sbn.getUser());
        boolean appCanShowBadge = mConfig.canShowBadge(record.sbn.getPackageName(), record.sbn.getUid());
        if (!userWantsBadges || !appCanShowBadge) {
            record.setShowBadge(false);
        } else {
            if (record.getChannel() != null) {
                record.setShowBadge(record.getChannel().canShowBadge() && appCanShowBadge);
            } else {
                record.setShowBadge(appCanShowBadge);
            }
        }
        if (record.isIntercepted()
                && (record.getSuppressedVisualEffects() & SUPPRESSED_EFFECT_BADGE) != 0) {
            record.setShowBadge(false);
        }
        return null;
    }

    @Override
    public void setConfig(RankingConfig config) {
        mConfig = config;
    }

    @Override
    public void setZenHelper(ZenModeHelper helper) {
    }
}
这是一套决定通知是否显示圆点的规则,规则包括:
- 系统是否允许显示圆点(Config.badgingEnabled),受一个系统全局变量影响,该变量写在 Settings 数据库字段中:NOTIFICATION_BADGING = “notification_badging”,改变该值的地方是 设置中的开关
- 用户是否在设置中打开了允许通知(Config.canShowBadge),受我们前面说的
setShowBadge接口影响,也就是会去查询PreferencesHelper类中的数据结构PackagePreferences
- 此外还可能受通知
channel影响等等
以上只是处理了一个通知属性,而其他各种属性则分别在不同的规则处理器中处理,Android定义了一个配置列表,声明了所有的规则处理器,同时允许我们去扩展我们自己的规则处理器。
我们看看这个规则处理器配置列表:
/*frameworks/base/core/res/res/values/config.xml*/

    <string-array name="config_notificationSignalExtractors">
        <!-- many of the following extractors depend on the notification channel, so this
        extractor must come first -->
        <item>com.android.server.notification.NotificationChannelExtractor</item>
        <item>com.android.server.notification.NotificationAdjustmentExtractor</item>
        <item>com.android.server.notification.BubbleExtractor</item>
        <!-- depends on AdjustmentExtractor-->
        <item>com.android.server.notification.ValidateNotificationPeople</item>
        <item>com.android.server.notification.PriorityExtractor</item>
        <!-- depends on PriorityExtractor -->
        <item>com.android.server.notification.ZenModeExtractor</item>
        <item>com.android.server.notification.ImportanceExtractor</item>
        <!-- depends on ImportanceExtractor-->
        <item>com.android.server.notification.NotificationIntrusivenessExtractor</item>
        <item>com.android.server.notification.VisibilityExtractor</item>
        <!-- Depends on ZenModeExtractor -->
        <item>com.android.server.notification.BadgeExtractor</item>
        <item>com.android.server.notification.CriticalNotificationExtractor</item>
    </string-array>
当我们需要新增规则时,只需要在这个配置列表中指定我们的规则实现类,并让我们的规则实现类实现NotificationSignalExtractor这个接口,完成我们特定的规则制定即可。
/*PostNotificationRunnable.run()*/
                    // 步骤7
                    mRankingHelper.extractSignals(r);
我们接着看PostNotificationRunnable.run()中的步骤7
/*frameworks/base/services/core/java/com/android/server/notification/RankingHelper.java*/
    public void extractSignals(NotificationRecord r) {
        final int N = mSignalExtractors.length;
        for (int i = 0; i < N; i++) {
            NotificationSignalExtractor extractor = mSignalExtractors[i];
            try {
                RankingReconsideration recon = extractor.process(r);
                if (recon != null) {
                    mRankingHandler.requestReconsideration(recon);
                }
            }
        }
    }
也就是遍历各个规则处理器,触发其process方法去设置通知的各种属性,当返回值RankingReconsideration不为空时,则进一步处理其他规则,不展开讲。
这里主要学习源码的这种实现思路:将赋值过程复杂的属性的处理通过抽象隔离开来分别处理,达到修改某个属性的规则时不影响其他属性的目的,同时还保证了良好的可扩展性,当我们需要定义新的规则的时候,只需要扩展我们自己的一套规则即可.
这里体现了设计模式中多个基本原则,如单一职责原则(一个类应只包含单一的职责)、依赖倒转原则(抽象不应该依赖于细节,细节应当依赖于抽象)和迪米特原则(一个类尽量不要与其他类发生关系)等,整个通知系统的设计是十分复杂的,这个过程中有很多设计模式的体现,读者阅读的时候可多加思考并学习其应用。
4.3 通知排序
/*PostNotificationRunnable.run()*/
                    // 步骤8
                    mRankingHelper.sort(mNotificationList);
- 步骤8:更新完通知的各种属性后,就可以对通知进行排序了,可以看到传进去排序的集合为
mNotificationList,这也就是为什么我们前面说mNotificationList是已排序的通知集合
服务端通知排序分为两次,初步排序与最终排序,具体排序规则受两个排序类影响:
初步排序:frameworks/base/services/core/java/com/android/server/notification/NotificationComparator.java
最终排序:frameworks/base/services/core/java/com/android/server/notification/GlobalSortKeyComparator.java
其中初步排序主要是 根据Importance / 彩色通知(受Notification.setColorized()接口影响) / 是否常驻通知(ongoing) / 是否重要消息 / 是否重要联系人 / priority / 通知发送时间 等因素影响,其中通知发送时间在排序规则中是最后被考虑的,这也是为什么经常我们看到的最新通知不一定是显示在最顶端的原因。具体规则和代码不展开讲,感兴趣的自己阅读下frameworks/base/services/core/java/com/android/server/notification/NotificationComparator.java 的 compare 方法。
对于初步排序这里只强调一点,由于Comparator比较器默认是升序的,如果不做处理会导致mNotificationList中的通知的排序是按照重要程度从低到高排序,这与我们的预期结果是相反的,源码的处理是在返回比较结果前做一次反序处理,举个例子:
/*frameworks/base/services/core/java/com/android/server/notification/NotificationComparator.java*/
    public int compare(NotificationRecord left, NotificationRecord right) {
        final int leftImportance = left.getImportance();
        final int rightImportance = right.getImportance();
        final boolean isLeftHighImportance = leftImportance >= IMPORTANCE_DEFAULT;
        final boolean isRightHighImportance = rightImportance >= IMPORTANCE_DEFAULT;
        if (Settings.Secure.getInt(mContext.getContentResolver(),
                Settings.Secure.NOTIFICATION_NEW_INTERRUPTION_MODEL, 1) == 1) {
            if (isLeftHighImportance != isRightHighImportance) {
                return -1 * Boolean.compare(isLeftHighImportance, isRightHighImportance);
            }
        }
        ......
    }
我们知道,int compare(T o1, T o2)是“比较o1和o2的大小”:
- 返回 负数 表示 o1 比 o2小
- 返回 0 表示 o1 等于 o2
- 返回 正数 表示 o1 大于 o2
所以正常情况下,当isLeftHighImportance的值大于isRightHighImportance时,由于是升序,Importance较大的通知会被排在后面,而这里执行了 -1 * result 后,Importance较大的通知就排在前面了
接下来思考:为什么初步排序还不够呢,这里就涉及到我们发送通知时可能会用到的一个接口了:Builder.setSortKey(),有时候我们发送通知会调用Builder.setSortKey()设置一个排序键值,去对当前应用的通知进行排序,系统就是在最终排序里面对我们通过setSortKey设置的排序规则做受理的,而在最终排序前,系统会去规范我们设置的键值
那当我们设置了setSortKey之后,系统是怎么排序的呢?这块可能有些童鞋有点糊迷,下面看看步骤8的sort方法:
/*frameworks/base/services/core/java/com/android/server/notification/RankingHelper.java*/
    public void sort(ArrayList<NotificationRecord> notificationList) {
        final int N = notificationList.size();
        // clear global sort keys
        for (int i = N - 1; i >= 0; i--) {
            notificationList.get(i).setGlobalSortKey(null);
        }
        // 初步排序,详见 `NotificationComparator`
        Collections.sort(notificationList, mPreliminaryComparator);
        // 最终排序前的预处理
        synchronized (mProxyByGroupTmp) {
            for (int i = 0; i < N; i++) {
                final NotificationRecord record = notificationList.get(i);
                record.setAuthoritativeRank(i);
                final String groupKey = record.getGroupKey();
                NotificationRecord existingProxy = mProxyByGroupTmp.get(groupKey);
                if (existingProxy == null) {
                    mProxyByGroupTmp.put(groupKey, record);
                }
            }
            for (int i = 0; i < N; i++) {
                final NotificationRecord record = notificationList.get(i);
                NotificationRecord groupProxy = mProxyByGroupTmp.get(record.getGroupKey());
                String groupSortKey = record.getNotification().getSortKey();
                // 步骤8.1,执行预处理
                String groupSortKeyPortion;
                if (groupSortKey == null) {
                    groupSortKeyPortion = "nsk";
                } else if (groupSortKey.equals("")) {
                    groupSortKeyPortion = "esk";
                } else {
                    groupSortKeyPortion = "gsk=" + groupSortKey;
                }
                boolean isGroupSummary = record.getNotification().isGroupSummary();
                // 步骤8.2,执行预处理
               record.setGlobalSortKey(String.format("crtcl=0x%04x:intrsv=%c:grnk=0x%04x:gsmry=%c:%s:rnk=0x%04x",
                        record.getCriticality(), record.isRecentlyIntrusive() && record.getImportance() > NotificationManager.IMPORTANCE_MIN ? '0' : '1',
                        groupProxy.getAuthoritativeRank(), isGroupSummary ? '0' : '1', groupSortKeyPortion, record.getAuthoritativeRank()));
            }
            mProxyByGroupTmp.clear();
        }
        // 步骤8.3,执行最终排序
        Collections.sort(notificationList, mFinalComparator);
    }
- 步骤8.1:最终排序预处理,可以看到系统对
sortKey做了统一处理:
- 当我们没设置
sortKey时,groupSortKeyPortion = “nsk”
- 当我们设置的
sortKey为空(也就是"")时,groupSortKeyPortion = “esk”;
- 当我们设置的
sortKey不为null时,groupSortKeyPortion = “gsk=” + groupSortKey;
- 步骤8.2:最终排序预处理,以
crtcl=0x%04x:intrsv=%c:grnk=0x%04x:gsmry=%c:%s:rnk=0x%04x这个格式为record设置mGlobalSortKey,也就是系统将这几个属性组合成一个字符串,赋值给mGlobalSortKey,里面就包括前面步骤1中规范化出来的sortKey,而这一整个字符串将在最终排序中影响通知排序
- 步骤8.3:执行最终排序,这里我们直接看最终排序用的这个对比器
mFinalComparator里面的规则:
/*frameworks/base/services/core/java/com/android/server/notification/GlobalSortKeyComparator.java*/
public class GlobalSortKeyComparator implements Comparator<NotificationRecord> {
    @Override
    public int compare(NotificationRecord left, NotificationRecord right) {
        if (left.getGlobalSortKey() == null) { return 1; }
        if (right.getGlobalSortKey() == null) { return  -1; }
        return left.getGlobalSortKey().compareTo(right.getGlobalSortKey());
    }
}
可以看到系统直接比较了前面设置的mGlobalSortKey值,mGlobalSortKey是一个字符串,也就是这里的排序规则是由字典序排序规则决定的。结合前面两点我们可以得出,当两条通知的crtcl、intrsv、grnk、gsmry这几个属性的值都一样的情况下,我们通过Builder.setSortKey()设置的排序键值就会生效了。
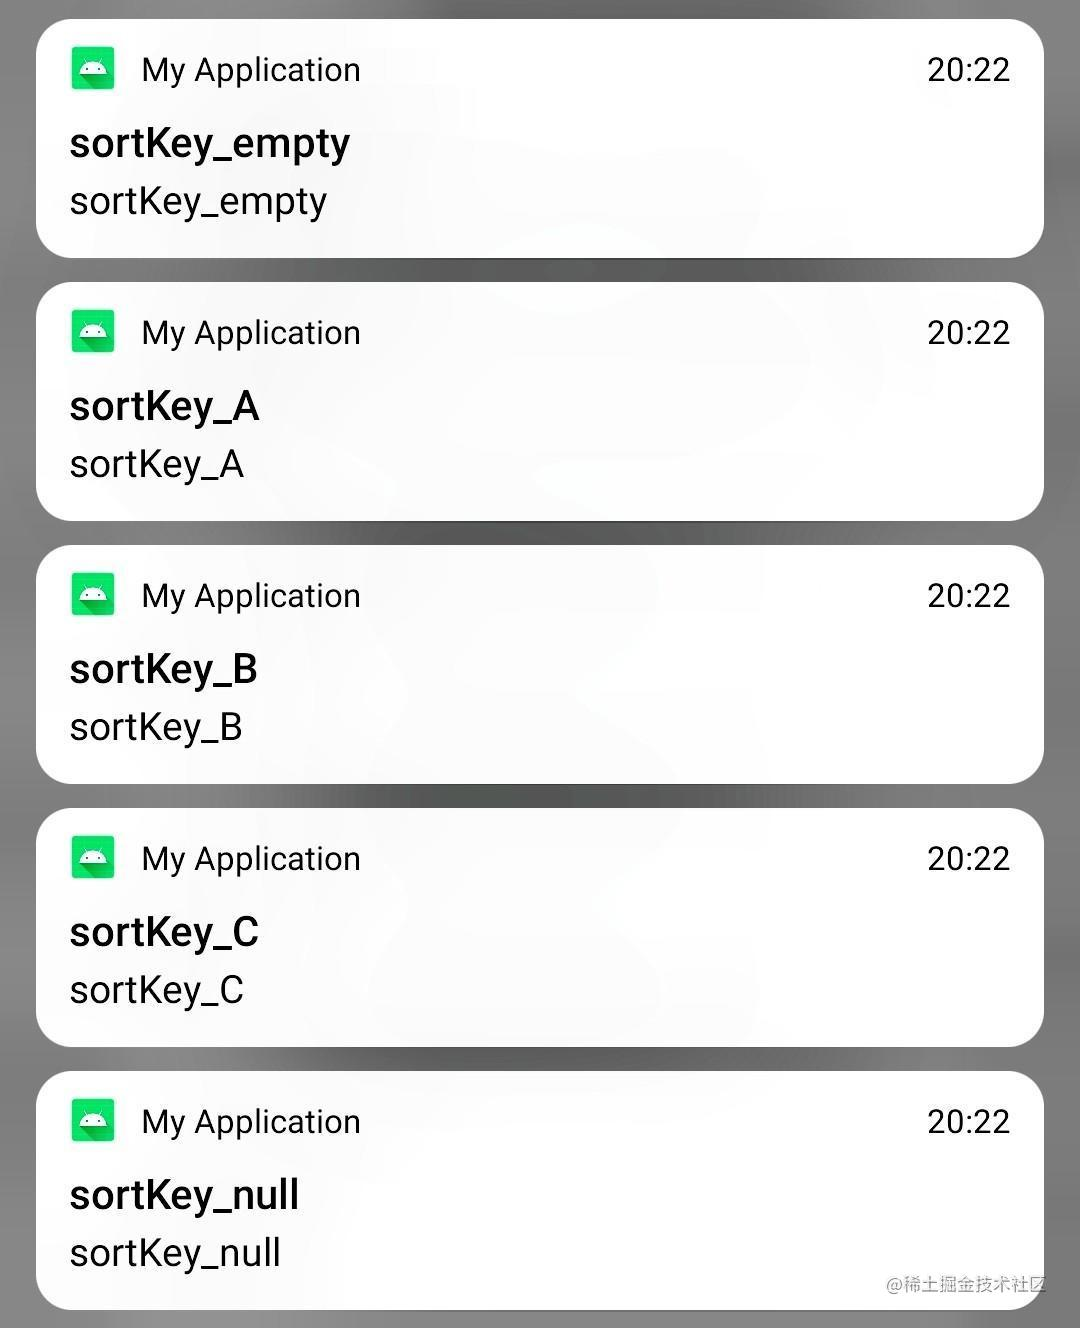
经过前面系统的规范,不同的键值类型对应的字典序排序结果为:esk类型 > gsk=xxx类型 > nsk类型,即sortKey类型为**“”** 的通知会排在最前面,接着是设置了sortKey的通知,这一类通知的排序则根据用户指定的sortKey而定,接着才是没设置sortKey的,本地写了个demo验证了下,结果如下:
到这里我们也就明白了为什么有时候设置sortKey并不能生效了,因为sortKey的排序优先级不是最高的,还受crtcl、intrsv、grnk、gsmry这几个属性影响。
4.4 通知震动、音效和呼吸灯处理
/*PostNotificationRunnable.run()*/
                    // 步骤9
                    if (!r.isHidden()) { buzzBeepBlinkLocked(r); }
- 步骤9:这里开始处理通知的震动、音效和呼吸灯效果,这里主要根据通知的 重要程度、是否当前用户、是否更新类型的通知等 信息共同决定当前这条通知是否需要 震动、音效和呼吸灯效果,代码较简单,不展开讲,感兴趣的童鞋直接看下
NotificationManagerService.buzzBeepBlinkLocked(NotificationRecord record)方法,下面重点看看通知的post
4.5 通知post
分析了这么久,我们终于来到通知的发送步骤了,别急,还有很多事情没处理呢~例如我们前面说过,当用户未主动给应用通知设置组别时,系统会帮我们最这件事,但是到目前为止都没有见到相关处理,答案就在下面,接着往下看:
/*PostNotificationRunnable.run()*/
                    // 步骤:10
                    if (notification.getSmallIcon() != null) {
                        StatusBarNotification oldSbn = (old != null) ? old.sbn : null;
                        // 步骤10.2
                        mListeners.notifyPostedLocked(r, old);
                        if ((oldSbn == null || !Objects.equals(oldSbn.getGroup(), n.getGroup())) && !isCritical(r)) {
                            mHandler.post(new Runnable() {
                                @Override
                                public void run() {
                                    // 步骤10.3
                                    mGroupHelper.onNotificationPosted(n, hasAutoGroupSummaryLocked(n));
                                }
                            });
                        }
                    } else {
                        // 步骤10.1
                        if (old != null && !old.isCanceled) {
                            mListeners.notifyRemovedLocked(r, NotificationListenerService.REASON_ERROR, r.getStats());
                            mHandler.post(new Runnable() {
                                @Override
                                public void run() {
                                    mGroupHelper.onNotificationRemoved(n);
                                }
                            });
                        }
                    }
                } finally {
                    // 将前面入列的通知从 mEnqueuedNotifications 移除,所以最终该集合记录的是所有入列成功但发送不成功的通知
                    int N = mEnqueuedNotifications.size();
                    for (int i = 0; i < N; i++) {
                        final NotificationRecord enqueued = mEnqueuedNotifications.get(i);
                        if (Objects.equals(key, enqueued.getKey())) {
                            mEnqueuedNotifications.remove(i);
                            break;
                        }
                    }
                }
            }
        }
- 步骤10:这里再次对通知是否有
mSmallIcon做了检查,避免前面在处理通知的过程中mSmallIcon丢失了,而没有mSmallIcon的通知是一定不能发送的,这也看出了Google对流氓通知是零容忍的。如果没有mSmallIcon,则走进else。
- 步骤10.1:先看
else 的情况,此时如果旧通知已成功发送但新通知没smallIcon,则旧通知会被移除,所以移除通知不一定要调用cancel接口,在这种情况下旧通知也是会被移除的。
通知各监听者
/*PostNotificationRunnable.run()*/
                        // 步骤10.2
                        mListeners.notifyPostedLocked(r, old);
- 步骤10.2:
mSmallIcon不为空,终于可以发送了,mListeners.notifyPostedLocked(r, old)将以异步的形式,将该消息通知给各个listeners,其中就包括我们后面主要分析的SystemUI:
/*frameworks/base/services/core/java/com/android/server/notification/NotificationManagerService.java$*/
        private void notifyPostedLocked(NotificationRecord r, NotificationRecord old, boolean notifyAllListeners) {
            for (final ManagedServiceInfo info : getServices()) {
                // 过滤掉部分listener.如不可见用户,Android P以下hidden类型的通知等
                ......
                // 步骤10.2.1
                final NotificationRankingUpdate update = makeRankingUpdateLocked(info);
                // 移除原来可见现在不可见的通知
                if (oldSbnVisible && !sbnVisible) {
                    final StatusBarNotification oldSbnLightClone = oldSbn.cloneLight();
                    mHandler.post(new Runnable() {
                        @Override
                        public void run() {
                            notifyRemoved(
                                    info, oldSbnLightClone, update, null, REASON_USER_STOPPED);
                        }
                    });
                    continue;
                }
                // 步骤10.2.2
                mHandler.post(new Runnable() {
                    @Override
                    public void run() {
                        notifyPosted(info, sbnToPost, update);
                    }
                });
            }
        }
- 步骤10.2.1:构建一个包含所有通知排序信息和关键属性的映射表,其中
key=StatusBarNotification.key,value=NotificationListenerService.Ranking:
/*frameworks/base/services/core/java/com/android/server/notification/NotificationManagerService.java$*/
    private NotificationRankingUpdate makeRankingUpdateLocked(ManagedServiceInfo info) {
        final int N = mNotificationList.size();
        final ArrayList<NotificationListenerService.Ranking> rankings = new ArrayList<>();

        for (int i = 0; i < N; i++) {
            NotificationRecord record = mNotificationList.get(i);
            // 过滤掉当前用户不可见的通知
            if (!isVisibleToListener(record.sbn, info)) {
                continue;
            }
            final String key = record.sbn.getKey();
            // 一条通知对应一个 Ranking
            final NotificationListenerService.Ranking ranking =
                    new NotificationListenerService.Ranking();
            // 将通知的关键信息,包括排序、关键属性等存进 Ranking
            ranking.populate(
                    key,
                    rankings.size(),
                    !record.isIntercepted(),
                    record.getPackageVisibilityOverride(),
                    record.getSuppressedVisualEffects(),
                    record.getImportance(),
                    record.getImportanceExplanation(),
                    record.sbn.getOverrideGroupKey(),
                    record.getChannel(),
                    record.getPeopleOverride(),
                    record.getSnoozeCriteria(),
                    record.canShowBadge(),
                    record.getUserSentiment(),
                    record.isHidden(),
                    record.getLastAudiblyAlertedMs(),
                    record.getSound() != null || record.getVibration() != null,
                    record.getSystemGeneratedSmartActions(),
                    record.getSmartReplies(),
                    record.canBubble()
            );
            rankings.add(ranking);
        }
        // 构建`RankingMap`
        return new NotificationRankingUpdate(
                rankings.toArray(new NotificationListenerService.Ranking[0]));
    }
关注下最后一步:将列表转为 NotificationListenerService.Ranking 类型的数组,然后构建一个RankingMap,RankingMap是一个key=StatusBarNotification.key,value=NotificationListenerService.Ranking的ArrayMap,后面SystemUI会根据这个映射表的排序信息显示通知
/*frameworks/base/core/java/android/service/notification/NotificationRankingUpdate.java*/
    public NotificationRankingUpdate(NotificationListenerService.Ranking[] rankings) {
        mRankingMap = new NotificationListenerService.RankingMap(rankings);
    }

/*frameworks/base/core/java/android/service/notification/NotificationRankingUpdate$RankingMap.java*/
        public RankingMap(Ranking[] rankings) {
            for (int i = 0; i < rankings.length; i++) {
                final String key = rankings[i].getKey();
                mOrderedKeys.add(key);
                // key=StatusBarNotification.key,value=NotificationListenerService.Ranking
                mRankings.put(key, rankings[i]);
            }
        }
- 步骤10.2.2:执行
listener.onNotificationPosted(sbnHolder, rankingUpdate);接口通知各个监听器
至此,各个监听器就能收到来新通知的消息了
尝试构建系统分组
/*PostNotificationRunnable.run()*/
                        if ((oldSbn == null || !Objects.equals(oldSbn.getGroup(), n.getGroup())) && !isCritical(r)) {
                            mHandler.post(new Runnable() {
                                @Override
                                public void run() {
                                    // 步骤10.3
                                    mGroupHelper.onNotificationPosted(n, hasAutoGroupSummaryLocked(n));
                                }
                            });
                        }
- 步骤10.3:这里将利用分组通知的辅助类
GroupHelper在必要的情况下构建一个父通知,前面我们说的用户未主动将通知分组时系统会帮我们去做这件事,就是在这里完成的。但GroupHelper只是负责判断是否需要创建或者移除系统创建的通知,具体的操作是在NMS中完成的,涉及到下面这个回调:
/*frameworks/base/services/core/java/com/android/server/notification/GroupHelper.java*/
    protected interface Callback {
        void addAutoGroup(String key);
        void removeAutoGroup(String key);
        void addAutoGroupSummary(int userId, String pkg, String triggeringKey);
        void removeAutoGroupSummary(int user, String pkg);
    }
NMS将回调注册到GroupHelper,GroupHelper则在必要的时候通知NMS去完成相关操作,来看看 步骤10.3 的具体操作,代码做过简化
/*frameworks/base/services/core/java/com/android/server/notification/GroupHelper.java*/
    // 步骤10.3.1
    Map<Integer, Map<String, LinkedHashSet<String>>> mUngroupedNotifications = new HashMap<>();

    public void onNotificationPosted(StatusBarNotification sbn, boolean autogroupSummaryExists) {
        try {
            List<String> notificationsToGroup = new ArrayList<>();
            // 步骤10.3.2
            if (!sbn.isAppGroup()) {
                synchronized (mUngroupedNotifications) {
                    // 步骤10.3.3
                    if (notificationsForPackage.size() >= mAutoGroupAtCount
                            || autogroupSummaryExists) {
                        notificationsToGroup.addAll(notificationsForPackage);
                    }
                }
                if (notificationsToGroup.size() > 0) {
                    // 步骤10.3.4
                    adjustAutogroupingSummary(sbn.getUserId(), sbn.getPackageName(), notificationsToGroup.get(0), true);
                    // 步骤10.3.5
                    adjustNotificationBundling(notificationsToGroup, true);
                }
            } else {
                // 步骤10.3.6
                maybeUngroup(sbn, false, sbn.getUserId());
            }
        }
    }
- 步骤10.3.1:
GroupHelper持有一个集合mUngroupedNotifications,存储内容为:<user, <packageName, notificationsForPackage>>,这样就能将每个用户的每个应用下的通知存储起来,在条件满足的时候去执行系统成组操作
- 步骤10.3.2:若用户创建该通知的时候未指定
mGroupKey或者mSortKey,则系统会尝试去走创建父通知的逻辑
- 步骤10.3.3:系统尝试创建父通知,创建的条件是该应用的通知数达到了4条 或者 之前已经存在该应用的父通知了,这个的 4 是在配置在
config中的,路径为frameworks/base/core/res/res/values/config.xml 下的 config_autoGroupAtCount字段,所以如果我们想要修改系统的通知自动成组数条件,修改该变量即可。
- 步骤10.3.4:满足创建父通知的条件,走
adjustAutogroupingSummary逻辑,该方法最终调了NMS中的addAutoGroupSummary方法,这里关注下创建的这条父通知的内容:
/*frameworks/base/services/core/java/com/android/server/notification/NotificationManagerService.java*/
    private void createAutoGroupSummary(int userId, String pkg, String triggeringKey) {
        NotificationRecord summaryRecord = null;
        synchronized (mNotificationLock) {
            // 步骤10.3.4.1
            NotificationRecord notificationRecord = mNotificationsByKey.get(triggeringKey);
            ......
            if (!summaries.containsKey(pkg)) {
                ......
                final Notification summaryNotification =
                        new Notification.Builder(getContext(), channelId)
                                .setSmallIcon(adjustedSbn.getNotification().getSmallIcon())
                                .setGroupSummary(true)
                                .setGroupAlertBehavior(Notification.GROUP_ALERT_CHILDREN)
                                // 步骤10.3.4.2
                                .setGroup(GroupHelper.AUTOGROUP_KEY)
                                .setFlag(FLAG_AUTOGROUP_SUMMARY, true)
                                .setFlag(Notification.FLAG_GROUP_SUMMARY, true)
                                .setColor(adjustedSbn.getNotification().color)
                                .setLocalOnly(true)
                                .build();
                ......
                final StatusBarNotification summarySbn =
                        new StatusBarNotification(adjustedSbn.getPackageName(), adjustedSbn.getOpPkg(), Integer.MAX_VALUE,
                                // 步骤10.3.4.2
                                GroupHelper.AUTOGROUP_KEY,
                                adjustedSbn.getUid(), adjustedSbn.getInitialPid(), summaryNotification, adjustedSbn.getUser(),
                                // 步骤10.3.4.2
                                GroupHelper.AUTOGROUP_KEY,
                                System.currentTimeMillis());
                ......
            }
        }
        if (summaryRecord != null && checkDisqualifyingFeatures(userId, MY_UID, summaryRecord.sbn.getId(), summaryRecord.sbn.getTag(), summaryRecord, true)) {
            //  步骤10.3.4.3
            mHandler.post(new EnqueueNotificationRunnable(userId, summaryRecord));
        }
    }
- 步骤10.3.4.1:拿到欲成组的子通知里面的第一条,然后将该子通知的各种属性复制给父通知,包括子通知的userId、extras、contentIntent等信息
- 步骤10.3.4.2:这里创建父通知时指定了
Notification的mGroupKey = GroupHelper.AUTOGROUP_KEY,也就是ranker_group,同时指定了StatusBarNotification的tag = GroupHelper.AUTOGROUP_KEY 和 overrideGroupKey = GroupHelper.AUTOGROUP_KEY,这些信息在后续分析客户端通知显示的时候会用到
- 步骤10.3.4.3:父通知构建完成后,执行入列操作,这个就跟前面分析的新通知入列的流程是一样的了
/*GroupHelper.onNotificationPosted(...)*/
                    // 步骤10.3.5
                    adjustNotificationBundling(notificationsToGroup, true);
- 步骤10.3.5:看回前面的 步骤10.3.5,这里会去刷新所有刚被成组的所有子通知的属性,主要操作是执行了
StatusBarNotification的setOverrideGroupKey()方法,将该值指定为GroupHelper.AUTOGROUP_KEY,所以到这里,所以成组的通知,包括父通知的overrideGroupKey就都变成了ranker_group,同样,这个属性将在SystemUI显示时发挥作用
/*GroupHelper.onNotificationPosted(...)*/
                // 步骤10.3.6
                maybeUngroup(sbn, false, sbn.getUserId());
- 步骤10.3.6:存在一种情况:某通知原来未指定group,然后被加进了系统创建的父通知里,但现在用户更新了该通知,并为其指定了group,也就是用户告诉系统,接下我自己要创建分组了,你把通知还给我。对于这种情况,系统需要将该通知从系统分组里面移除出来,避免出错
至此,整个 PostNotificationRunnable.run() 方法就都分析完了,通知会发送给各个监听者,包括我们后面要讲的 SystemUI,第四篇在路上~
本文转自 [https://juejin.cn/post/6844904176015638535],如有侵权,请联系删除。