Several modern C++ features are currently missing from Visual Studio Express, and from the system GCC compiler provided with many of today’s Linux distributions. Generic lambdas – also known as polymorphic lambdas – are one such feature. This feature is, however, available in the latest versions of GCC and Clang.
The following guide will help you install the latest GCC on Windows, so you can experiment with generic lambdas and other cutting-edge C++ features. You’ll need to compile GCC from sources, but that’s not a problem. Depending on the speed of your machine, you can have the latest GCC up and running in as little as 15 minutes.
The steps are:
- Install Cygwin, which gives us a Unix-like environment running on Windows.
- Install a set of Cygwin packages required for building GCC.
- From within Cygwin, download the GCC source code, build and install it.
- Test the new GCC compiler in C++14 mode using the
-std=c++14 option.
[Update: As a commenter points out, you can also install native GCC compilers from the MinGW-w64 project without needing Cygwin.]
1. Install Cygwin
First, download and run either the 32- or 64-bit version of the Cygwin installer, depending on your version of Windows. Cygwin’s setup wizard will walk you through a series of steps. If your machine is located behind a proxy server, make sure to check “Use Internet Explorer Proxy Settings” when you get to the “Select Your Internet Connection” step.
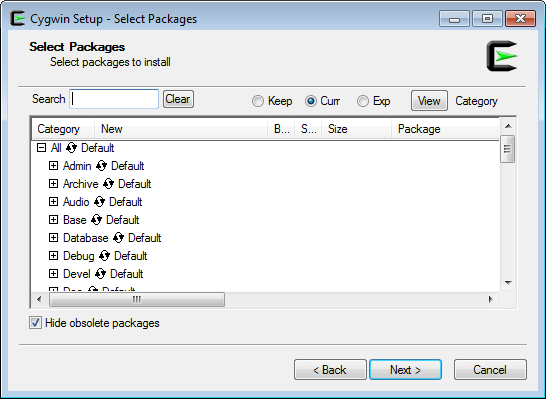
When you reach the “Select Packages” step (shown below), don’t bother selecting any packages yet. Just go ahead and click Next. We’ll add additional packages from the command line later.
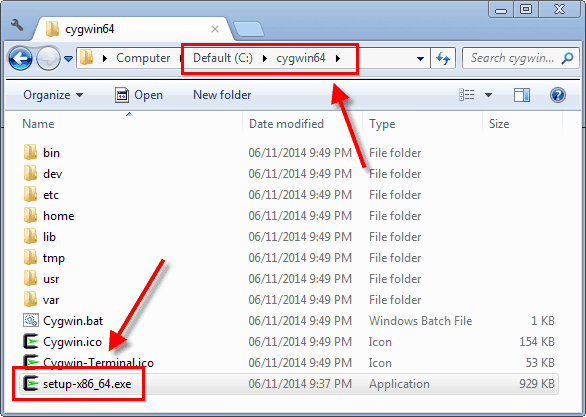
After the Cygwin installer completes, it’s very important to keep the installer around. The installer is an executable named either setup-x86.exe or setup-x86_64.exe, and you’ll need it to add or remove Cygwin packages in the future. I suggest moving the installer to the same folder where you installed Cygwin itself; typically C:\cygwin or C:\cygwin64.
If you already have Cygwin installed, it’s a good idea to re-run the installer to make sure it has the latest available packages. Alternatively, you can install a new instance of Cygwin in a different folder.
2. Install Required Cygwin Packages
Next, you’ll need to add several packages to Cygwin. You can add them all in one fell swoop. Just open a Command Prompt (in Windows), navigate to the folder where the Cygwin installer is located, and run the following command:
C:\cygwin64>setup-x86_64.exe -q -P wget -P gcc-g++ -P make -P diffutils -P libmpfr-devel -P libgmp-devel -P libmpc-devel
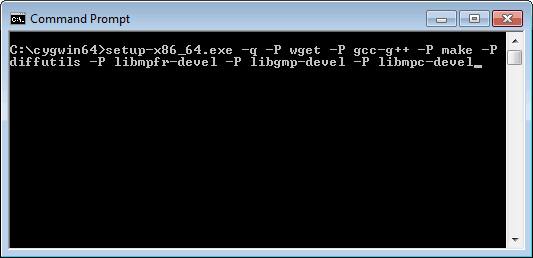
A window will pop up and download all the required packages along with their dependencies.
At this point, you now have a working GCC compiler on your system. It’s not the latest version of GCC; it’s whatever version the Cygwin maintainers chose as their system compiler. At the time of writing, that’s GCC 4.8.3. To get a more recent version of GCC, you’ll have to compile it yourself, using the GCC compiler you already have.
3. Download, Build and Install the Latest GCC
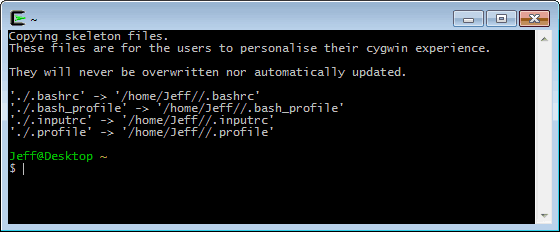
Open a Cygwin terminal, either from the Start menu or by running Cygwin.bat from the Cygwin installation folder.
If your machine is located behind a proxy server, you must run the following command from the Cygwin terminal before proceeding – otherwise, wget won’t work. This step is not needed if your machine is directly connected to the Internet.
$ export http_proxy=$HTTP_PROXY https_proxy=$HTTP_PROXY ftp_proxy=$HTTP_PROXY
To download and extract the latest GCC source code, enter the following commands in the Cygwin terminal. If you’re following this guide at a later date, there will surely be a more recent version of GCC available. I used 4.9.2, but you can use any version you like. Keep in mind, though, that it’s always best to have the latest Cygwin packages installed when building the latest GCC. Be patient with the tar command; it takes several minutes.
$ wget http://ftpmirror.gnu.org/gcc/gcc-4.9.2/gcc-4.9.2.tar.gz
$ tar xf gcc-4.9.2.tar.gz
That will create a subdirectory named gcc-4.9.2. Next, we’ll configure our GCC build. As the GCC documentation recommends, it’s best to configure and build GCC in another directory outside gcc-4.9.2, so that’s what we’ll do.
$ mkdir build-gcc
$ cd build-gcc
$ ../gcc-4.9.2/configure --program-suffix=-4.9.2 --enable-languages=c,c++ --disable-bootstrap --disable-shared
Here’s a description of the command-line options passed to configure:
-
The --program-suffix=-4.9.2 option means that once our new GCC is installed, we’ll run it as g++-4.9.2. This will make it easier for the new GCC compiler to coexist alongside the system GCC compiler provided by Cygwin.
-
The --enable-languages=c,c++ option means that only the C and C++ compilers will be built. Compilers for other languages, such as Fortran, Java and Go, will be excluded. This will save compile time.
-
The --disable-bootstrap option means that we only want to build the new compiler once. If we don’t specify --disable-bootstrap, the new compiler will be built three times, for testing and performance reasons. However, the system GCC compiler (4.8.3) provided by Cygwin is pretty recent, so --disable-bootstrap is good enough for our purposes. This will save a significant amount of compile time.
-
The --disable-shared option means that we don’t want to build the new standard C++ runtime library as a DLL that’s shared with other C++ applications on the system. It’s totally possible to make C++ executables work with such DLLs, but it takes care not to introduce conflicts with C++ executables created by older or newer versions of GCC. That’s something distribution maintainers need to worry about; not us. Let’s just avoid the additional headache.
-
By default, the new version of GCC will be installed to /usr/local in Cygwin’s virtual filesystem. This will make it easier to launch the new GCC, since /usr/local/bin is already listed in Cygwin’s PATH environment variable. However, if you’re using an existing Cygwin installation, it might prove difficult to uninstall GCC from /usr/local later on (if you so choose), since that directory tends to contain files from several different packages. If you prefer to install the new GCC to a different directory, add the option --prefix=/path/to/directory to the above configure command.
We’re not going to build a new Binutils, which GCC relies on, because the existing Binutils provided by Cygwin is already quite recent. We’re also skipping a couple of packages, namely ISL and CLooG, which means that the new compiler won’t be able to use any of the Graphite loop optimizations.
Next, we’ll actually build the new GCC compiler suite, including C, C++ and the standard C++ library. This is the longest step.
$ make -j4
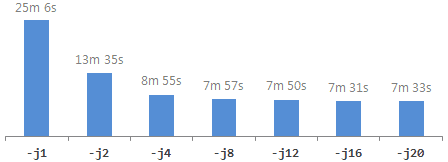
The -j4 option lets the build process spawn up to four child processes in parallel. If your machine’s CPU has at least four hardware threads, this option makes the build process run significantly faster. The main downside is that it jumbles the output messages generated during the build process. If your CPU has even more hardware threads, you can specify a higher number with -j. For comparison, I tried various numbers on a Xeon-based machine having 12 hardware threads, and got the following build times:
Be warned: I encountered a segmentation fault the first time I ran with -j4. Bad luck on my part. If that happens to you, running the same command a second time should allow the build process to finish successfully. Also, when specifying higher numbers with -j, there are often strange error messages at the end of the build process involving “jobserver tokens”, but they’re harmless.
Once that’s finished, install the new compiler:
$ make install
$ cd ..
This installs several executables to /usr/local/bin; it installs the standard C++ library’s include files to /usr/local/include/c++/4.9.2; and it installs the static standard C++ library to /usr/local/lib, among other things. Interestingly, it does not install a new standard C library! The new compiler will continue to use the existing system C library that came with Cygwin.
If, later, you decide to uninstall the new GCC compiler, you have several options:
- If you installed GCC to a directory other than
/usr/local, and that directory contains no other files, you can simply delete that directory.
- If you installed GCC to
/usr/local, and there are files from other packages mixed into the same directory tree, you can run the list_modifications.py script from this post to determine which files are safe to delete from /usr/local.
- You can simply uninstall Cygwin itself, by deleting the
C:\cygwin64 folder in Windows, along with its associated Start menu entry.
4. Test the New Compiler
All right, let’s compile some code that uses generic lambdas! Generic lambdas are part of the C++14 standard. They let you pass arguments to lambda functions as auto (or any templated type), like the one highlighted below. Create a file named test.cpp with the following contents:
#include <iostream>

int main()
{
    auto lambda = [](auto x){ return x; };
    std::cout << lambda("Hello generic lambda!\n");
    return 0;
}
You can add files to your home directory in Cygwin using any Windows-based text editor; just save them to the folder C:\cygwin64\home\Jeff (or similar) in Windows.
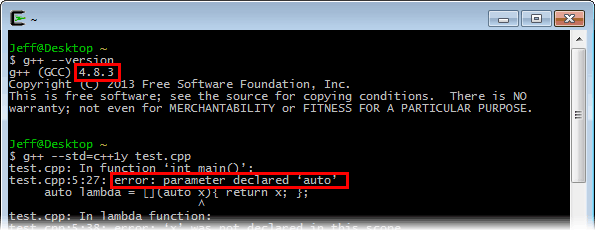
First, let’s see what happens when we try to compile it using the system GCC compiler provided by Cygwin:
$ g++ --version
$ g++ -std=c++1y test.cpp
If the system compiler version is less than 4.9, compilation will fail:
Now, let’s try it again using our freshly built GCC compiler. The new compiler is already configured to locate its include files in /usr/local/include/c++/4.9.2 and its static libraries in /usr/local/lib. All we need to do is run it:
$ g++-4.9.2 -std=c++14 test.cpp
$ ./a.exe

It works!