之前在 http://blog.csdn.net/fengbingchun/article/details/49849225 中简单介绍过使用Caffe train MNIST的文章,当时只是仿照caffe中的example实现了下,下面说一下执行流程,并精简代码到仅有10余行:
1. 先注册所有层,执行layer_factory.hpp中类LayerRegisterer的构造函数,类LayerRegistry的AddCreator和Registry静态函数;关于Caffe中Layer的注册可以参考 http://blog.csdn.net/fengbingchun/article/details/54310956
2. 指定执行mode是采用CPU还是GPU;
3. 构造SolverParameter类对象,存放Solver 参数信息;
4. 调用ReadProtoFromTextFile函数解析Solver文本文件(lenet_solver.prototxt),其文件内的各字段名需要在caffe.proto的message SolverParameter中存在,否则会解析不成功,其文件内容如下:
# The train/test net protocol buffer definition
# Proto filename for the train net, possibly combined with one or more test nets.
# train net 和 test net在同一个文件中
net: "E:/GitCode/Caffe_Test/test_data/model/mnist/lenet_train_test.prototxt"
# Solver type,采用哪种Solver优化方法
solver_type: SGD
# test_iter specifies how many forward passes the test should carry out.
# In the case of MNIST, we have test batch size 100 and 100 test iterations,
# covering the full 10,000 testing images.
# The number of iterations for each test net.
# batch size * test iter = test images,即 100 * 100 = 10000
test_iter: 100
# Carry out testing every 500 training iterations.
# The number of iterations between two testing phases.
#  指定执行多少次训练网络执行一次测试网络
test_interval: 500
# The base learning rate, momentum and the weight decay of the network.
# The base learning rate, 基础学习率
base_lr: 0.01
# The momentum value, 动量
momentum: 0.9
# The weight decay, 权值衰减
weight_decay: 0.0005
# The learning rate policy, 学习策略
lr_policy: "inv"
# The parameter to compute the learning rate,学习率计算参数
gamma: 0.0001
# The parameter to compute the learning rate,学习率计算参数
power: 0.75
# Display every 100 iterations
# the number of iterations between displaying info.
# If display = 0, no info will be displayed.
# 指定训练多少次显示一次结果信息,如loss值等
display: 100
# The maximum number of iterations,最多执行训练次数
max_iter: 10000
# snapshot intermediate results,执行多少次训练保存一次中间结果
snapshot: 5000
# The prefix for the snapshot, file save position,中间结果保存位置
snapshot_prefix: "E:/GitCode/Caffe_Test/test_data/model/mnist/lenet"
5. 将MNIST原始数据转换成LMDB数据库格式,在train和test时会使用;
6. 根据Solver type,New一个SGDSolver类对象并进行初始化操作:
(1)、调用GetSolver函数,new一个SGDSolver了对象;
(2)、调用Solver类的Init函数;
(3)、调用SolverParameter的DebugString函数打印解析后的lenet_solver.prototxt信息,输出结果如下:
test_iter: 100
test_interval: 500
base_lr: 0.01
display: 100
max_iter: 10000
lr_policy: "inv"
gamma: 0.0001
power: 0.75
momentum: 0.9
weight_decay: 0.0005
snapshot: 5000
snapshot_prefix: "E:/GitCode/Caffe_Test/test_data/model/mnist/lenet"
net: "E:/GitCode/Caffe_Test/test_data/model/mnist/lenet_train_test.prototxt"
solver_type: SGD
(4)、调用ReadNetParamsFromTextFileOrDie函数,解析lenet_train_test.prototxt文件(此文件中的各个layer段的位置不是固定的,每个layer内的各个段位置也不是固定的,它们的位置无关紧要,只是一般按照流程顺序从上到下排列),各个字段的说明如下:
name: "LeNet" # net名
layer { # memory required: (50175+64)*4=200960
  name: "mnist" # layer名字
  type: "Data" # layer类型,数据层,Data enters Caffe through data layers,read data from LEVELDB or LMDB
  top: "data" # top名字, shape: 64 1 28 28 (50175)
  top: "label" # top名字, shape: 64 (64)
  include { # 指定何时将此layer mnist包含到网络中
    phase: TRAIN # 训练阶段会将此layer mnist包含到网络中
  }
  transform_param { # 图像预处理
    scale: 0.00390625 # 对图像像素值进行scale操作,范围[0, 1)
  }
  data_param { # data parameter
    source: "E:/GitCode/Caffe_Test/test_data/MNIST/train" # 数据存放路径
    batch_size: 64 # 指定一次处理图像的数量
    backend: LMDB # 数据存储方式
  }
}
layer { # memory required: (78400+100)*4=314000
  name: "mnist" # layer名字
  type: "Data" # layer类型,数据层,Data enters Caffe through data layers,read data from LEVELDB or LMDB
  top: "data" # top名字, shape: 100 1 28 28 (78400)
  top: "label" # top名字, shape: 100 (100)
  include { # 指定何时将此layer mnist包含到网络中
    phase: TEST # 测试阶段会将此layer mnist包含到此网络中
  }
  transform_param { # 图像预处理
    scale: 0.00390625 # 对图像像素值进行scale操作,范围[0, 1)
  }
  data_param { # data parameter
    source: "E:/GitCode/Caffe_Test/test_data/MNIST/test" # 数据存放路径
    batch_size: 100 # 指定一次处理图像的数量
    backend: LMDB # 数据存储方式
  }
}
# test 阶段会创建一个layer: label_mnist_1_split,如下:
# layer_factory.hpp:75] Creating layer label_mnist_1_split
# net.cpp:110] Creating Layer label_mnist_1_split
# net.cpp:476] label_mnist_1_split <- label
# net.cpp:432] label_mnist_1_split -> label_mnist_1_split_0
# net.cpp:432] label_mnist_1_split -> label_mnist_1_split_1
# net.cpp:155] Setting up label_mnist_1_split
# net.cpp:163] Top shape: 100 (100)
# net.cpp:163] Top shape: 100 (100)
layer { # memory required: 737280*4=2949120/1152000*4=4608000
  name: "conv1" # layer名字
  type: "Convolution" # layer类型,卷积层
  bottom: "data" # bottom名字
  top: "conv1" # top名字, shape: 64 20 24 24 (737280)/100 20 24 24 (1152000)
  param { # 训练时用到的参数
    lr_mult: 1 # The multiplier on the global learning rate
  }
  param { # 训练时用到的参数
    lr_mult: 2 # The multiplier on the global learning rate
  }
  convolution_param { # convolution parameter
    num_output: 20 # 输出特征图(feature map)数量
    kernel_size: 5 # 卷积核大小(卷积核其实就是权值)
    stride: 1 # 滑动步长
    weight_filler { # The filler for the weight
      type: "xavier" # 权值使用xavier滤波
    }
    bias_filler { # The filler for the bias
      type: "constant" # 偏置使用常量滤波
    }
  }
}
layer { # memory required: 184320*4=737280/288000*4=1152000
  name: "pool1" # layer名字
  type: "Pooling" # layer类型,Pooling层
  bottom: "conv1" # bottom名字
  top: "pool1" # top名字, shape: 64 20 12 12 (184320)/ 100 20 12 12 (288000)
  pooling_param { # pooling parameter,pooling层参数
    pool: MAX # pooling方法:最大值采样
    kernel_size: 2 # 滤波器大小
    stride: 2 # 滑动步长
  }
}
layer { # memory required: 204800*4=819200/320000*4=1280000
  name: "conv2" # layer名字
  type: "Convolution" # layer类型,卷积层
  bottom: "pool1" # bottom名字
  top: "conv2" # top名字, shape: 64 50 8 8 (204800)/ 100 50 8 8 (320000)
  param { # 训练时用到的参数
    lr_mult: 1 # The multiplier on the global learning rate
  }
  param { # 训练时用到的参数
    lr_mult: 2 # The multiplier on the global learning rate
  }
  convolution_param { # convolution parameter,卷基层参数
    num_output: 50 # 输出特征图(feature map)数量
    kernel_size: 5 # 卷积核大小(卷积核其实就是权值)
    stride: 1 # 滑动步长
    weight_filler { # The filler for the weight
      type: "xavier" # 权值使用xavier滤波
    }
    bias_filler { # The filler for the bias
      type: "constant" # 偏置使用常量滤波
    }
  }
}
layer { # memory required: 51200*4=204800/80000*4=320000
  name: "pool2" # layer名字
  type: "Pooling" # layer类型,Pooling层
  bottom: "conv2" # bottom名字
  top: "pool2" # top名字, shape: 64 50 4 4 (51200)/ 100 50 4 4 (80000)
  pooling_param { # pooling parameter,卷积层参数
    pool: MAX # pooling方法:最大值采样
    kernel_size: 2 # 滤波器大小
    stride: 2 # 滑动步长
  }
}
layer { # memory required: 32000*4=128000/50000*4=200000
  name: "ip1" # layer名字
  type: "InnerProduct" # layer类型,全连接层
  bottom: "pool2" # bottom名字
  top: "ip1" # top名字, shape: 64 500 (32000)/ 100 500 (50000)
  param { # 训练时用到的参数
    lr_mult: 1 # The multiplier on the global learning rate
  }
  param { # 训练时用到的参数
    lr_mult: 2 # The multiplier on the global learning rate
  }
  inner_product_param { # 全连接层参数
    num_output: 500 # 输出特征图(feature map)数量
    weight_filler { # The filler for the weight
      type: "xavier" # 权值使用xavier滤波
    }
    bias_filler { # The filler for the bias
      type: "constant" # 偏置使用常量滤波
    }
  }
}
# ReLU: Given an input value x, The ReLU layer computes the output as x if x > 0 and
# negative_slope * x if x <= 0. When the negative slope parameter is not set,
# it is equivalent to the standard ReLU function of taking max(x, 0).
# It also supports in-place computation, meaning that the bottom and
# the top blob could be the same to preserve memory consumption
layer { # memory required: 32000*4=128000/50000*4=200000
  name: "relu1" # layer名字
  type: "ReLU" # layer类型
  bottom: "ip1" # bottom名字
  top: "ip1" # top名字 (in-place), shape: 64 500 (32000)/ 100 500 (50000)
}
layer { # memory required: 640*4=2560/1000*4=4000
  name: "ip2" # layer名字
  type: "InnerProduct" # layer类型,全连接层
  bottom: "ip1" # bottom名字
  top: "ip2" # top名字, shape: 64 10 (640)/ 100 10 (1000)
  param { # 训练时用到的参数
    lr_mult: 1 # The multiplier on the global learning rate
  }
  param { # 训练时用到的参数
    lr_mult: 2 # The multiplier on the global learning rate
  }
  inner_product_param { # 全连接层参数
    num_output: 10 # 输出特征图(feature map)数量
    weight_filler { # The filler for the weight
      type: "xavier" # 权值使用xavier滤波
    }
    bias_filler { # The filler for the bias
      type: "constant" # 偏置使用常量滤波
    }
  }
}
# test阶段会创建一个layer: ip2_ip2_0_split,如下:
# layer_factory.hpp:75] Creating layer ip2_ip2_0_split
# net.cpp:110] Creating Layer ip2_ip2_0_split
# net.cpp:476] ip2_ip2_0_split <- ip2
# net.cpp:432] ip2_ip2_0_split -> ip2_ip2_0_split_0
# net.cpp:432] ip2_ip2_0_split -> ip2_ip2_0_split_1
# net.cpp:155] Setting up ip2_ip2_0_split
# net.cpp:163] Top shape: 100 10 (1000)
# net.cpp:163] Top shape: 100 10 (1000)
layer { # memory required: 1*4=4
  name: "accuracy" # layer名字
  type: "Accuracy" # layer类型,计算输出准确率
  bottom: "ip2" # bottom名字
  bottom: "label" # bottom名字
  top: "accuracy" # top名字, shape: (1)
  include { # 指定何时将此layer accuracy包含到网络中
    phase: TEST # 测试阶段会将此layer accuracy包含到此网络中
  }
}
# SoftmaxWithLoss: Computes the multinomial logistic loss for a one-of-many
# classification task, passing real-valued predictions through a
# softmax to get a probability distribution over classes.
layer { # memory required: 1*4=4/1*4=4
  name: "loss" # layer名字
  type: "SoftmaxWithLoss" # layer类型
  bottom: "ip2" # bottom名字
  bottom: "label" # bottom名字
  top: "loss" # top名字, shape: (1)/ (1)
}

# 在训练网络中,占用总内存大小为:200960+2949120+737280+819200+204800+128000+128000+2560+4=5169924
# 在测试网络中,占用总内存大小为:314000+(100+100)*4+4608000+1152000+1280000+320000+200000+200000+4000+(1000+1000)*4+4+4=8086808
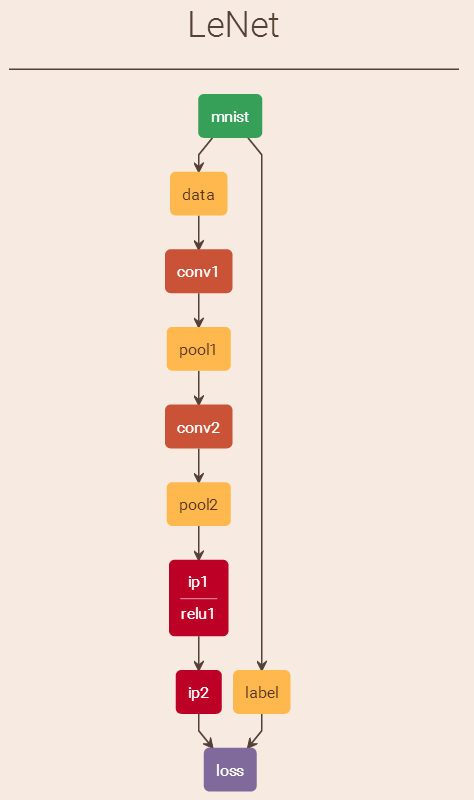
lenet_train_test.prototxt可视化结果如下图(
http://ethereon.github.io/netscope/quickstart.html):此视图给出的是train阶段时的流程图,不包括测试阶段:
(5)、创建训练网络Net对象,并调用Net类的InitTrainNet函数构建训练网络,训练网络输出结果如下:
name: "LeNet"
state {
  phase: TRAIN
}
layer {
  name: "mnist"
  type: "Data"
  top: "data"
  top: "label"
  include {
    phase: TRAIN
  }
  transform_param {
    scale: 0.00390625
  }
  data_param {
    source: "E:/GitCode/Caffe_Test/test_data/MNIST/train"
    batch_size: 64
    backend: LMDB
  }
}
layer {
  name: "conv1"
  type: "Convolution"
  bottom: "data"
  top: "conv1"
  param {
    lr_mult: 1
  }
  param {
    lr_mult: 2
  }
  convolution_param {
    num_output: 20
    kernel_size: 5
    stride: 1
    weight_filler {
      type: "xavier"
    }
    bias_filler {
      type: "constant"
    }
  }
}
layer {
  name: "pool1"
  type: "Pooling"
  bottom: "conv1"
  top: "pool1"
  pooling_param {
    pool: MAX
    kernel_size: 2
    stride: 2
  }
}
layer {
  name: "conv2"
  type: "Convolution"
  bottom: "pool1"
  top: "conv2"
  param {
    lr_mult: 1
  }
  param {
    lr_mult: 2
  }
  convolution_param {
    num_output: 50
    kernel_size: 5
    stride: 1
    weight_filler {
      type: "xavier"
    }
    bias_filler {
      type: "constant"
    }
  }
}
layer {
  name: "pool2"
  type: "Pooling"
  bottom: "conv2"
  top: "pool2"
  pooling_param {
    pool: MAX
    kernel_size: 2
    stride: 2
  }
}
layer {
  name: "ip1"
  type: "InnerProduct"
  bottom: "pool2"
  top: "ip1"
  param {
    lr_mult: 1
  }
  param {
    lr_mult: 2
  }
  inner_product_param {
    num_output: 500
    weight_filler {
      type: "xavier"
    }
    bias_filler {
      type: "constant"
    }
  }
}
layer {
  name: "relu1"
  type: "ReLU"
  bottom: "ip1"
  top: "ip1"
}
layer {
  name: "ip2"
  type: "InnerProduct"
  bottom: "ip1"
  top: "ip2"
  param {
    lr_mult: 1
  }
  param {
    lr_mult: 2
  }
  inner_product_param {
    num_output: 10
    weight_filler {
      type: "xavier"
    }
    bias_filler {
      type: "constant"
    }
  }
}
layer {
  name: "loss"
  type: "SoftmaxWithLoss"
  bottom: "ip2"
  bottom: "label"
  top: "loss"
}
(6)、创建测试网络Net对象,并调用Net类的InitTestNets函数构建测试网络,测试网络输出结果如下:
name: "LeNet"
state {
  phase: TEST
}
layer {
  name: "mnist"
  type: "Data"
  top: "data"
  top: "label"
  include {
    phase: TEST
  }
  transform_param {
    scale: 0.00390625
  }
  data_param {
    source: "E:/GitCode/Caffe_Test/test_data/MNIST/test"
    batch_size: 100
    backend: LMDB
  }
}
layer {
  name: "conv1"
  type: "Convolution"
  bottom: "data"
  top: "conv1"
  param {
    lr_mult: 1
  }
  param {
    lr_mult: 2
  }
  convolution_param {
    num_output: 20
    kernel_size: 5
    stride: 1
    weight_filler {
      type: "xavier"
    }
    bias_filler {
      type: "constant"
    }
  }
}
layer {
  name: "pool1"
  type: "Pooling"
  bottom: "conv1"
  top: "pool1"
  pooling_param {
    pool: MAX
    kernel_size: 2
    stride: 2
  }
}
layer {
  name: "conv2"
  type: "Convolution"
  bottom: "pool1"
  top: "conv2"
  param {
    lr_mult: 1
  }
  param {
    lr_mult: 2
  }
  convolution_param {
    num_output: 50
    kernel_size: 5
    stride: 1
    weight_filler {
      type: "xavier"
    }
    bias_filler {
      type: "constant"
    }
  }
}
layer {
  name: "pool2"
  type: "Pooling"
  bottom: "conv2"
  top: "pool2"
  pooling_param {
    pool: MAX
    kernel_size: 2
    stride: 2
  }
}
layer {
  name: "ip1"
  type: "InnerProduct"
  bottom: "pool2"
  top: "ip1"
  param {
    lr_mult: 1
  }
  param {
    lr_mult: 2
  }
  inner_product_param {
    num_output: 500
    weight_filler {
      type: "xavier"
    }
    bias_filler {
      type: "constant"
    }
  }
}
layer {
  name: "relu1"
  type: "ReLU"
  bottom: "ip1"
  top: "ip1"
}
layer {
  name: "ip2"
  type: "InnerProduct"
  bottom: "ip1"
  top: "ip2"
  param {
    lr_mult: 1
  }
  param {
    lr_mult: 2
  }
  inner_product_param {
    num_output: 10
    weight_filler {
      type: "xavier"
    }
    bias_filler {
      type: "constant"
    }
  }
}
layer {
  name: "accuracy"
  type: "Accuracy"
  bottom: "ip2"
  bottom: "label"
  top: "accuracy"
  include {
    phase: TEST
  }
}
layer {
  name: "loss"
  type: "SoftmaxWithLoss"
  bottom: "ip2"
  bottom: "label"
  top: "loss"
}
(7)、调用SGDSolver类的PreSolve函数。
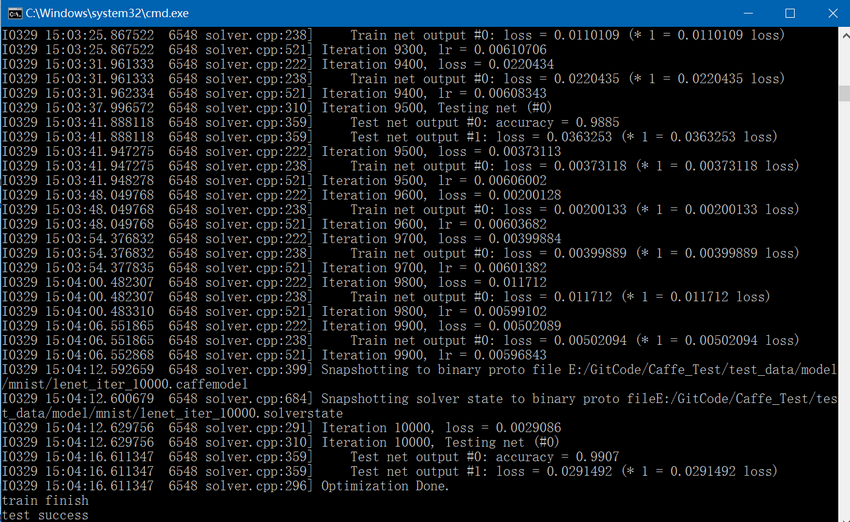
7. 调用Solver类的Solve函数开始进行训练和测试:
(1)、当训练次数是500的倍数时(在lenet_solver.prototxt中设置test_interval为500),执行一次测试网络的Forward计算,循环100次(在lenet_solver.prototxt中设置test_iter为100,在lenet_train_test.prototxt文件中,测试阶段batch size为100,这样100*100=10000正好覆盖到所有的测试图像),测试网络最终会有两个结果输出,一个是accuracy,一个是loss;
(2)、执行一次训练网络的ForwardBackward计算,训练网络最终会有一个结果输出即loss;
(3)、更新训练网络的权值和偏置;
(4)、每训练5000次(在lenet_solver.prototxt中设置snapshot为5000)保存一次结果,包括.caffemodel和.caffestate;
(5)、按照以上(1)、(2)、(3)、(4)中的步骤,循环执行10000次(在lenet_solver.prototxt中设置max_iter为10000)。
精简后的mnist train代码如下:
#include "funset.hpp"
#include "common.hpp"

int mnist_train()
{
	caffe::Caffe::set_mode(caffe::Caffe::CPU);

	const std::string filename{ "E:/GitCode/Caffe_Test/test_data/model/mnist/lenet_solver.prototxt" };
	caffe::SolverParameter solver_param;
	if (!caffe::ReadProtoFromTextFile(filename.c_str(), &solver_param)) {
		fprintf(stderr, "parse solver.prototxt fail\n");
		return -1;
	}

	mnist_convert(); // convert MNIST to LMDB

	boost::shared_ptr<caffe::Solver<float> > solver(caffe::GetSolver<float>(solver_param));
	solver->Solve();

	fprintf(stderr, "train finish\n");
	return 0;
}
train最终结果如下:
GitHub:https://github.com/fengbingchun/Caffe_Test