Mediacodec 如何硬件解码到纹理的
背景:
网上很多关于mediacodec,surface ,surfacetexture的源码分析,以及内部原理,但是都局限于各自的内容,今天我们就从mediacodec硬件解码到纹理,以及外部纹理到底是什么角度的来分析源码。
mediacodec
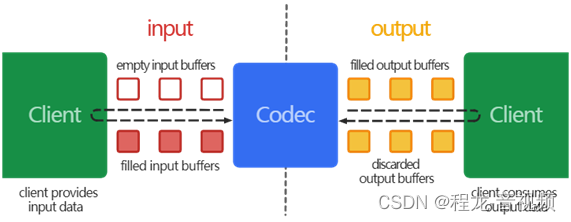
这是googl官网提供的一张图https://developer.android.com/reference/android/media/MediaCodec,
大体上是生产者消费者之间的关系。
解码过程如下:
| Java
MediaCodec codec = MediaCodec.createByCodecName(name);
codec.configure(format, …);
MediaFormat outputFormat = codec.getOutputFormat(); // option B
codec.start();
for (;;) {
int inputBufferId = codec.dequeueInputBuffer(timeoutUs);
if (inputBufferId >= 0) {
ByteBuffer inputBuffer = codec.getInputBuffer(…);
// fill inputBuffer with valid data
…
codec.queueInputBuffer(inputBufferId, …);
}
int outputBufferId = codec.dequeueOutputBuffer(…);
if (outputBufferId >= 0) {
ByteBuffer outputBuffer = codec.getOutputBuffer(outputBufferId);
MediaFormat bufferFormat = codec.getOutputFormat(outputBufferId); // option A
// bufferFormat is identical to outputFormat
// outputBuffer is ready to be processed or rendered.
…
codec.releaseOutputBuffer(outputBufferId, …);
} else if (outputBufferId == MediaCodec.INFO_OUTPUT_FORMAT_CHANGED) {
// Subsequent data will conform to new format.
// Can ignore if using getOutputFormat(outputBufferId)
outputFormat = codec.getOutputFormat(); // option B
}
}
codec.stop();
codec.release(); |
因为我们要分析渲染到纹理的过程,我就着重看下releaseOutputBuffer这个方法
releaseOutputBuffer
| Java
public void releaseOutputBuffer (int index,
boolean render)
/*
If you are done with a buffer, use this call to return the buffer to the codec or to render it on the output surface. If you configured the codec with an output surface, setting render to true will first send the buffer to that output surface. The surface will release the buffer back to the codec once it is no longer used/displayed. Once an output buffer is released to the codec, it MUST NOT be used until it is later retrieved by getOutputBuffer(int) in response to a dequeueOutputBuffer(MediaCodec.BufferInfo, long) return value or a Callback#onOutputBufferAvailable callback.
Parameters
indexint: The index of a client-owned output buffer previously returned from a call to dequeueOutputBuffer(MediaCodec.BufferInfo, long).
renderboolean: If a valid surface was specified when configuring the codec, passing true renders this output buffer to the surface.
*/ |
可以看的到当render=true的时候就会渲染到surface,那我结合android framework的源码来跟下这个代码到底做了些什么
https://android.googlesource.com/platform/frameworks/base/+/master/media/jni/android_media_MediaCodec.cpp
| C++
status_t JMediaCodec::releaseOutputBuffer(
size_t index, bool render, bool updatePTS, int64_t timestampNs) {
if (updatePTS) {
return mCodec->renderOutputBufferAndRelease(index, timestampNs);
}
return render
? mCodec->renderOutputBufferAndRelease(index)
: mCodec->releaseOutputBuffer(index);
} |
可以看的出来当render=true的时候,调用的是renderOutputBufferAndRelease,那接下来我们来看下renderOutputBufferAndRelease他的源码
renderOutputBufferAndRelease
| C++
status_t MediaCodec::renderOutputBufferAndRelease(size_t index, int64_t timestampNs) {
sp<AMessage> msg = new AMessage(kWhatReleaseOutputBuffer, this);
msg->setSize("index", index);
msg->setInt32("render", true);
msg->setInt64("timestampNs", timestampNs);
sp<AMessage> response;
return PostAndAwaitResponse(msg, &response);
} |
mediacodec在start的时候会起一个线程,这里会这个解码线程发送一个消息,并设置msg->setInt32("render", true);那我们就看下它的接收方是怎么做的
| C++
void MediaCodec::onMessageReceived(const sp<AMessage> &msg) {
switch (msg->what()) {
....
case kWhatReleaseOutputBuffer:
{
sp<AReplyToken> replyID;
CHECK(msg->senderAwaitsResponse(&replyID));
status_t err = onReleaseOutputBuffer(msg);
PostReplyWithError(replyID, err);
break;
}
.........
}
} |
接着看下onReleaseOutputBuffer这个
onReleaseOutputBuffer
| C++
tatus_t MediaCodec::onReleaseOutputBuffer(const sp<AMessage> &msg) {
size_t index;
CHECK(msg->findSize("index", &index));
int32_t render;
if (!msg->findInt32("render", &render)) {
render = 0;
}
if (index >= mPortBuffers[kPortIndexOutput].size()) {
return -ERANGE;
}
BufferInfo *info = &mPortBuffers[kPortIndexOutput][index];
if (info->mData == nullptr || !info->mOwnedByClient) {
return -EACCES;
}
// synchronization boundary for getBufferAndFormat
sp<MediaCodecBuffer> buffer;
if (render && buffer->size() != 0) {
......
status_t err = mBufferChannel->renderOutputBuffer(buffer, renderTimeNs);
if (err == NO_INIT) {
ALOGE("rendering to non-initilized(obsolete) surface");
return err;
}
if (err != OK) {
ALOGI("rendring output error %d", err);
}
}
return OK;
}
|
最终调用这个mBufferChannel->renderOutputBuffer(buffer, renderTimeNs),也就是mBufferChannel就是ACodecBufferChannel 这里就不去跟代码分析了,也就是我们要去找它对应的
ACodecBufferChannel::renderOutputBuffer
| C++
status_t ACodecBufferChannel::renderOutputBuffer(
const sp<MediaCodecBuffer> &buffer, int64_t timestampNs) {
std::shared_ptr<const std::vector<const BufferInfo>> array(
std::atomic_load(&mOutputBuffers));
BufferInfoIterator it = findClientBuffer(array, buffer);
if (it == array->end()) {
return -ENOENT;
}
ALOGV("renderOutputBuffer #%d", it->mBufferId);
sp<AMessage> msg = mOutputBufferDrained->dup();
msg->setObject("buffer", buffer);
msg->setInt32("buffer-id", it->mBufferId);
msg->setInt32("render", true);
msg->setInt64("timestampNs", timestampNs);
msg->post();
return OK;
} |
可以看下mOutputBufferDrained这个是来自哪里
| C++
ACodecBufferChannel::ACodecBufferChannel(
const sp<AMessage> &inputBufferFilled, const sp<AMessage> &outputBufferDrained)
: mInputBufferFilled(inputBufferFilled),
mOutputBufferDrained(outputBufferDrained),
mHeapSeqNum(-1) {
}
std::shared_ptr<BufferChannelBase> ACodec::getBufferChannel() {
if (!mBufferChannel) {
mBufferChannel = std::make_shared<ACodecBufferChannel>(
new AMessage(kWhatInputBufferFilled, this),
new AMessage(kWhatOutputBufferDrained, this));
}
return mBufferChannel;
}
status_t MediaCodec::init(const AString &name) {
..............
mBufferChannel = mCodec->getBufferChannel();
mBufferChannel->setCallback(
std::unique_ptr<CodecBase::BufferCallback>(
new BufferCallback(new AMessage(kWhatCodecNotify, this))));
} |
也就是说mOutputBufferDrained = new AMessage(kWhatOutputBufferDrained, this)
因此sp<AMessage> msg = mOutputBufferDrained->dup(); 的消息发送到了ACodec里边,那我们就看下消息接收方
| C++
bool ACodec::BaseState::onMessageReceived(const sp<AMessage> &msg) {
switch (msg->what()) {
case kWhatOutputBufferDrained:
{
onOutputBufferDrained(msg);
break;
}
} |
代码又来了到了onOutputBufferDrained
ACodec::onOutputBufferDrained
| C++
void ACodec::BaseState::onOutputBufferDrained(const sp<AMessage> &msg) {
IOMX::buffer_id bufferID;
CHECK(msg->findInt32("buffer-id", (int32_t*)&bufferID));
sp<RefBase> obj;
CHECK(msg->findObject("buffer", &obj));
sp<MediaCodecBuffer> buffer = static_cast<MediaCodecBuffer *>(obj.get());
int32_t discarded = 0;
msg->findInt32("discarded", &discarded);
info->mData = buffer;
int32_t render;
.........
err = mCodec->mNativeWindow->queueBuffer(
mCodec->mNativeWindow.get(), info->mGraphicBuffer.get(), info->mFenceFd);
.........
}
|
mNativeWindow来自于你创建解码器通过texture-》创建的surfacetexture,又通过surfacetexture创建surface的native层结构就是mNativeWindow,mNativeWindow即使surfacetexture的生产者
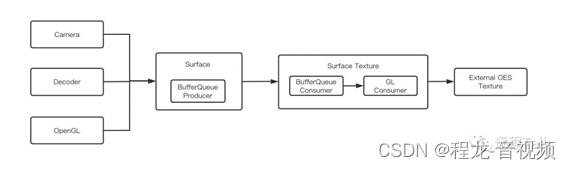
借用网络上的一张图,可以看的出来mNativeWindow对应的就是surface,mNativeWindow->queueBuffer 就是生产者入队一帧,这一帧的数据是由解码器产生的,接下来我们就看下怎么入队的
| C++
int Surface::queueBuffer(android_native_buffer_t* buffer, int fenceFd) {
ATRACE_CALL();
ALOGV("Surface::queueBuffer");
Mutex::Autolock lock(mMutex);
int64_t timestamp;
bool isAutoTimestamp = false;
.........
int i = getSlotFromBufferLocked(buffer);
nsecs_t now = systemTime();
status_t err = mGraphicBufferProducer->queueBuffer(i, input, &output);
mLastQueueDuration = systemTime() - now;
if (err != OK) {
ALOGE("queueBuffer: error queuing buffer to SurfaceTexture, %d", err);
}
............
return err;
}
|
也就是最终mGraphicBufferProducer->queueBuffer把这个解码器输出数据给入队, 解码器输出的数据在一开始创建解码器的时候,从nativewidow->dequeue出来的数据
BufferQueueProducer::queueBuffer
| C++
status_t BufferQueueProducer::queueBuffer(int slot,
const QueueBufferInput &input, QueueBufferOutput *output) {
ATRACE_CALL();
ATRACE_BUFFER_INDEX(slot);
..........................
item.mAcquireCalled = mSlots[slot].mAcquireCalled;
item.mGraphicBuffer = mSlots[slot].mGraphicBuffer;
item.mCrop = crop;
item.mTransform = transform &
~static_cast<uint32_t>(NATIVE_WINDOW_TRANSFORM_INVERSE_DISPLAY);
item.mTransformToDisplayInverse =
(transform & NATIVE_WINDOW_TRANSFORM_INVERSE_DISPLAY) != 0;
item.mScalingMode = static_cast<uint32_t>(scalingMode);
item.mTimestamp = requestedPresentTimestamp;
item.mIsAutoTimestamp = isAutoTimestamp;
item.mDataSpace = dataSpace;
item.mHdrMetadata = hdrMetadata;
item.mFrameNumber = currentFrameNumber;
item.mSlot = slot;
item.mFence = acquireFence;
item.mFenceTime = acquireFenceTime;
item.mIsDroppable = mCore->mAsyncMode ||
(mConsumerIsSurfaceFlinger && mCore->mQueueBufferCanDrop) ||
(mCore->mLegacyBufferDrop && mCore->mQueueBufferCanDrop) ||
(mCore->mSharedBufferMode && mCore->mSharedBufferSlot == slot);
item.mSurfaceDamage = surfaceDamage;
item.mQueuedBuffer = true;
item.mAutoRefresh = mCore->mSharedBufferMode && mCore->mAutoRefresh;
item.mApi = mCore->mConnectedApi;
mStickyTransform = stickyTransform;
output->bufferReplaced = false;
if (mCore->mQueue.empty()) {
// When the queue is empty, we can ignore mDequeueBufferCannotBlock
// and simply queue this buffer
mCore->mQueue.push_back(item);
frameAvailableListener = mCore->mConsumerListener;
} else {
.......
mCore->mQueue.push_back(item);
frameAvailableListener = mCore->mConsumerListener;
.......
}
........
if (frameAvailableListener != nullptr) {
frameAvailableListener->onFrameAvailable(item);
}
}
return NO_ERROR;
}
|
会把这块显存最终 mCore->mQueue.push_back(item) 放入到对队列中,最终通过 frameAvailableListener->onFrameAvailable(item) ,去一层一层的通知到Java层的QSurfaceTexture创建的设置的onFrameAvailable回调,最终通知调用我有一帧数据准备好了,你可以用QSurfaceTexture.updateTexImage()来更新数据到纹理上了,接下来我们就看下是怎么更新纹理的
如何更新到纹理的
QSurfaceTexture.updateTexImage()
| C++
status_t SurfaceTexture::updateTexImage() {
ATRACE_CALL();
SFT_LOGV("updateTexImage");
Mutex::Autolock lock(mMutex);
if (mAbandoned) {
SFT_LOGE("updateTexImage: SurfaceTexture is abandoned!");
return NO_INIT;
}
return mEGLConsumer.updateTexImage(*this);
} |
接下来看下mEGLConsumer.updateTexImage
EGLConsumer::updateTexImage
| C++
status_t EGLConsumer::updateTexImage(SurfaceTexture& st){
BufferItem item;
// Acquire the next buffer.
// In asynchronous mode the list is guaranteed to be one buffer
// deep, while in synchronous mode we use the oldest buffer.
err = st.acquireBufferLocked(&item, 0);
.......
// Release the previous buffer.
err = updateAndReleaseLocked(item, nullptr, st);
........
// Bind the new buffer to the GL texture, and wait until it's ready.
return bindTextureImageLocked(st);
} |
接下来重点分析下这3个方法到底是干什么的吧
st.acquireBufferLocked
| C++
status_t ConsumerBase::acquireBufferLocked(BufferItem *item,
nsecs_t presentWhen, uint64_t maxFrameNumber) {
if (mAbandoned) {
CB_LOGE("acquireBufferLocked: ConsumerBase is abandoned!");
return NO_INIT;
}
status_t err = mConsumer->acquireBuffer(item, presentWhen, maxFrameNumber);
if (err != NO_ERROR) {
return err;
}
if (item->mGraphicBuffer != nullptr) {
if (mSlots[item->mSlot].mGraphicBuffer != nullptr) {
freeBufferLocked(item->mSlot);
}
mSlots[item->mSlot].mGraphicBuffer = item->mGraphicBuffer;
}
mSlots[item->mSlot].mFrameNumber = item->mFrameNumber;
mSlots[item->mSlot].mFence = item->mFence;
CB_LOGV("acquireBufferLocked: -> slot=%d/%" PRIu64,
item->mSlot, item->mFrameNumber);
return OK;
} |
这个正好跟上边入队对上了, 这里从消费者这里取出这个item,item包含了上述中这个mGraphicBuffer,接下来我们看下另外一个接口updateAndReleaseLocked
updateAndReleaseLocked
| C++
status_t EGLConsumer::updateAndReleaseLocked(const BufferItem& item, PendingRelease* pendingRelease,
SurfaceTexture& st) {
status_t err = NO_ERROR;
int slot = item.mSlot;
........
err = mEglSlots[slot].mEglImage->createIfNeeded(mEglDisplay);
if (err != NO_ERROR) {
EGC_LOGW("updateAndRelease: unable to createImage on display=%p slot=%d", mEglDisplay,
slot);
st.releaseBufferLocked(slot, st.mSlots[slot].mGraphicBuffer, mEglDisplay, EGL_NO_SYNC_KHR);
return UNKNOWN_ERROR;
}
...................
sp<EglImage> nextTextureImage = mEglSlots[slot].mEglImage;
mCurrentTextureImage = nextTextureImage;
return err;
}
status_t EGLConsumer::EglImage::createIfNeeded(EGLDisplay eglDisplay, bool forceCreation) {
// If there's an image and it's no longer valid, destroy it.
.......
mEglImage = createImage(mEglDisplay, mGraphicBuffer);
........
return OK;
}
EGLImageKHR EGLConsumer::EglImage::createImage(EGLDisplay dpy,
const sp<GraphicBuffer>& graphicBuffer) {
EGLClientBuffer cbuf = static_cast<EGLClientBuffer>(graphicBuffer->getNativeBuffer());
const bool createProtectedImage =
(graphicBuffer->getUsage() & GRALLOC_USAGE_PROTECTED) && hasEglProtectedContent();
EGLint attrs[] = {
EGL_IMAGE_PRESERVED_KHR,
EGL_TRUE,
createProtectedImage ? EGL_PROTECTED_CONTENT_EXT : EGL_NONE,
createProtectedImage ? EGL_TRUE : EGL_NONE,
EGL_NONE,
};
eglInitialize(dpy, nullptr, nullptr);
EGLImageKHR image =
eglCreateImageKHR(dpy, EGL_NO_CONTEXT, EGL_NATIVE_BUFFER_ANDROID, cbuf, attrs);
if (image == EGL_NO_IMAGE_KHR) {
EGLint error = eglGetError();
ALOGE("error creating EGLImage: %#x", error);
eglTerminate(dpy);
}
return image;
}
|
接下来重点看下eglCreateImageKHR
eglCreateImageKHR
| C++
EGLAPI EGLImageKHR EGLAPIENTRY eglCreateImageKHR(EGLDisplay dpy, EGLContext ctx, EGLenum target, EGLClientBuffer buffer, const EGLint *attrib_list)
{
return egl::CreateImageKHR(dpy, ctx, target, buffer, attrib_list);
} |
| C++
EGLImageKHR CreateImageKHR(EGLDisplay dpy, EGLContext ctx, EGLenum target, EGLClientBuffer buffer, const EGLint *attrib_list)
{
TRACE("(EGLDisplay dpy = %p, EGLContext ctx = %p, EGLenum target = 0x%X, buffer = %p, const EGLint attrib_list = %p)", dpy, ctx, target, buffer, attrib_list);
egl::Display *display = egl::Display::get(dpy);
egl::Context *context = static_cast<egl::Context*>(ctx);
.................
GLuint name = static_cast<GLuint>(reinterpret_cast<uintptr_t>(buffer));
if(name == 0)
{
return error(EGL_BAD_PARAMETER, EGL_NO_IMAGE_KHR);
}
if(target == EGL_NATIVE_BUFFER_ANDROID)
{
ANativeWindowBuffer *nativeBuffer = reinterpret_cast<ANativeWindowBuffer*>(buffer);
if(!nativeBuffer || GLPixelFormatFromAndroid(nativeBuffer->format) == GL_NONE)
{
ALOGW("%s badness unsupported HAL format=%x", __FUNCTION__, nativeBuffer ? nativeBuffer->format : 0);
return error(EGL_BAD_ATTRIBUTE, EGL_NO_IMAGE_KHR);
}
Image *image = new AndroidNativeImage(nativeBuffer);
EGLImageKHR eglImage = display->createSharedImage(image);
return success(eglImage);
}
return success(eglImage);
}
EGLImageKHR Display::createSharedImage(Image *image)
{
return reinterpret_cast<EGLImageKHR>((intptr_t)mSharedImageNameSpace.allocate(image));
} |
经过上边的源码可以看的出来updateAndReleaseLocked 最终把一个grapicbuffer转换成了 EGLImageKHR 记录在了mEglSlots[slot].mEglImage,也就是mCurrentTextureImage,这个mCurrentTextureImage 在接下来纹理绑定也是直管重要的,那我们就在回到bindTextureImageLocked
bindTextureImageLocked
| C++
status_t EGLConsumer::bindTextureImageLocked(SurfaceTexture& st) {
if (mEglDisplay == EGL_NO_DISPLAY) {
ALOGE("bindTextureImage: invalid display");
return INVALID_OPERATION;
}
glBindTexture(st.mTexTarget, st.mTexName);
if (st.mCurrentTexture == BufferQueue::INVALID_BUFFER_SLOT && mCurrentTextureImage == nullptr) {
EGC_LOGE("bindTextureImage: no currently-bound texture");
return NO_INIT;
}
........................
mCurrentTextureImage->bindToTextureTarget(st.mTexTarget);
........................
// Wait for the new buffer to be ready.
return doGLFenceWaitLocked(st);
}
|
glBindTexture
| C++
GL_APICALL void GL_APIENTRY glBindTexture(GLenum target, GLuint texture)
{
return es2::BindTexture(target, texture);
}
void BindTexture(GLenum target, GLuint texture)
{
TRACE("(GLenum target = 0x%X, GLuint texture = %d)", target, texture);
es2::Context *context = es2::getContext();
if(context)
{
switch(target)
{
case GL_TEXTURE_EXTERNAL_OES:
context->bindTextureExternal(texture);
break;
}
}
}
void Context::bindTextureExternal(GLuint texture)
{
mResourceManager->checkTextureAllocation(texture, TEXTURE_EXTERNAL);
mState.samplerTexture[TEXTURE_EXTERNAL][mState.activeSampler] = getTexture(texture);
}
void ResourceManager::checkTextureAllocation(GLuint texture, TextureType type)
{
if(!getTexture(texture) && texture != 0)
{
Texture *textureObject;
if(type == TEXTURE_2D)
{
textureObject = new Texture2D(texture);
}
else if(type == TEXTURE_CUBE)
{
textureObject = new TextureCubeMap(texture);
}
else
{
UNREACHABLE(type);
return;
}
mTextureMap[texture] = textureObject;
textureObject->addRef();
}
}
|
接下来看下bindToTextureTarget的实现
bindToTextureTarget
| C++
void EGLConsumer::EglImage::bindToTextureTarget(uint32_t texTarget) {
glEGLImageTargetTexture2DOES(texTarget, static_cast<GLeglImageOES>(mEglImage));
}
GL_APICALL void GL_APIENTRY glEGLImageTargetTexture2DOES(GLenum target, GLeglImageOES image)
{
return es2::EGLImageTargetTexture2DOES(target, image);
}
void EGLImageTargetTexture2DOES(GLenum target, GLeglImageOES image)
{
es2::Context *context = es2::getContext();
if(context)
{
es2::Texture2D *texture = nullptr;
switch(target)
{
case GL_TEXTURE_2D: texture = context->getTexture2D(); break;
case GL_TEXTURE_EXTERNAL_OES: texture = context->getTextureExternal(); break;
default: UNREACHABLE(target);
}
egl::Image *eglImage = context->getSharedImage(image);
if(!eglImage)
{
return error(GL_INVALID_OPERATION);
}
texture->setSharedImage(eglImage);
}
}
|
texTarget在surfacetexturenatice层创建的时候就已经确定好了GL_TEXTURE_EXTERNAL_OES
context->getSharedImage(image); 把上边创建的好的image给取出来,然后把这块数据通过 texture->setSharedImage(eglImage),替换texture内部的数据。
总结:
至此分析到这,大家可以清晰看出来的,外部纹理到底是怎么回事了,本质就是把外部一块显存转化为纹理的内部的显存使用,对于大家以后使用外部纹理可以更放使用了
为什么当使用外部纹理的时候需要用GL_TEXTURE_EXTERNAL_OES进行绑定
通过上边的分析我们知道在surfacetexture内部绑定纹理的是GL_TEXTURE_EXTERNAL_OES,在context专门为外部纹理建立了缓存,当我们使用这个纹理作为输入纹理的,如果不是在OES则会直接找不到这个纹理,导致渲染效果异常
| C++
mResourceManager->checkTextureAllocation(texture, TEXTURE_EXTERNAL);
mState.samplerTexture[TEXTURE_EXTERNAL][mState.activeSampler] = getTexture(texture);
|
本文内容由网友自发贡献,版权归原作者所有,本站不承担相应法律责任。如您发现有涉嫌抄袭侵权的内容,请联系:hwhale#tublm.com(使用前将#替换为@)