1. kubectl使用
官方文档:
https://kubernetes.io/zh-cn/docs/reference/kubectl/
https://kubernetes.io/zh-cn/docs/reference/kubectl/cheatsheet/
https://kubernetes.io/docs/reference/generated/kubectl/kubectl-commands#get
1. 常用命令
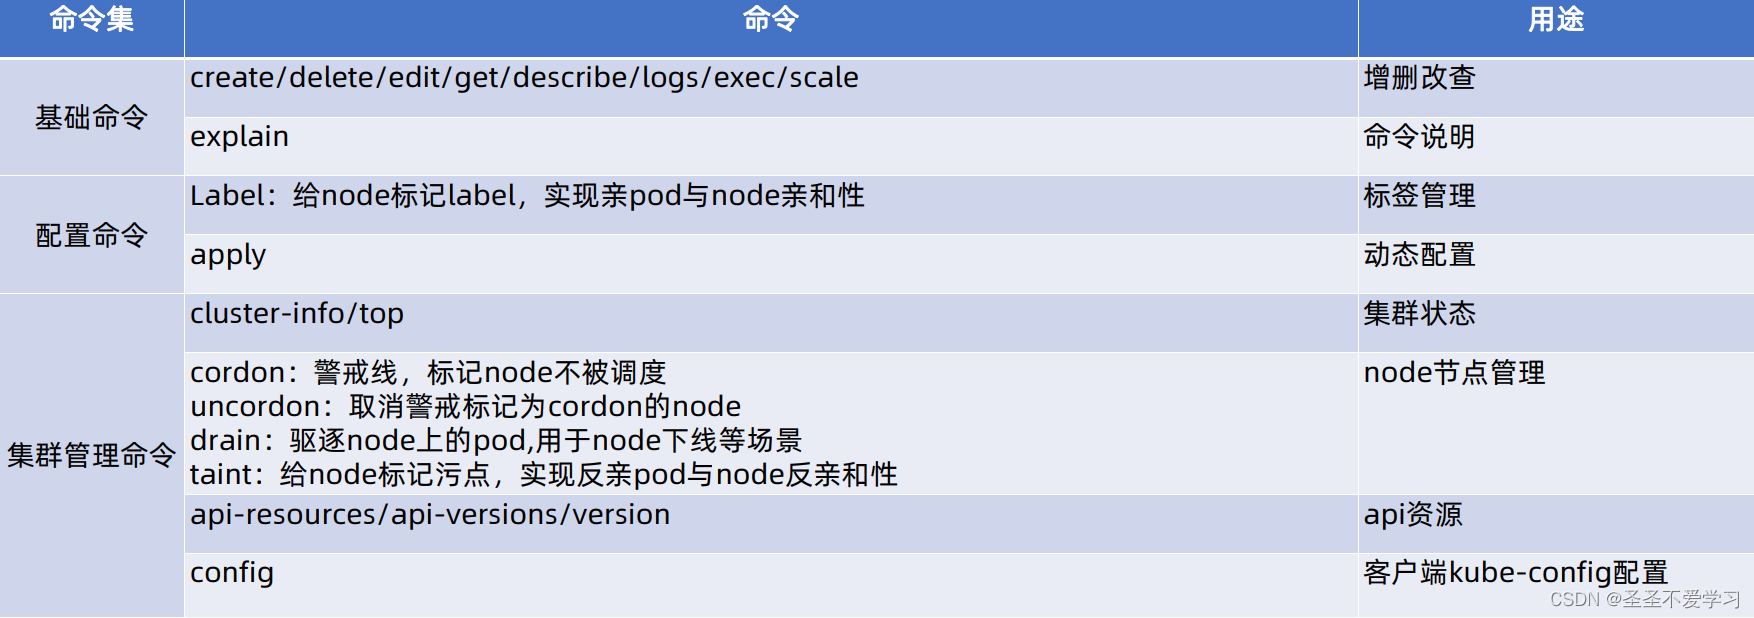
2. 基础命令
2.1 explain
当我们不知道如何管理一个资源(yaml)的时候,可以通过这个参数获取帮助
[root@k8s-harbor01 ~]
KIND: Pod
VERSION: v1
DESCRIPTION:
Pod is a collection of containers that can run on a host. This resource is
created by clients and scheduled onto hosts.
FIELDS:
apiVersion <string>
APIVersion defines the versioned schema of this representation of an
object. Servers should convert recognized schemas to the latest internal
value, and may reject unrecognized values. More info:
https://git.k8s.io/community/contributors/devel/sig-architecture/api-conventions.md
kind <string>
Kind is a string value representing the REST resource this object
represents. Servers may infer this from the endpoint the client submits
requests to. Cannot be updated. In CamelCase. More info:
https://git.k8s.io/community/contributors/devel/sig-architecture/api-conventions.md
metadata <Object>
Standard object's metadata. More info:
https://git.k8s.io/community/contributors/devel/sig-architecture/api-conventions.md
spec <Object>
Specification of the desired behavior of the pod. More info:
https://git.k8s.io/community/contributors/devel/sig-architecture/api-conventions.md
status <Object>
Most recently observed status of the pod. This data may not be up to date.
Populated by the system. Read-only. More info:
https://git.k8s.io/community/contributors/devel/sig-architecture/api-conventions.md
[root@k8s-harbor01 ~]
KIND: Pod
VERSION: v1
RESOURCE: volumes <[]Object>
…………省略部分内容
sepc:
volumes:
2.2 使用explain创建一个ns
开两个窗口,一个查,一个写yaml
2.2.1 查ns怎么创建
[root@k8s-harbor01 ~]
KIND: Namespace
VERSION: v1
DESCRIPTION:
Namespace provides a scope for Names. Use of multiple namespaces is
optional.
FIELDS:
apiVersion <string>
APIVersion defines the versioned schema of this representation of an
object. Servers should convert recognized schemas to the latest internal
value, and may reject unrecognized values. More info:
https://git.k8s.io/community/contributors/devel/sig-architecture/api-conventions.md
kind <string>
Kind is a string value representing the REST resource this object
represents. Servers may infer this from the endpoint the client submits
requests to. Cannot be updated. In CamelCase. More info:
https://git.k8s.io/community/contributors/devel/sig-architecture/api-conventions.md
metadata <Object>
Standard object's metadata. More info:
https://git.k8s.io/community/contributors/devel/sig-architecture/api-conventions.md
spec <Object>
Spec defines the behavior of the Namespace. More info:
https://git.k8s.io/community/contributors/devel/sig-architecture/api-conventions.md
status <Object>
Status describes the current status of a Namespace. More info:
https://git.k8s.io/community/contributors/devel/sig-architecture/api-conventions.md
2.2.2 写
[root@k8s-harbor01 yaml]
apiVersion: v1
kind:
2.2.3 查ns的kind类型
[root@k8s-harbor01 ~]
KIND: Namespace
VERSION: v1
FIELD: kind <string>
DESCRIPTION:
Kind is a string value representing the REST resource this object
represents. Servers may infer this from the endpoint the client submits
requests to. Cannot be updated. In CamelCase. More info:
https://git.k8s.io/community/contributors/devel/sig-architecture/api-conventions.md
2.2.4 写
[root@k8s-harbor01 yaml]
apiVersion: v1
kind: Namespace
2.2.5 查怎么写ns的名称
名称、端口等都属于元数据,所以要查metadata字段
[root@k8s-harbor01 ~]
name <string>
Name must be unique within a namespace. Is required when creating
generation of an appropriate name automatically. Name is primarily intended
More info: http://kubernetes.io/docs/user-guide/identifiers
2.2.6 写
[root@k8s-harbor01 yaml]
apiVersion: v1
kind: Namespace
metadata:
name: myserver
2.2.7 创建
[root@k8s-harbor01 yaml]
namespace/myserver created
[root@k8s-harbor01 yaml]
myserver Active 6s
2.3 get 显示一个或多个资源
2.3.1 get 作用
查询集群中的各种资源信息
[root@k8s-harbor01 yaml]
2.3.2 查看deployment类型的控制器
其他资源类型的查看方式基本也都一样
[root@k8s-harbor01 yaml]
No resources found in default namespace.
[root@k8s-harbor01 yaml]
NAMESPACE NAME READY UP-TO-DATE AVAILABLE AGE
kube-system calico-kube-controllers 1/1 1 1 18h
kube-system coredns 2/2 2 2 18h
[root@k8s-harbor01 yaml]
NAME READY UP-TO-DATE AVAILABLE AGE
calico-kube-controllers 1/1 1 1 18h
coredns 2/2 2 2 18h
2.3.3 json格式输出
这种方式不易读,但是方便脚本处理
[root@k8s-harbor01 yaml]
[root@k8s-harbor01 yaml]
2.3.4 yaml格式输出
[root@k8s-harbor01 yaml]
2.4 查看node
node是全局资源,不受ns限制
[root@k8s-harbor01 yaml]
NAME STATUS ROLES AGE VERSION
k8s-master01 Ready,SchedulingDisabled master 18h v1.26.1
k8s-master02 Ready,SchedulingDisabled master 18h v1.26.1
k8s-master03 Ready,SchedulingDisabled master 18h v1.26.1
k8s-node01 Ready node 18h v1.26.1
k8s-node02 Ready node 18h v1.26.1
k8s-node03 Ready node 18h v1.26.1
2.5 describe 显示特定资源或资源组的详细信息
2.5.1 查看pod事件
其他资源类型操作也一样的
[root@k8s-harbor01 yaml]
…………省略部分内容
Events:
Type Reason Age From Message
---- ------ ---- ---- -------
Normal Scheduled 7s default-scheduler Successfully assigned default/net-test3 to k8s-node02
Normal Pulled 6s kubelet Container image "10.31.200.104/myserver/centos:7.9.2009" already present on machine
Normal Created 6s kubelet Created container net-test3
Normal Started 6s kubelet Started container net-test3
2.5.2 查看node详情
[root@k8s-harbor01 yaml]
Labels: beta.kubernetes.io/arch=amd64
beta.kubernetes.io/os=linux
kubernetes.io/arch=amd64
kubernetes.io/hostname=k8s-node03
kubernetes.io/os=linux
kubernetes.io/role=node
Taints: <none>
Namespace Name CPU Requests CPU Limits Memory Requests Memory Limits Age
--------- ---- ------------ ---------- --------------- ------------- ---
default net-test1 0 (0%) 0 (0%) 0 (0%) 0 (0%) 19h
kube-system calico-node-bcpqf 250m (12%) 0 (0%) 0 (0%) 0 (0%) 19h
kube-system coredns-5879bb4b8c-g8z8b 100m (5%) 200m (10%) 70Mi (1%) 256Mi (7%) 19h
Allocated resources:
(Total limits may be over 100 percent, i.e., overcommitted.)
Resource Requests Limits
-------- -------- ------
cpu 350m (17%) 200m (10%)
memory 70Mi (1%) 256Mi (7%)
ephemeral-storage 0 (0%) 0 (0%)
hugepages-1Gi 0 (0%) 0 (0%)
hugepages-2Mi 0 (0%) 0 (0%)
Events: <none>
2.6 logs 查看容器日志
logs只能看到标准输出和错误输出(/dev/stdout、/dev/stderr),非这两种类型的,只能进入容器查看
如官方的nginx:dockerfile中就有,ln -sf /dev/stdout /var/log/access.log、ln -sf /dev/stderr /var/log/error.log
2.6.1 查看所有日志
不推荐这种方式,pod日志太多,会直接卡死终端
[root@k8s-harbor01 yaml]
2.6.2 实时查看日志
这个也不推荐
[root@k8s-harbor01 yaml]
2.6.3 实时查看最后几行日志
这种方式还可以
[root@k8s-harbor01 yaml]
2.6.4 分页查看所有日志
这种方式还可以
[root@k8s-harbor01 yaml]
2.7 exec 在某个容器中执行一个命令
2.7.1 执行命令
[root@k8s-harbor01 ~]
127.0.0.1 localhost
::1 localhost ip6-localhost ip6-loopback
fe00::0 ip6-localnet
fe00::0 ip6-mcastprefix
fe00::1 ip6-allnodes
fe00::2 ip6-allrouters
10.200.85.195 net-test2
2.7.2 进入pod
[root@k8s-harbor01 ~]
2.8 delete 按文件名、标准输入、资源和名称或按资源和标签选择器删除资源
kubectl delete -f app.yaml
kubectl delete $资源名称
3. 配置命令
3.1 create 从文件或标准输入创建资源
工作中不常用,更推荐apply
kucectl create -f app.yaml
3.2 apply 通过文件名或标准输入将配置应用于资源
支持从yaml或json格式文件、标准输入、或指定URL创建资源对象
kucectl apply -f app.yaml
kucectl apply -f https://xxx.yaml
kucectl apply -k dir/
4. 集群管理命令
4.1 cluster-info 显示集群信息
[root@k8s-harbor01 ~]
Kubernetes control plane is running at https://10.31.200.100:6443
CoreDNS is running at https://10.31.200.100:6443/api/v1/namespaces/kube-system/services/kube-dns:dns/proxy
4.2 cordon 标记节点为不可调度
[root@k8s-harbor01 ~]
NAME STATUS ROLES AGE VERSION
k8s-master01 Ready,SchedulingDisabled master 43h v1.26.1
k8s-master02 Ready,SchedulingDisabled master 43h v1.26.1
k8s-master03 Ready,SchedulingDisabled master 43h v1.26.1
k8s-node01 Ready node 43h v1.26.1
k8s-node02 Ready node 43h v1.26.1
k8s-node03 Ready node 43h v1.26.1
[root@k8s-harbor01 ~]
node/k8s-node01 cordoned
[root@k8s-harbor01 ~]
NAME STATUS ROLES AGE VERSION
k8s-master01 Ready,SchedulingDisabled master 43h v1.26.1
k8s-master02 Ready,SchedulingDisabled master 43h v1.26.1
k8s-master03 Ready,SchedulingDisabled master 43h v1.26.1
k8s-node01 Ready,SchedulingDisabled node 43h v1.26.1
k8s-node02 Ready node 43h v1.26.1
k8s-node03 Ready node 43h v1.26.1
4.4 uncordon 标记节点为可调度
一般是配合上面的命令使用
[root@k8s-harbor01 ~]
node/k8s-node01 uncordoned
[root@k8s-harbor01 ~]
NAME STATUS ROLES AGE VERSION
k8s-master01 Ready,SchedulingDisabled master 43h v1.26.1
k8s-master02 Ready,SchedulingDisabled master 43h v1.26.1
k8s-master03 Ready,SchedulingDisabled master 43h v1.26.1
k8s-node01 Ready node 43h v1.26.1
k8s-node02 Ready node 43h v1.26.1
k8s-node03 Ready node 43h v1.26.1
4.5 drain 驱逐节点上的pod
清空节点以准备维护。一般是先关闭节点调度,再进行驱逐操作
注意:不能驱逐没有控制器的资源(如单纯的pod)和daemonset控制器管理的pod,除非添加参数
[root@k8s-harbor01 ~]
node/k8s-node01 cordoned
[root@k8s-harbor01 ~]
default net-test2 1/1 Running 0 43h 10.200.85.195 k8s-node01 <none> <none>
kube-system calico-node-cf7xm 1/1 Running 0 43h 10.31.200.110 k8s-node01 <none> <none>
kube-system coredns-5879bb4b8c-tjhhk 1/1 Running 0 43h 10.200.85.194 k8s-node01 <none> <none>
[root@k8s-harbor01 ~]
node/k8s-node01 already cordoned
error: unable to drain node "k8s-node01" due to error:[cannot delete Pods declare no controller (use --force to override): default/net-test2, cannot delete DaemonSet-managed Pods (use --ignore-daemonsets to ignore): kube-system/calico-node-cf7xm], continuing command...
There are pending nodes to be drained:
k8s-node01
cannot delete Pods declare no controller (use --force to override): default/net-test2
cannot delete DaemonSet-managed Pods (use --ignore-daemonsets to ignore): kube-system/calico-node-cf7xm
[root@k8s-harbor01 ~]
node/k8s-node01 already cordoned
Warning: deleting Pods that declare no controller: default/net-test2; ignoring DaemonSet-managed Pods: kube-system/calico-node-cf7xm
evicting pod kube-system/coredns-5879bb4b8c-tjhhk
evicting pod default/net-test2
pod/coredns-5879bb4b8c-tjhhk evicted
pod/net-test2 evicted
node/k8s-node01 drained
[root@k8s-harbor01 ~]
kube-system calico-node-cf7xm 1/1 Running 0 43h 10.31.200.110 k8s-node01 <none> <no
4.6 taint 更新一个或者多个节点上的污点
主要是实现pod亲和性和反亲和性的
这个后面讲
[root@k8s-harbor01 ~]
4.7 api-resources 打印服务器上支持的API资源
就是显示各种资源类型,简称、支持的apiversion版本
[root@k8s-harbor01 ~]
NAME SHORTNAMES APIVERSION NAMESPACED KIND
deployments deploy apps/v1 true Deployment
4.8 api-versions 只显示api版本
还是上面的更加适用
[root@k8s-harbor01 ~]
admissionregistration.k8s.io/v1
apiextensions.k8s.io/v1
apiregistration.k8s.io/v1
apps/v1
authentication.k8s.io/v1
authorization.k8s.io/v1
autoscaling/v1
autoscaling/v2
batch/v1
certificates.k8s.io/v1
coordination.k8s.io/v1
discovery.k8s.io/v1
events.k8s.io/v1
flowcontrol.apiserver.k8s.io/v1beta2
flowcontrol.apiserver.k8s.io/v1beta3
networking.k8s.io/v1
node.k8s.io/v1
policy/v1
rbac.authorization.k8s.io/v1
scheduling.k8s.io/v1
storage.k8s.io/v1
storage.k8s.io/v1beta1
v1
4.9 version 输出客户端和服务端的版本信息
[root@k8s-harbor01 ~]
Flag --short has been deprecated, and will be removed in the future. The --short output will become the default.
Client Version: v1.26.1
Kustomize Version: v4.5.7
Server Version: v1.26.1
[root@k8s-harbor01 ~]
clientVersion:
buildDate: "2023-01-18T15:58:16Z"
compiler: gc
gitCommit: 8f94681cd294aa8cfd3407b8191f6c70214973a4
gitTreeState: clean
gitVersion: v1.26.1
goVersion: go1.19.5
major: "1"
minor: "26"
platform: linux/amd64
kustomizeVersion: v4.5.7
serverVersion:
buildDate: "2023-01-18T15:51:25Z"
compiler: gc
gitCommit: 8f94681cd294aa8cfd3407b8191f6c70214973a4
gitTreeState: clean
gitVersion: v1.26.1
goVersion: go1.19.5
major: "1"
minor: "26"
platform: linux/amd64
4.10 config 动态修改kubeconfig 文件
[root@k8s-harbor01 ~]
Modify kubeconfig files using subcommands like "kubectl config set current-context my-context"
The loading order follows these rules:
1. If the --kubeconfig flag is set, then only that file is loaded. The flag may only be set once and no merging takes
place.
2. If $KUBECONFIG environment variable is set, then it is used as a list of paths (normal path delimiting rules for
your system). These paths are merged. When a value is modified, it is modified in the file that defines the stanza. When
a value is created, it is created in the first file that exists. If no files in the chain exist, then it creates the
last file in the list.
3. Otherwise, ${HOME}/.kube/config is used and no merging takes place.
Available Commands:
current-context Display the current-context
delete-cluster 从 kubeconfig 中删除指定的集群
delete-context 从 kubeconfig 中删除指定的上下文
delete-user Delete the specified user from the kubeconfig
get-clusters 显示在 kubeconfig 中定义的集群
get-contexts 描述一个或多个上下文
get-users Display users defined in the kubeconfig
rename-context Rename a context from the kubeconfig file
set Set an individual value in a kubeconfig file
set-cluster Set a cluster entry in kubeconfig
set-context Set a context entry in kubeconfig
set-credentials Set a user entry in kubeconfig
unset Unset an individual value in a kubeconfig file
use-context Set the current-context in a kubeconfig file
view 显示合并的 kubeconfig 配置或一个指定的 kubeconfig 文件
Usage:
kubectl config SUBCOMMAND [options]
Use "kubectl <command> --help" for more information about a given command.
Use "kubectl options" for a list of global command-line options (applies to all commands).
2. yaml
k8s中支持yaml格式的文件应用,也支持json格式的应用,但还是yaml比较常用,因为json可读性太差。
2.1 yaml文件简介
2.1.1 格式
人员名单:
张三:
年龄: 18
职业: Linux运维工程师
爱好:
- 看书
- 学习
- 加班
李四:
年龄: 20
职业: Java开发工程师
爱好:
- 开源技术
- 微服务
- 分布式存储
2.1.2 使用注意事项
大小写敏感
使用缩进表示层级关系
缩进时不允许使用Tal键,只允许使用空格
缩进的空格数目不重要,只要相同层级的元素左侧对齐即可
使用”
比json更适用于配置文件
2.2 yaml文件示例
2.2.1 deployment文件示例
[root@k8s-harbor01 yaml]
apiVersion: apps/v1
kind: Deployment
metadata:
labels:
app: myserver-nginx-deployment-label
name: myserver-nginx-deployment
namespace: myserver
spec:
replicas: 1
selector:
matchLabels:
app: myserver-nginx-selector
template:
metadata:
labels:
app: myserver-nginx-selector
spec:
containers:
- name: myserver-nginx-container
image: 10.31.200.104/myserver/nginx:latest
imagePullPolicy: IfNotPresent
ports:
- containerPort: 80
protocol: TCP
name: http
- containerPort: 443
protocol: TCP
name: https
env:
- name: "password"
value: "123456"
- name: "age"
value: "18"
resources:
limits:
cpu: 500m
memory: 2Gi
requests:
cpu: 200m
memory: 512Mi
2.2.2 service yaml文件示例
[root@k8s-harbor01 yaml]
kind: Service
apiVersion: v1
metadata:
labels:
app: myserver-nginx
name: myserver-nginx-svc
namespace: myserver
spec:
type: NodePort
ports:
- name: http
port: 80
protocol: TCP
targetPort: 80
nodePort: 30001
- name: https
port: 443
protocol: TCP
targetPort: 443
nodePort: 30443
selector:
app: myserver-nginx-selector
2.3 应用并测试访问
2.3.1 创建deploy
[root@k8s-harbor01 yaml]
deployment.apps/myserver-nginx-deployment created
[root@k8s-harbor01 yaml]
NAME READY STATUS RESTARTS AGE
myserver-nginx-deployment-5c9d79c56f-zcj7b 1/1 Running 0 10s
2.3.2 创建svc
root@k8s-harbor01 yaml]
NAME READY STATUS RESTARTS AGE
pod/myserver-nginx-deployment-5c9d79c56f-zcj7b 1/1 Running 0 61s
NAME TYPE CLUSTER-IP EXTERNAL-IP PORT(S) AGE
service/myserver-nginx-svc NodePort 10.100.140.203 <none> 80:30001/TCP,443:30443/TCP 8s
2.3.3 测试访问
[root@k8s-harbor01 yaml]
NAME READY STATUS RESTARTS AGE
pod/myserver-nginx-deployment-5c9d79c56f-zcj7b 1/1 Running 0 23m
NAME TYPE CLUSTER-IP EXTERNAL-IP PORT(S) AGE
service/myserver-nginx-svc NodePort 10.100.140.203 <none> 80:30001/TCP,443:30443/TCP 22m
[root@k8s-master01 ~]
HTTP/1.1 200 OK
Server: nginx/1.23.4
Date: Thu, 04 May 2023 13:45:18 GMT
Content-Type: text/html
Content-Length: 615
Last-Modified: Tue, 28 Mar 2023 15:01:54 GMT
Connection: keep-alive
ETag: "64230162-267"
Accept-Ranges: bytes
本文内容由网友自发贡献,版权归原作者所有,本站不承担相应法律责任。如您发现有涉嫌抄袭侵权的内容,请联系:hwhale#tublm.com(使用前将#替换为@)