目录
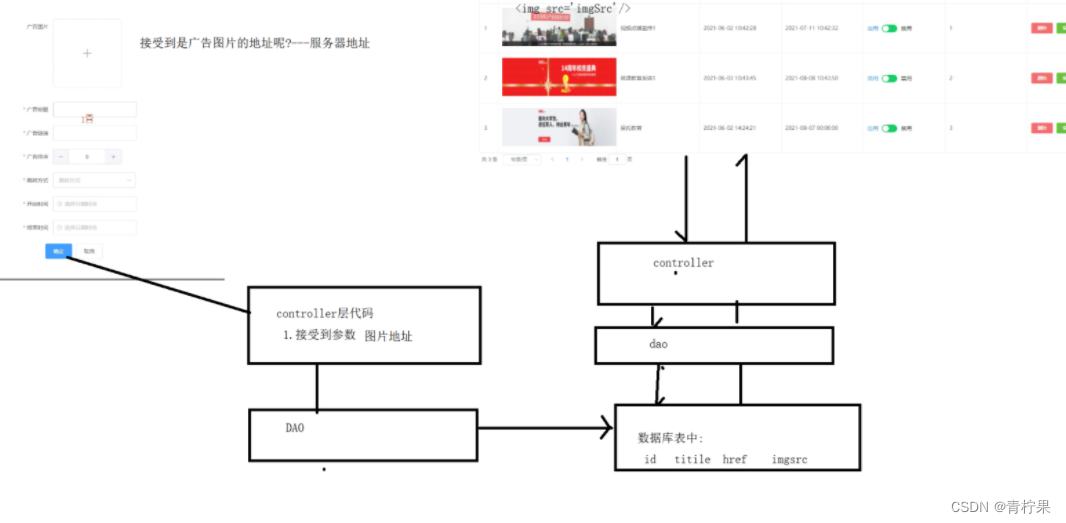
1.文件上传的原理
2.文件上传到本地服务器
2.1 添加上传的依赖
2.2 创建一个页面
2.3 在springmvc中配置文件上传解析器
2.4 创建upload01接口方法
3.elementui+vue+axios完成文件上传
3.1 页面的布局引用elementui
3.2 后台的接口
1.文件上传的原理

2.文件上传到本地服务器
2.1 添加上传的依赖
<dependency>
     <groupId>commons-fileupload</groupId>
     <artifactId>commons-fileupload</artifactId>
     <version>1.4</version>
   </dependency>
2.2 创建一个页面
method: 提交方式 文件上传必须为post提交。
enctype:默认application/x-www-form-urlencoded 表示提交表单数据
multipart/form-data:可以包含文件数据
input的类型必须为file类型,而且必须有name属性
<form method="post" enctype="multipart/form-data" action="fileUp">
        <input type="file" value="上传图片" name="myfile">
        <input type="submit" value="提交">
    </form>
2.3 在springmvc中配置文件上传解析器
id的名称必须叫multipartResolver
 <bean id="multipartResolver" class="org.springframework.web.multipart.commons.CommonsMultipartResolver">
  <!--这里的单位为字节10M*1024K*1024-->
     <property name="maxUploadSize" value="10485760"/>
 </bean>
2.4 创建upload01接口方法
  //注意:MultipartFile 参数名必须和<input type="file" name="myfile"/>中name属性相同
    @RequestMapping("/upload01")
    public String upload01(MultipartFile myfile, HttpServletRequest request) throws Exception{

        //(1)得到本地服务目录的地址
        String path = request.getSession().getServletContext().getRealPath("upload");
        //(2)判断该对应目录路径所对应的目录是否存在
        File file=new File(path);
        if(!file.exists()){
             file.mkdirs();
        }
        //(3)//把myfile保存到本地服务中某个文件夹下。UUID.randomUUID()生成随机字码
        //myfile.getOriginalFilename()获取所上传文件的原始文件名,因为想要后缀名
    String filename= UUID.randomUUID().toString().replace("-","")+myfile.getOriginalFilename();
        //文件路径
        File target=new File(path+"/"+filename);
        myfile.transferTo(target); //把myfile转移到目标目录下
        return "";
    }
3.elementui+vue+axios完成文件上传
3.1 页面的布局引用elementui
此处注意要引入样式
<head>
    <title>登录页面2</title>
    <link type="text/css" rel="stylesheet"  href="css/index.css">
    <script type="text/javascript" src="js/qs.min.js"></script>
    <script type="text/javascript" src="js/axios.min.js"></script>
    <script type="text/javascript" src="js/vue.js"></script>
    <script type="text/javascript" src="js/index.js"></script>
    <style>
        .avatar-uploader .el-upload {
            border: 1px dashed #d9d9d9;
            border-radius: 6px;
            cursor: pointer;
            position: relative;
            overflow: hidden;
        }
        .avatar-uploader .el-upload:hover {
            border-color: #409EFF;
        }
        .avatar-uploader-icon {
            font-size: 28px;
            color: #8c939d;
            width: 178px;
            height: 178px;
            line-height: 178px;
            text-align: center;
        }
        .avatar {
            width: 178px;
            height: 178px;
            display: block;
        }
    </style>

</head>
<body>
<div id="con">
    <el-upload
            class="avatar-uploader"
        //注意此处的跳转网页
            action="fileUp01"
            :show-file-list="false"
            :on-success="handleAvatarSuccess"
            :before-upload="beforeAvatarUpload">
        <img v-if="imageUrl" :src="imageUrl" class="avatar">
        <i v-else class="el-icon-plus avatar-uploader-icon"></i>
    </el-upload>
</div>
</body>
<script>
    var app=new Vue({
        el:"#con",
        data:{
            imageUrl: ''
        },
        methods: {
             //上传成功后触发的方法
            handleAvatarSuccess(res, file) {
            //此处进行数据修改
                this.imageUrl =res.date;
            },
        //上传前触发的方法
            beforeAvatarUpload(file) {
                const isJPG = file.type === 'image/jpeg';
                const isLt2M = file.size / 1024 / 1024 < 2;

                if (!isJPG) {
                    this.$message.error('上传头像图片只能是 JPG 格式!');
                }
                if (!isLt2M) {
                    this.$message.error('上传头像图片大小不能超过 2MB!');
                }
                return isJPG && isLt2M;
            }
        }
    })
</script>
</html>
3.2 后台的接口
    @RequestMapping("fileUp01")
    @ResponseBody
    public CommonResult test02(MultipartFile file, HttpSession session){
        try{
//1.获取上传到服务器的文件夹路径
            String path = session.getServletContext().getRealPath("path1");
            File file = new File(path1);//此路径下创建文件对象
            if(!file.exists()){
                file.mkdirs();
            }
            String filename=UUID.randomUUID().toString().replace("-","")
                    + file.getOriginalFilename();//图片名
            File file1 = new File(path + "/" + filename);
            file.transferTo(file1);
            CommonResult success = CommonResult.success("http://localhost:8080/keqianceSpring/path1/"+filename);
            return success;
        } catch (IOException e) {
            e.printStackTrace();
        }
        CommonResult error = CommonResult.error(500);
        return error;
读取照片和写入照片,除了上述使用的file.transferTo(file1)方法,还可以使用IO流来做,举例:
@Controller
public class UploadFile02 {
    @RequestMapping("/load02")
    @ResponseBody
    public CommonResult test01(MultipartFile file, HttpSession httpSession) throws IOException {
        String path = httpSession.getServletContext().getRealPath("path");
        File file1 = new File(path);
        if(!file1.exists()){
            file1.mkdirs();
        }
        String pName=UUID.randomUUID().toString().replace("-","")+file.getOriginalFilename();
        File file2 = new File(file1, pName);
        if(!file2.exists()){
            file2.createNewFile();
        }
        try(InputStream inputStream=file.getInputStream();
            OutputStream outputStream=new FileOutputStream(file2)){
            byte[] b=new byte[1024];
            int len=0;
            while((len=inputStream.read(b))!=-1){
                outputStream.write(b,0,len);
            }
            outputStream.flush();
            outputStream.close();
            inputStream.close();
            return CommonResult.success("http://localhost:8080/keqianceSpring/path/"+pName);
        }catch (Exception e){
            e.printStackTrace();
            return CommonResult.error("上传失败");
        }
    }
}
CommonResult
@Data
@AllArgsConstructor
@NoArgsConstructor
public class CommonResult {
    private final static int success=200;
    private final static int error=500;
    private final static int not_fount=404;
    private  int code;
    private  String msg;
    //注意此处的date,后续要是不能打印注意看此处
    private Object date;

    public static CommonResult success(Object date){
        return new CommonResult(CommonResult.success,"success",date);
    }
    public static CommonResult error(Object date){
        return new CommonResult(CommonResult.error,"未知错误,请联系管理员",date);
    }
    public static CommonResult notFount(){
        return new CommonResult(CommonResult.not_fount,"资源不存在",null);
    }
}