官方文档:https://ezdxf.readthedocs.io/en/master/tutorials/index.html
一、从DXF文件获取数据的教程
加载DXF文件:
import ezdxf
doc = ezdxf.readfile("your_dxf_file.dxf")
1、布局
| 布局类型 |
说明 |
方法 |
| Modelspace |
这是公共建筑空间 |
ezdxf.layouts.Modelspace |
| Paperspace |
用于创建打印布局 |
ezdxf.layouts.Paperspace |
| BlockLayout |
可重用元素,每个块都有自己的实体空间 |
ezdxf.layouts.BlockLayout |
2、遍历布局的DXF实体
# iterate over all entities in modelspace
msp = doc.modelspace()
for e in msp:
    if e.dxftype() == 'LINE':
        print_entity(e)

# entity query for all LINE entities in modelspace
for e in msp.query('LINE'):
    print_entity(e)

def print_entity(e):
    print("LINE on layer: %s\n" % e.dxf.layer)
    print("start point: %s\n" % e.dxf.start)
    print("end point: %s\n" % e.dxf.end)
3、访问实体的DXF属性
检查DXF实体的类型e.dxftype() 。DXF类型总是大写的。更多的实体属性请查看参考资料。
e.dxf.layer  # layer of the entity as string
e.dxf.color  # color of the entity as integer
如果未设置DXF属性(有效的DXF属性没有值),则DXFValueError将被提升。若要避免此操作,请使用 get_dxf_attrib() 具有默认值的
# if DXF attribute 'paperspace' does not exist, the entity defaults to modelspace
p = e.get_dxf_attrib('paperspace', 0)
不支持的dxf属性引发DXFAttributeError.
4、得到一个纸空间布局
paperspace = doc.layout('layout0')
检索名为layout0的用法。Layout对象与模型空间对象相同。DXF r12只提供一个纸空间,因此方法调用中的纸质空间名。doc.layout(‘layout0’) 被忽略或可以停止。对于以后的DXF版本,您可以通过以下方法获得可用布局的名称列表layout_names().
5、通过查询语言检索实体
所有布局类型都有query() 方法启动实体查询或使用ezdxf.query.new() 功能。
查询字符串是两个查询的组合,第一个是所需的实体查询,第二个是可选的属性查询,括在方括号中:'EntityQuery[AttributeQuery]'
实体查询是DXF实体名称或特殊名称的空格分隔列表。* 。哪里 * 表示所有DXF实体,所有其他DXF名称必须大写。这个 * 搜索可以通过添加带有预分配的实体名称来排除实体类型。!(如: * !LINE,搜索除行外的所有实体)。
属性查询用于通过DXF属性选择DXF实体。属性查询是对实体查询的添加,只有在实体已经匹配的情况下才匹配。属性查询是一个布尔表达式,支持操作符:and, or, !.
从模型空间获取所有行实体:
msp = doc.modelspace()
lines = msp.query('LINE')
结果容器EntityQuery还提供了query() 方法,获取层上的所有线条实体。construction:
construction_lines = lines.query('*[layer=="construction"]')
这个* 是所有dxf类型的通配符,在本例中还可以使用LINE而不是 *, *在这里工作是因为lines只包含DXF类型行的实体。
合并为一个查询:
lines = msp.query('LINE[layer=="construction"]')
实体部分还支持query() 方法:
lines_and_circles = doc.entities.query('LINE CIRCLE[layer=="construction"]')
获取层上的所有模型空间实体construction,但不包括具有线型的实体DASHED:
not_dashed_entities = msp.query('*[layer=="construction" and linetype!="DASHED"]')
6、按groupby()函数检索实体
根据用户定义的条件搜索和分组实体。例如,让我们逐层对模型空间中的所有实体进行分组,结果将是一个以层名作为dict键的dict,以及将此层匹配为dict值的模型空间中的所有实体的列表。作为专用函数调用的用法:
from ezdxf.groupby import groupby
group = groupby(entities=msp, dxfattrib='layer')
这个实体参数可以是任何产生DXFEntity或者继承的对象。更短更简单的方法BaseLayout(模型空间、纸空间布局、块)和查询结果EntityQuery物体:
group = msp.groupby(dxfattrib='layer')

for layer, entities in group.items():
    print(f'Layer "{layer}" contains following entities:')
    for entity in entities:
        print('    {}'.format(str(entity)))
    print('-'*40)
前面的示例演示了如何通过单个dxf属性对实体进行分组,但也可以按自定义键对实体进行分组,从而创建一个自定义键函数,该函数接受dxf实体作为参数,并以dict-key或None将实体排除在外。下面的示例演示如何按层和颜色对实体进行分组,因此每个结果条目都有一个元组。(layer, color) 作为键和具有匹配的DXF属性的实体列表:
def layer_and_color_key(entity):
    # return None to exclude entities from result container
    if entity.dxf.layer == '0':  # exclude entities from default layer '0'
        return None
    else:
        return entity.dxf.layer, entity.dxf.color

group = msp.groupby(key=layer_and_color_key)
for key, entities in group.items():
    print(f'Grouping criteria "{key}" matches following entities:')
    for entity in entities:
        print('    {}'.format(str(entity)))
    print('-'*40)
若要从结果容器中排除实体,请将key函数应返回None。这个groupby() 功能渔获量DXFAttributeError在处理实体时出现异常,并将此实体排除在结果容器之外。因此,不需要担心不支持某些属性的DXF实体,它们将被自动排除。
二、创建简单DXF绘图教程
创建一个新的DXF绘图ezdxf.new() 使用所有可用的DXF实体:
import ezdxf

doc = ezdxf.new('R2010')  # create a new DXF R2010 drawing, official DXF version name: 'AC1024'

msp = doc.modelspace()  # add new entities to the modelspace
msp.add_line((0, 0), (10, 0))  # add a LINE entity
doc.saveas('line.dxf')
新实体总是添加到布局中,布局可以是模型空间、纸空间布局或块布局。
三、图层教程
1、创建一个层定义
import ezdxf

doc = ezdxf.new(setup=True)  # setup required line types
msp = modelspace()
doc.layers.new(name='MyLines', dxfattribs={'linetype': 'DASHED', 'color': 7})
将线型和颜色分配给层的优点是,该层上的实体可以通过以下方式继承此属性:‘BYLAYER’ 作为线型字符串和256作为颜色,这两个值都是新实体的默认值,因此可以停止此分配:
msp.add_line((0, 0), (10, 0), dxfattribs={'layer': 'MyLines'})
新创建的线条将用颜色绘制。7线型 ‘DASHED’ .
2、变化层状态
获取层定义对象:
my_lines = doc.layers.get('MyLines')
检查该层的状态:
my_lines.is_off()  # True if layer is off
my_lines.is_on()   # True if layer is on
my_lines.is_locked()  # True if layer is locked
layer_name = my_lines.dxf.name  # get the layer name
更改层的状态:
# switch layer off, entities at this layer will not shown in CAD applications/viewers
my_lines.off()

# lock layer, entities at this layer are not editable in CAD applications
my_lines.lock()
按属性获取/设置层的默认颜色Layer.color,因为DXF属性Layer.dxf.color被误用于打开和关闭层,如果颜色值为负值,则层被关闭。
更改默认层值:
my_lines.dxf.linetype = 'DOTTED'
my_lines.color = 13  # preserves on/off state of layer
3、检查可用层
Layers对象支持一些标准的Python协议:
# iteration
for layer in doc.layers:
    if layer.dxf.name != '0':
        layer.off()  # switch all layers off except layer '0'

# check for existing layer definition
if 'MyLines' in doc.layers::
    layer = doc.layers.get('MyLines')

layer_count = len(doc.layers) # total count of layer definitions
4、删除一层
删除层定义:
doc.layers.remove('MyLines')
这只是删除了层定义,所有的dxf实体都将dxf属性层设置为 ‘MyLines’ 仍然存在,但是如果它们从层定义继承颜色和/或线型,它们现在将用线型绘制。‘Continuous’ 和颜色1.
四、块教程
1、什么是块?
块是DXF实体的集合,可以在不同的布局和块中多次放置,作为对块定义的引用。块引用(Insert)可以旋转、缩放、放置在3D中。OCS以一种类似网格的方式排列,每一个Insert实体可以有单独的属性(Attrib)附呈。
2、创建块
块作为BlockLayout被BlocksSection类,并且每幅图只有一个块部分:Drawing.blocks.
import ezdxf
import random  # needed for random placing points


def get_random_point():
    """Returns random x, y coordinates."""
    x = random.randint(-100, 100)
    y = random.randint(-100, 100)
    return x, y

# Create a new drawing in the DXF format of AutoCAD 2010
doc = ezdxf.new('R2010')

# Create a block with the name 'FLAG'
flag = doc.blocks.new(name='FLAG')

# Add DXF entities to the block 'FLAG'.
# The default base point (= insertion point) of the block is (0, 0).
flag.add_lwpolyline([(0, 0), (0, 5), (4, 3), (0, 3)])  # the flag symbol as 2D polyline
flag.add_circle((0, 0), .4, dxfattribs={'color': 2})  # mark the base point with a circle
3、块引用(插入)
块引用是dxf。Insert实体,并可放置在任何布局中:Modelspace,任何Paperspace或BlockLayout(它启用嵌套块引用)。每个块引用可以单独缩放和旋转。
让我们在模型空间中插入一些随机标志:
# Get the modelspace of the drawing.
msp = doc.modelspace()

# Get 50 random placing points.
placing_points = [get_random_point() for _ in range(50)]

for point in placing_points:
    # Every flag has a different scaling and a rotation of -15 deg.
    random_scale = 0.5 + random.random() * 2.0
    # Add a block reference to the block named 'FLAG' at the coordinates 'point'.
    msp.add_blockref('FLAG', point, dxfattribs={
        'xscale': random_scale,
        'yscale': random_scale,
        'rotation': -15
    })

# Save the drawing.
doc.saveas("blockref_tutorial.dxf")
查询块的所有块引用FLAG:
for flag_ref in msp.query('INSERT[name=="FLAG"]'):
    print(str(flag_ref))
4、什么是属性?
属性(Attrib)是附加到带关联标记的块引用的文本注释。属性通常用于向块添加信息,这些信息可以通过CAD程序进行评估和导出。属性可以是可见的,也可以是隐藏的。使用属性的简单方法是将属性添加到块引用中。Insert.add_attrib(),但是属性在几何上与块引用无关,因此您必须自己计算属性的插入点、旋转和缩放。
5、使用属性定义
在块引用中使用属性的第二种方法是两个步骤,第一步是在块定义中创建属性定义(模板),第二步是通过Layout.add_blockref()属性自动附加和填充属性。add_auto_attribs()方法到块引用。该方法的优点是所有属性都相对于块基点放置,具有与块相同的旋转和缩放特性,但其缺点是不均匀缩放处理得不太好。方法Layout.add_auto_blockref()通过将块引用及其属性封装到一个匿名块中,更好地处理非均匀缩放,并让CAD应用程序完成转换工作,至少通过AutoCAD和BricsCAD创建正确的图形表示。这种方法的缺点是对附加属性的计算比较复杂。
使用属性定义(Attdef):
# Define some attributes for the block 'FLAG', placed relative
# to the base point, (0, 0) in this case.
flag.add_attdef('NAME', (0.5, -0.5), dxfattribs={'height': 0.5, 'color': 3})
flag.add_attdef('XPOS', (0.5, -1.0), dxfattribs={'height': 0.25, 'color': 4})
flag.add_attdef('YPOS', (0.5, -1.5), dxfattribs={'height': 0.25, 'color': 4})

# Get another 50 random placing points.
placing_points = [get_random_point() for _ in range(50)]

for number, point in enumerate(placing_points):
    # values is a dict with the attribute tag as item-key and
    # the attribute text content as item-value.
    values = {
        'NAME': "P(%d)" % (number + 1),
        'XPOS': "x = %.3f" % point[0],
        'YPOS': "y = %.3f" % point[1]
    }

    # Every flag has a different scaling and a rotation of +15 deg.
    random_scale = 0.5 + random.random() * 2.0
    blockref = msp.add_blockref('FLAG', point, dxfattribs={
        'rotation': 15
    }).scale(random_scale)
    blockref.add_auto_attribs(values)

# Save the drawing.
doc.saveas("auto_blockref_tutorial.dxf")
6、获取/设置现有块引用的属性
块引用(Insert)可以具有附加属性(Attrib),这些都是简单的文本注释,并在块引用后面附加了一个关联的标记。
迭代所有附加的属性:
# get all INSERT entities with entity.dxf.name == "Part12"
blockrefs = msp.query('INSERT[name=="Part12"]')
if len(blockrefs):
    entity = blockrefs[0]  # process first entity found
    for attrib in entity.attribs:
        if attrib.dxf.tag == "diameter":  # identify attribute by tag
            attrib.dxf.text = "17mm"  # change attribute content
按标记获取属性:
diameter = entity.get_attrib('diameter')
if diameter is not None:
    diameter.dxf.text = "17mm"
7、计算包装块引用
如上所述,封装在匿名块中的块引用的评估非常复杂:
# Collect all anonymous block references starting with '*U'
anonymous_block_refs = modelspace.query('INSERT[name ? "^\*U.+"]')

# Collect real references to 'FLAG'
flag_refs = []
for block_ref in anonymous_block_refs:
    # Get the block layout of the anonymous block
    block = doc.blocks.get(block_ref.dxf.name)
    # Find all block references to 'FLAG' in the anonymous block
    flag_refs.extend(block.query('INSERT[name=="FLAG"]'))

# Evaluation example: collect all flag names.
flag_numbers = [flag.get_attrib_text('NAME') for flag in flag_refs if flag.has_attrib('NAME')]

print(flag_numbers)
8、爆炸块引用
这是一个先进的、仍在实验中的特性,因为ezdxf仍然不是一个CAD应用程序,结果可能并不完美。非均匀标度导致文本实体(Text、MTEXT、attrib)和其他一些实体的结果不正确,例如椭圆、SHAPE、带弧或椭圆路径段的Hatch和带弧段的Polyline/LWPOLLYLINE,因此参数为非均匀标度是False默认情况下,为了避免非均匀缩放块引用的爆炸。
默认情况下,“爆炸”实体与块引用所在的布局相同。
for flag_ref in msp.query('INSERT[name=="FLAG"]'):
    flag_ref.explode()
9、检查块引用的实体
如果只想检查块引用的实体,请使用virtual_entities()方法。该方法生成“虚拟”实体,其属性与“爆炸”实体相同,但它们没有存储在实体数据库中,没有句柄,也没有分配给任何布局。
for flag_ref in msp.query('INSERT[name=="FLAG"]'):
    for entity in flag_ref.virtual_entities():
        if entity.dxftype() == 'LWPOLYLINE':
            print(f'Found {str(entity)}.')
五、LWPolyline教程
这个LWPolyline定义为单个图形实体,与旧样式不同。Polyline实体,它被定义为一组子实体。LWPolyline显示速度更快(在AutoCAD中),占用更少的磁盘空间,它是一个平面元素,因此在OCS如(x, y)元组(LWPolyline.dxf.elevation是z轴值)。
创建一个简单的折线:
import ezdxf

doc = ezdxf.new('R2000')
msp = doc.modelspace()

points = [(0, 0), (3, 0), (6, 3), (6, 6)]
msp.add_lwpolyline(points)

doc.saveas("lwpolyline1.dxf")
将多个点附加到折线:
doc = ezdxf.readfile("lwpolyline1.dxf")
msp = doc.modelspace()

line = msp.query('LWPOLYLINE')[0]  # take first LWPolyline
line.append_points([(8, 7), (10, 7)])

doc.saveas("lwpolyline2.dxf")
积分总是返回一个5元组。(x, y, start_width, ent_width, bulge),开始宽度,末端宽度和凸起是0如果没有出席:
first_point = line[0]
x, y, start_width, end_width, bulge = first_point
使用上下文管理器编辑Polyline点时,引入了这种方法,因为访问单个点的速度非常慢,但是ezdxfv0.8.9,由索引运算符直接访问[]非常快,不再需要使用上下文管理器了。上下文管理器的优点是能够使用用户定义的点格式:
doc = ezdxf.readfile("lwpolyline2.dxf")
msp = doc.modelspace()

line = msp.query('LWPOLYLINE').first # take first LWPolyline, 'first' was introduced with v0.10

with line.points('xyseb') as points:
    # points is a standard python list
    # existing points are 5-tuples, but new points can be
    # set as (x, y, [start_width, [end_width, [bulge]]]) tuple
    # set start_width, end_width to 0 to be ignored (x, y, 0, 0, bulge).

    del points[-2:]  # delete last 2 points
    points.extend([(4, 7), (0, 7)])  # adding 2 other points
    # the same as one command
    # points[-2:] = [(4, 7), (0, 7)]

doc.saveas("lwpolyline3.dxf")
每个线段可以有不同的起始宽度和结束宽度,如果省略,则起始宽度和结束宽度为0:
doc = ezdxf.new('R2000')
msp = doc.modelspace()

# point format = (x, y, [start_width, [end_width, [bulge]]])
# set start_width, end_width to 0 to be ignored (x, y, 0, 0, bulge).

points = [(0, 0, .1, .15), (3, 0, .2, .25), (6, 3, .3, .35), (6, 6)]
msp.add_lwpolyline(points)

doc.saveas("lwpolyline4.dxf")
第一个点包含第一个段的开始宽度和结束宽度,第二个段的第二个点等等,如果Polyline关闭,则最后一个点的开始宽度和结束宽度值用于结束段,否则值被忽略。仅当dxf属性有效时,才能启动和结束宽度。dxf.const_width是未设置的,可以肯定地删除它:
del line.dxf.const_width # no exception will be raised if const_width is already unset
LWPolyline也可以有曲线元素,它们由膨胀值:
doc = ezdxf.new('R2000')
msp = doc.modelspace()

# point format = (x, y, [start_width, [end_width, [bulge]]])
# set start_width, end_width to 0 to be ignored (x, y, 0, 0, bulge).

points = [(0, 0, 0, .05), (3, 0, .1, .2, -.5), (6, 0, .1, .05), (9, 0)]
msp.add_lwpolyline(points)

doc.saveas("lwpolyline5.dxf")
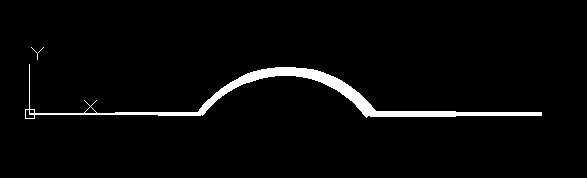
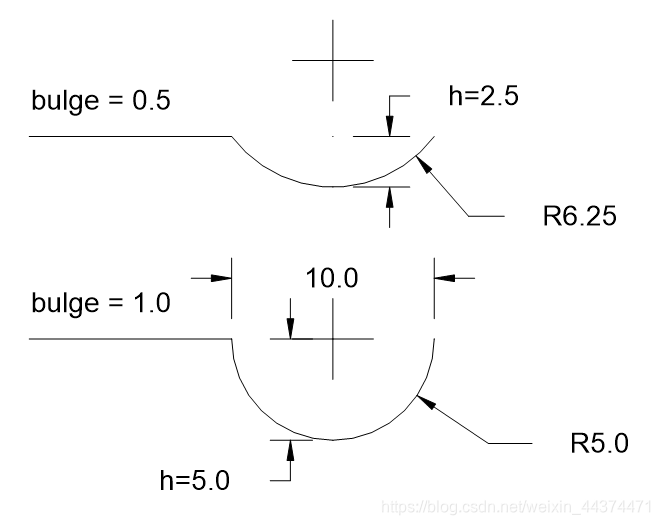
曲线段是从定义鼓起值到下面一点,曲线段总是AA弧,凸起值定义弧矢状面的比率(段高)。h)到半线段长度(点距离),凸起值为1定义半圆。鼓起 > 0曲线在顶点连接线的右边,鼓起 < 0曲线在左边。
ezdxfv0.8.9支持用户定义的点数格式,默认为xyseb:
- x=x坐标
- y=y坐标
- s=起始宽度
- e=末端宽度
- b=膨胀值
- v=(x,y)为元组
msp.add_lwpolyline([(0, 0, 0), (10, 0, 1), (20, 0, 0)], format='xyb')
msp.add_lwpolyline([(0, 10, 0), (10, 10, .5), (20, 10, 0)], format='xyb')
六、文本教程
按工厂函数添加一个简单的单行文本实体add_text().
import ezdxf

# TEXT is a basic entity and is supported by every DXF version.
# Argument setup=True for adding standard linetypes and text styles.
doc = ezdxf.new('R12', setup=True)
msp = doc.modelspace()

# use set_pos() for proper TEXT alignment:
# The relations between DXF attributes 'halign', 'valign',
# 'insert' and 'align_point' are tricky.
msp.add_text("A Simple Text").set_pos((2, 3), align='MIDDLE_RIGHT')

# Using a text style
msp.add_text("Text Style Example: Liberation Serif",
             dxfattribs={
                 'style': 'LiberationSerif',
                 'height': 0.35}
             ).set_pos((2, 6), align='LEFT')

doc.saveas("simple_text.dxf")
参数的有效文本对齐对齐在……里面Text.set_pos():
| VILT/Horiz |
左边 |
中心 |
正确的 |
| 顶 |
TOP_LEFT |
TOP_CENTER |
TOP_RIGHT |
| 中间 |
MIDDLE_LEFT |
MIDDLE_CENTER |
MIDDLE_RIGHT |
| 底部 |
BOTTOM_LEFT |
BOTTOM_CENTER |
BOTTOM_RIGHT |
| 基线 |
LEFT |
CENTER |
RIGHT |
特殊对齐ALIGNED和FIT,它们需要第二个对齐点,文本以垂直对齐对齐。基线在这两点之间的虚拟线上。
| 对齐 |
描述 |
| ALIGNED |
文本被拉伸或压缩,以精确地在P1和P2并调整文本高度以保持高度/宽度比。 |
| FIT |
文本被拉伸或压缩,以精确地在P1和P2但是只有文本宽度被调整,文本高度由高度属性。 |
| MIDDLE |
也是特制调整,但结果与MIDDLE_CENTER. |
1、标准文本样式
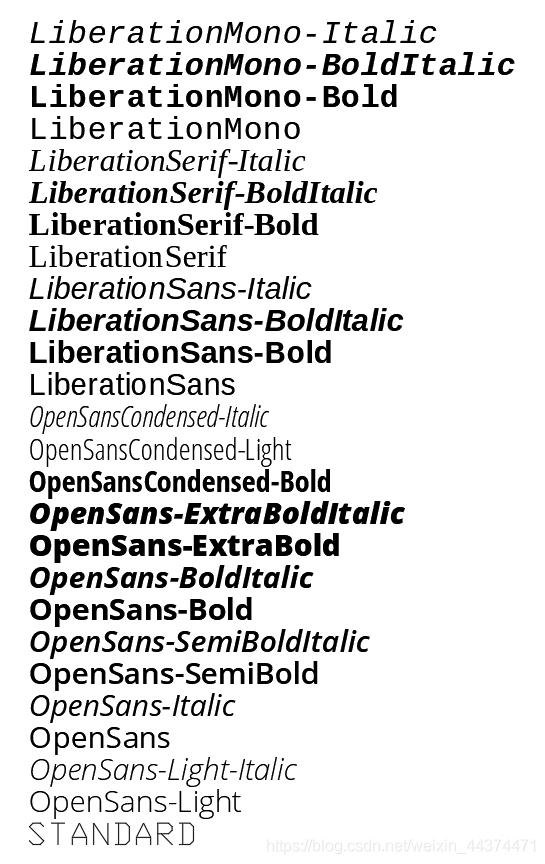
通过参数设置一些标准文本样式和线型setup=True:
doc = ezdxf.new('R12', setup=True)
中替换了所有专有字体声明。setup_styles()(Arial,Arial_窄,ISOCPEUR和时代)通过开放源码字体,这也是风格名称(例如。{‘style’: ‘OpenSans-Italic’}):
2、新文本风格
创建新的文本样式很简单:
doc.styles.new('myStandard', dxfattribs={'font' : 'OpenSans-Regular.ttf'})
但是,获得正确的字体名称通常并不那么简单,特别是在Windows环境下。这显示了获取字体名称所需的步骤。开放SANS:
- 打开字体文件夹C:\windows\字体
- 选择并打开字体系列开放SANS
- 右击开放SANS标准并选择特性
- 在第一个选项卡的顶部,您可以看到字体名称:‘OpenSans-Regular.ttf’
样式名称在dxf文档中必须是唯一的,否则ezdxf将引发DXFTableEntryError例外。若要替换现有条目,请将现有条目删除为doc.styles.remove(name),并添加替换项。
3、三维文本
可以将2D放置在Text使用OCS,详情见:接触网/UCS使用教程.
七、MText教程
这个MText实体是一个具有扩展格式可能性的多行实体,至少需要DXF版本R 2000,才能使用所有功能(例如背景填充)DXF R 2007。
PROLOG代码:
import ezdxf
doc = ezdxf.new('R2007', setup=True)
msp = doc.modelspace()
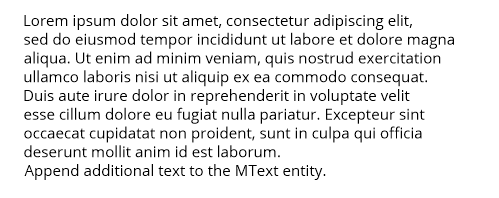
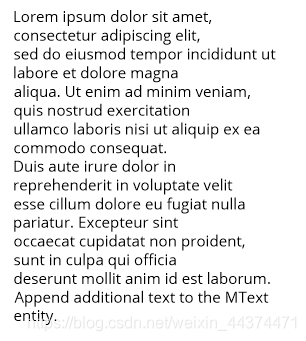
lorem_ipsum = """
Lorem ipsum dolor sit amet, consectetur adipiscing elit,
sed do eiusmod tempor incididunt ut labore et dolore magna
aliqua. Ut enim ad minim veniam, quis nostrud exercitation
ullamco laboris nisi ut aliquip ex ea commodo consequat.
Duis aute irure dolor in reprehenderit in voluptate velit
esse cillum dolore eu fugiat nulla pariatur. Excepteur sint
occaecat cupidatat non proident, sunt in culpa qui officia
deserunt mollit anim id est laborum.
"""
1、添加MText实体
可以将MText实体添加到任何布局(模型空间、纸张空间或块)中。add_mtext()功能。
# store MText entity for additional manipulations
mtext = msp.add_mtext(lorem_ipsum, dxfattribs={'style': 'OpenSans'})
这将添加具有文本样式的MText实体。‘OpenSans’。控件可以访问MText内容。text属性时,可以像任何Python字符串一样编辑该属性:
mtext.text += 'Append additional text to the MText entity.'
# even shorter with __iadd__() support:
mtext += 'Append additional text to the MText entity.'
线尾\n将被mtext行尾替换。\P在DXF出口,但是不反之亦然\P通过\n在DXF文件加载时。
2、文本放置
MText实体的位置由MText.dxf.insert而MText.dxf.attachment_point属性。这个attachment_point定义相对于insert位置,默认值为1.
中定义的附着点常数ezdxf.lldxf.const:
| 附件点 |
价值 |
| MTEXT左上方 |
1 |
| MTEXT顶部中心 |
2 |
| MTEXT右上角 |
3 |
| MTEXT中左 |
4 |
| MTEXT中间中心 |
5 |
| MTEXT中右 |
6 |
| MTEXT底部左 |
7 |
| MTEXT底部中心 |
8 |
| MTEXT底部右 |
9 |
MText实体有一个用于设置insert, attachment_point和rotation属性通过一个调用:set_location()
3、字符高度
字符高度由dxf属性定义。MText.dxf.char_height在绘图单元中,这对MText实体的行距也有影响:
mtext.dxf.char_height = 0.5
字符高度可以内联更改,请参见MText格式和MText内联码.
4、文本旋转(方向)
这个MText.dxf.rotation属性将文本旋转定义为x轴与文本水平方向之间的角度(以度数为单位)。这个MText.dxf.text_direction属性将MText的水平方向定义为WCS或OCS中的向量,如果OCS被定义。这两个属性都可以出现在同一个实体中,在这种情况下,MText.dxf.text_direction属性具有更高的优先级。
MText实体有两个获取/设置旋转的方法:get_rotation()返回独立于定义为角度或方向的旋转角度,以及set_rotation()设置rotation属性并移除text_direction属性(如果存在)。
5、定义包装边框
环绕边框限制文本宽度,并强制超出此边框的文本断行。无属性dxf.width(或设置)0)这些行仅在常规行尾处包装\P或\n,将参考列宽度设置为在给定宽度处强制附加行包装。文本高度不能被限制,文本总是占据所需的空间。
mtext.dxf.width = 60
6、MText格式
MText通过特殊代码支持内联格式:MText内联码
mtext.text = "{\\C1red text} - {\\C3green text} - {\\C5blue text}"

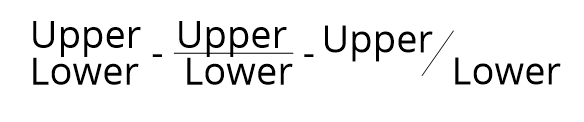
7、堆叠文本
MText还支持堆叠文本:
# the space ' ' in front of 'Lower' anr the ';' behind 'Lower' are necessary
# combined with vertical center alignment
mtext.text = "\\A1\\SUpper^ Lower; - \\SUpper/ Lower;} - \\SUpper# Lower;"
可用的文本格式辅助函数:
- set_color()-附加文字颜色更改
- set_font()-附加文字字体更改
- add_stacked_text()-附加堆叠文本
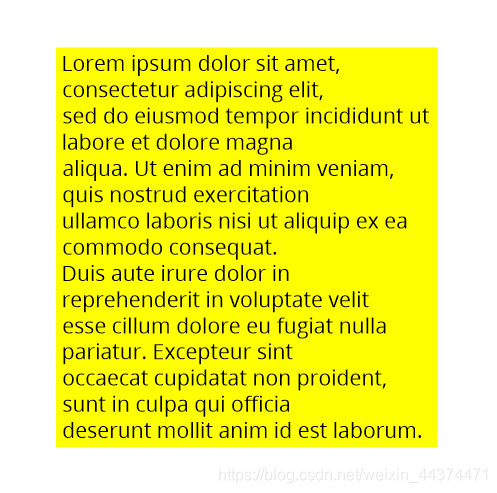
8、背景色(填充)
MText实体可以有一个背景填充:
- AutoCAD颜色索引
- 真彩色值(r, g, b)元组
- 颜色名称作为字符串,使用特殊名称’canvas’使用画布背景色
因为复杂的依赖关系ezdxf提供一种方法,用于一次性设置所有必需的DXF属性:
mtext.set_bg_color(2, scale=1.5)
参数比例尺确定文本周围有多少边框,该值基于文本高度,并且应该在1 - 5,在哪里1正好符合MText实体。
八、样条教程
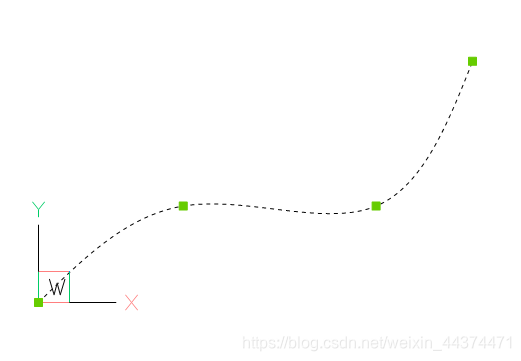
1、拟合点样条
样条只能由拟合点定义,这意味着曲线通过所有给定的拟合点。AutoCAD和BricsCAD自动生成所需的控制点和节点值,只要存在合适的点。
创建一个简单的样条:
doc = ezdxf.new('R2000')

fit_points = [(0, 0, 0), (750, 500, 0), (1750, 500, 0), (2250, 1250, 0)]
msp = doc.modelspace()
spline = msp.add_spline(fit_points)
在样条上附加一个适合点:
# fit_points, control_points, knots and weights are list-like containers:
spline.fit_points.append((2250, 2500, 0))
您可以设置额外的控制点,但是如果它们不适合自动生成的AutoCAD值,则它们将被忽略,并且不会被乱搞。
编辑AutoCAD生成的样条后出现的错误值问题:
doc = ezdxf.readfile("AutoCAD_generated.dxf")

msp = doc.modelspace()
spline = msp.query('SPLINE').first

# fit_points, control_points, knots and weights are list-like objects:
spline.fit_points.append((2250, 2500, 0))
据我所测试,这种方法工作正常,没有来自AutoCAD的投诉,但是对于出现问题的情况,请删除无效的数据:
# current control points do not match spline defined by fit points
spline.control_points = []

# count of knots is not correct:
# count of knots = count of control points + degree + 1
spline.knots = []

# same for weights, count of weights == count of control points
spline.weights = []
2、控制点样条
从拟合点生成样条是最简单的生成样条的方法,但这种方法也是最不精确的,因为样条是由控制点和节点值定义的,它们是针对由拟合点定义的情况产生的,而最糟糕的事实是,对于给定的每一组拟合点,都存在无限多个可能的样条作为解。
AutoCAD(和BricsCAD也)使用一种专有的算法从Fit点生成控制点和节点值,这与详细的文档不同。曲线全局插值。因此,由拟合点生成的样条由ezdxf不匹配由AutoCAD生成的样条(BricsCAD)。
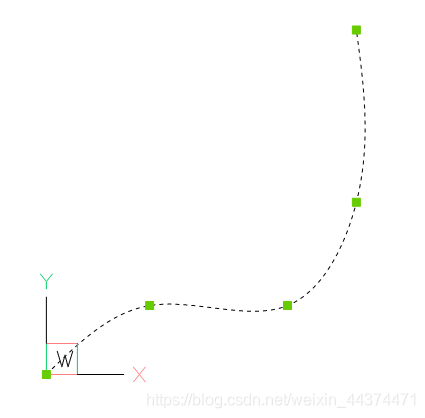
为了确保所有CAD应用程序的样条几何相同,样条必须由控制点定义。方法add_spline_control_frame()通过计算控制点添加样条槽拟合点。曲线全局插值算法。也有一个低级函数。ezdxf.math.bspline_control_frame()从契合点计算控制点。
msp.add_spline_control_frame(fit_points, method='uniform', dxfattribs={'color': 1})
msp.add_spline_control_frame(fit_points, method='distance', dxfattribs={'color': 3})
msp.add_spline_control_frame(fit_points, method='centripetal', dxfattribs={'color': 5})
- 黑色曲线:从拟合点生成AutoCAD/BricsCAD样条曲线
- 红色曲线:样条曲线插值,'uniform’方法
- 绿色曲线:样条曲线插值,'distance’方法
- 蓝色曲线:样条曲线插值,'centripetal’方法

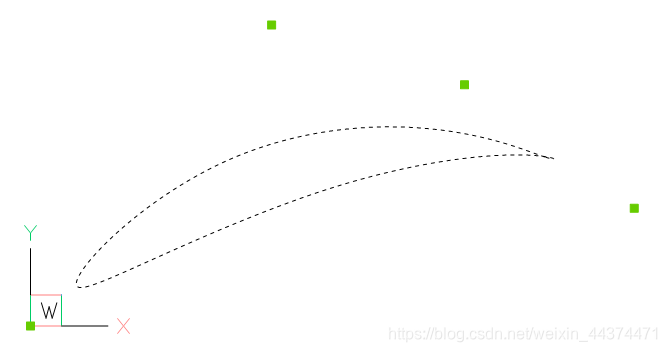
3、开样条
用该方法添加并打开控制点定义的(夹紧)样条。add_open_spline()。如果没有结给出数值,生成一个开放的均匀结向量。夹紧B样条从第一个控制点开始,在最后一个控制点结束.
control_points = [(0, 0, 0), (1250, 1560, 0), (3130, 610, 0), (2250, 1250, 0)]
msp.add_open_spline(control_points)

4、闭样条
闭样条是连续闭曲线。
msp.add_closed_spline(control_points)
5、有理样条
有理B样条为每个控制点设置一个权重,该控制点可以提高或降低控制点的影响,默认权重=1,以降低影响设置的权重<1提高影响力设定的权重>1。权值的计数必须始终等于控制点的计数。
示例以提高第一个控制点的影响:
msp.add_closed_rational_spline(control_points, weights=[3, 1, 1, 1])
6、样条性质
检查样条是否为闭曲线或者关闭/开样条,对于闭样条,最后一点连接到第一个点:
if spline.closed:
    # this spline is closed
    pass

# close spline
spline.closed = True

# open spline
spline.closed = False
设置由拟合点定义的样条的起始切线和结束切线:
spline.dxf.start_tangent = (0, 1, 0)  # in y-axis
spline.dxf.end_tangent = (1, 0, 0)  # in x-axis
获取存储在DXF文件中的数据计数:
count = spline.dxf.n_fit_points
count = spline.dxf.n_control_points
count = spline.dxf.n_knots
获取实际现有数据的数据计数:
count = spline.fit_point_count
count = spline.control_point_count
count = spline.knot_count
九、多边形教程(待补充)
十、网格教程
通过直接访问基本数据结构创建立方体网格:
import ezdxf

# 8 corner vertices
cube_vertices = [
    (0, 0, 0),
    (1, 0, 0),
    (1, 1, 0),
    (0, 1, 0),
    (0, 0, 1),
    (1, 0, 1),
    (1, 1, 1),
    (0, 1, 1),
]

# 6 cube faces
cube_faces = [
    [0, 1, 2, 3],
    [4, 5, 6, 7],
    [0, 1, 5, 4],
    [1, 2, 6, 5],
    [3, 2, 6, 7],
    [0, 3, 7, 4]
]

doc = ezdxf.new('R2000')  # MESH requires DXF R2000 or later
msp = doc.modelspace()
mesh = msp.add_mesh()
mesh.dxf.subdivision_levels = 0  # do not subdivide cube, 0 is the default value
with mesh.edit_data() as mesh_data:
    mesh_data.vertices = cube_vertices
    mesh_data.faces = cube_faces

doc.saveas("cube_mesh_1.dxf")
通过方法调用创建多维网格:
import ezdxf

# 8 corner vertices
p = [
    (0, 0, 0),
    (1, 0, 0),
    (1, 1, 0),
    (0, 1, 0),
    (0, 0, 1),
    (1, 0, 1),
    (1, 1, 1),
    (0, 1, 1),
]

doc = ezdxf.new('R2000')  # MESH requires DXF R2000 or later
msp = doc.modelspace()
mesh = msp.add_mesh()

with mesh.edit_data() as mesh_data:
    mesh_data.add_face([p[0], p[1], p[2], p[3]])
    mesh_data.add_face([p[4], p[5], p[6], p[7]])
    mesh_data.add_face([p[0], p[1], p[5], p[4]])
    mesh_data.add_face([p[1], p[2], p[6], p[5]])
    mesh_data.add_face([p[3], p[2], p[6], p[7]])
    mesh_data.add_face([p[0], p[3], p[7], p[4]])
    mesh_data.optimize()  # optional, minimizes vertex count

doc.saveas("cube_mesh_2.dxf")
十一、舱口教程
1、创建一条边界路径的舱口
最简单的形式Hatch实体有一条多边形路径,其中只有直线作为边界路径:
import ezdxf

doc = ezdxf.new('R2000')  # hatch requires the DXF R2000 (AC1015) format or later
msp = doc.modelspace()  # adding entities to the model space

hatch = msp.add_hatch(color=2)  # by default a solid fill hatch with fill color=7 (white/black)

# every boundary path is always a 2D element
# vertex format for the polyline path is: (x, y[, bulge])
# there are no bulge values in this example
hatch.paths.add_polyline_path([(0, 0), (10, 0), (10, 10), (0, 10)], is_closed=1)

doc.saveas("solid_hatch_polyline_path.dxf")
但与所有Polyline实体一样,Polyline路径也可以具有凸起值:
import ezdxf

doc = ezdxf.new('R2000')  # hatch requires the DXF R2000 (AC1015) format or later
msp = doc.modelspace()  # adding entities to the model space

hatch = msp.add_hatch(color=2)  # by default a solid fill hatch with fill color=7 (white/black)

# every boundary path is always a 2D element
# vertex format for the polyline path is: (x, y[, bulge])
# bulge value 1 = an arc with diameter=10 (= distance to next vertex * bulge value)
# bulge value > 0 ... arc is right of line
# bulge value < 0 ... arc is left of line
hatch.paths.add_polyline_path([(0, 0, 1), (10, 0), (10, 10, -0.5), (0, 10)], is_closed=1)

doc.saveas("solid_hatch_polyline_path_with_bulge.dxf")
定义边界路径最灵活的方法是边缘路径。边路径由多个边组成,每条边都可以是下列元素之一:
- 线EdgePath.add_line()
- 弧EdgePath.add_arc()
- 椭圆EdgePath.add_ellipse()
- 样条EdgePath.add_spline()
创建一个以边缘路径(椭圆)为边界路径的实体舱口:
import ezdxf

doc = ezdxf.new('R2000')  # hatch requires the DXF R2000 (AC1015) format or later
msp = doc.modelspace()  # adding entities to the model space

# important: major axis >= minor axis (ratio <= 1.)
# minor axis length = major axis length * ratio
msp.add_ellipse((0, 0), major_axis=(0, 10), ratio=0.5)

# by default a solid fill hatch with fill color=7 (white/black)
hatch = msp.add_hatch(color=2)

# every boundary path is always a 2D element
edge_path = hatch.paths.add_edge_path()
# each edge path can contain line arc, ellipse and spline elements
# important: major axis >= minor axis (ratio <= 1.)
edge_path.add_ellipse((0, 0), major_axis=(0, 10), ratio=0.5)

doc.saveas("solid_hatch_ellipse.dxf")
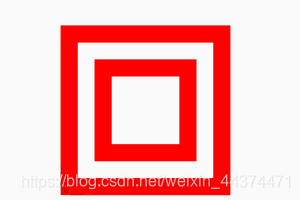
2、创建多条边界路径(岛屿)的舱口
DXF分布hatch_style定义岛屿检测样式:
| 编号 |
样式 |
| 0 |
嵌套变化填充和未填充区域 |
| 1 |
外区外部和最外层路径被填充 |
| 2 |
无视-外部路径被填充 |
hatch = msp.add_hatch(color=1, dxfattribs={
    'hatch_style': 0,
    # 0 = nested
    # 1 = outer
    # 2 = ignore
})

# The first path has to set flag: 1 = external
# flag const.BOUNDARY_PATH_POLYLINE is added (OR) automatically
hatch.paths.add_polyline_path([(0, 0), (10, 0), (10, 10), (0, 10)], is_closed=1, flags=1)
这也是所有4条路径的结果hatch_style设为2(忽略)
# The second path has to set flag: 16 = outermost
hatch.paths.add_polyline_path([(1, 1), (9, 1), (9, 9), (1, 9)], is_closed=1, flags=16)
这也是所有4条路径的结果hatch_style设为1(外部)。
# The third path has to set flag: 0 = default
hatch.paths.add_polyline_path([(2, 2), (8, 2), (8, 8), (2, 8)], is_closed=1, flags=0)

# The forth path has to set flag: 0 = default, and so on
hatch.paths.add_polyline_path([(3, 3), (7, 3), (7, 7), (3, 7)], is_closed=1, flags=0)
各种组合的预期效果hatch_style价值与路径旗子,或者DXF引用没有记录重叠路径的处理,所以不要问我、询问Autodesk或者自己尝试并在论坛上发布您的经验。
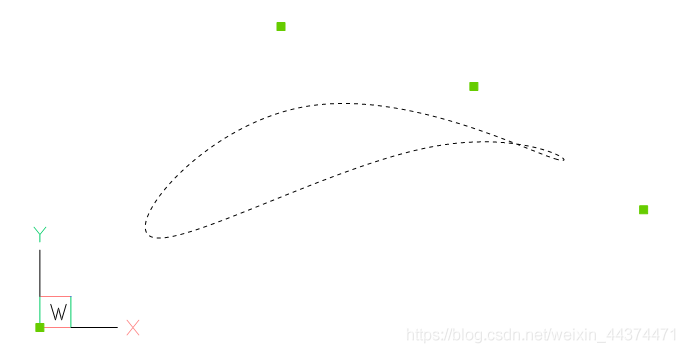
3、边缘路径边界实例
hatch = msp.add_hatch(color=1)

# 1. polyline path
hatch.paths.add_polyline_path([
    (240, 210, 0),
    (0, 210, 0),
    (0, 0, 0.),
    (240, 0, 0),
],
    is_closed=1,
    flags=1,
)
# 2. edge path
edge_path = hatch.paths.add_edge_path(flags=16)
edge_path.add_spline(
    control_points=[
        (126.658105895725, 177.0823706957212),
        (141.5497003747484, 187.8907860433995),
        (205.8997365206943, 154.7946313459515),
        (113.0168862297068, 117.8189380884978),
        (202.9816918983783, 63.17222935389572),
        (157.363511042264, 26.4621294342132),
        (144.8204003260554, 28.4383294369643)
    ],
    knot_values=[
        0.0, 0.0, 0.0, 0.0, 55.20174685732758, 98.33239645153571,
        175.1126541251052, 213.2061566683142, 213.2061566683142,
        213.2061566683142, 213.2061566683142
    ],
)
edge_path.add_arc(
    center=(152.6378550678883, 128.3209356351659),
    radius=100.1880612627354,
    start_angle=94.4752130054052,
    end_angle=177.1345242028005,
)
edge_path.add_line(
    (52.57506282464041, 123.3124200796114),
    (126.658105895725, 177.0823706957212)
)

4、结合边界路径
Hatch实体可以与基本几何相关联,这意味着如果在CAD应用程序中编辑基本几何,则Hatch得到相同的修改。因为ezdxf是不一个CAD应用程序,这个关联是不由ezdxf因此,如果您修改了基础几何之后,边界路径的几何没有被更新,并且没有进行验证来检查关联的几何是否与边界路径匹配,这将打开许多创建无效DXF文件的可能性:小心使用。
此示例将LWPOLYLINE实体与从LWPOLYLINE顶点创建的舱口关联:
# Create base geometry
lwpolyline = msp.add_lwpolyline(
    [(0, 0, 0), (10, 0, .5), (10, 10, 0), (0, 10, 0)],
    format='xyb',
    dxfattribs={'closed': True},
)

hatch = msp.add_hatch(color=1)
path = hatch.paths.add_polyline_path(
    # get path vertices from associated LWPOLYLINE entity
    lwpolyline.get_points(format='xyb'),
    # get closed state also from associated LWPOLYLINE entity
    is_closed=lwpolyline.closed,
)

# Set association between boundary path and LWPOLYLINE
hatch.associate(path, [lwpolyline])
一个EdgePath需要与形成边界路径的所有几何实体相关联。
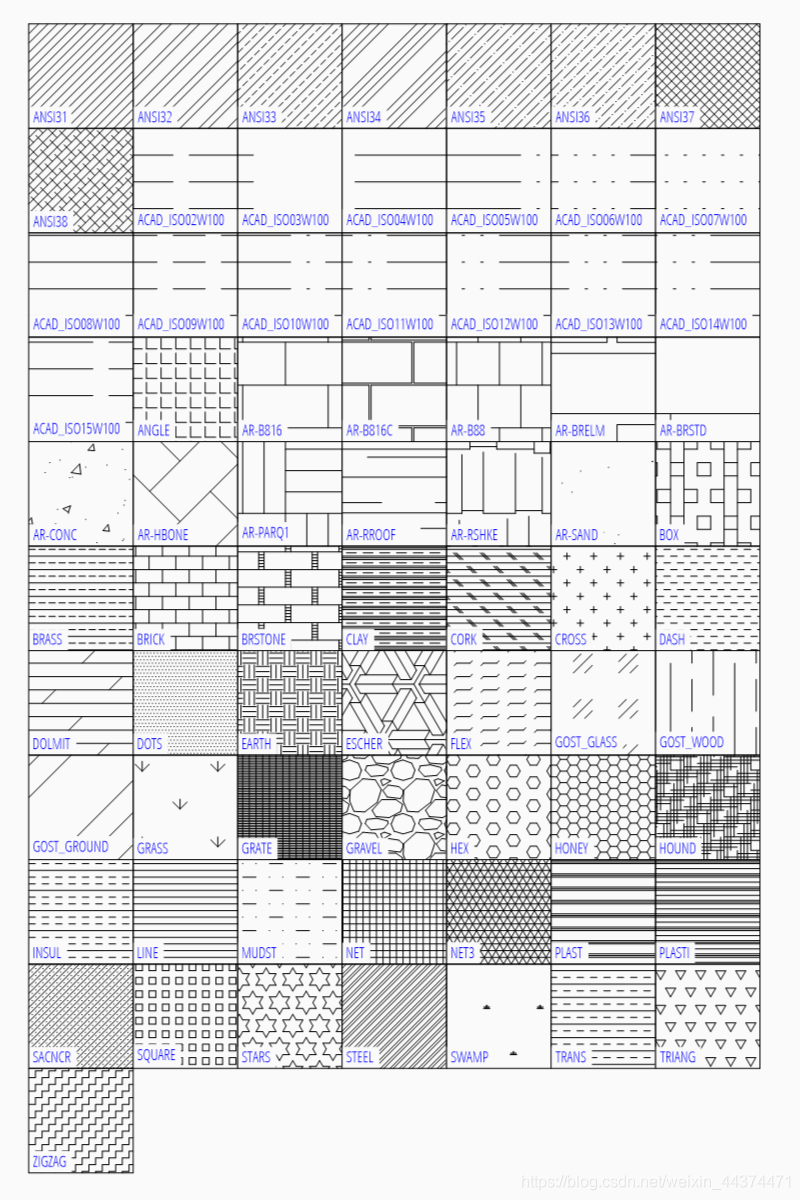
5、预定义舱口图案
hatch.set_pattern_fill('ANSI31', scale=0.5)
十二、图像和图像Def教程
将光栅图像插入DXF绘图中,光栅图像不会嵌入DXF文件中:
import ezdxf


doc = ezdxf.new('AC1015')  # image requires the DXF R2000 format or later
my_image_def = doc.add_image_def(filename='mycat.jpg', size_in_pixel=(640, 360))
# The IMAGEDEF entity is like a block definition, it just defines the image

msp = doc.modelspace()
# add first image
msp.add_image(insert=(2, 1), size_in_units=(6.4, 3.6), image_def=my_image_def, rotation=0)
# The IMAGE entity is like the INSERT entity, it creates an image reference,
# and there can be multiple references to the same picture in a drawing.

msp.add_image(insert=(4, 5), size_in_units=(3.2, 1.8), image_def=my_image_def, rotation=30)

# get existing image definitions, Important: IMAGEDEFs resides in the objects section
image_defs = doc.objects.query('IMAGEDEF')  # get all image defs in drawing

doc.saveas("dxf_with_cat.dxf")
十三、底盘及底座定义指南
插入PDF、DWF、DWFx或DGN文件作为绘图底片,底片文件未嵌入DXF文件:
import ezdxf


doc = ezdxf.new('AC1015')  # underlay requires the DXF R2000 format or later
my_underlay_def = doc.add_underlay_def(filename='my_underlay.pdf', name='1')
# The (PDF)DEFINITION entity is like a block definition, it just defines the underlay
# 'name' is misleading, because it defines the page/sheet to be displayed
# PDF: name is the page number to display
# DGN: name='default' ???
# DWF: ????

msp = doc.modelspace()
# add first underlay
msp.add_underlay(my_underlay_def, insert=(2, 1, 0), scale=0.05)
# The (PDF)UNDERLAY entity is like the INSERT entity, it creates an underlay reference,
# and there can be multiple references to the same underlay in a drawing.

msp.add_underlay(my_underlay_def, insert=(4, 5, 0), scale=.5, rotation=30)

# get existing underlay definitions, Important: UNDERLAYDEFs resides in the objects section
pdf_defs = doc.objects.query('PDFDEFINITION')  # get all pdf underlay defs in drawing

doc.saveas("dxf_with_underlay.dxf")
十四、线型教程
简单的行类型示例:

您可以定义自己的行类型。DXF线型定义由名称、描述和元素组成:
elements = [total_pattern_length, elem1, elem2, ...]
总图案长度
所有线型元素之和(绝对值)
埃莱姆
如果elem>0是一条线,如果elem<0是间隙,如果elem=0.0是一个点。
创建一个新的线型定义:
import ezdxf
from ezdxf.tools.standards import linetypes  # some predefined line types

doc = ezdxf.new()
msp = modelspace()

my_line_types = [
    ("DOTTED", "Dotted .  .  .  .  .  .  .  .  .  .  .  .  .  .  .  .", [0.2, 0.0, -0.2]),
    ("DOTTEDX2", "Dotted (2x) .    .    .    .    .    .    .    . ", [0.4, 0.0, -0.4]),
    ("DOTTED2", "Dotted (.5) . . . . . . . . . . . . . . . . . . . ", [0.1, 0.0, -0.1]),
]
for name, desc, pattern in my_line_types:
    if name not in doc.linetypes:
        doc.linetypes.new(name=name, dxfattribs={'description': desc, 'pattern': pattern})
设置一些预定义的行类型:
for name, desc, pattern in linetypes():
    if name not in doc.linetypes:
        doc.linetypes.new(name=name, dxfattribs={'description': desc, 'pattern': pattern})
1、检查可用行类型
linetypes对象支持一些标准的Python协议:
# iteration
print('available line types:')
for linetype in doc.linetypes:
    print('{}: {}'.format(linetype.dxf.name, linetype.dxf.description))

# check for existing line type
if 'DOTTED' in doc.linetypes:
    pass

count = len(doc.linetypes) # total count of linetypes
2、删除线型
删除仍在使用的行类型将生成无效的DXF文件。
您可以删除一行类型:
doc.layers.remove('DASHED')
这只是删除了linetype定义,所有dxf属性linetype设置为DASHED仍指线型DASHED并且AutoCAD不会用未定义的行类型打开DXF文件。
3、复杂线型教程
在DXF R13中,Autodesk引入了复杂的线条类型,在线条类型中包含文本或形状。ezdxfv0.8.4及更高版本支持复杂的行类型。
包含文本的复杂行类型示例:

具有形状的复杂线型示例:

为了简单起见,用于复杂行类型的模式字符串与AutoCAD.lin文件中的模式定义字符串基本上是相同的。
复杂行类型文本示例:
doc = ezdxf.new('R2018')  # DXF R13 or later is required

doc.linetypes.new('GASLEITUNG2', dxfattribs={
    'description': 'Gasleitung2 ----GAS----GAS----GAS----GAS----GAS----GAS--',
    'length': 1,  # required for complex line types
    # line type definition in acadlt.lin:
    'pattern': 'A,.5,-.2,["GAS",STANDARD,S=.1,U=0.0,X=-0.1,Y=-.05],-.25',
})
模式总是以A,以下浮点值的含义与简单行类型相同,值>0是一行,值<0是间隙,0是点,[启动线条模式的复杂部分。下面的引号文本定义文本类型,下面的文本没有引号定义SHAPE类型,在.lin文件中,形状类型是形状名称,但ezdxf无法将此名称转换为所需的形状文件索引,因此你必须将此名称转换为形状文件索引(例如,使用AutoCAD保存该文件为DXF并搜索行类型定义,另请参阅DXF内部文件:LTYPE表).
第二个参数是文本类型的文本样式和SHAPE类型的形状文件名,形状文件必须与DXF文件位于同一个目录中。方案中的下列参数S=1.0是:
- S…缩放因子,始终>0,如果S=0时文本或SHAPE不可见
- R或U…相对于直线方向的旋转
- X…X方向偏移(沿线)
- Y…Y方向偏移(垂直于直线)
参数不区分大小写。]结束线型的复杂部分。
对我来说,对这些参数的微调仍然是一个尝试错误的过程,对于文本来说,缩放因子(标准文本样式)设置文本高度(S=1,文本的高度为1单位),通过将y方向移动到缩放因子的一半,文本的中心在直线上。对于x方向来说,在文本前面和文本之后放置一个空白,通过尝试和错误找到x移动值和间隙大小似乎是一个很好的实践。总长度至少是所有行和间隙定义(绝对值)的总和。
复杂行类型SHAPE的示例:
doc.linetypes.new('GRENZE2', dxfattribs={
    'description': 'Grenze eckig ----[]-----[]----[]-----[]----[]--',
    'length': 1.45,  # required for complex line types
    # line type definition in acadlt.lin:
    # A,.25,-.1,[BOX,ltypeshp.shx,x=-.1,s=.1],-.1,1
    # replacing BOX by shape index 132 (got index from an AutoCAD file),
    # ezdxf can't get shape index from ltypeshp.shx
    'pattern': 'A,.25,-.1,[132,ltypeshp.shx,x=-.1,s=.1],-.1,1',
})
只有关联的形状文件(lypeshp.shx)和DXF文件位于同一个目录下,具有形状的复杂行类型才能工作。