一、前言
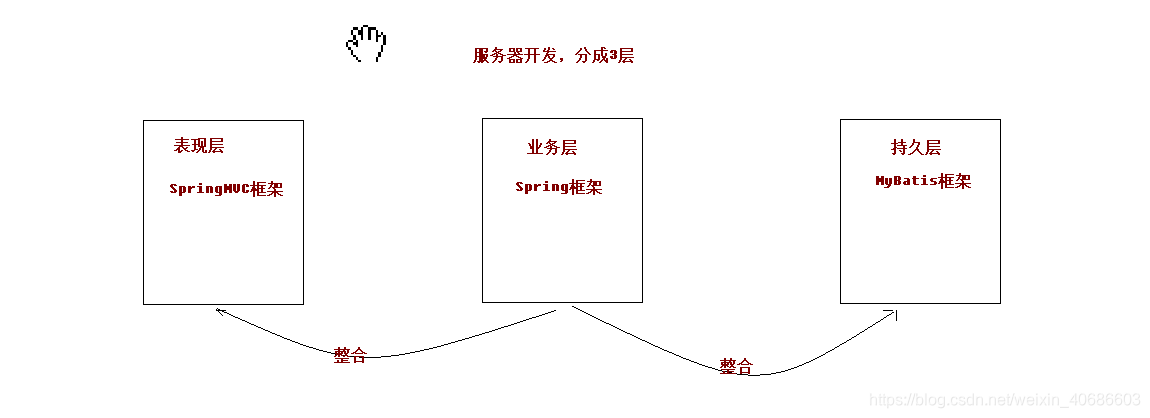
之前学习ssm框架的时候都是每个框架独立分散的系统性学习,对于框架的整体,总结效果不太好,后来看了黑马视频教程有个老师的思路给了我比较大的启发,以spring为中心,去整合springmvc、mybatis,无论是搭建环境,还是理解整体ssm思路都是比较不错的选择
二、SSM整合步骤介绍(本文通过注解+配置实现)

首先进行整合的前提是确保各自独立都能够正常运行,然后在互相整合横向扩展
1、在domain包下定义一个Account的Javabean类用于交互数据
public class Account implements Serializable {
    private Integer id;
    private String name;
    private Integer salary;

    public Integer getId() {
        return id;
    }

    public void setId(Integer id) {
        this.id = id;
    }

    public String getName() {
        return name;
    }

    public void setName(String name) {
        this.name = name;
    }

    public Integer getSalary() {
        return salary;
    }

    public void setSalary(Integer salary) {
        this.salary = salary;
    }

    @Override
    public String toString() {
        return "Account{" +
                "id=" + id +
                ", name='" + name + '\'' +
                ", salary=" + salary +
                '}';
    }
}
2、先在业务层定义IAccountService接口及AccountServiceImpl接口实现类
@Service
public interface IAccountService {

    //查询用户
    List<Account> findAccount();

    //删除用户
    void delAccount(Account account);

    //添加用户
    void addAccount(Account account);

}
@Service("accountService")
public class AccountServiceImpl implements IAccountService {

    @Autowired
    private AccountDao accountDao;

    @Override
    public List<Account> findAccount(){

        System.out.println("业务层findAccount方法执行了");
        return accountDao.findAccount();
    }

    @Override
    public void delAccount(Account account) {
        System.out.println("业务层delAccount方法执行了");
        accountDao.delAccount(account);
    }

    @Override
    public void addAccount(Account account) {
        System.out.println("业务层addAccount方法执行了");
        accountDao.addAccount(account);
    }
}
3、在dao层定义AccountDao用于跟数据库进行交互,得到结果
@Repository
public interface AccountDao {

    //查询用户
    @Select("select * from user_info")
    List<Account> findAccount();

    //删除用户
    @Delete("delete from user_info where id=#{id}")
    void delAccount(Account account);

    //添加用户
    @Insert("insert into user_info values(#{id},#{name},#{salary})")
    void addAccount(Account account);
}
4、业务层/持久层整合的配置文件
<?xml version="1.0" encoding="UTF-8"?>
<beans xmlns="http://www.springframework.org/schema/beans"
       xmlns:xsi="http://www.w3.org/2001/XMLSchema-instance"
       xmlns:context="http://www.springframework.org/schema/context"
       xmlns:aop="http://www.springframework.org/schema/aop"
       xmlns:tx="http://www.springframework.org/schema/tx"
       xsi:schemaLocation="http://www.springframework.org/schema/beans
   http://www.springframework.org/schema/beans/spring-beans.xsd
   http://www.springframework.org/schema/context
   http://www.springframework.org/schema/context/spring-context.xsd
   http://www.springframework.org/schema/aop
   http://www.springframework.org/schema/aop/spring-aop.xsd
   http://www.springframework.org/schema/tx
   http://www.springframework.org/schema/tx/spring-tx.xsd">

  <!--配置业务层要扫描的包-->
  <context:component-scan base-package="com.yushi">
     <context:exclude-filter type="annotation" expression="org.springframework.stereotype.Controller"/>
  </context:component-scan>

  <!--配置连接池-->
  <bean id="dataSource" class="com.mchange.v2.c3p0.ComboPooledDataSource">
    <property name="driverClass" value="com.mysql.jdbc.Driver"/>
    <property name="jdbcUrl" value="jdbc:mysql://ip:port/test"/>
    <property name="user" value="****"/>
    <property name="password" value="*****"/>
  </bean>

  <!--配置sqlsessionFactory工厂-->
  <bean id="sqlSessionFactory" class="org.mybatis.spring.SqlSessionFactoryBean">
    <property name="dataSource" ref="dataSource"/>
  </bean>

  <!--配置dao要扫描的包-->
  <bean id="mapperScanner" class="org.mybatis.spring.mapper.MapperScannerConfigurer">
    <property name="basePackage" value="com.yushi.dao"/>
  </bean>

  <!--配置Spring框架声明式事务管理-->
  <!--配置事务管理器-->
  <bean id="transactionManager" class="org.springframework.jdbc.datasource.DataSourceTransactionManager">
    <property name="dataSource" ref="dataSource" />
  </bean>

  <!--配置事务通知-->
  <tx:advice id="txAdvice" transaction-manager="transactionManager">
    <tx:attributes>
      <tx:method name="find*" read-only="true"/>
      <tx:method name="*" isolation="DEFAULT"/>
    </tx:attributes>
  </tx:advice>

  <!--配置AOP增强-->
  <aop:config>
    <aop:advisor advice-ref="txAdvice" pointcut="execution(* com.yushi.service.impl.*.*(..))"/>
  </aop:config>

</beans>
5、调试下整合后的效果,成功获得持久层的数据(业务层、持久层建立联系没有问题)
public class client {
    @Test
    public void run2(){
        ApplicationContext ioc = new ClassPathXmlApplicationContext("applicationContext.xml");
        IAccountService accountService = (IAccountService)ioc.getBean("accountService");

        List<Account> accounts = accountService.findAccount();
        for (Account account:accounts){
            System.out.println(account);
        }
    }
}

6、开始建立表现层与业务层之间的联系,配置webapp包下的index.jsp,确保前端入口可以正确访问到服务端表现层
<%@ page contentType="text/html;charset=UTF-8" language="java" %>
<html>
<head>
    <title>测试</title>
</head>
<body>
    <a href="/user/findAll">查询用户信息</a><br/>

    <form action="/user/delAccount" method="post">
        用户id:<input type="text" name="id"><br/>
               <input type="submit" value="提交"><br/>
    </form>

    <form action="/user/addAccount" method="post">
        用户id <input type="text" name="id"><br/>
        用户名:<input type="text" name="name"><br/>
        工资: <input type="text" name="salary"><br/>
               <input type="submit" value="提交">
    </form>

</body>
</html>
7、配置前端控制器,表现层的枢纽部分,对应web.xml文件
<!DOCTYPE web-app PUBLIC
        "-//Sun Microsystems, Inc.//DTD Web Application 2.3//EN"
        "http://java.sun.com/dtd/web-app_2_3.dtd" >
<web-app>
  <display-name>Archetype Created Web Application</display-name>

  <!--配置spring的监听器-->
  <listener>
    <listener-class>org.springframework.web.context.ContextLoaderListener</listener-class>
  </listener>
  <!--设置配置文件的路径-->
  <context-param>
    <param-name>contextConfigLocation</param-name>
    <param-value>classpath:applicationContext.xml</param-value>
  </context-param>

  <!--配置前端控制器-->
  <servlet>
    <servlet-name>dispatcherServlet</servlet-name>
    <servlet-class>org.springframework.web.servlet.DispatcherServlet</servlet-class>
    <!--加载springmvc配置文件-->
    <init-param>
      <param-name>contextConfigLocation</param-name>
      <param-value>classpath:springmvc.xml</param-value>
    </init-param>
    <!--启动服务器,创建servlet-->
    <load-on-startup>1</load-on-startup>
  </servlet>
  <servlet-mapping>
    <servlet-name>dispatcherServlet</servlet-name>
    <url-pattern>/</url-pattern>
  </servlet-mapping>

  <!--解决中文乱码问题-->
  <filter>
    <filter-name>characterEncodingFilter</filter-name>
    <filter-class>org.springframework.web.filter.CharacterEncodingFilter</filter-class>
    <init-param>
      <param-name>encoding</param-name>
      <param-value>UTF-8</param-value>
    </init-param>
  </filter>
  <filter-mapping>
    <filter-name>characterEncodingFilter</filter-name>
    <url-pattern>/*</url-pattern>
  </filter-mapping>


</web-app>
8、配置表现层对应spring容器的初始化文件
<?xml version="1.0" encoding="UTF-8"?>
<beans xmlns="http://www.springframework.org/schema/beans"
       xmlns:mvc="http://www.springframework.org/schema/mvc" xmlns:context="http://www.springframework.org/schema/context"
       xmlns:xsi="http://www.w3.org/2001/XMLSchema-instance"
       xsi:schemaLocation="
        http://www.springframework.org/schema/beans
        http://www.springframework.org/schema/beans/spring-beans.xsd
        http://www.springframework.org/schema/mvc
        http://www.springframework.org/schema/mvc/spring-mvc.xsd
        http://www.springframework.org/schema/context
        http://www.springframework.org/schema/context/spring-context.xsd">

    <!--开启注解扫描,只扫描controller注解-->
    <context:component-scan base-package="com.yushi">
        <context:include-filter type="annotation" expression="org.springframework.stereotype.Controller"/>
    </context:component-scan>

    <!--配置视图解析器-->
    <bean id="internalResourceViewResolver" class="org.springframework.web.servlet.view.InternalResourceViewResolver">
        <property name="prefix" value="/WEB-INF/pages/"/>
        <property name="suffix" value=".jsp"/>
    </bean>

    <!--开启springmvc注解的支持-->
    <mvc:annotation-driven/>

</beans>
9、在controller包下定义AccountController类,定义方法用于跟业务层进行联系
@Controller
@RequestMapping("/user")
public class AccountController {

    @Autowired
    private IAccountService accountService;

    //查询所有账户
    @RequestMapping("/findAll")
    public String findAll(Model model){
        System.out.println("表现层findAll方法执行了");
        List<Account> accounts = accountService.findAccount();
        for (Account account:accounts){
            System.out.println(account);
        }
        model.addAttribute("list",accounts);
        return "success";
    }

    //删除账户
    @RequestMapping("/delAccount")
    public String delAccount(){
        Account account = new Account();
        account.setId(1);
        System.out.println("表现层delAccount方法执行了");
        accountService.delAccount(account);
        return "success";
    }

    //添加账户
    @RequestMapping("/addAccount")
    public String addAccount(Integer id,String name,Integer salary){
        Account account = new Account();
        account.setId(id);
        account.setName(name);
        account.setSalary(salary);
        System.out.println("表现层addAccount方法执行了");
        accountService.addAccount(account);
        return "success";
    }

}
10、在WEB-INF/pages目录下新建success.jsp用于controller方法请求成功后跳转的页面
<%@ page contentType="text/html;charset=UTF-8" language="java" isELIgnored="false" %>
<%@ taglib prefix="c" uri="http://java.sun.com/jsp/jstl/core" %>
<html>
<head>
    <title>成功</title>
</head>
<body>
    <h3>跳转成功</h3>
    <c:forEach items="${list}" var="account">
        ${account.name}<br/>
    </c:forEach>
</body>
</html>
11、项目整体引入的依赖包参考
<properties>
  <project.build.sourceEncoding>UTF-8</project.build.sourceEncoding>
  <maven.compiler.source>1.8</maven.compiler.source>
  <maven.compiler.target>1.8</maven.compiler.target>
  <spring.version>5.0.2.RELEASE</spring.version>
  <slf4j.version>1.6.6</slf4j.version>
  <log4j.version>1.2.12</log4j.version>
  <mysql.version>5.1.6</mysql.version>
  <mybatis.version>3.4.5</mybatis.version>
</properties>

<dependencies>
  <!-- spring -->
  <dependency>
    <groupId>org.aspectj</groupId>
    <artifactId>aspectjweaver</artifactId>
    <version>1.6.8</version>
  </dependency>

  <dependency>
    <groupId>org.springframework</groupId>
    <artifactId>spring-aop</artifactId>
    <version>${spring.version}</version>
  </dependency>

  <dependency>
    <groupId>org.springframework</groupId>
    <artifactId>spring-context</artifactId>
    <version>${spring.version}</version>
  </dependency>

  <dependency>
    <groupId>org.springframework</groupId>
    <artifactId>spring-web</artifactId>
    <version>${spring.version}</version>
  </dependency>

  <dependency>
    <groupId>org.springframework</groupId>
    <artifactId>spring-webmvc</artifactId>
    <version>${spring.version}</version>
  </dependency>

  <dependency>
    <groupId>org.springframework</groupId>
    <artifactId>spring-test</artifactId>
    <version>${spring.version}</version>
  </dependency>

  <dependency>
    <groupId>org.springframework</groupId>
    <artifactId>spring-tx</artifactId>
    <version>${spring.version}</version>
  </dependency>

  <dependency>
    <groupId>org.springframework</groupId>
    <artifactId>spring-jdbc</artifactId>
    <version>${spring.version}</version>
  </dependency>

  <dependency>
    <groupId>junit</groupId>
    <artifactId>junit</artifactId>
    <version>4.12</version>
    <scope>compile</scope>
  </dependency>

  <dependency>
    <groupId>mysql</groupId>
    <artifactId>mysql-connector-java</artifactId>
    <version>${mysql.version}</version>
  </dependency>

  <dependency>
    <groupId>javax.servlet</groupId>
    <artifactId>servlet-api</artifactId>
    <version>2.5</version>
    <scope>provided</scope>
  </dependency>

  <dependency>
    <groupId>javax.servlet.jsp</groupId>
    <artifactId>jsp-api</artifactId>
    <version>2.0</version>
    <scope>provided</scope>
  </dependency>

  <dependency>
    <groupId>jstl</groupId>
    <artifactId>jstl</artifactId>
    <version>1.2</version>
  </dependency>

  <!-- log start -->
  <dependency>
    <groupId>log4j</groupId>
    <artifactId>log4j</artifactId>
    <version>${log4j.version}</version>
  </dependency>

  <dependency>
    <groupId>org.slf4j</groupId>
    <artifactId>slf4j-api</artifactId>
    <version>${slf4j.version}</version>
  </dependency>

  <dependency>
    <groupId>org.slf4j</groupId>
    <artifactId>slf4j-log4j12</artifactId>
    <version>${slf4j.version}</version>
  </dependency>

  <!-- log end -->
  <dependency>
    <groupId>org.mybatis</groupId>
    <artifactId>mybatis</artifactId>
    <version>${mybatis.version}</version>
  </dependency>

  <dependency>
    <groupId>org.mybatis</groupId>
    <artifactId>mybatis-spring</artifactId>
    <version>1.3.0</version>
  </dependency>

  <dependency>
    <groupId>c3p0</groupId>
    <artifactId>c3p0</artifactId>
    <version>0.9.1.2</version>
    <type>jar</type>
    <scope>compile</scope>
  </dependency>
</dependencies>
三、结合项目层级介绍用户请求代码走向

1、通过Tomcat启动后端服务时,Tomcat会加载web.xml配置,创建servletContext域对象,同时还会初始化两个bean工厂,一个是springmvc.xml,一个是applicationContext.xml
1、applicationContext是通过监听器,监听servletContext对象是否创建而进行创建的
2、关于spring对应的bean工厂初始化的对象有哪些大家可配置文件即可
2、用户最初通过http://localhost:8080/index.jsp访问到index.jsp资源文件,触发事件

3、通过index.jsp中的事件触发请求到DispatcherServlet前端控制器,通过前端控制器分发到映射器,也就是我们配置的@requestMapping注解,映射到目标方法执行

4、执行controller层方法,会注入service层对象执行service下对应的接口方法(这个时候程序处理逻辑已经来到了业务层)

5、在service接口实现方法中又注入了dao层对象,然后通过方法去调用通知dao层(这个时候程序已经走到持久层)

6、DAO层对数据进行响应的增删改查,将结果返回到service层,service层又将结果向上返回到controller

7、最后controller层将最终结果通知到success.jsp文件
8、用户看到最后的变动效果

四、SSM简单整合demo源码