自定义组件:
Element 组件其实就是自定义的标签。例如<el-button> 就是对<button>的封装。
本质上,组件是带有一个名字且可复用的 Vue 实例,完全可以自己定义。
定义格式:
Vue.component(组件名称, {
	props:组件的属性,
	data: 组件的数据函数,
	template: 组件解析的标签模板
})
演示:
<!DOCTYPE html>
<html lang="en">
<head>
    <meta charset="UTF-8">
    <meta name="viewport" content="width=device-width, initial-scale=1.0">
    <title>自定义组件</title>
    <link rel="stylesheet" href="../element-ui/lib/theme-chalk/index.css">
    <script src="vue.js"></script>
    <script src="../element-ui/lib/index.js"></script>

</head>
<body>

<div id="div">
    <my-button>自定义按钮</my-button>
</div>
</body>
<script>
    Vue.component("my-button", {
        // 属性
        props: ["style"],
        // 数据函数
        data: function () {
            return {
                msg: "我的按钮"
            }
        },
        // 解析标签模板
        template: "<button style='color: #5fb1f3'>{{msg}}</button>"
    });
    new Vue({
        el: "#div"
    });
</script>
</html>
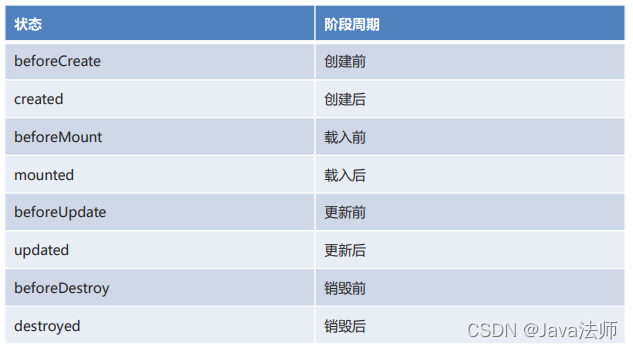
Vue生命周期:

生命周期的八个阶段:
演示:
<!DOCTYPE html>
<html lang="en">
<head>
    <meta charset="UTF-8">
    <meta name="viewport" content="width=device-width, initial-scale=1.0">
    <title>生命周期</title>
    <script src="vue.js"></script>
</head>
<body>
<div id="app">
    {{message}}
</div>
</body>
<script>
    let vm = new Vue({
        el: '#app',
        data: {
            message: 'Vue的生命周期'
        },
        beforeCreate: function() {
            console.group('------beforeCreate创建前状态------');
            console.log("%c%s", "color:red", "el     : " + this.$el); //undefined
            console.log("%c%s", "color:red", "data   : " + this.$data); //undefined
            console.log("%c%s", "color:red", "message: " + this.message);//undefined
        },
        created: function() {
            console.group('------created创建完毕状态------');
            console.log("%c%s", "color:red", "el     : " + this.$el); //undefined
            console.log("%c%s", "color:red", "data   : " + this.$data); //已被初始化
            console.log("%c%s", "color:red", "message: " + this.message); //已被初始化
        },
        beforeMount: function() {
            console.group('------beforeMount挂载前状态------');
            console.log("%c%s", "color:red", "el     : " + (this.$el)); //已被初始化
            console.log(this.$el);
            console.log("%c%s", "color:red", "data   : " + this.$data); //已被初始化
            console.log("%c%s", "color:red", "message: " + this.message); //已被初始化
        },
        mounted: function() {
            console.group('------mounted 挂载结束状态------');
            console.log("%c%s", "color:red", "el     : " + this.$el); //已被初始化
            console.log(this.$el);
            console.log("%c%s", "color:red", "data   : " + this.$data); //已被初始化
            console.log("%c%s", "color:red", "message: " + this.message); //已被初始化
        },
        beforeUpdate: function() {
            console.group('beforeUpdate 更新前状态===============》');
            let dom = document.getElementById("app").innerHTML;
            console.log(dom);
            console.log("%c%s", "color:red", "el     : " + this.$el);
            console.log(this.$el);
            console.log("%c%s", "color:red", "data   : " + this.$data);
            console.log("%c%s", "color:red", "message: " + this.message);
        },
        updated: function() {
            console.group('updated 更新完成状态===============》');
            let dom = document.getElementById("app").innerHTML;
            console.log(dom);
            console.log("%c%s", "color:red", "el     : " + this.$el);
            console.log(this.$el);
            console.log("%c%s", "color:red", "data   : " + this.$data);
            console.log("%c%s", "color:red", "message: " + this.message);
        },
        beforeDestroy: function() {
            console.group('beforeDestroy 销毁前状态===============》');
            console.log("%c%s", "color:red", "el     : " + this.$el);
            console.log(this.$el);
            console.log("%c%s", "color:red", "data   : " + this.$data);
            console.log("%c%s", "color:red", "message: " + this.message);
        },
        destroyed: function() {
            console.group('destroyed 销毁完成状态===============》');
            console.log("%c%s", "color:red", "el     : " + this.$el);
            console.log(this.$el);
            console.log("%c%s", "color:red", "data   : " + this.$data);
            console.log("%c%s", "color:red", "message: " + this.message);
        }
    });


    // 销毁Vue对象
    //vm.$destroy();
    //vm.message = "hehe";	// 销毁后 Vue 实例会解绑所有内容

    // 设置data中message数据值
    vm.message = "good...";
</script>
</html>
Vue异步:
在Vue中发送异步请求,本质上还是AJAX。可以使用axios这个插件来简化操作!
使用步骤:
- 引入axios核心js文件。
- 调用axios对象的方法来发起异步请求。
- 调用axios对象的方法来处理响应的数据。
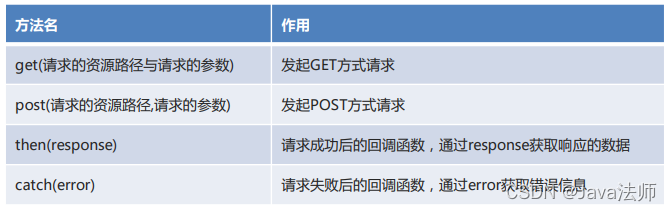
axios常用方法:
演示:
<!DOCTYPE html>
<html lang="en">
<head>
    <meta charset="UTF-8">
    <title>异步操作</title>
    <script src="js/axios-0.18.0.js"></script>
    <script src="js/vue.js"></script>

</head>
<body>
<div id="div">
    {{name}}
    <button @click="send()">发起请求</button>
</div>
</body>
<script>
    new Vue({
        el: "#div",
        data: {
            name: "张三"
        },
        methods: {
            send() {
                // GET方式请求
                // axios.get("testServlet?name=" + this.name)
                //     .then(resp => {
                //         alert(resp.data);
                //     })
                //     .catch(error => {
                //         alert(error);
                //     })

                // POST方式请求
                axios.post("testServlet", "name=" + this.name)
                    .then(resp => {
                        alert(resp.data);
                    })
                    .catch(error => {
                        alert(error);
                    })
            }
        }
    });
</script>
</html>
package com.example.demo1;

import javax.servlet.ServletException;
import javax.servlet.annotation.WebServlet;
import javax.servlet.http.HttpServlet;
import javax.servlet.http.HttpServletRequest;
import javax.servlet.http.HttpServletResponse;
import java.io.IOException;
/**
 * @author itzhuzhu
 */
@WebServlet("/testServlet")
public class TestServlet extends HttpServlet {
    @Override
    protected void doGet(HttpServletRequest req, HttpServletResponse resp) throws ServletException, IOException {
        //设置请求和响应的编码
        req.setCharacterEncoding("UTF-8");
        resp.setContentType("text/html;charset=UTF-8");

        //获取请求参数
        String name = req.getParameter("name");
        System.out.println(name);

        //响应客户端
        resp.getWriter().write("请求成功");
    }

    @Override
    protected void doPost(HttpServletRequest req, HttpServletResponse resp) throws ServletException, IOException {
        this.doGet(req,resp);
    }
}