前言
在Android应用程序中,Fragment是一种可以嵌入Activity中的组件。通过 Fragment,我们可以将UI
目录
前言
一、什么是Android Studio
二、简介Fragment
三、学期知识汇总
四、什么是碎片(Fragment)
五、页面实现步骤
1.程序APP主界面的常用例子
2.定义4个Fragment
3.activity_main.xml代码展示
4.四个碎片代码展示
5.后台代码展示
6.运行结果
六、总结
分成多个逻辑和可重用的部分来管理。动态加载Fragment是开发Android应用程序时一个常见且有趣的任务,它使应用程序更加灵活、易于维护。
一、什么是Android Studio
Android Studio 是谷歌推出的一个Android集成开发工具,基于IntelliJ IDEA开发,并支持Java和Kotlin语言。Android Studio提供了代码编辑器、编译器、调试器、布局编辑器、虚拟设备模拟器、性能分析器等一系列工具,方便开发者进行应用程序的开发、测试和发布。
二、简介Fragment
随着移动设备的迅速发展,手机成为了生活必需品,平板电脑也变得越来越普及。Fragment能够同时兼顾手机和平板电脑的开发;可以让界面在平板电脑上更好地展示;Fragment是能够嵌入到活动中的组件,可以将多个片段组合在一个Activity中来构建多窗格UI,有自己的生命周期,并且可以有也可以没有用户界面。
三、学期知识汇总
经过一个学期时间的学习,学习到了很多关于Android studio的知识,比如实现项目跳转;如何仿造QQ相册,制作一个简易版的QQ相册;如何制作一个简易版的计算器;如何完成登陆与注册页面......今天我来讲讲我从Android studio里学到的Fragment方法。
四、什么是碎片(Fragment)
碎片(Fragment)是一种可以嵌入到活动中的UI片段,它能让程序更加合理和充分地利用大屏幕地空间,因而在平板电脑上应用得非常广泛。Fragment与活动非常像,同样都能包含布局,同样都有自己的生命周期。那么如何充分使用这些碎片呢?
五、页面实现步骤
1.程序APP主界面的常用例子
如图:APP下方有4个功能键,单机不同的功能键,可以加载不同的碎片。

2.定义4个Fragment
如果使用静态加载,上面的主视图布局只能加载一个碎片,不能实现动态切换的功能;这种情况下需要使用动态加载的功能,如图所示,页面1~页面4是4个不同的Fragment,在功能键进行切换的时候,Activity主视图动态加载对应的碎片进行切换。
3.activity_main.xml代码展示
在主视图activity_main.xml布局中增加FragmentLayout,这是Android中最简单的一种布局,他没有任何的定位方式,所有的控件都会摆放在布局的左上角,FragmentLayout布局可以包含多个Fragment,并根据要求动态加载指定的Fragment;主视图activity_main.xml代码如下:
<?xml version="1.0" encoding="utf-8"?>
<LinearLayout xmlns:android="http://schemas.android.com/apk/res/android"
    xmlns:app="http://schemas.android.com/apk/res-auto"
    xmlns:tools="http://schemas.android.com/tools"
    android:layout_width="match_parent"
    android:layout_height="match_parent"
    android:orientation="vertical"
    tools:context=".MainActivity">

    <FrameLayout
        android:id="@+id/fm"
        android:layout_width="match_parent"
        android:layout_height="match_parent"
        android:layout_weight="1"/>
    <LinearLayout
        android:layout_width="match_parent"
        android:layout_height="match_parent"
        android:layout_weight="12">
        <Button
            android:id="@+id/wx"
            android:layout_width="match_parent"
            android:layout_height="wrap_content"
            android:layout_weight="1"
            android:text="微信"/>
        <Button
            android:id="@+id/txl"
            android:layout_width="match_parent"
            android:layout_height="wrap_content"
            android:layout_weight="1"
            android:text="通讯录"/>
        <Button
            android:id="@+id/fx"
            android:layout_width="match_parent"
            android:layout_height="wrap_content"
            android:layout_weight="1"
            android:text="发现"/>
        <Button
            android:id="@+id/w"
            android:layout_width="match_parent"
            android:layout_height="wrap_content"
            android:layout_weight="1"
            android:text="我"/>
    </LinearLayout>
</LinearLayout>
4.四个碎片代码展示
增加Fragment1到Fragment4的碎片布局,布局中只有一个TextView,分别设置文本为页面一到页面四,如图完成fragment_wx.xml、fragment_txl.xml、fragment_fx.xml、fragment_w.xml..
<?xml version="1.0" encoding="utf-8"?>
<LinearLayout xmlns:android="http://schemas.android.com/apk/res/android"
    xmlns:tools="http://schemas.android.com/tools"
    android:layout_width="match_parent"
    android:layout_height="match_parent"
    android:orientation="vertical"
    tools:context=".WxFragment">

    <TextView
        android:layout_width="match_parent"
        android:layout_height="match_parent"
        android:textSize="40dp"
        android:text="微信"/>
</LinearLayout>
5.后台代码展示
主视图包含4个按钮,根据视图的getId方法可以判断是哪一个按钮被按下;按钮被按下后调用Fragment方法,可以实现碎片的动态加载,主视图的整体代码如下:
package com.example.lyy_0506;

import androidx.appcompat.app.AppCompatActivity;
import androidx.fragment.app.Fragment;
import androidx.fragment.app.FragmentManager;
import androidx.fragment.app.FragmentTransaction;

import android.os.Bundle;
import android.view.View;
import android.widget.Button;

public class MainActivity extends AppCompatActivity implements View.OnClickListener {


    private Button wx,txl,fx,w;
    @Override
    protected void onCreate(Bundle savedInstanceState) {
        super.onCreate(savedInstanceState);
        setContentView(R.layout.activity_main2);

        wx=findViewById(R.id.wx);
        txl=findViewById(R.id.txl);
        fx=findViewById(R.id.fx);
        w=findViewById(R.id.w);
        wx.setOnClickListener(this);
        txl.setOnClickListener(this);
        fx.setOnClickListener(this);
        w.setOnClickListener(this);

//        replace(R.id.fm,new WxFragment());
    }

    @Override
    public void onClick(View v) {
        switch (v.getId()){
            case R.id.wx:
                replace(R.id.fm,new WxFragment());
                break;
            case R.id.txl:
                replace(R.id.fm,new TxlFragment());
                break;
            case R.id.fx:
                replace(R.id.fm,new FxFragment());
                break;
            case R.id.w:
                replace(R.id.fm,new WFragment());
                break;
        }
    }
    private void replace(int layout, Fragment fragment){
        //getSupportFragmentManager获取碎片管理器
        FragmentManager FM = getSupportFragmentManager();//获取管理器

        //使用碎片管理器的beginTransaction方法,启动事务管理
        FragmentTransaction FT=FM.beginTransaction();//获取启动器

        //使用事务管理replace方法,替换当前碎片
        FT.replace(layout,fragment);//替换碎片

        //将 Fragment操作(比如添加,替换等)加入到系统回退栈中
        FT.addToBackStack(null);//是否启动回退栈

        //使用事务管理的commit方法将此次碎片操作提交给主视图actitity_wx
        FT.commit();//提交


    }
}
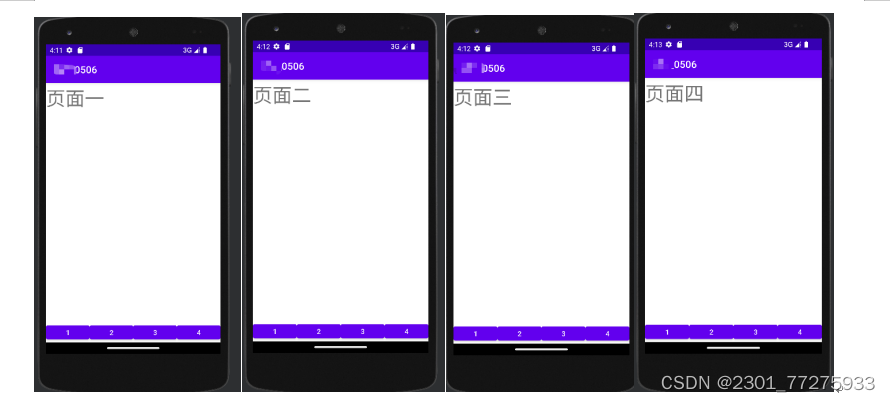
6.运行结果
程序编写完成后在手机上运行和模拟器上运行,程序运行的效果及页面的生命周期流程如图。
在此处我们可以看到java文件继承Fragment且常用的两种方法是:
onCreateView()方法,该方法返回视图文件,相当于Activity中onCreate方法中setContentView一样onViewCreated()方法,该方法当view创建完成之后的回调方法
六、总结
在Android Studio的学习过程中,我获得了丰富的知识、技能和经验。首先,我熟练掌握了各种基础概念和核心要点,例如Activity、Fragment、Intent、布局等等。其次,在实践项目开发方面,我逐步掌握并应用了MVP框架思想,并利用SQLite数据库进行本地数据存储与管理;这门课给予我的帮助不仅是知道如何使用Android Studio进行项目开发所需要具备的理论知识与实际操作经验,更是让我对移动应用领域有更深入的认识并提高自身创新研究解决问题能力。通过这门课程的学习,我不仅加深了对Android 开发的理解,同时也提高了自己的编程技巧和实践经验。我掌握了Android Studio的基础使用方法,学会了如何使用各种组件和API进行应用程序开发,并且通过实际项目的经历加深了对整个开发流程一的理解。