前言
hello兄弟们,最近在钻研新鲜知识,一不留神没想起来更新。今天我们顺着前面几篇文章完整的写出一篇12306的自动购票软件。

首先把我们已经写完的前期步骤代码再顺一遍
from selenium.webdriver import Chrome
from selenium.webdriver.chrome.options import Options
from selenium.webdriver.common.by import By
from selenium.webdriver import ActionChains
from selenium.webdriver.support.ui import WebDriverWait
from selenium.webdriver.support import expected_conditions as EC


# 定义登录方法
def login(user, pwd):
    login_choice = web.find_element(By.XPATH, '//*[@id="toolbar_Div"]/div[2]/div[2]/ul/li[1]')
    # 点击账号密码登录方式
    login_choice.click()
    username = web.find_element(By.XPATH, '//*[@id="J-userName"]')  # 向账号框传入账号信息
    passwd = web.find_element(By.XPATH, '//*[@id="J-password"]')  # 向密码框传入密码
    username.click()
    username.send_keys(user)
    passwd.click()
    passwd.send_keys(pwd)
    # 定位到登录按钮并点击
    web.find_element(By.XPATH, '//*[@id="J-login"]').click()
    # 设置显示等待直到滑块的span标签被定位到
    WebDriverWait(web, 0.5, 0.05).until(EC.presence_of_element_located((By.ID, 'nc_1_n1z')))
    span = web.find_element(By.ID, 'nc_1_n1z')
    action = ActionChains(web)
    action.click_and_hold(span).move_by_offset(300, 0).perform() # click_and_hold代表点击并保持点击动作。move_by_offset(x, y),其中x代表水平移动距离,y代表垂直移动距离


if __name__ == '__main__':
    opt = Options()
    opt.add_experimental_option('excludeSwitches', ['enable-automation'])  # 去除浏览器顶部显示受自动化程序控制
    opt.add_experimental_option('detach', True)  # 规避程序运行完自动退出浏览器
    web = Chrome(options=opt)
    web.get('https://kyfw.12306.cn/otn/resources/login.html')
    # 解除浏览器特征识别selenium
    script = 'Object.defineProperty(navigator,"webdriver", {get: () => false,});'
    web.execute_script(script)
    user = ''  # 此处输入账号
    pwd = ''   # 此处输入密码
    login(user, pwd)
在前面几篇文章中,我们实现了自动打开浏览器并且完成登录以及绕过验证码操作。
完成这些步骤后,我们应该想到要进行购票操作。老样子,先对登录成功后的页面进行分析在设计代码。
页面分析
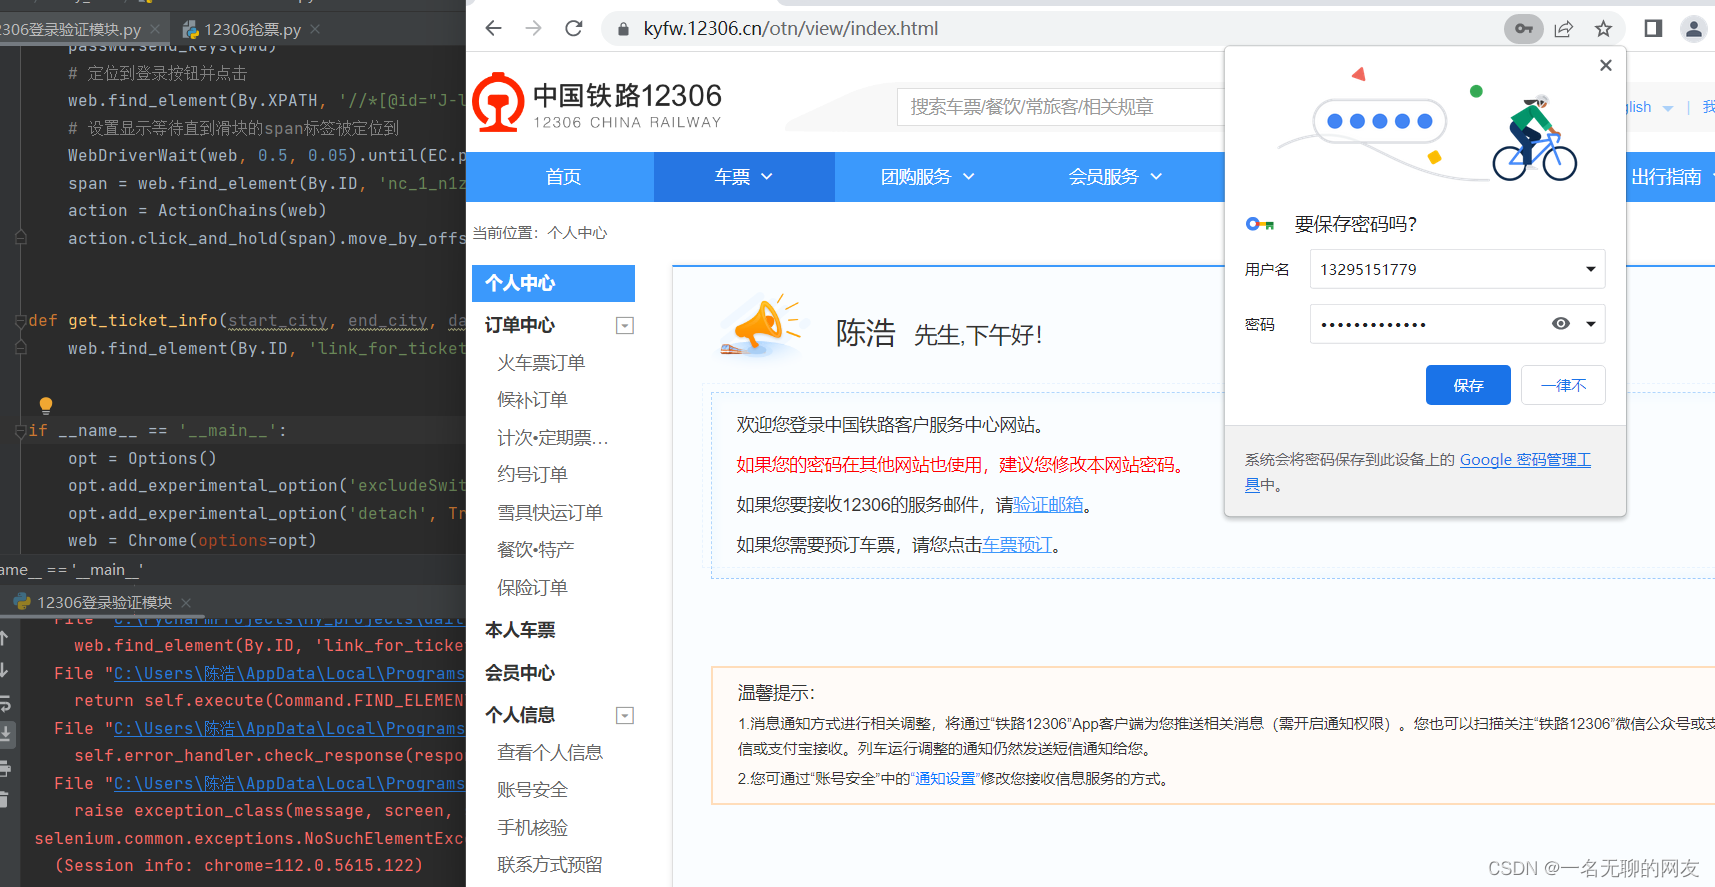
 可以看到登录成功后映入眼帘的就是登录成功的信息以及左侧一系列的功能选项。屏幕中央也有一个车票预定的跳转选项,点击后会跳转到车票查询页面
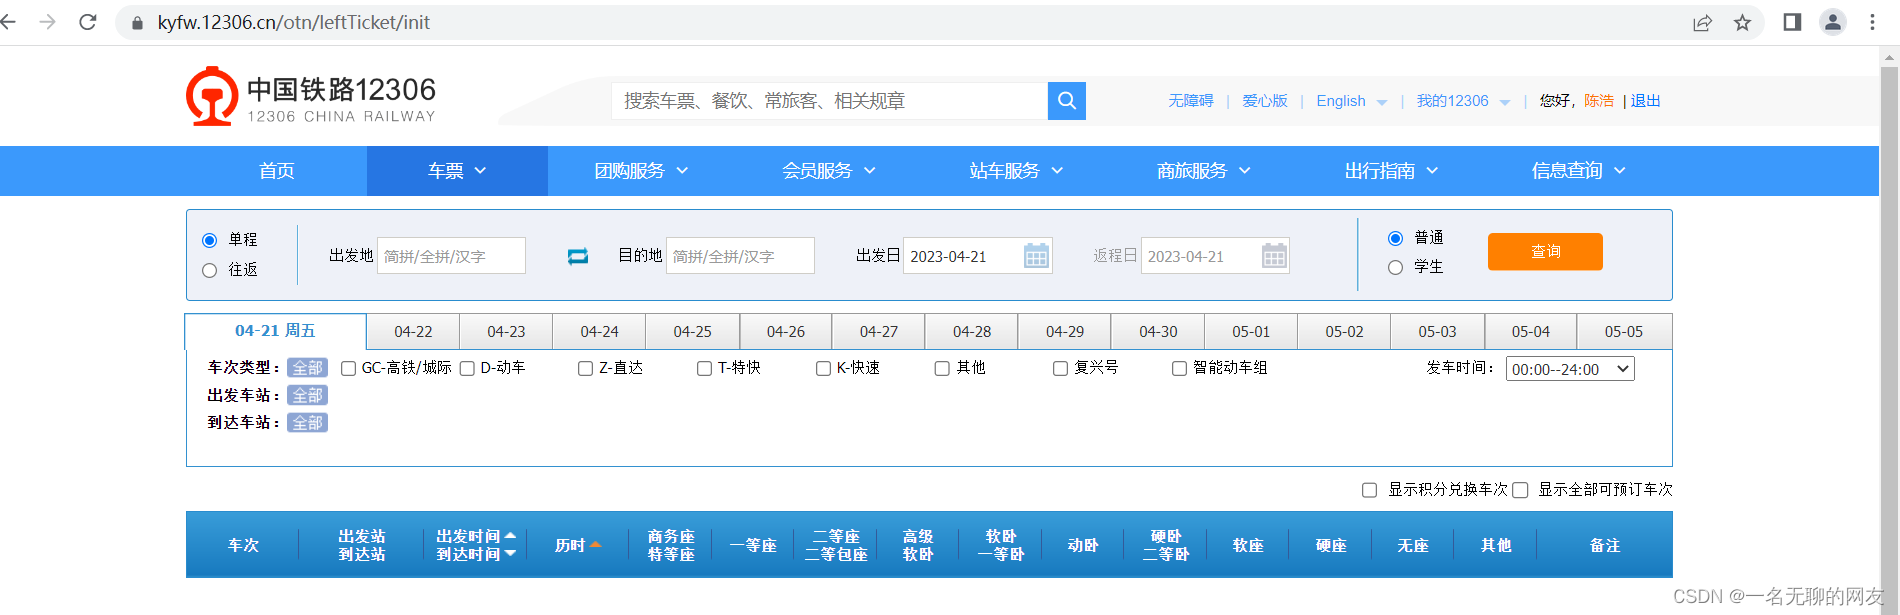
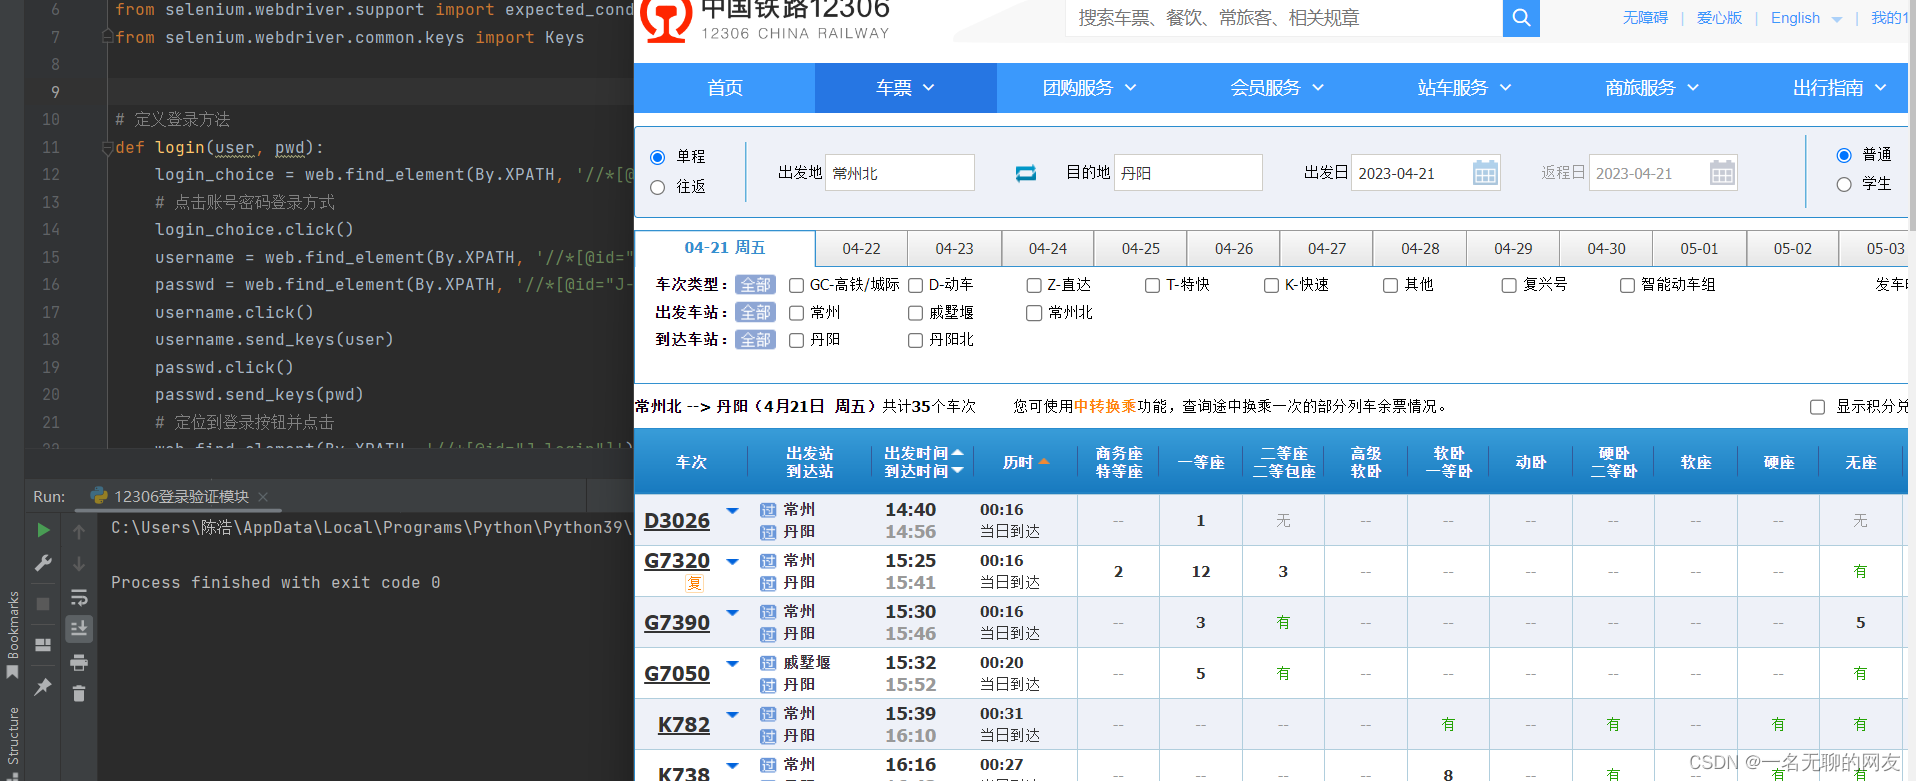
可以看到页面上有出发地,目的地,出发日三个输入框。这里就是我们需要传入参数的地方,先随便传入参数看看页面返回数据。
 在输入参数时我发现简单的输入数据并不能把参数输入到框中,必须在输入参数后enter确认后,输入框的信息才会变实,此时才能正确查询。否则点击查询时页面输入框变红报错
 只有正确输入参数后才会显示可选车辆信息
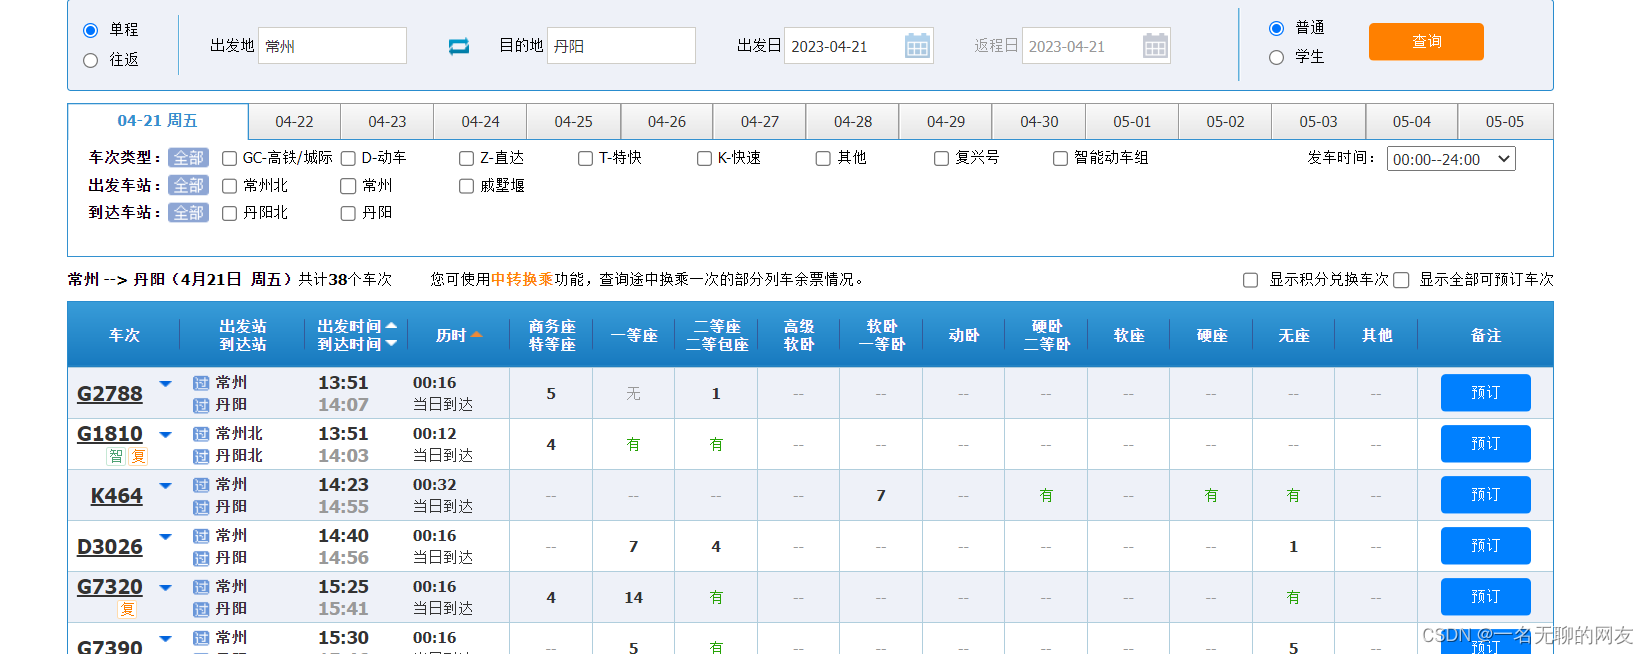
到了这一步后就是选择自己想要选择的车次点击选票了
大致流程分析到这里就可以开始设计代码了
代码设计
首先完成第一步点击车票查询按钮,最好在这一步完成参数传递,所以我们设计一个带有出发地,目的地,出发日期三个参数的函数
def get_ticket_info(start_city, end_city, date):
		pass
首先我们需要在main中定义完start_city,end_city,date三个参数并自己赋值
if __name__ == '__main__':
	start_city = '常州' # 输入自己的出发地
	end_city = '丹阳' # 目的地
	date = '2023-04-21' # 按照页面规定格式输入出发日期
	get_ticket_info(start_city, end_city, date)
参数定义完成后我们就要开始设计get_ticket_info内部的代码了

# 首先第一步,定位到登录后页面的车票预定链接并点击进去,
# 上图可以看到我们能够通过其id定位到
web.find_element(By.ID, 'link_for_ticket').click()
我们整合这一步并运行查看效果(基于上面登录代码后新加代码内容)
def get_ticket_info(start_city, end_city, date):
web.find_element(By.ID, 'link_for_ticket').click()
if __name__ == '__main__':
start_city = '常州'
end_city = '丹阳'
date = '2023-04-21'
get_ticket_info(start_city, end_city, date)
 可以看到如上图所示的报错信息,没有检测到我们的element信息,原因同样是因为没有给页面反应时间就直接请求,我们需要再请求发送前设计一个显示等待
def get_ticket_info(start_city, end_city, date):
# 通过检测xpath路径是否变更为要选择的id
WebDriverWait(web, 2, 0.5).until(EC.presence_of_element_located((By.ID, 'link_for_ticket')))
web.find_element(By.ID, 'link_for_ticket').click()
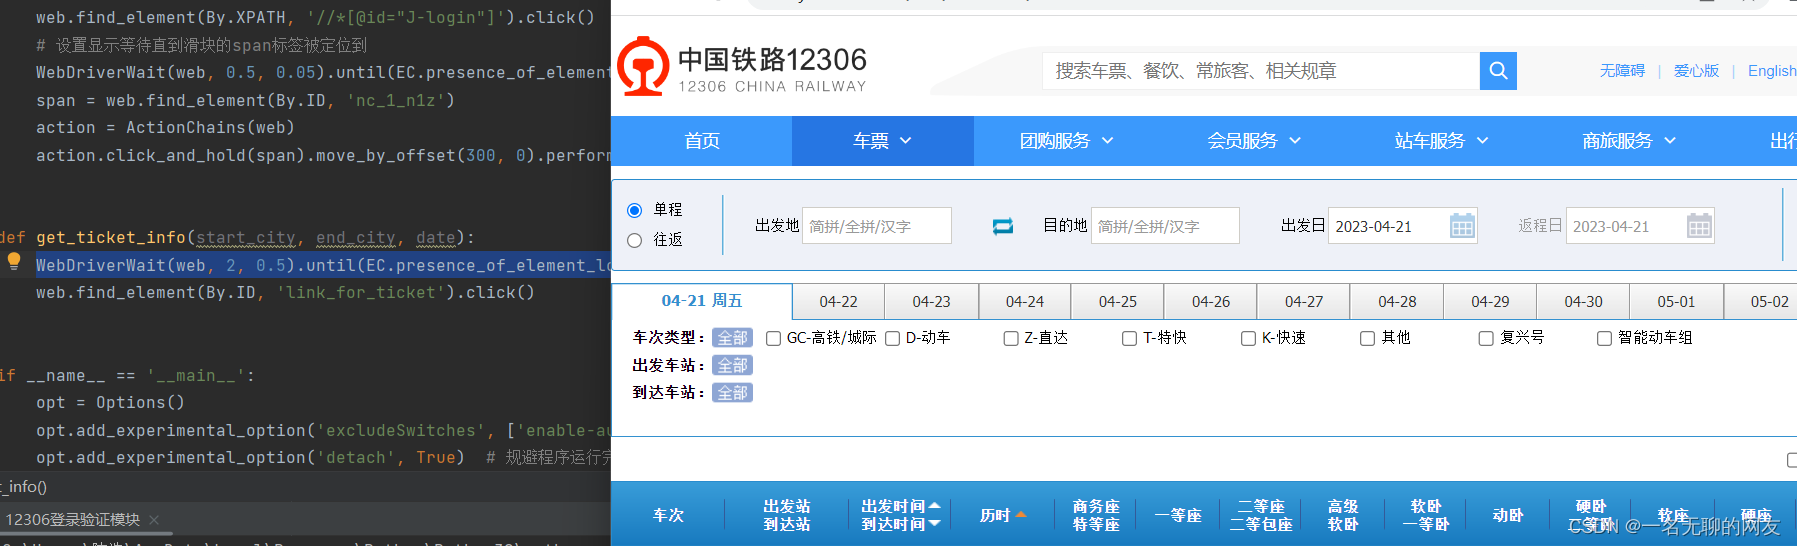 可以看到我们成功进入到了车票预定界面。
接下来就是定位到输入框并传入参数
from selenium.webdriver.common.keys import Keys
def get_ticket_info(start_city, end_city, date):
    WebDriverWait(web, 2, 0.5).until(EC.presence_of_element_located((By.ID, 'link_for_ticket')))
    web.find_element(By.ID, 'link_for_ticket').click()

    web.find_element(By.ID, 'fromStationText').click()  # 先定位到出发地输入框点击后再传入参数
    web.find_element(By.ID, 'fromStationText').send_keys(start_city, Keys.ENTER)  # Keys库可以模拟实现键盘上的功能键

    web.find_element(By.ID, 'toStationText').click()  # 目的地
    web.find_element(By.ID, 'toStationText').send_keys(end_city, Keys.ENTER)

    web.find_element(By.ID, 'train_date').clear()  # 由于date页面默认当天日期,所以先清空默认内容在输入参数
    web.find_element(By.ID, 'train_date').send_keys(date, Keys.ENTER)

    web.find_element(By.ID, 'query_ticket').click()  # 点击查询
运行查看效果
 完美实现我们设计的步骤
到了这一步后我们可以将页面上的所以车次信息获取打印到控制台中让我们选择车次。
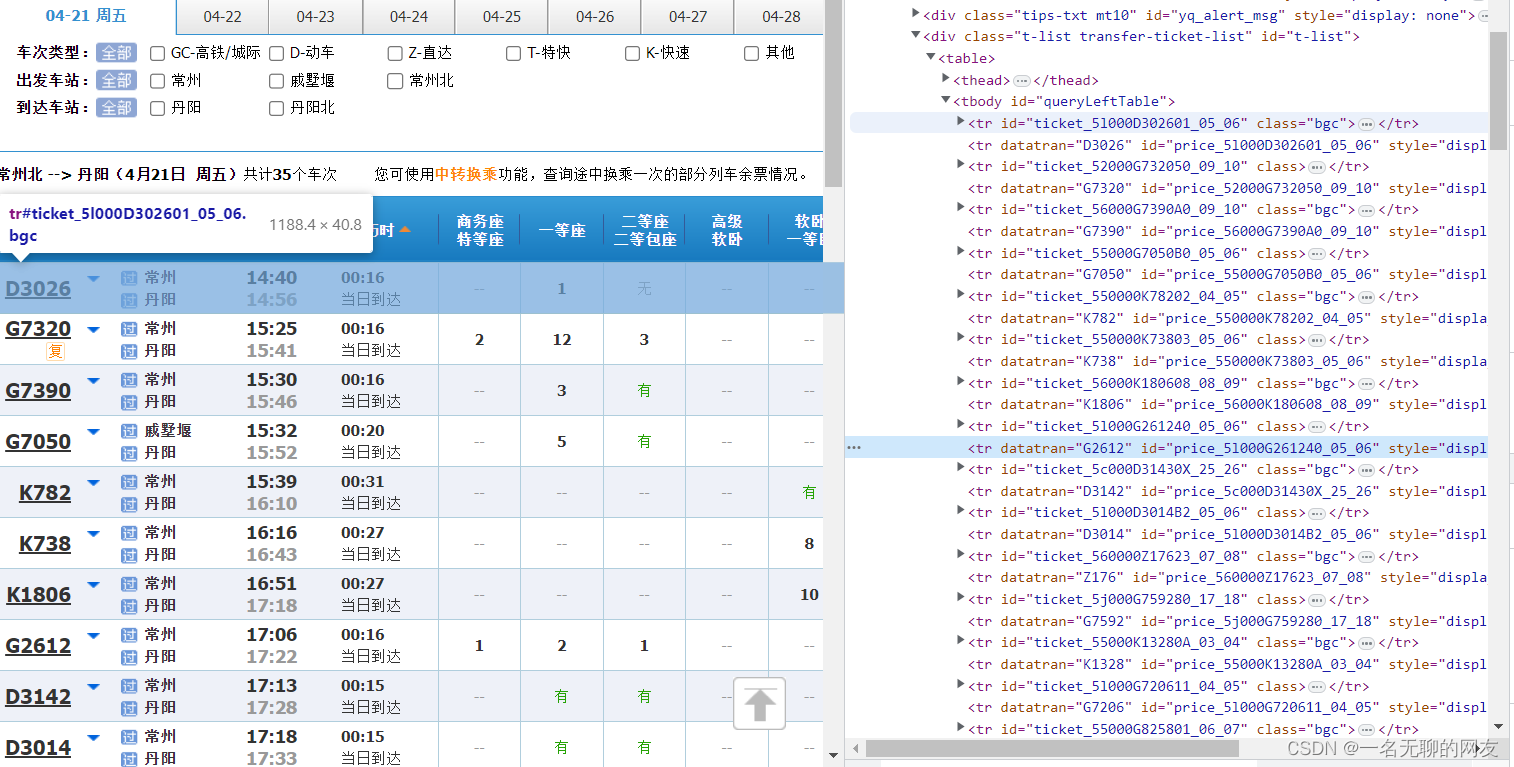 可以看到右边一列tr就是我们要获取到的信息保存地,可我们同样注意到并不是tr都带有列表信息,我们先尝试利用etree的xpath获取到此处的列表
def get_ticket_list():
    # 一定要用显示等待,否则会返回空列表
    WebDriverWait(web,2,0.5).until(EC.presence_of_element_located((By.XPATH, '//*[@id="queryLeftTable"]/tr')))
    tree = etree.HTML(web.page_source)
    tick_list = tree.xpath('//*[@id="queryLeftTable"]/tr')
    print(tick_list)
 可以看到所有tr信息已经获取。这个时候就可以对信息进一步提取。由于tr只有一半是包含具体信息的所以我们需要做一个过滤,利用if判断能否获取到列车车次文本信息,能获取的就保留,获取不到的就剔除
def get_ticket_info():
    WebDriverWait(web, 2, 0.5).until(EC.presence_of_element_located((By.XPATH, '//*[@id="queryLeftTable"]/tr')))
    tree = etree.HTML(web.page_source)
    tick_list = tree.xpath('//*[@id="queryLeftTable"]/tr')
    tr_dic = {}
    for tr in tick_list:
        if not tr.xpath('./td[1]/div/div[1]/div/a/text()'):
            continue
        else:
            tr_num = '车次' + tr.xpath('./td[1]/div/div[1]/div/a/text()')[0]
            tr_id = '车辆ID为:' + tr.xpath('./@id')[0] + '|'  # 添加标识头和分隔符便于观看
            tr_from_place = '出发地:' + tr.xpath('./td[1]/div/div[2]/strong[1]/text()')[0] + '  '
            tr_get_place = '目的地:' + tr.xpath('./td[1]/div/div[2]/strong[2]/text()')[0] + '  '
            tr_start_time = '出发时间:' + tr.xpath('./td[1]/div/div[3]/strong[1]/text()')[0] + '  '  # 列车发动时间
            tr_get_time = '到达时间:' + tr.xpath('./td[1]/div/div[3]/strong[2]/text()')[0] + '  '  # 列车到达目的地时间
            if not tr.xpath('./td[2]/@aria-label'):
                tr_shang_wu = 'Null'
            else:
                tr_shang_wu = '商务座:' + tr.xpath('./td[2]/@aria-label')[0] + '  '  # 商务座
            if not tr.xpath('./td[3]/@aria-label'):
                tr_yi_deng = 'Null'
            else:
                tr_yi_deng = '一等座:' + tr.xpath('./td[3]/@aria-label')[0] + '  '  # 一等座
            if not tr.xpath('./td[4]/@aria-label'):
                tr_er_deng = 'Null'
            else:
                tr_er_deng = '二等:' + tr.xpath('./td[4]/@aria-label')[0] + '  '  # 二等座
            if not tr.xpath('./td[6]/@aria-label'):
                tr_ruan_wo = 'Null'
            else:
                tr_ruan_wo = '软卧:' + tr.xpath('./td[6]/@aria-label')[0] + '  '  # 软卧
            if not tr.xpath('./td[8]/@aria-label'):
                tr_ying_wo = 'Null'
            else:
                tr_ying_wo = '硬卧:' + tr.xpath('./td[8]/@aria-label')[0] + ' '   # 硬卧
            if not tr.xpath('./td[10]/@aria-label'):
                tr_ying_zuo = 'Null'
            else:
                tr_ying_zuo = '硬座:' + tr.xpath('./td[10]/@aria-label')[0] + ' '  # 硬座
            if not tr.xpath('./td[11]/@aria-label'):
                tr_wu_zuo = 'Null'
            else:
                tr_wu_zuo = '无座:' + tr.xpath('./td[11]/@aria-label')[0]  # 无座
            tr_dic[tr_num] = tr_id + tr_from_place + tr_get_place + tr_start_time + tr_get_time + tr_shang_wu + \
                            tr_yi_deng + tr_er_deng + tr_ruan_wo + tr_ying_wo + tr_ying_zuo + tr_wu_zuo
    return tr_dic
获取到车次信息后,我们就要设计选择函数。首先将获取到的信息规范输出在控制台中,然后根据输入的自己想要选择的车次信息进行匹配获取到车辆id进行预定行为
def chick_ticket(dic):
    print('*'*15+'查询到的车次信息如下'+'*'*30)
    print(str(dic).replace(',', '\n'))
    train_id = '车次:' + str(input('请输入选择的车次:\n'))  # 车次:与输入的车次num拼接为字典的key值
    if train_id in dic.keys():
        tr_info = dic.get(train_id)  # 根据key值信息获取到其保存在value里的id与座位信息等
    obj = re.compile(r'车辆ID为:(?P<id>.*?)出发地')  # 利用正则获取到车次id
    result = obj.finditer(tr_info)  # 此时获取到的是迭代器,要重新获取出来
    for i in result:
        tr_id = i.group('id').strip('|')  # 由于获取到的id中带有分隔符|,因此剔除掉
    web.find_element(By.XPATH, f'//*[@id="{tr_id}"]/td[13]/a').click()  # 根据id匹配到车次所在列并点击末尾的预定按钮
运行程序查看效果

 可以看到页面成功匹配选择的车辆并跳转到购票页面
到了这一步后,后面的内容就是要根据你自己的乘车人的数量,以及成人票与学生票的选择,再加上一个座位匹配模块就可以完成了。
这一块的内容我的源码是设计完了,但是根据我的个人需求设计的。建议小伙伴们自己动手完成这最后一个模块的设计,如果想要这一块源码的话,可以评论,我会考虑下次把这一块补上。关于12306的订票就先写这么多了。希望兄弟们勤加练习。

最后放上本文章的源码
from selenium.webdriver import Chrome
from selenium.webdriver.chrome.options import Options
from selenium.webdriver.common.by import By
from selenium.webdriver import ActionChains
from selenium.webdriver.support.ui import WebDriverWait
from selenium.webdriver.support import expected_conditions as EC
from selenium.webdriver.common.keys import Keys
from lxml import etree
import re


# 定义登录方法
def login(user, pwd):
    login_choice = web.find_element(By.XPATH, '//*[@id="toolbar_Div"]/div[2]/div[2]/ul/li[1]')
    # 点击账号密码登录方式
    login_choice.click()
    username = web.find_element(By.XPATH, '//*[@id="J-userName"]')  # 向账号框传入账号信息
    passwd = web.find_element(By.XPATH, '//*[@id="J-password"]')  # 向密码框传入密码
    username.click()
    username.send_keys(user)
    passwd.click()
    passwd.send_keys(pwd)
    # 定位到登录按钮并点击
    web.find_element(By.XPATH, '//*[@id="J-login"]').click()
    # 设置显示等待直到滑块的span标签被定位到
    WebDriverWait(web, 0.5, 0.05).until(EC.presence_of_element_located((By.ID, 'nc_1_n1z')))
    span = web.find_element(By.ID, 'nc_1_n1z')
    action = ActionChains(web)
    action.click_and_hold(span).move_by_offset(300, 0).perform() # click_and_hold代表点击并保持点击动作。move_by_offset(x, y),其中x代表水平移动距离,y代表垂直移动距离


def get_ticket_info(start_city, end_city, date):
    WebDriverWait(web, 2, 0.5).until(EC.presence_of_element_located((By.ID, 'link_for_ticket')))
    web.find_element(By.ID, 'link_for_ticket').click()

    web.find_element(By.ID, 'fromStationText').click()  # 先定位到出发地输入框点击后再传入参数
    web.find_element(By.ID, 'fromStationText').send_keys(start_city, Keys.ENTER)  # Keys库可以模拟实现键盘上的功能键

    web.find_element(By.ID, 'toStationText').click()  # 目的地
    web.find_element(By.ID, 'toStationText').send_keys(end_city, Keys.ENTER)

    web.find_element(By.ID, 'train_date').clear()  # 由于date页面默认当天日期,所以先清空默认内容在输入参数
    web.find_element(By.ID, 'train_date').send_keys(date, Keys.ENTER)

    web.find_element(By.ID, 'query_ticket').click()  # 点击查询


def get_ticket_dic_info():
    WebDriverWait(web, 2, 0.5).until(EC.presence_of_element_located((By.XPATH, '//*[@id="queryLeftTable"]/tr')))
    tree = etree.HTML(web.page_source)
    tick_list = tree.xpath('//*[@id="queryLeftTable"]/tr')
    tr_dic = {}
    for tr in tick_list:
        if not tr.xpath('./td[1]/div/div[1]/div/a/text()'):
            continue
        else:
            tr_num = '车次:' + tr.xpath('./td[1]/div/div[1]/div/a/text()')[0]
            tr_id = '车辆ID为:' + tr.xpath('./@id')[0] + '|'  # 添加标识头和分隔符便于观看
            tr_from_place = '出发地:' + tr.xpath('./td[1]/div/div[2]/strong[1]/text()')[0] + '  '
            tr_get_place = '目的地:' + tr.xpath('./td[1]/div/div[2]/strong[2]/text()')[0] + '  '
            tr_start_time = '出发时间:' + tr.xpath('./td[1]/div/div[3]/strong[1]/text()')[0] + '  '  # 列车发动时间
            tr_get_time = '到达时间:' + tr.xpath('./td[1]/div/div[3]/strong[2]/text()')[0] + '  '  # 列车到达目的地时间
            if not tr.xpath('./td[2]/@aria-label'):
                tr_shang_wu = 'Null'
            else:
                tr_shang_wu = '商务座:' + tr.xpath('./td[2]/@aria-label')[0] + '  '  # 商务座
            if not tr.xpath('./td[3]/@aria-label'):
                tr_yi_deng = 'Null'
            else:
                tr_yi_deng = '一等座:' + tr.xpath('./td[3]/@aria-label')[0] + '  '  # 一等座
            if not tr.xpath('./td[4]/@aria-label'):
                tr_er_deng = 'Null'
            else:
                tr_er_deng = '二等:' + tr.xpath('./td[4]/@aria-label')[0] + '  '  # 二等座
            if not tr.xpath('./td[6]/@aria-label'):
                tr_ruan_wo = 'Null'
            else:
                tr_ruan_wo = '软卧:' + tr.xpath('./td[6]/@aria-label')[0] + '  '  # 软卧
            if not tr.xpath('./td[8]/@aria-label'):
                tr_ying_wo = 'Null'
            else:
                tr_ying_wo = '硬卧:' + tr.xpath('./td[8]/@aria-label')[0] + ' '   # 硬卧
            if not tr.xpath('./td[10]/@aria-label'):
                tr_ying_zuo = 'Null'
            else:
                tr_ying_zuo = '硬座:' + tr.xpath('./td[10]/@aria-label')[0] + ' '  # 硬座
            if not tr.xpath('./td[11]/@aria-label'):
                tr_wu_zuo = 'Null'
            else:
                tr_wu_zuo = '无座:' + tr.xpath('./td[11]/@aria-label')[0]  # 无座
            tr_dic[tr_num] = tr_id + tr_from_place + tr_get_place + tr_start_time + tr_get_time + tr_shang_wu + \
                            tr_yi_deng + tr_er_deng + tr_ruan_wo + tr_ying_wo + tr_ying_zuo + tr_wu_zuo
    return tr_dic


def chick_ticket(dic):
    print('*'*15+'查询到的车次信息如下'+'*'*30)
    print(str(dic).replace(',', '\n'))
    train_id = '车次:' + str(input('请输入选择的车次:\n'))  # 车次:与输入的车次num拼接为字典的key值
    if train_id in dic.keys():
        tr_info = dic.get(train_id)  # 根据key值信息获取到其保存在value里的id与座位信息等
    obj = re.compile(r'车辆ID为:(?P<id>.*?)出发地')  # 利用正则获取到车次id
    result = obj.finditer(tr_info)  # 此时获取到的是迭代器,要重新获取出来
    for i in result:
        tr_id = i.group('id').strip('|')  # 由于获取到的id中带有分隔符|,因此剔除掉
    web.find_element(By.XPATH, f'//*[@id="{tr_id}"]/td[13]/a').click()  # 根据id匹配到车次所在列并点击末尾的预定按钮


if __name__ == '__main__':
    opt = Options()
    opt.add_experimental_option('excludeSwitches', ['enable-automation'])  # 去除浏览器顶部显示受自动化程序控制
    opt.add_experimental_option('detach', True)  # 规避程序运行完自动退出浏览器
    web = Chrome(options=opt)
    web.get('https://kyfw.12306.cn/otn/resources/login.html')
    # 解除浏览器特征识别selenium
    script = 'Object.defineProperty(navigator,"webdriver", {get: () => false,});'
    web.execute_script(script)
    user = ''  # 此处输入账号
    pwd = ''   # 此处输入密码
    login(user, pwd)
    start_city = ''
    end_city = ''
    date = ''
    get_ticket_info(start_city, end_city, date)
    tick_dic = get_ticket_dic_info()
    chick_ticket(tick_dic)
ok,下次再见,记得点赞兄弟们