1.下载官网客户端(其中包含SDK)
官方网站
海康机器人-机器视觉-下载中心
安装deb文件
sudo dpkg -i deb文件名
2.运行客户端
cd /opt/MVS/bin/
./MVS.sh

如果连不上,看看是不是usb3.0的接口
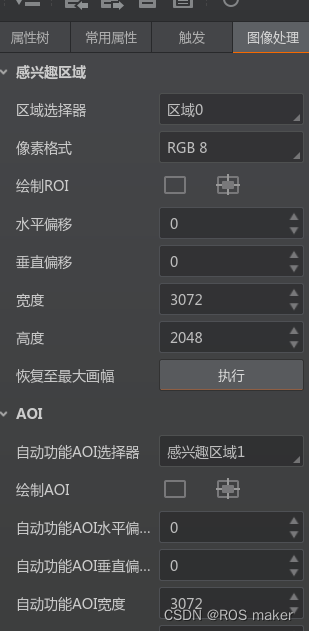
3.调整参数
用客户端调整的参数,会默认的存在于配置中,每次打开都是一样,并且用其他代码调用时候同样也采用这种配置。
如果刚开始显示的非常黑,自动曝光和自动增益改成连续。
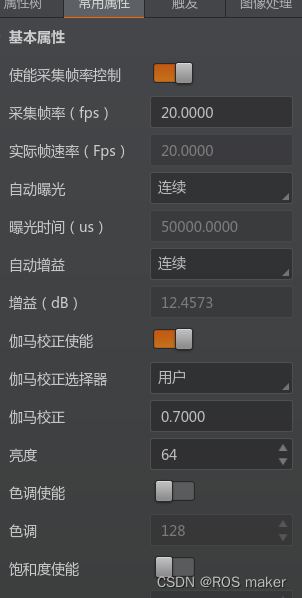
尤其注意像素格式,在使用opencv时候图像转换需要用到。
4.实际代码
该代码借鉴于
使用PYQT5打开海康威视工业相机并获取图像进行显示_暂未成功人士!的博客-CSDN博客_pyqt5 海康威视
import cv2
from PyQt5 import QtCore, QtGui, QtWidgets
from PyQt5.QtCore import pyqtSignal
from PyQt5.QtGui import *
import numpy as np
import matplotlib.pyplot as plt
# from MvImport.MvCameraControl_header import MV_CC_DEVICE_INFO_LIST
from open_camera import Ui_MainWindow  # 导入创建的GUI类
import sys
import threading
# import msvcrt
from ctypes import *
from PyQt5.Qt import *
from PIL import Image
# ImageTk

sys.path.append("../MvImport")
from MvCameraControl_class import *
import time
import os

class mywindow(QtWidgets.QMainWindow, Ui_MainWindow):

    sendAddDeviceName = pyqtSignal()  # 定义一个添加设备列表的信号。
    deviceList = MV_CC_DEVICE_INFO_LIST()
    tlayerType = MV_GIGE_DEVICE | MV_USB_DEVICE

    g_bExit = False
    camera_information = False  #获取相机标志
    opencamera_flay = False #打开相机标志
    # ch:创建相机实例 | en:Creat Camera Object
    cam = MvCamera()

    def __init__(self):
        super(mywindow, self).__init__()
        self.setupUi(self)
        # self.connect_and_emit_sendAddDeviceName()
        self.init()
        self.label.setScaledContents(True)  # 图片自适应
        self.label_2.setScaledContents(True)  # 图片自适应

    def init(self):
        #获取相机相信
        self.pushButton.clicked.connect(self.get_camera_information)
        # 打开摄像头
        self.pushButton_2.clicked.connect(self.openCamera)
        # 拍照
        self.pushButton_3.clicked.connect(self.taking_pictures)
        # 关闭摄像头
        self.pushButton_4.clicked.connect(self.closeCamera)
        # Connect the sendAddDeviceName signal to a slot.
        # self.sendAddDeviceName.connect(self.camera_information)
        # Emit the signal.
        # self.sendAddDeviceName.emit()

        # 获得所有相机的列表存入cmbSelectDevice中
    def get_camera_information(self):
        '''选择所有能用的相机到列表中,
             gige相机需要配合 sdk 得到。
        '''
        # 得到相机列表
        # tlayerType = MV_GIGE_DEVICE | MV_USB_DEVICE
        # ch:枚举设备 | en:Enum device
        ret = MvCamera.MV_CC_EnumDevices(self.tlayerType, self.deviceList)
        if ret != 0:
            print("enum devices fail! ret[0x%x]" % ret)
            # QMessageBox.critical(self, '错误', '读取设备驱动失败!')
            # sys.exit()
        if self.deviceList.nDeviceNum == 0:
            QMessageBox.critical(self, "错误", "没有发现设备 ! ")
            # print("find no device!")
            # sys.exit()
        else:
            QMessageBox.information(self, "提示", "发现了 %d 个设备 !" % self.deviceList.nDeviceNum)
        # print("Find %d devices!" % self.deviceList.nDeviceNum)
        if self.deviceList.nDeviceNum == 0:
            return None

        for i in range(0, self.deviceList.nDeviceNum):
            mvcc_dev_info = cast(self.deviceList.pDeviceInfo[i], POINTER(MV_CC_DEVICE_INFO)).contents
            if mvcc_dev_info.nTLayerType == MV_GIGE_DEVICE:
                print("\ngige device: [%d]" % i)
                strModeName = ""
                for per in mvcc_dev_info.SpecialInfo.stGigEInfo.chModelName:
                    strModeName = strModeName + chr(per)
                print("device model name: %s" % strModeName)


        self.camera_information = True
    # 打开摄像头。
    def openCamera(self, camid=0):
        if self.camera_information == True:
            self.g_bExit = False
            # ch:选择设备并创建句柄 | en:Select device and create handle
            stDeviceList = cast(self.deviceList.pDeviceInfo[int(0)], POINTER(MV_CC_DEVICE_INFO)).contents
            ret = self.cam.MV_CC_CreateHandle(stDeviceList)
            if ret != 0:
                # print("create handle fail! ret[0x%x]" % ret)
                QMessageBox.critical(self, "错误", "创建句柄失败 ! ret[0x%x]" % ret)
                # sys.exit()
            # ch:打开设备 | en:Open device
            ret = self.cam.MV_CC_OpenDevice(MV_ACCESS_Exclusive, 0)
            if ret != 0:
                # print("open device fail! ret[0x%x]" % ret)
                QMessageBox.critical(self, "错误", "打开设备失败 ! ret[0x%x]" % ret)
                # sys.exit()
            # ch:探测网络最佳包大小(只对GigE相机有效) | en:Detection network optimal package size(It only works for the GigE camera)
            if stDeviceList.nTLayerType == MV_GIGE_DEVICE:
                nPacketSize = self.cam.MV_CC_GetOptimalPacketSize()
                if int(nPacketSize) > 0:
                    ret = self.cam.MV_CC_SetIntValue("GevSCPSPacketSize", nPacketSize)
                    if ret != 0:
                        # print("Warning: Set Packet Size fail! ret[0x%x]" % ret)
                        QMessageBox.warning(self, "警告", "报文大小设置失败 ! ret[0x%x]" % ret)
                else:
                    # print("Warning: Get Packet Size fail! ret[0x%x]" % nPacketSize)
                    QMessageBox.warning(self, "警告", "报文大小获取失败 ! ret[0x%x]" % nPacketSize)

            # ch:设置触发模式为off | en:Set trigger mode as off
            ret = self.cam.MV_CC_SetEnumValue("TriggerMode", MV_TRIGGER_MODE_OFF)
            if ret != 0:
                # print("set trigger mode fail! ret[0x%x]" % ret)
                QMessageBox.critical(self, "错误", "设置触发模式失败 ! ret[0x%x]" % ret)
                # sys.exit()
                # ch:获取数据包大小 | en:Get payload size
            stParam = MVCC_INTVALUE()
            memset(byref(stParam), 0, sizeof(MVCC_INTVALUE))

            ret = self.cam.MV_CC_GetIntValue("PayloadSize", stParam)
            if ret != 0:
                # print("get payload size fail! ret[0x%x]" % ret)
                QMessageBox.critical(self, "错误", "获取有效负载大小失败 ! ret[0x%x]" % ret)
                # sys.exit()
            nPayloadSize = stParam.nCurValue

            # ch:开始取流 | en:Start grab image
            ret = self.cam.MV_CC_StartGrabbing()
            if ret != 0:
                # print("start grabbing fail! ret[0x%x]" % ret)
                QMessageBox.critical(self, "错误", "开始抓取图像失败 ! ret[0x%x]" % ret)
                # sys.exit()

            data_buf = (c_ubyte * nPayloadSize)()
            self.opencamera_flay = True
            try:
                hThreadHandle = threading.Thread(target=self.work_thread, args=(self.cam, data_buf, nPayloadSize))
                hThreadHandle.start()
            except:
                # print("error: unable to start thread")
                QMessageBox.critical(self, "错误", "无法启动线程 ! ")

        else:
            QMessageBox.critical(self, '错误', '获取相机信息失败!')
            return None

    # 关闭相机
    def closeCamera(self):
        if self.opencamera_flay == True:
            self.g_bExit = True
            # ch:停止取流 | en:Stop grab image
            ret = self.cam.MV_CC_StopGrabbing()
            if ret != 0:
                # print("stop grabbing fail! ret[0x%x]" % ret)
                QMessageBox.critical(self, "错误", "停止抓取图像失败 ! ret[0x%x]" % ret)
                # sys.exit()

            # ch:关闭设备 | Close device
            ret = self.cam.MV_CC_CloseDevice()
            if ret != 0:
                # print("close deivce fail! ret[0x%x]" % ret)
                QMessageBox.critical(self, "错误", "停止设备失败 ! ret[0x%x]" % ret)
            # ch:销毁句柄 | Destroy handle
            ret = self.cam.MV_CC_DestroyHandle()
            if ret != 0:
                # print("destroy handle fail! ret[0x%x]" % ret)
                QMessageBox.critical(self, "错误", "销毁处理失败 ! ret[0x%x]" % ret)

            self.label.clear()  # 清除label组件上的图片
            self.label_2.clear()  # 清除label组件上的图片
            self.label.setText("摄像头")
            self.label_2.setText("显示图片")
            self.camera_information = False
            self.opencamera_flay = False
        else:
            QMessageBox.critical(self, '错误', '未打开摄像机!')
            return None

    def work_thread(self, cam=0, pData=0, nDataSize=0):
        stFrameInfo = MV_FRAME_OUT_INFO_EX()
        memset(byref(stFrameInfo), 0, sizeof(stFrameInfo))
        while True:
            ret = cam.MV_CC_GetOneFrameTimeout(pData, nDataSize, stFrameInfo, 1000)
            if ret == 0:
                # pData = (c_ubyte * stFrameInfo.nWidth * stFrameInfo.nHeight* 2)()
                # # memmove(byref(pData), stFrameInfo.pBufAddr, stFrameInfo.stFameInfo.nWidth * stFrameInfo.nHeight*2)
                # data = np.frombuffer(pData, count=int(stFrameInfo.nWidth * stFrameInfo.nHeight*2),dtype=np.uint8)
                # image = data.reshape(stFrameInfo.nHeight ,stFrameInfo.nWidth,2)
                # image = cv2.cvtColor(image, cv2.COLOR_YUV2RGB_Y422)
                # self.image_show = QImage(image.data, stFrameInfo.nWidth, stFrameInfo.nHeight, QImage.Format_RGB888)
                image = np.asarray(pData)  # 将c_ubyte_Array转化成ndarray得到(3686400,)
                # print(image.shape)
                image= image.reshape((2048,3072,3))  # 根据自己分辨率进行转化
                # image = image[0]
                # image = np.asarray(pData).reshape((stFrameInfo.nHeight, stFrameInfo.nWidth))
                # image = cv2.cvtColor(image, cv2.COLOR_BGR2RGB)  # 这一步获取到的颜色不对,因为默认是BRG,要转化成RGB,颜色才正常
                #image = cv2.cvtColor(image, cv2.COLOR_BAYER_GB2BGR)  # Bayer格式(raw data)向RGB或BGR颜色空间的转换
                image = cv2.cvtColor(image, cv2.COLOR_RGB2BGR)
                # print(image.shape)
                # pyrD1 = cv2.pyrDown(image)  # 向下取样
                # pyrD2 = cv2.pyrDown(pyrD1)  # 向下取样
                image_height, image_width, image_depth = image.shape  # 读取图像高宽深度
                # self.image_show = QImage(image.data, image_width, image_height, image_width * image_depth,
                                        #  QImage.Format_RGB888)
                self.image_show = QImage(image.data, image_width, image_height, image_width * image_depth,
                                         QImage.Format_RGB888)
                self.label.setPixmap(QPixmap.fromImage(self.image_show))
            if self.g_bExit == True:
                del pData
                break

    #拍照
    def taking_pictures(self):
        if self.opencamera_flay == True:
            FName = fr"images/cap{time.strftime('%Y%m%d%H%M%S', time.localtime())}"
            print(FName)
            self.label_2.setPixmap(QtGui.QPixmap.fromImage(self.image_show))
            # self.showImage.save(FName + ".jpg", "JPG", 100)
            self.image_show.save('./1.bmp')
        else:
            QMessageBox.critical(self, '错误', '摄像机未打开!')
            return None
    #重写关闭函数
    def closeEvent(self, event):
        reply = QMessageBox.question(self,'提示',"确认退出吗?",QMessageBox.Yes | QMessageBox.No,QMessageBox.No)
        if reply == QMessageBox.Yes:
            event.accept()
            #用过sys.exit(0)和sys.exit(app.exec_()),但没起效果
            os._exit(0)
        else:
            event.ignore()

if __name__ == '__main__':
    from PyQt5 import QtCore
    QtCore.QCoreApplication.setAttribute(QtCore.Qt.AA_EnableHighDpiScaling)  # 自适应分辨率

    app = QtWidgets.QApplication(sys.argv)
    window = mywindow()
    window.show()
    sys.exit(app.exec_())
界面显示,看上面链接里原作者的界面代码 。
我采用的是RGB格式的工业摄像头,其他格式的图像转化得再调整。
。。。。。。。。。。。。。。。。。。。。。。。。。。。。。。。。。。。。。。。。。。。
8月3日补充
问题:遇到每次重新通电,摄像头都得重新配置参数
解决:
1.先去软件客户端配置可以正常显示的配置例如连续曝光,连续白平衡等 这时候这种配置会默认保存在摄像头里
3.找到下面的案例文档,其中有个代码可以生成目前摄像头的参数。然后在自己的代码里导入


上面的cam.MV_CC_FeatureLoad()语句加入到自己代码中的 那个位置。
这样就不需要每次打开软件配置了
///
8月4日更新
询问厂家后,可以看到下面网址中的三种方式(亲测第一种只在软件中设置好了,重启也不需要配置)
海康工业相机功能模块-参数保存、加载、批量复制参数_青山笑我依旧在的博客-CSDN博客_海康相机保存配置
问题:使用YUV 422 怎么配置代码
如果要使用cv2.COLOR_YUV2RGB_Y422
就在软件中使用YUV 422 packed 一定要看好 不是 有括号那个。
然后代码改变
 image= image.reshape(2048,3072,2)

 image = cv2.cvtColor(image, cv2.COLOR_YUV2RGB_Y422)
问题:一直出现段错误核心已转存
解决 感觉上是图像尺寸太大了,这样循环起来处理很可能跟不上,果然是这样
所以在上面的基础上
image= cv2.resize(image,(480,640))
改一下尺寸 ok!解决