一、firmware-mod-kit工具的安装
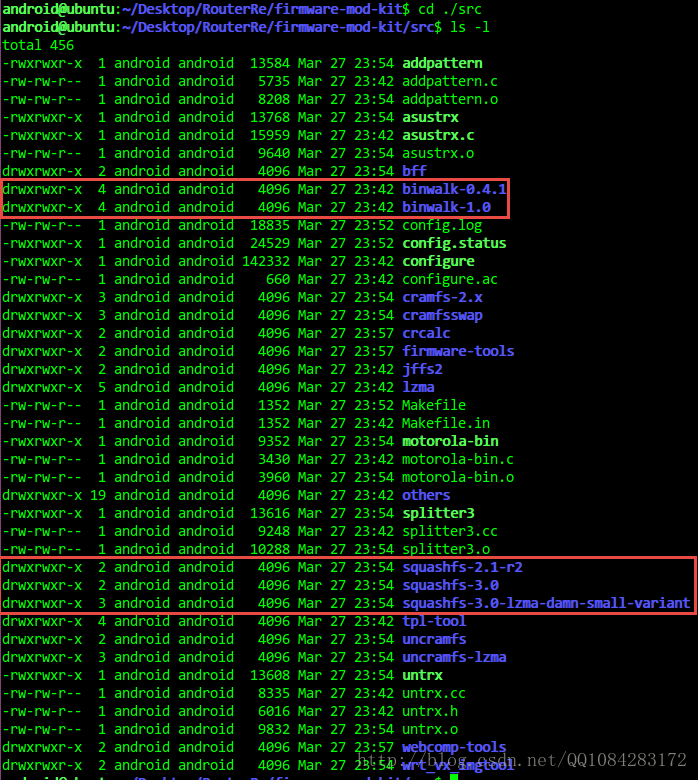
firmware-mod-kit工具的功能和binwalk工具的类似,其实firmware-mod-kit工具在功能上有调用binwalk工具提供的功能以及其他的固件解包工具的整合。下载firmware-mod-kit工具的源码进入到src目录下就能够看到firmware-mod-kit工具整合了那些固件提取和文件系统解压的工具。firmware-mod-kit工具的功能有固件文件的解包和打包、固件提取文件系统的解压和压缩、DD-WRT Web Pages的修改等,在每个整合的固件分析工具的源码文件夹里都有相关的使用说明。
1.在ubuntu系统上安装firmware-mod-kit工具之前需要先安装需要的依赖库文件。
具体可以参考firmware-mod-kit工具的官方说明文档:https://code.google.com/archive/p/firmware-mod-kit/wikis/Documentation.wiki。
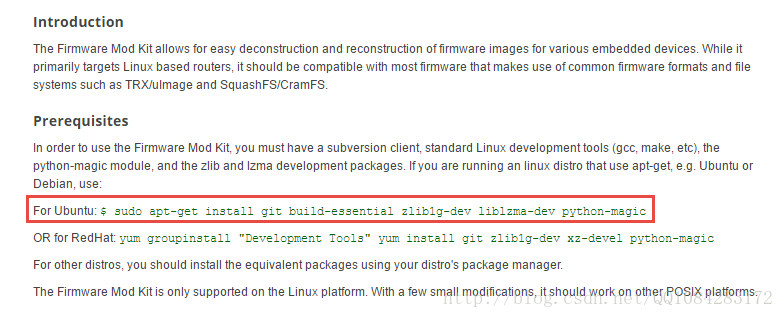
- # For Ubuntu 需要安装的依赖库文件
- $ sudo apt-get install git build-essential zlib1g-dev liblzma-dev python-magic
2.firmware-mod-kit工具的下载和安装.
firmware-mod-kit工具的github源码下载地址:https://github.com/mirror/firmware-mod-kit。
- git clone https://github.com/mirror/firmware-mod-kit.git
-
- # 进入源码目录
- cd firmware-mod-kit/src
-
- # 执行configure文件生成Makefile文件然后make编译生成可执行文件
- ./configure && make
3.firmware-mod-kit工具官方的详细说明教程
firmware-mod-kit工具官方详细说明教程的参考网址为:https://bitsum.com//firmware_mod_kit.htm,该网页中详细的说明了firmware-mod-kit工具运行支持的平台,整合的固件解包和分析的工具、支持分析的路由器的固件型号以及使用的命令行参数的说明。
4.设备固件分析的讨论
有关路由器等设备固件分析讨论的论坛:https://forum.bitsum.com/forum/index.php/board,12.html,该论坛里有很多的有关固件提取、解压、修改、工具交流的信息。
二、firmware-mod-kit工具的使用说明
1.firmware-mod-kit工具的官方功能描述(有些功能去掉了):
2.firmware-mod-kit工具提供的功能对应的脚本.
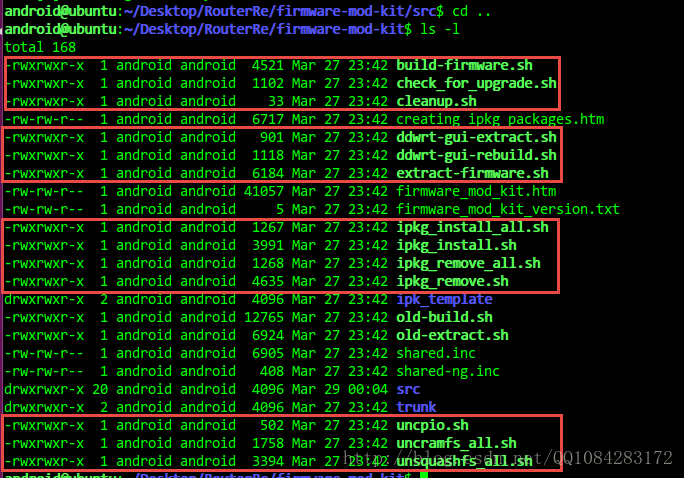
3.firmware-mod-kit工具的功能简单介绍
3.1.解包固件提取内核和文件系统
The Firmware Working Directory
The Firmware Mod Kit uses a 'hard coded' working directory of 'fmk'. The extraction script extracts to this folder, and the rebuild script rebuilds from this folder. Allowance of alternate working directories is supported for some operations, but not all. We'll be expanding that in the future. For now, if you have multiple working directories, we suggest you rename the ones you're not currently operating on.
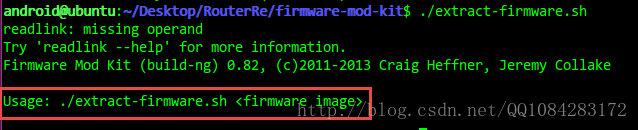
Extracting Firmware
Automated firmware extraction typically works with most firmware images that employ uImage/TRX firmware headers and use SquashFS or CramFS file systems. Currently, extract-firmware.sh is the preferred method of extraction as it supports more firmware types than the older old-extract.sh script. However, old-extract.sh is still included and works with many firmware formats.
Usage for both extract-firmware.sh and extract_firmware.sh is straight forward:
$ ./extract-firmware.sh firmware.bin
By default, output from extract-firmware.sh will be located in the 'fmk' directory, while old-extract.sh will place extracted data into the specified working directory.
3.2.重打包解包的内核和文件系统重建固件文件

Re-Building Firmware
Which build script to use is dependant on which extraction script was used. If you extracted a firmware image with extract-firmware.sh, then you must use build-firmware.sh to re-build it. Likewise, if old-extract.sh was used, then old-build.sh must be invoked when re-building an image:
$ ./build-firmware.sh [-nopad] [-min]
The new firmware generated by build-firmware.sh will be located at 'fmk/new-firmware.bin', while old-build.sh will generate firmware images in several different formats and save them in the specified output directory.
The optional -nopad switch will instruct build-firmware.sh to NOT pad the firmware up to its original size.
The optional -minswitch will use the maximum squashfs block size of 1MB. This will decrease the firmware image size at the cost of additional CPU and RAM resources utilized on the target device. Do not use this switch unless you must. This is a very large block size for embedded systems. The original firmware squashfs block size is preserved on rebuild, and the original block size should be the one used unless you are sure you know what you're doing. Too large a block size may appear to work fine, but runtime performance of the firmware may suffer in all or some loads.
3.3.修改 DD-WRT Web Pages 面
Modifying DD-WRT Web Pages
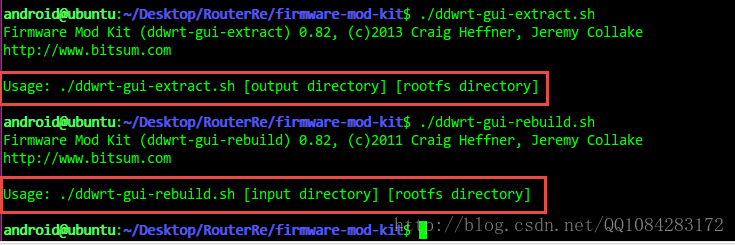
One very unique feature of the Firmware Mod Kit is its ability to extract and rebuild files from the DD-WRT Web GUI. This is automated by the ddwrt-gui-extract.sh and ddwrt-gui-restore.sh scripts.
Once you have extracted a DD-WRT firmware image using extract-firmwware.sh, you can extract the Web files by running:
$ ./ddwrt-gui-extract.sh
This will create a directory named 'www' and extract the Web files there. You may modify the files any way you like, but you cannot add or delete files.
When you are finished editing, you can rebuild the Web files by running:
$ ./ddwrt-gui-rebuild.sh
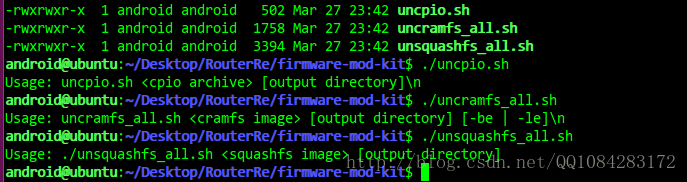
3.4.解压cpio、cramfs、squashfs格式的文件系统
当然了,在firmware-mod-kit工具的源码文件夹里仔细看看,能发现cpio、cramfs、squashfs格式的文件系统的压缩工具。
3.5.使用firmware-mod-kit工具修改设备固件然后重打包
Reverting to a vendor firmware
Sometimes you'll enthusiastically flash a third-party firmware like Gargoyle or DD-WRT only to discover it lacks features you need, doesn't perform as well as the vendor firmware, or has functional problems. In this situation, you might find yourself wanting to go back to the vendor firmware, but have no way to do so!
Here's how the Firmware Mod Kit can help you revert to a vendor firmware. The process is this:
- Extract vendor firmware. Then rename the 'fmk' directory.
- Extract third-party 'upgrade' firmware (e.g. Gargoyle-sysupgrade)
- Replace extracted third-party firmware's rootfs and image_parts with those from the vendor firmware.
- Rebuild firmware image
- Flash vendor firmware image (now packaged as your third-party firmware expects).
- If all succeeded, you're now using the vendor firmware again.
Once you are back to the vendor firmware, then it accepts vendor firmware images again.
Examples
This example demonstrates how to extract a firmware image, replace its existing telnet daemon with a custom built one, and then build a new firmware image:
$ ./extract-firmware.sh firmware.bin
$ cp new-telnetd fmk/rootfs/usr/sbin/telnetd
$ ./build-firmware.sh
Below is an example of the commands to run in order to extract a DD-WRT firmware image, modify the Web index page, and build a new firmware image:
$ ./extract-firmware.sh firmware.bin
$ ./ddwrt-gui-extract.sh
$ echo "HELLO WORLD" > www/index.asp
$ ./ddwrt-gui-rebuild.sh
$ ./build-firmware.sh
3.6.firmware-mod-kit工具的其它功能
- Making changes to the firmware's file system
-
- Modifying the firmware is simple. The file system is stored in the working directory you supplied to extract_firmware.sh. Here are the subfolders of this directory:
-
- rootfs/
- This is where the file system is. Make modifications here.
- image_parts/
- This is where intermediate files are stored. If you need to replace the kernel (not at all recommended), you can do so by replacing the appropriate file here (usually segment2).
- installed_packages/
- If you use the ipkg_install.sh tool, this is where packages you've installed after firmware extraction will reside.
-
- One can manually change the files in rootfs and/or use the automated package scripts.
-
-
-
- Installing packages (.IPK)
-
- In compliment to manually making changes, one can use pre-built IPKG format package files with the ipkg_install/remove scripts. Although not all will work and a repository for packages verified to work has not yet been produced, many packages work just fine.
-
- Packages are pre-built collections of files pertaining to a set of software. OpenWrt and DD-WRT both use packages, and most are cross-compatible. These packages are stored in a tar/gzip archive of a pre-defined structure that includes some control files. You can extract and copy the files manually, or use the ipkg_install.sh script included with this kit. For a list of some of the available packages (not all may work), see http://downloads.openwrt.org/whiterussian/packages/ and http://ftp.selfnet.de/pub/openwrt/backports/rc5/ . We are currently in the process of compiling a set of packages known to be good for DD-WRT ... to help in this matter please visit here.
-
- For information on how to create IPKs, see the IPK Creation Kit.
-
- Example use:
-
-
- $ ./ipkg_install.sh some_package-1.2.5.ipk working_directory/
-
- some_package-1.2.5.ipkg would be the filename of the package.
- working_directory is the same working directory you supplied to the extract_firmware.sh script.
-
- Notes:
-
- A script, ipkg_install_all.sh is also available to install an entire folder of packages.
-
- The collection of installed packages will be stored in working_directory/installed_packages .
-
- Removing packages (.IPK)
-
- To remove packages there is the ipkg_remove.sh script.
-
- Example use:
-
-
- $ ./ipkg_remove.sh some_package-1.2.5.ipk working_directory/
-
- some_package-1.2.5.ipkg would be the filename of the package.
- working_directory is the same working directory you supplied to the extract_firmware.sh script.
-
- Notes:
-
- A script, ipkg_remove_all.sh is also available to install an entire folder of packages.
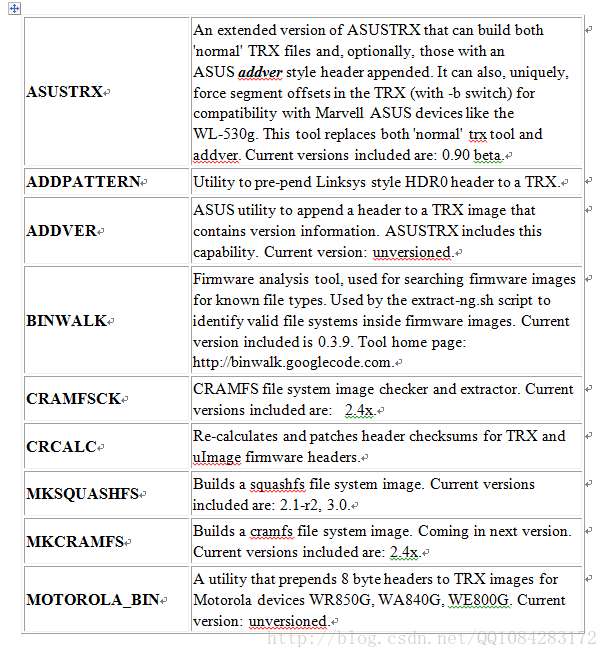
三、firmware-mod-kit包含的工具的说明
Tools / Utilities
The Firmware Mod Kit consists of a collection of tools useful when working with embedded firmware images. These include those listed below, though there are MANY MORE that are not listed here.
| |Tool | Description
| |:---------|:----------------
| | AsusTRX | An extended version of ASUSTRX that can build both 'normal' TRX files and, optionally, those with an ASUS addver style header appended. It can also, uniquely, force segment offsets in the TRX (with -b switch) for compatibility with Marvell ASUS devices like the WL-530g. This tool replaces both 'normal' trx tool and addver. Current versions included are: 0.90 beta.
| | AddPattern | Utility to pre-pend Linksys style HDR0 header to a TRX.
| | AddVer | ASUS utility to append a header to a TRX image that contains version information. ASUSTRX includes this capability. Current version: unversioned.
| | Binwalk | Scans firmware images for known file types (firmware headers, compressed kernels, file systems, etc.)
| | CramFSCK | CRAMFS file system image checker and extractor. Current versions included are: 2.4x.
| | CramFSSwap | Utility to swap the endianess of a CramFS image
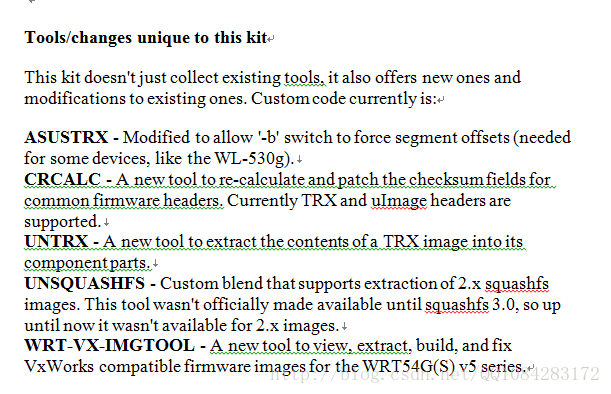
| | CRCalc | Utility to patch all uImage and TRX headers inside a given firmware image.
| | MkSquashFS | Builds a squashfs file system image. Current versions included are: 2.1-r2, 3.0.
| | MkCramFS | Builds a cramfs file system image. Coming in next version. Current versions included are: 2.4x.
| | MotorolaBin | Utility that prepends 8 byte headers to TRX images for Motorola devices WR850G, WA840G, WE800G. Current version: unversioned.
| | Splitter3 | Utility to scan and extract a firmware image's component parts.
| | Tpl-tool | Utility to manipulate TP-Link vendor format images.
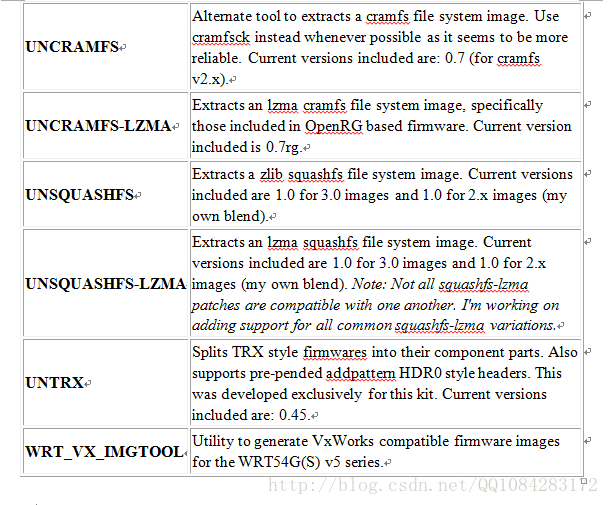
| | UnCramFS | Alternate tool to extract a cramfs file system image. Use cramfsck instead whenever possible as it seems to be more reliable. Current versions included are: 0.7 (for cramfs v2.x).
| | UnCramFS-LZMA | Alternate tool to extract LZMA-compressed cramfs file system images, such as those used by OpenRG.
| | UnSquashFS | Extracts a zlib squashfs file system image. Current versions included are 1.0 for 3.0 images and 1.0 for 2.x images (my own blend).
| | UnSquashFS-LZMA | Extracts an lzma squashfs file system image. Current versions included are 1.0 for 3.0 images and 1.0 for 2.x images (my own blend). Note: Not all squashfs-lzma patches are compatible with one another. I'm working on adding support for all common squashfs-lzma variations.
| | UnTRX | Splits TRX style firmwares into their component parts. Also supports pre-pended addpattern HDR0 style headers. This was developed exclusively for this kit. Current versions included are: 0.45.
| | WebDecomp | Extracts and restores Web GUI files from DD-WRT firmware images, allowing modifications to the Web pages.
| | WRTVxImgTool | Utility to generate VxWorks compatible firmware images for the WRT54G(S) v5 series.
参考网址:https://code.google.com/archive/p/firmware-mod-kit/wikis/Documentation.wiki