一、跳板机,堡垒机的概念
1、跳板机
跳板机就是一台服务器,运维人员在使用管理服务器的时候,必须先连接上跳板机,然后才能去操控内网中的服务器,才能登录到目标设备上进行维护和操作。
跳板机的缺点,仅仅实现服务器登录安全,但是没有实现对于运维人员的行为操控和审计。
- 跳板机的优点:集中式对服务器进行管理
- 缺点:没有实现对于运维人员的行为操作监控和审计,使用跳板机的过程中,还有可能在服务器上进行错误操作。
2、堡垒机运维思想
- 审计也只是事后的行为,审计能够发现问题以及责任人,但是无法防止问题的发生;
- 只有实现了事先严格监控,才能够源头上解决服务器错误操作的事故;
- 堡垒机能够创建系统账号,该系统账号功能时属于角色区分的作用,但是也无法确定该账号的执行人。
3、堡垒机的作用
由于跳板机的不足,企业需要更好,更安全的技术理念去管理服务器的运维操作,需要一种能够满足角色管理,角色授权,信息资源访问控制,操作记录和审计,系统更变和维护控制等等需求,且还能生成服务器资产统计报表等功能的一个IT堡垒机。
- 核心系统运维和安全审计管理
- 过滤和拦截非法请求访问,恶意攻击,拒绝不合法命令,进行审计监控,报警和责任追踪
- 报警,记录,分析,处理
4、堡垒机核心功能
- 单点登录功能
登录堡垒机之后就不用输入目标服务器的密码了
- 账号管理
账号的权限设置,增删
- 身份认证
- 资源授权
- 访问控制
- 操作审计
5、堡垒机应用的场景
- 多个用户使用同一个账号
- 一个用户使用多个账号
- 缺少统一的权限管理平台,难以实现高密度的命令权限控制
- 对于传统的网络设备无法对运维人员的远程连接命令进行加密,审计
6、企业角度看堡垒机
通过更加细致的力度随企业it资产设备进行管理,保证企业的it设备资产的安全,可靠进行降低人为误操作的风险,避免风险性,保证企业的资源资金安全。
7、管理角度看堡垒机
运维人员只需要记录堡垒机的账号密码,一次登录,即可快捷访问多个管理设备,无需记忆多个账号密码,提升工作效率,且能够对于服务器最大化的安全性操作。
8、企业真实堡垒机案例
- 运维管理人员手段落后,导致难以发现问题的因素,以及问题的责任制
- 设备的账户管理缺失,企业每一个运维人员都能够直接操控左右的服务器,账号密码时及其不安全的,一套完整的信息管理系统,一般需要更多的运维人员去管理,因此也存在了多个账户密码信息,因此存在一些问题隐患,比如密码丢失,忘记密码,还有就是,第三方运维人员,对于服务器的操作,需要有效的进行账号管理,以及账号监控。
二、JumpServer 环境部署
官方文档:https://docs.jumpserver.org/zh/master/
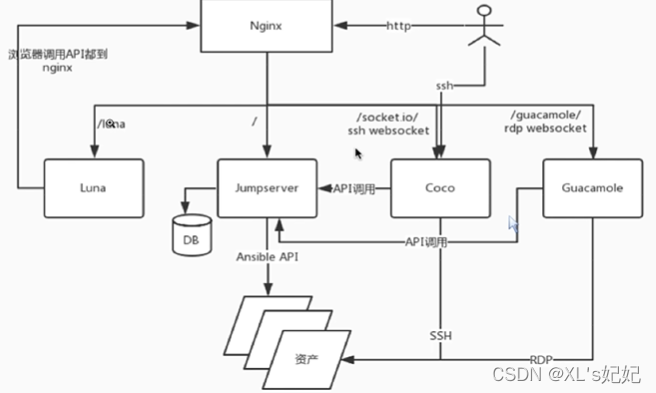
JumpServer工作流程图

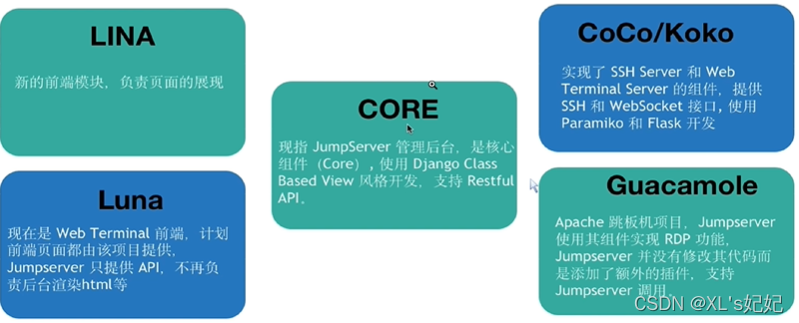
JumpServer组件
JumpServer核心架构
JumpServer使用方式
物理机、虚拟机、云

JumpServer企业级建议配置

1、liunx服务器准备
硬件:
2cpu 4g内存 50g硬盘
2、解释器
jumpserver是由python编程语言开发,旧的jumpserver是由python2开发的,新版本的是python3开发的
3、软件准备
python3
MySQL server 必须大于等于5.6
mariadb 也必须大于等于5.6 在centos上,由于mysql收费了,开源社区就诞生了mariadb数据库,是开源的
redis 数据库,缓存型数据库
4、jumpserver软件环境部署
4.1 关闭防火墙
略,参考:https://blog.csdn.net/ytangdigl/article/details/79796961?
4.2 配置阿里yum源
略,参考:https://blog.csdn.net/ltx06/article/details/78030056?
4.3 安装常用centos工具软件
[root@node1 yum.repos.d]# yum install -y bash-completion vim lrzsz wget expect net-tools nc nmap tree dos2unix htop iftop iotop unzip telnet sl psmisc nethogs glances bc ntpdate openldap-devel gcc
4.4 依赖
[root@node1 yum.repos.d]# yum -y install git python-pip gcc automake autoconf python-devel sshpass lrzsz readline-devel openssl openssl-devel zlib zlib-devel
4.5 修改字符集,支持中文
[root@node1 yum.repos.d]# localedef -c -f UTF-8 -i zh_CN zh_CN.UTF-8
[root@node1 yum.repos.d]# export LC_ALL=zh_CN.UTF-8
#配置到全局
[root@node1 yum.repos.d]# echo 'LANG="zh_CN.UTF-8"' > /etc/locale.conf
[root@node1 yum.repos.d]# locale
LANG=zh_CN.UTF-8
LC_CTYPE="zh_CN.UTF-8"
LC_NUMERIC="zh_CN.UTF-8"
LC_TIME="zh_CN.UTF-8"
LC_COLLATE="zh_CN.UTF-8"
LC_MONETARY="zh_CN.UTF-8"
LC_MESSAGES="zh_CN.UTF-8"
LC_PAPER="zh_CN.UTF-8"
LC_NAME="zh_CN.UTF-8"
LC_ADDRESS="zh_CN.UTF-8"
LC_TELEPHONE="zh_CN.UTF-8"
LC_MEASUREMENT="zh_CN.UTF-8"
LC_IDENTIFICATION="zh_CN.UTF-8"
LC_ALL=zh_CN.UTF-8
5、部署MySQL5.6
5.1 下载MySQL安装包
[root@node1 yum.repos.d]# wget https://cdn.mysql.com//Downloads/MySQL-5.6/MySQL-5.6.49-1.el7.x86_64.rpm-bundle.tar
--2022-04-13 16:24:03--  https://cdn.mysql.com//Downloads/MySQL-5.6/MySQL-5.6.49-1.el7.x86_64.rpm-bundle.tar
正在解析主机 cdn.mysql.com (cdn.mysql.com)... 184.50.117.5
正在连接 cdn.mysql.com (cdn.mysql.com)|184.50.117.5|:443... 已连接。
已发出 HTTP 请求,正在等待回应... 200 OK
长度:254310400 (243M) [application/x-tar]
正在保存至: “MySQL-5.6.49-1.el7.x86_64.rpm-bundle.tar”

100%[=====================================================================================================================================================================>] 254,310,400 1.45MB/s 用时 2m 26s

2022-04-13 16:26:35 (1.66 MB/s) - 已保存 “MySQL-5.6.49-1.el7.x86_64.rpm-bundle.tar” [254310400/254310400])
5.2 解压缩
[root@node1 jump_ser]# mkdir mysql_rpm
[root@node1 jump_ser]# tar -xf MySQL-5.6.49-1.el7.x86_64.rpm-bundle.tar -C ./mysql_rpm
5.3 使用yum工具安装一系列的rpm包
[root@node1 mysql_rpm]# ls
MySQL-client-5.6.49-1.el7.x86_64.rpm  MySQL-embedded-5.6.49-1.el7.x86_64.rpm  MySQL-shared-5.6.49-1.el7.x86_64.rpm         MySQL-test-5.6.49-1.el7.x86_64.rpm
MySQL-devel-5.6.49-1.el7.x86_64.rpm   MySQL-server-5.6.49-1.el7.x86_64.rpm    MySQL-shared-compat-5.6.49-1.el7.x86_64.rpm
[root@node1 mysql_rpm]# yum localinstall ./*   #意思是,使用yum工具安装当前目录下的所有rpm包,并且yum会自动识别rpm之间的依赖关系。
5.4mysql的启动文件,并修改配置
[root@localhost mysql]# cat /etc/my.cnf
[mysqld]
datadir=/var/lib/mysql  #存放数据库的目录
socket=/var/lib/mysql/mysql.sock  # 存放进程的位置
# Disabling symbolic-links is recommended to prevent assorted security risks
symbolic-links=0
# Settings user and group are ignored when systemd is used.
# If you need to run mysqld under a different user or group,
# customize your systemd unit file for mariadb according to the
# instructions in http://fedoraproject.org/wiki/Systemd

#注意修改
[mysqld_safe]
log-error=/var/log/mysql/mysql.log
pid-file=/var/run/mysql/mysql.pid
# log-error=/var/log/mariadb/mariadb.log # 存放日志
# pid-file=/var/run/mariadb/mariadb.pid

#
# include all files from the config directory
#
!includedir /etc/my.cnf.d
5.5、启动MySQL
[root@localhost mysql]# systemctl start mysql
[root@localhost mysql]# ss -untlp|grep 3306
tcp    LISTEN     0      80     [::]:3306               [::]:*                   users:(("mysqld",pid=2910,fd=8))
[root@localhost mysql]#
5.6查看mysql5.7默认生成的root密码
[root@localhost mysql]# cat ~/.mysql_secret
# The random password set for the root user at Wed Apr 13 17:36:36 2022 (local time): adsmSq340G4P2Chg
5.7修改root密码,并登录
# 方法一:
[root@localhost mysql]# mysqladmin -uroot -padsmSq340G4P2Chg password 123
Warning: Using a password on the command line interface can be insecure. ###提示这种修改不安全。
[root@localhost mysql]# mysql -uroot -p123
Warning: Using a password on the command line interface can be insecure.
Welcome to the MySQL monitor.  Commands end with ; or \g.
Your MySQL connection id is 2
Server version: 5.6.49 MySQL Community Server (GPL)

Copyright (c) 2000, 2020, Oracle and/or its affiliates. All rights reserved.

Oracle is a registered trademark of Oracle Corporation and/or its
affiliates. Other names may be trademarks of their respective
owners.

Type 'help;' or '\h' for help. Type '\c' to clear the current input statement.

#方法二:
mysql> update mysql.user set password=password('1234') where user='root';
Query OK, 4 rows affected (0.00 sec)
Rows matched: 4  Changed: 4  Warnings: 0
#刷新数据表信息
mysql> flush privileges;
Query OK, 0 rows affected (0.00 sec)
5.8 创建数据库
mysql> create database jumpserver default charset 'utf8' collate 'utf8_bin';
Query OK, 1 row affected (0.00 sec)
5.9 创建用户
mysql> create user 'jumpserver'@'%' identified by '1234';
Query OK, 0 rows affected (0.00 sec)
5.10给用户授权
mysql> grant all on jumpserver.* to 'jumpserver'@'%';
Query OK, 0 rows affected (0.00 sec)
mysql> flush privileges;
Query OK, 0 rows affected (0.00 sec)
6、部署python3.6
6.1、下载安装包
[root@localhost teach_jmp]# wget https://www.python.org/ftp/python/3.6.10/Python-3.6.10.tgz
6.2、解压并安装
[root@localhost teach_jmp]# tar -zxf Python-3.6.10.tgz
[root@localhost teach_jmp]# ls
MySQL-5.6.49-1.el7.x86_64.rpm-bundle.tar  mysql_rpm  Python-3.6.10  Python-3.6.10.tgz
[root@localhost teach_jmp]# cd Python-3.6.10/
# --prefix= 指定安装路径
[root@localhost Python-3.6.10]# ./configure --prefix=/teach_jmp/python3.6.10/
#编译并安装
[root@localhost Python-3.6.10]# make && make install
#如果编译安装出错,则需要重新解压编码
6.3、配置python3的环境变量
[root@localhost bin]# tail -1 /etc/profile
PATH="/teach_jmp/python3.6.10/bin:$PATH"
[root@localhost bin]# source /etc/profile
[root@localhost bin]# python3
Python 3.6.10 (default, Apr 14 2022, 16:17:56)
[GCC 4.8.5 20150623 (Red Hat 4.8.5-44)] on linux
Type "help", "copyright", "credits" or "license" for more information.
>>>
6.4、创建python运行的虚拟环境
- 以免搞乱环境变量,由于Linux系统内置python2,并且linux运行过程中需要依赖python2,所有当额外安装python3之后,为了不扰乱Linux原有的环境变量,所以需要运行安装python3的虚拟环境
- python程序需要安装多个模块,且如果运行多个python程序,一个python解释器就不够了
- 则需要使用虚拟环境创建多个python解释器
6.4.1 安装虚拟环境工具
[root@localhost bin]# pip3 install virtualenv
pip is configured with locations that require TLS/SSL, however the ssl module in Python is not available.
Collecting virtualenv
  Retrying (Retry(total=4, connect=None, read=None, redirect=None, status=None)) after connection broken by 'SSLError("Can't connect to HTTPS URL because the SSL module is not available.",)': /simple/virtualenv/
  Retrying (Retry(total=3, connect=None, read=None, redirect=None, status=None)) after connection broken by 'SSLError("Can't connect to HTTPS URL because the SSL module is not available.",)': /simple/virtualenv/
  Retrying (Retry(total=2, connect=None, read=None, redirect=None, status=None)) after connection broken by 'SSLError("Can't connect to HTTPS URL because the SSL module is not available.",)': /simple/virtualenv/
  Retrying (Retry(total=1, connect=None, read=None, redirect=None, status=None)) after connection broken by 'SSLError("Can't connect to HTTPS URL because the SSL module is not available.",)': /simple/virtualenv/
  Retrying (Retry(total=0, connect=None, read=None, redirect=None, status=None)) after connection broken by 'SSLError("Can't connect to HTTPS URL because the SSL module is not available.",)': /simple/virtualenv/
  Could not fetch URL https://pypi.org/simple/virtualenv/: There was a problem confirming the ssl certificate: HTTPSConnectionPool(host='pypi.org', port=443): Max retries exceeded with url: /simple/virtualenv/ (Caused by SSLError("Can't connect to HTTPS URL because the SSL module is not available.",)) - skipping
  Could not find a version that satisfies the requirement virtualenv (from versions: )
No matching distribution found for virtualenv
pip is configured with locations that require TLS/SSL, however the ssl module in Python is not available.
Could not fetch URL https://pypi.org/simple/pip/: There was a problem confirming the ssl certificate: HTTPSConnectionPool(host='pypi.org', port=443): Max retries exceeded with url: /simple/pip/ (Caused by SSLError("Can't connect to HTTPS URL because the SSL module is not available.",)) - skipping
更新pip下载源
[root@localhost Python-3.6.10]# mkdir ~/.pip
[root@localhost Python-3.6.10]# vim ~/.pip/pip.conf
[root@localhost Python-3.6.10]# cat ~/.pip/pip.conf
[global]
index-url = https://mirrors.aliyun.com/pypi/simple
安装时报错,缺少SSL
解决:删除编译安装的python3(取消配置的环境变量,删除解压的和编译安装的文件夹),然后安装openssl工具(yum install openssl openssl-devel),重新编译安装python3
[root@localhost Python-3.6.10]# pip3 install virtualenv
Collecting virtualenv
  Downloading https://files.pythonhosted.org/packages/9e/34/e86fc6a8f84329b49321a532b3c1fef103c67765df957fbb3852eea39d00/virtualenv-20.14.1-py2.py3-none-any.whl (8.8MB)
    100% |████████████████████████████████| 8.8MB 42kB/s
Collecting filelock<4,>=3.2 (from virtualenv)
。。。。。。。。。。。。。。
Successfully installed distlib-0.3.4 filelock-3.4.1 importlib-metadata-4.8.3 importlib-resources-5.4.0 platformdirs-2.4.0 six-1.16.0 typing-extensions-4.1.1 virtualenv-20.14.1 zipp-3.6.0
You are using pip version 18.1, however version 21.3.1 is available.
You should consider upgrading via the 'pip install --upgrade pip' command.
6.4.2 使用虚拟环境工具再创建一个解释器
[root@localhost teach_jmp]# virtualenv --python=python3 jmp_venv1
created virtual environment CPython3.6.10.final.0-64 in 3971ms
  creator CPython3Posix(dest=/teach_jmp/jmp_venv1, clear=False, no_vcs_ignore=False, global=False)
  seeder FromAppData(download=False, pip=bundle, setuptools=bundle, wheel=bundle, via=copy, app_data_dir=/root/.local/share/virtualenv)
    added seed packages: pip==21.3.1, setuptools==59.6.0, wheel==0.37.1
  activators BashActivator,CShellActivator,FishActivator,NushellActivator,PowerShellActivator,PythonActivator
此时就有两个python3解释器了
路径为:
[root@localhost bin]# /teach_jmp/jmp_venv1/bin/python3
Python 3.6.10 (default, Apr 14 2022, 17:09:52)
[GCC 4.8.5 20150623 (Red Hat 4.8.5-44)] on linux
Type "help", "copyright", "credits" or "license" for more information.
>>>
6.5激活虚拟环境
#进入虚拟环境
[root@localhost bin]# source /teach_jmp/jmp_venv1/bin/activate
#查看当前python3的环境变量路径
(jmp_venv1) [root@localhost bin]# which python3
/teach_jmp/jmp_venv1/bin/python3
#退出虚拟环境
(jmp_venv1) [root@localhost bin]# deactivate
[root@localhost bin]# which python3
/teach_jmp/python3.6.10/bin/python3
7 redis数据库部署
redis是内存性数据库,缓存性数据库,读写速度快
7.1安装redis的形式
- rpm包手动安装,需要手动解决依赖,不推荐
- 郁闷自动化安装,合适软件调试学习使用,安装自动解决依赖
- 源码编译安装,用于对版本有特殊要求
7.2安装redis,yum安装
[root@localhost bin]# yum install epel-release
[root@localhost bin]# yum install redis -y
7.3启动redis,测试是否能用
[root@localhost bin]# systemctl start redis
[root@localhost bin]# netstat -tunlp
Active Internet connections (only servers)
Proto Recv-Q Send-Q Local Address           Foreign Address         State       PID/Program name
tcp        0      0 127.0.0.1:6379          0.0.0.0:*               LISTEN      39135/redis-server
[root@localhost bin]# redis-cli
127.0.0.1:6379> ping
PONG
127.0.0.1:6379>
三、部署jumpserver服务
一个后台程序,基本上都是需要依赖于数据库才能运行。
1、获取jumpserver安装包
[root@localhost teach_jmp]# wget https://github.com/jumpserver/jumpserver/releases/download/v2.1.0/jumpserver-v2.1.0.tar.gz
2、解压,指定软链接
#解压
[root@localhost teach_jmp]# tar -zxf jumpserver-v2.1.0.tar.gz
[root@localhost teach_jmp]# ll
总用量 277236
drwxr-xr-x 10 root root      4096 7月  16 2020 jumpserver-v2.1.0

#指定软链接
[root@localhost teach_jmp]# ln -s /teach_jmp/jumpserver-v2.1.0 /teach_jmp/jumpserver
[root@localhost teach_jmp]# ll
总用量 277236
lrwxrwxrwx  1 root root        28 4月  15 10:39 jumpserver -> /teach_jmp/jumpserver-v2.1.0
3、安装依赖
[root@localhost teach_jmp]# yum install -y bash-completion vim lrzsz wget expect net-tools nc nmap tree doszunix htop iftop iotop unzip telnet sl psmisc nethogs glances bc ntpdate openldap-devel
4、安装运行jumpserver所需要的模块
由python开发的程序,必须先安装python所需要的模块,才能运行
查看所需要的模块
[root@localhost requirements]# pwd
/teach_jmp/jumpserver/requirements
[root@localhost requirements]# cat requirements.txt
amqp==2.5.2
ansible==2.8.8
asn1crypto==0.24.0
bcrypt==3.1.4
billiard==3.6.3.0
。。。。。
必须先激活python3的虚拟环境,再安装模块
#激活虚拟机环境
[root@localhost requirements]# source /teach_jmp/jmp_venv1/bin/activate
(jmp_venv1) [root@localhost requirements]#
#安装模块
(jmp_venv1) [root@localhost requirements]# pip3 install -r /teach_jmp/jumpserver/requirements/requirements.txt
5、修改jumpserver的配置文件
拷贝,查看配置文件
[root@localhost jumpserver]# grep -Ev '^#|^$' config_example.yml
SECRET_KEY: #需要手动生成密钥
BOOTSTRAP_TOKEN: #需要手动生成密钥
DB_ENGINE: mysql # 数据库类型
DB_HOST: 127.0.0.1 #数据库ip
DB_PORT: 3306 #数据库端口
DB_USER: jumpserver ##数据库用户名
DB_PASSWORD: #数据库用户密码
DB_NAME: jumpserver #数据库库名
HTTP_BIND_HOST: 0.0.0.0 #jumpserver的地址
HTTP_LISTEN_PORT: 8080 #jumpserver默认端口
WS_LISTEN_PORT: 8070
REDIS_HOST: 127.0.0.1 #redis数据库ip
REDIS_PORT: 6379 #redis数据库端口
修改配置文件
坑:mysql的配置要加双引号
#手动生成SECRET_KEY密钥
(jmp_venv1) [root@localhost apps]# if [ "$SECRET_KEY" = "" ]; then SECRET_KEY=`cat /dev/urandom | tr -dc A-Za-z0-9 | head -c 50`; echo "SECRET_KEY=$SECRET_KEY" >> ~/.bashrc; echo $SECRET_KEY; else echo $SECRET_KEY; fi
wDpFdg1JITM2Qb2ChfbdgjUX7dQuvZaq76fc8X9AIkALGLF2nK
#手动生成BOOTSTRAP_TOKEN密钥
(jmp_venv1) [root@localhost apps]# if [ "$BOOTSTRAP_TOKEN" = "" ]; then BOOTSTRAP_TOKEN=`cat /dev/urandom | tr -dc A-Za-z0-9 | head -c 50`; echo "BOOTSTRAP_TOKEN=$BOOTSTRAP_TOKEN" >> ~/.bashrc; echo $BOOTSTRAP_TOKEN; else echo $BOOTSTRAP_TOKEN; fi
icBSPBEIDGo3RJN3bDgIhe5wWMfwsR6vyBsPiJL26DCtEoygjg


#修改配置文件
(jmp_venv1) [root@localhost jumpserver]# vim config_example.yml
(jmp_venv1) [root@localhost jumpserver]# grep -Ev '^#|^$' config_example.yml
SECRET_KEY: wDpFdg1JITM2Qb2ChfbdgjUX7dQuvZaq76fc8X9AIkALGLF2nK
BOOTSTRAP_TOKEN: icBSPBEIDGo3RJN3bDgIhe5wWMfwsR6vyBsPiJL26DCtEoygjg
DB_ENGINE: "mysql"
DB_HOST: "127.0.0.1"
DB_PORT: "3306"
DB_USER: "jumserver"
DB_PASSWORD: "1234"
DB_NAME: "jumserver"
HTTP_BIND_HOST: 0.0.0.0
HTTP_LISTEN_PORT: 8080
WS_LISTEN_PORT: 8070
REDIS_HOST: 127.0.0.1
REDIS_PORT: 6379
6、对python程序进行数据库迁移
jumpserver这个程序是由python的web框架django开发,必须先进行数据库迁移,生成库表的信息,才能运行程序。
6.1、jumpserver后台程序,数据库迁移命令
(jmp_venv1) [root@localhost jumpserver]# python3 apps/manage.py makemigrations
Migrations for 'tickets':
  apps/tickets/migrations/0002_auto_20220419_1441.py
    - Alter field type on ticket
(jmp_venv1) [root@localhost jumpserver]# python3 apps/manage.py migrate
Operations to perform:
  Apply all migrations: admin, applications, assets, audits, auth, authentication, captc                                                                                                                        ha, common, contenttypes, django_cas_ng, django_celery_beat, jms_oidc_rp, ops, orgs, per                                                                                                                        ms, sessions, settings, terminal, tickets, users
Running migrations:
  Applying contenttypes.0001_initial... OK
  Applying contenttypes.0002_remove_content_type_name... OK
  Applying auth.0001_initial... OK
  Applying auth.0002_alter_permission_name_max_length... OK
  Applying auth.0003_alter_user_email_max_length... OK
  Applying auth.0004_alter_user_username_opts... OK
  Applying auth.0005_alter_user_last_login_null... OK
  Applying auth.0006_require_contenttypes_0002... OK
  Applying auth.0007_alter_validators_add_error_messages... OK
  Applying auth.0008_alter_user_username_max_length... OK
  Applying users.0001_initial... OK
  Applying admin.0001_initial... OK
  Applying admin.0002_logentry_remove_auto_add... OK
  Applying admin.0003_logentry_add_action_flag_choices... OK
  Applying users.0002_auto_20171225_1157_squashed_0019_auto_20190304_1459... OK
  Applying assets.0001_initial... OK
  Applying perms.0001_initial... OK
  Applying assets.0002_auto_20180105_1807_squashed_0009_auto_20180307_1212... OK
  Applying assets.0010_auto_20180307_1749_squashed_0019_auto_20180816_1320... OK
  Applying perms.0002_auto_20171228_0025_squashed_0009_auto_20180903_1132... OK
  Applying perms.0003_action... OK
  Applying perms.0004_assetpermission_actions... OK
7、启动jumpserver
# 后台启动
(jmp_venv1) [root@localhost jumpserver]# ./jms start -d
2022-04-19 14:53:11 Tue Apr 19 14:53:11 2022
2022-04-19 14:53:11 Jumpserver version v2.1.0, more see https://www.jumpserver.org
- Start Gunicorn WSGI HTTP Server
.......
 [X] 0027_auto_20200616_1503
2022-04-19 14:53:18 Database connect success
.......
- Start Daphne ASGI WS Server
gunicorn is running: 64463
celery_ansible is running: 64485
celery_default is running: 64502
beat is running: 64519
flower is running: 64531
daphne is running: 64542
(jmp_venv1) [root@localhost jumpserver]# ps -ef|grep 64463
root      64463      1  0 14:53 pts/0    00:00:00 /teach_jmp/jmp_venv1/bin/python /teach                                                                                                                        _jmp/jmp_venv1/bin/gunicorn jumpserver.wsgi -b 0.0.0.0:8080 -k gthread --threads 10 -w 4                                                                                                                         --max-requests 4096 --access-logformat %(h)s %(t)s "%(r)s" %(s)s %(b)s  --access-logfil                                                                                                                        e -
root      65009  64463 22 14:55 pts/0    00:00:04 /teach_jmp/jmp_venv1/bin/python /teach                                                                                                                        _jmp/jmp_venv1/bin/gunicorn jumpserver.wsgi -b 0.0.0.0:8080 -k gthread --threads 10 -w 4                                                                                                                         --max-requests 4096 --access-logformat %(h)s %(t)s "%(r)s" %(s)s %(b)s  --access-logfil                                                                                                                        e -
root      65011  64463 18 14:55 pts/0    00:00:03 /teach_jmp/jmp_venv1/bin/python /teach                                                                                                                        _jmp/jmp_venv1/bin/gunicorn jumpserver.wsgi -b 0.0.0.0:8080 -k gthread --threads 10 -w 4                                                                                                                         --max-requests 4096 --access-logformat %(h)s %(t)s "%(r)s" %(s)s %(b)s  --access-logfil                                                                                                                        e -
root      65012  64463 18 14:55 pts/0    00:00:03 /teach_jmp/jmp_venv1/bin/python /teach                                                                                                                        _jmp/jmp_venv1/bin/gunicorn jumpserver.wsgi -b 0.0.0.0:8080 -k gthread --threads 10 -w 4                                                                                                                         --max-requests 4096 --access-logformat %(h)s %(t)s "%(r)s" %(s)s %(b)s  --access-logfil                                                                                                                        e -
root      65013  64463 41 14:55 pts/0    00:00:07 /teach_jmp/jmp_venv1/bin/python /teach                                                                                                                        _jmp/jmp_venv1/bin/gunicorn jumpserver.wsgi -b 0.0.0.0:8080 -k gthread --threads 10 -w 4                                                                                                                         --max-requests 4096 --access-logformat %(h)s %(t)s "%(r)s" %(s)s %(b)s  --access-logfil                                                                                                                        e -
root      65114 103353  0 14:55 pts/0    00:00:00 grep --color=auto 64463
(jmp_venv1) [root@localhost jumpserver]# netstat -untlp
Active Internet connections (only servers)
Proto Recv-Q Send-Q Local Address           Foreign Address         State       PID/Program name
tcp        0      0 0.0.0.0:8070            0.0.0.0:*               LISTEN      64542/python
tcp        0      0 0.0.0.0:6379            0.0.0.0:*               LISTEN      16130/redis-server
tcp        0      0 0.0.0.0:8080            0.0.0.0:*               LISTEN      64463/python
tcp        0      0 0.0.0.0:5555            0.0.0.0:*               LISTEN      64531/python
tcp        0      0 0.0.0.0:22              0.0.0.0:*               LISTEN      1188/sshd
tcp6       0      0 :::3306                 :::*                    LISTEN      122867/mysqld
tcp6       0      0 :::6379                 :::*                    LISTEN      16130/redis-server
tcp6       0      0 :::5555                 :::*                    LISTEN      64531/python
tcp6       0      0 :::21                   :::*                    LISTEN      1199/vsftpd
tcp6       0      0 :::22                   :::*                    LISTEN      1188/sshd
(jmp_venv1) [root@localhost jumpserver]#
用浏览器访问8080端口
四、部署koko组件
koko是用golang编成开发的组件;
1、下载koko源代码
(jmp_venv1) [root@localhost teach_jmp]# wget https://github.com/jumpserver/koko/releases/download/v2.1.0/koko-v2.1.0-linux-amd64.tar.gz
2、解压
(jmp_venv1) [root@localhost teach_jmp]# tar -zxf koko-v2.1.0-linux-amd64.tar.gz
(jmp_venv1) [root@localhost teach_jmp]# ln -s koko-v2.1.0-linux-amd64 /teach_jmp/koko
(jmp_venv1) [root@localhost teach_jmp]# ll
总用量 292296
drwxr-xr-x  7 root root      4096 4月  15 15:40 jmp_venv1
lrwxrwxrwx  1 root root        28 4月  15 10:39 jumpserver -> /teach_jmp/jumpserver-v2.1.0
drwxr-xr-x 10 root root      4096 4月  19 15:05 jumpserver-v2.1.0
-rw-r--r--  1 root root   6537152 12月  7 15:29 jumpserver-v2.1.0.tar.gz
lrwxrwxrwx  1 root root        23 4月  19 16:01 koko -> koko-v2.1.0-linux-amd64
3、配置koko文件
(jmp_venv1) [root@localhost koko]# grep -Ev '^#|^$' config.yml
CORE_HOST: http://127.0.0.1:8080
BOOTSTRAP_TOKEN: p3xqdIsXR1eWuO1qNa1UnqPhRKCDxB8zMvhIjDEa8IUdx97gKh
LOG_LEVEL: INFO
REDIS_HOST: 127.0.0.1
REDIS_PORT: 6379
REDIS_PASSWORD: 1234
REDIS_CLUSTERS:
REDIS_DB_ROOM:

#启动koko
(jmp_venv1) [root@localhost koko]# pwd
/teach_jmp/koko
(jmp_venv1) [root@localhost koko]# koko -d

#日志文件
(jmp_venv1) [root@localhost koko]# tail -f data/logs/koko.log
2022-04-19 16:09:51 [ERRO] POST http://127.0.0.1:8080/api/v2/terminal/terminal-registrations/ failed, get code: 401, {"detail":"身份认证信息未提供。"}
2022-04-19 16:09:51 [ERRO] register access key failed
2022-04-19 16:11:32 [INFO] Exchange share room type: local
2022-04-19 16:11:32 [INFO] Start HTTP server at 0.0.0.0:5000
2022-04-19 16:11:32 [INFO] Start SSH server at 0.0.0.0:2222
4、补充—启动时报错
2022-04-19 16:09:51 [ERRO] POST http://127.0.0.1:8080/api/v2/terminal/terminal-registrations/ failed, get code: 401, {“detail”:“身份认证信息未提供。”}
解决
删除.access_key文件
(jmp_venv1) [root@localhost keys]# pwd
/teach_jmp/koko/data/keys
(jmp_venv1) [root@localhost keys]# rm -rf .access_key
重新生成SECRET_KEY和BOOTSTRAP_TOKEN(需要重新配置有关这两个字所有参数)
#删除原有值
(jmp_venv1) [root@localhost apps]#vim ~/.bashrc
#手动生成SECRET_KEY密钥
(jmp_venv1) [root@localhost apps]# if [ "$SECRET_KEY" = "" ]; then SECRET_KEY=`cat /dev/urandom | tr -dc A-Za-z0-9 | head -c 50`; echo "SECRET_KEY=$SECRET_KEY" >> ~/.bashrc; echo $SECRET_KEY; else echo $SECRET_KEY; fi
wDpFdg1JITM2Qb2ChfbdgjUX7dQuvZaq76fc8X9AIkALGLF2nK
#手动生成BOOTSTRAP_TOKEN密钥
(jmp_venv1) [root@localhost apps]# if [ "$BOOTSTRAP_TOKEN" = "" ]; then BOOTSTRAP_TOKEN=`cat /dev/urandom | tr -dc A-Za-z0-9 | head -c 50`; echo "BOOTSTRAP_TOKEN=$BOOTSTRAP_TOKEN" >> ~/.bashrc; echo $BOOTSTRAP_TOKEN; else echo $BOOTSTRAP_TOKEN; fi
icBSPBEIDGo3RJN3bDgIhe5wWMfwsR6vyBsPiJL26DCtEoygjg
五、Guacamole组件部署

1、使用docker安装guacamole
# 获取yum源
[root@localhost ~]# yum install -y yum-utils
已加载插件:fastestmirror
Loading mirror speeds from cached hostfile
 * base: mirrors.aliyun.com
.........
  libxml2.x86_64 0:2.9.1-6.el7_9.6

完毕!

#配置yum地址
[root@localhost ~]# yum-config-manager \
>     --add-repo \
>     https://mirrors.aliyun.com/docker-ce/linux/centos/docker-ce.repo
........
元数据缓存已建立

# 安装docker相关组件
[root@localhost ~]# yum install docker-ce docker-ce-cli containerd.io
已加载插件:fastestmirror
Loading mirror speeds from cached hostfile
 * base: mirrors.aliyun.com
........
完毕!

#启动docker
[root@localhost ~]# systemctl start docker

#获取guacamole镜像
[root@localhost ~]# docker pull guacamole:v2.4.0
v2.4.0: Pulling from jumpserver/jms_guacamole
75f829a71a1c: Pull complete
9844e8b2ad45: Pull complete
e09db46bb5f3: Pull complete
779bfb3b3ae4: Pull complete

#启动guacamole容器
[root@localhost ~]# docker run --name jms_guacamole -d -p 127.0.0.1:8081:8080 -e JUMPSERVER_SERVER=http://192.168.29.128:8080 -e BOOTSTRAP_TOKEN=p3xqdIsXR1eWuO1qNa1UnqPhRKCDxB8zMvhIjDEa8IUdx97gKh -e GUACAMOLE_LOG_LEVEL=ERROR jumpserver/jms_guacamole:v2.4.0
cb63c7752e921adb9d14983897d2549431ec1579ff1e46048f9ea9d56c61651e

#查看容器日志
[root@localhost ~]# docker logs -tf cb63c7752e921ad
2022-04-19T08:57:38.948281463Z guacd[10]: INFO: Guacamole proxy daemon (guacd) version 1.2.0 started
2022-04-19T08:57:38.949914616Z Starting guacd: SUCCESS
2022-04-19T08:57:38.981828979Z Tomcat started.
2022-04-19T08:57:38.982521153Z Guacamole version v2.4.0, more see https://www.jumpserver.org
2022-04-19T08:57:38.982690351Z Quit the server with CONTROL-C.
2022-04-19T08:57:38.988958837Z
2、使用官方编译安装guacamole
# 下载tar包
cd /opt && wget -O docker-guacamole-v2.4.0.tar.gz https://github.com/jumpserver/docker-guacamole/archive/master.tar.gz
# 创建对应目录并和依赖包
mkdir /opt/docker-guacamole
tar -xf docker-guacamole-v2.4.0.tar.gz -C /opt/docker-guacamole --strip-components 1
rm -rf /opt/docker-guacamole-v2.4.0.tar.gz && cd /opt/docker-guacamole
wget http://download.jumpserver.org/public/guacamole-server-1.2.0.tar.gz
tar -xf guacamole-server-1.2.0.tar.gz
wget http://download.jumpserver.org/public/ssh-forward.tar.gz
tar -xf ssh-forward.tar.gz -C /bin/ &&  chmod +x /bin/ssh-forward
# 安装依赖包
yum -y install cairo-devel libjpeg-turbo-devel libpng-devel libtool uuid-devel ffmpeg-devel freerdp-devel pango-devel libssh2-devel libtelnet-devel libvncserver-devel libwebsockets-devel pulseaudio-libs-devel openssl-devel libvorbis-devel libwebp-devel
# 安装
cd /opt/docker-guacamole/guacamole-server-1.2.0
# 预编译
./configure --with-init-dir=/etc/init.d
# 二进制编译及安装
make  && make install

yum install -y java-1.8.0-openjdk
# 创建对应目录
mkdir -p /config/guacamole /config/guacamole/extensions /config/guacamole/record /config/guacamole/drive && chown daemon:daemon /config/guacamole/record /config/guacamole/drive && cd /config
# 下载tomcat
wget http://mirrors.tuna.tsinghua.edu.cn/apache/tomcat/tomcat-9/v9.0.38/bin/apache-tomcat-9.0.38.tar.gz
# 解压
tar -xf apache-tomcat-9.0.36.tar.gz
mv apache-tomcat-9.0.36 tomcat9
rm -rf /config/tomcat9/webapps/*
# 修改配置文件
sed -i 's/Connector port="8080"/Connector port="8081"/g' /config/tomcat9/conf/server.xml && \
echo "java.util.logging.ConsoleHandler.encoding = UTF-8" >> /config/tomcat9/conf/logging.properties
# 其他设置
wget http://download.jumpserver.org/release/v2.4.0/guacamole-client-v2.4.0.tar.gz && \
tar -xf guacamole-client-v2.4.0.tar.gz && \
rm -rf guacamole-client-v2.4.0.tar.gz && \
cp guacamole-client-v2.4.0/guacamole-*.war /config/tomcat9/webapps/ROOT.war && \
cp guacamole-client-v2.4.0/guacamole-*.jar /config/guacamole/extensions/ && \
mv /opt/docker-guacamole/guacamole.properties /config/guacamole/ && \
rm -rf /opt/docker-guacamole
export JUMPSERVER_SERVER=http://127.0.0.1:8080
echo "export JUMPSERVER_SERVER=http://127.0.0.1:8080" >> ~/.bashrc
export BOOTSTRAP_TOKEN=zxffNymGjP79j6BN
echo "export BOOTSTRAP_TOKEN=zxffNymGjP79j6BN" >> ~/.bashrc
export JUMPSERVER_KEY_DIR=/config/guacamole/data/keys
echo "export JUMPSERVER_KEY_DIR=/config/guacamole/data/keys" >> ~/.bashrc
export GUACAMOLE_HOME=/config/guacamole
echo "export GUACAMOLE_HOME=/config/guacamole" >> ~/.bashrc
export GUACAMOLE_LOG_LEVEL=ERROR
echo "export GUACAMOLE_LOG_LEVEL=ERROR" >> ~/.bashrc
export JUMPSERVER_ENABLE_DRIVE=true
echo "export JUMPSERVER_ENABLE_DRIVE=true" >> ~/.bashrc
# 环境变量说明
JUMPSERVER_SERVER 指 core 访问地址
BOOTSTRAP_TOKEN 为 Jumpserver/config.yml 里面的 BOOTSTRAP_TOKEN 值
JUMPSERVER_KEY_DIR 认证成功后 key 存放目录
GUACAMOLE_HOME 为 guacamole.properties 配置文件所在目录
GUACAMOLE_LOG_LEVEL 为生成日志的等级
JUMPSERVER_ENABLE_DRIVE 为 rdp 协议挂载共享盘

# 启动
/etc/init.d/guacd start
sh /config/tomcat9/bin/startup.sh
坑:如果安装重复安装重启之后,发现仍然无法在jumpserver的web终端连接服务器,如“404 page not found”这个报错,则清空浏览器缓存,或者换个浏览器试试。
六、安装ffmpeg组件 用于处理媒体文件
(jmp_venv1) [root@localhost teach_jmp]# rpm -v --import http://li.nux.ro/download/nux/RPM-GPG-KEY-nux.ro
(jmp_venv1) [root@localhost teach_jmp]# rpm -Uvh http://li.nux.ro/download/nux/dextop/el7/x86_64/nux-dextop-release-0-5.el7.nux.noarch.rpm
获取http://li.nux.ro/download/nux/dextop/el7/x86_64/nux-dextop-release-0-5.el7.nux.noarch.rpm
准备中...                          ################################# [100%]
正在升级/安装...
   1:nux-dextop-release-0-5.el7.nux   ################################# [100%]
(jmp_venv1) [root@localhost teach_jmp]# yum install ffmpeg ffmpeg-devell -y
已加载插件:fastestmirror
Loading mirror speeds from cached hostfile
 * base: mirrors.aliyun.com
 * epel: mirrors.bfsu.edu.cn
 * extras: mirrors.aliyun.com
 * nux-dextop: li.nux.ro
 * updates: mirrors.aliyun.com
nux-dextop
 schroedinger.x86_64 0:1.0.11-4.el7             soxr.x86_64 0:0.1.2-1.el7                                  speex.x86_64 0:1.2-0.19.rc1.el7                    trousers.x86_64 0:0.3.14-2.el7
  vo-amrwbenc.x86_64 0:0.1.2-1.el7.nux           x264-libs.x86_64 0:0.142-11.20141221git6a301b6.el7.nux     x265-libs.x86_64 0:1.9-1.el7.nux                   xvidcore.x86_64 0:1.3.2-5.el7.nux
完毕!

(jmp_venv1) [root@localhost teach_jmp]# ffmpeg -version
...........
libswscale      3.  1.101 /  3.  1.101
libswresample   1.  2.101 /  1.  2.101
libpostproc    53.  3.100 / 53.  3.100
七、安装Lina组件、 Luna 组件
#下载 Lina组件
(jmp_venv1) [root@localhost teach_jmp]# wget https://github.com/jumpserver/lina/releases/download/v2.4.0/lina-v2.4.0.tar.gz
(jmp_venv1) [root@localhost teach_jmp]# tar -xf lina-v2.4.0.tar.gz
(jmp_venv1) [root@localhost teach_jmp]# mv lina-v2.4.0 lina
(jmp_venv1) [root@localhost teach_jmp]# chown -R nginx:nginx lina
# 下载 Luna 组件
(jmp_venv1) [root@localhost teach_jmp]# wget https://github.com/jumpserver/luna/releases/download/v2.4.0/luna-v2.4.0.tar.gz
(jmp_venv1) [root@localhost teach_jmp]# tar -xf luna-v2.4.0.tar.gz
(jmp_venv1) [root@localhost teach_jmp]# mv luna-v2.4.0 luna
(jmp_venv1) [root@localhost teach_jmp]# chown -R nginx:nginx luna
八、安装nginx
1、yum直接安装
(jmp_venv1) [root@localhost teach_jmp]# yum install nginx -y
2、修改nginx配置文件
原始文件配置文件
(jmp_venv1) [root@localhost nginx]# pwd
/etc/nginx
(jmp_venv1) [root@localhost nginx]# grep -Ev '^#|^$' nginx.conf
user nginx;
worker_processes auto;
error_log /var/log/nginx/error.log;
pid /run/nginx.pid;
include /usr/share/nginx/modules/*.conf;
events {
    worker_connections 1024;
}
http {
    log_format  main  '$remote_addr - $remote_user [$time_local] "$request" '
                      '$status $body_bytes_sent "$http_referer" '
                      '"$http_user_agent" "$http_x_forwarded_for"';
    access_log  /var/log/nginx/access.log  main;
    sendfile            on;
    tcp_nopush          on;
    tcp_nodelay         on;
    keepalive_timeout   65;
    types_hash_max_size 4096;
    include             /etc/nginx/mime.types;
    default_type        application/octet-stream;
    # Load modular configuration files from the /etc/nginx/conf.d directory.
    # See http://nginx.org/en/docs/ngx_core_module.html#include
    # for more information.
    include /etc/nginx/conf.d/*.conf;
    server {
        listen       80;
        listen       [::]:80;
        server_name  _;
        root         /usr/share/nginx/html;
        # Load configuration files for the default server block.
        include /etc/nginx/default.d/*.conf;
        error_page 404 /404.html;
        location = /404.html {
        }
        error_page 500 502 503 504 /50x.html;
        location = /50x.html {
        }
    }
}
备份原始文件:
(jmp_venv1) [root@localhost nginx]# cp nginx.conf nginx.conf.bak
修改后的文件
(jmp_venv1) [root@localhost nginx]# grep -Ev '^#|^$' nginx.conf
user nginx;
worker_processes auto;
error_log /var/log/nginx/error.log;
pid /run/nginx.pid;
include /usr/share/nginx/modules/*.conf;
events {
    worker_connections 1024;
}
http {
    log_format  main  '$remote_addr - $remote_user [$time_local] "$request" '
                      '$status $body_bytes_sent "$http_referer" '
                      '"$http_user_agent" "$http_x_forwarded_for"';
    access_log  /var/log/nginx/access.log  main;
    sendfile            on;
    tcp_nopush          on;
    tcp_nodelay         on;
    keepalive_timeout   65;
    types_hash_max_size 4096;
    include             /etc/nginx/mime.types;
    default_type        application/octet-stream;
    # Load modular configuration files from the /etc/nginx/conf.d directory.
    # See http://nginx.org/en/docs/ngx_core_module.html#include
    # for more information.
    include /etc/nginx/conf.d/*.conf;
    server {
    listen 80;
    client_max_body_size 100m;
    location /ui/ {
        try_files $uri / /index.html;
        alias /teach_jmp/lina/;
    }
    location /luna/ {
        try_files $uri / /index.html;
        alias /teach_jmp/luna/;
    }
    location /media/ {
        add_header Content-Encoding gzip;
        root /teach_jmp/jumpserver/data/;
    }
    location /static/ {
        root /teach_jmp/jumpserver/data/;
    }
    location /koko/ {
        proxy_pass       http://localhost:5000;
        proxy_buffering off;
        proxy_http_version 1.1;
        proxy_set_header Upgrade $http_upgrade;
        proxy_set_header Connection "upgrade";
        proxy_set_header X-Real-IP $remote_addr;
        proxy_set_header Host $host;
        proxy_set_header X-Forwarded-For $proxy_add_x_forwarded_for;
        access_log off;
    }
    location /guacamole/ {
        proxy_pass       http://localhost:8081/;
        proxy_buffering off;
        proxy_http_version 1.1;
        proxy_set_header Upgrade $http_upgrade;
        proxy_set_header Connection $http_connection;
        proxy_set_header X-Real-IP $remote_addr;
        proxy_set_header Host $host;
        proxy_set_header X-Forwarded-For $proxy_add_x_forwarded_for;
        access_log off;
    }
    location /ws/ {
        proxy_set_header X-Real-IP $remote_addr;
        proxy_set_header Host $host;
        proxy_set_header X-Forwarded-For $proxy_add_x_forwarded_for;
        proxy_pass http://localhost:8070;
        proxy_http_version 1.1;
        proxy_buffering off;
        proxy_set_header Upgrade $http_upgrade;
        proxy_set_header Connection "upgrade";
    }
    location /api/ {
        proxy_pass http://localhost:8080;
        proxy_set_header X-Real-IP $remote_addr;
        proxy_set_header Host $host;
        proxy_set_header X-Forwarded-For $proxy_add_x_forwarded_for;
    }
    location /core/ {
        proxy_pass http://localhost:8080;
        proxy_set_header X-Real-IP $remote_addr;
        proxy_set_header Host $host;
        proxy_set_header X-Forwarded-For $proxy_add_x_forwarded_for;
    }
    location / {
        rewrite ^/(.*)$ /ui/$1 last;
    }
}
}
启动nginx
(jmp_venv1) [root@localhost nginx]# systemctl start nginx
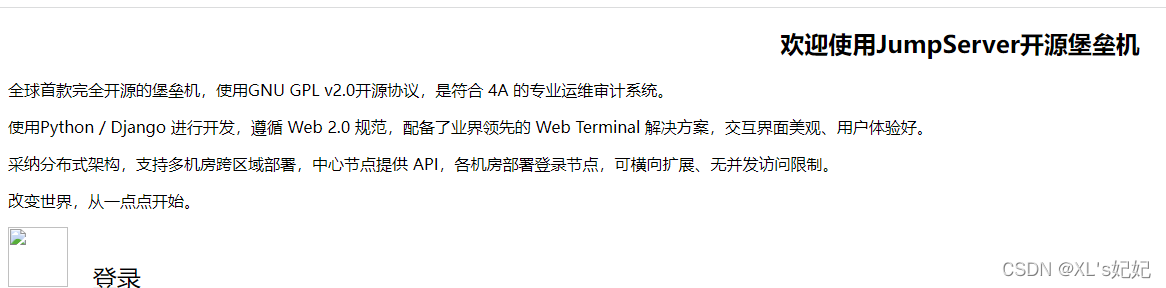
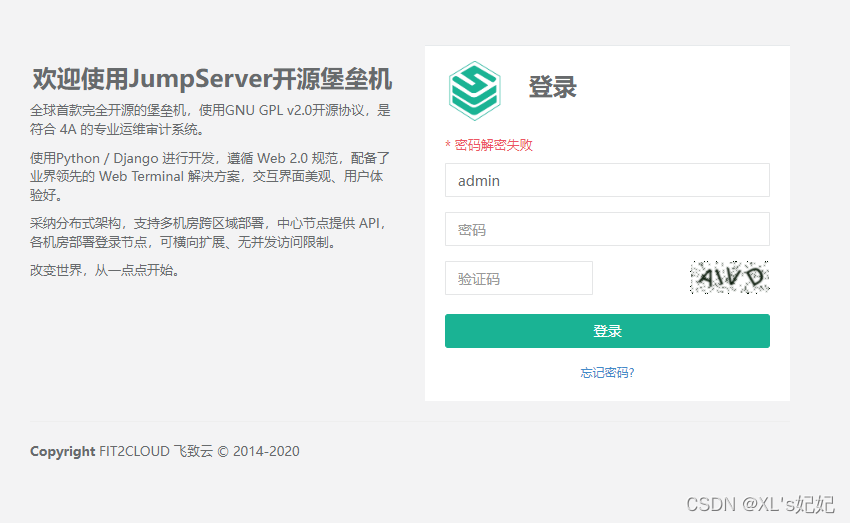
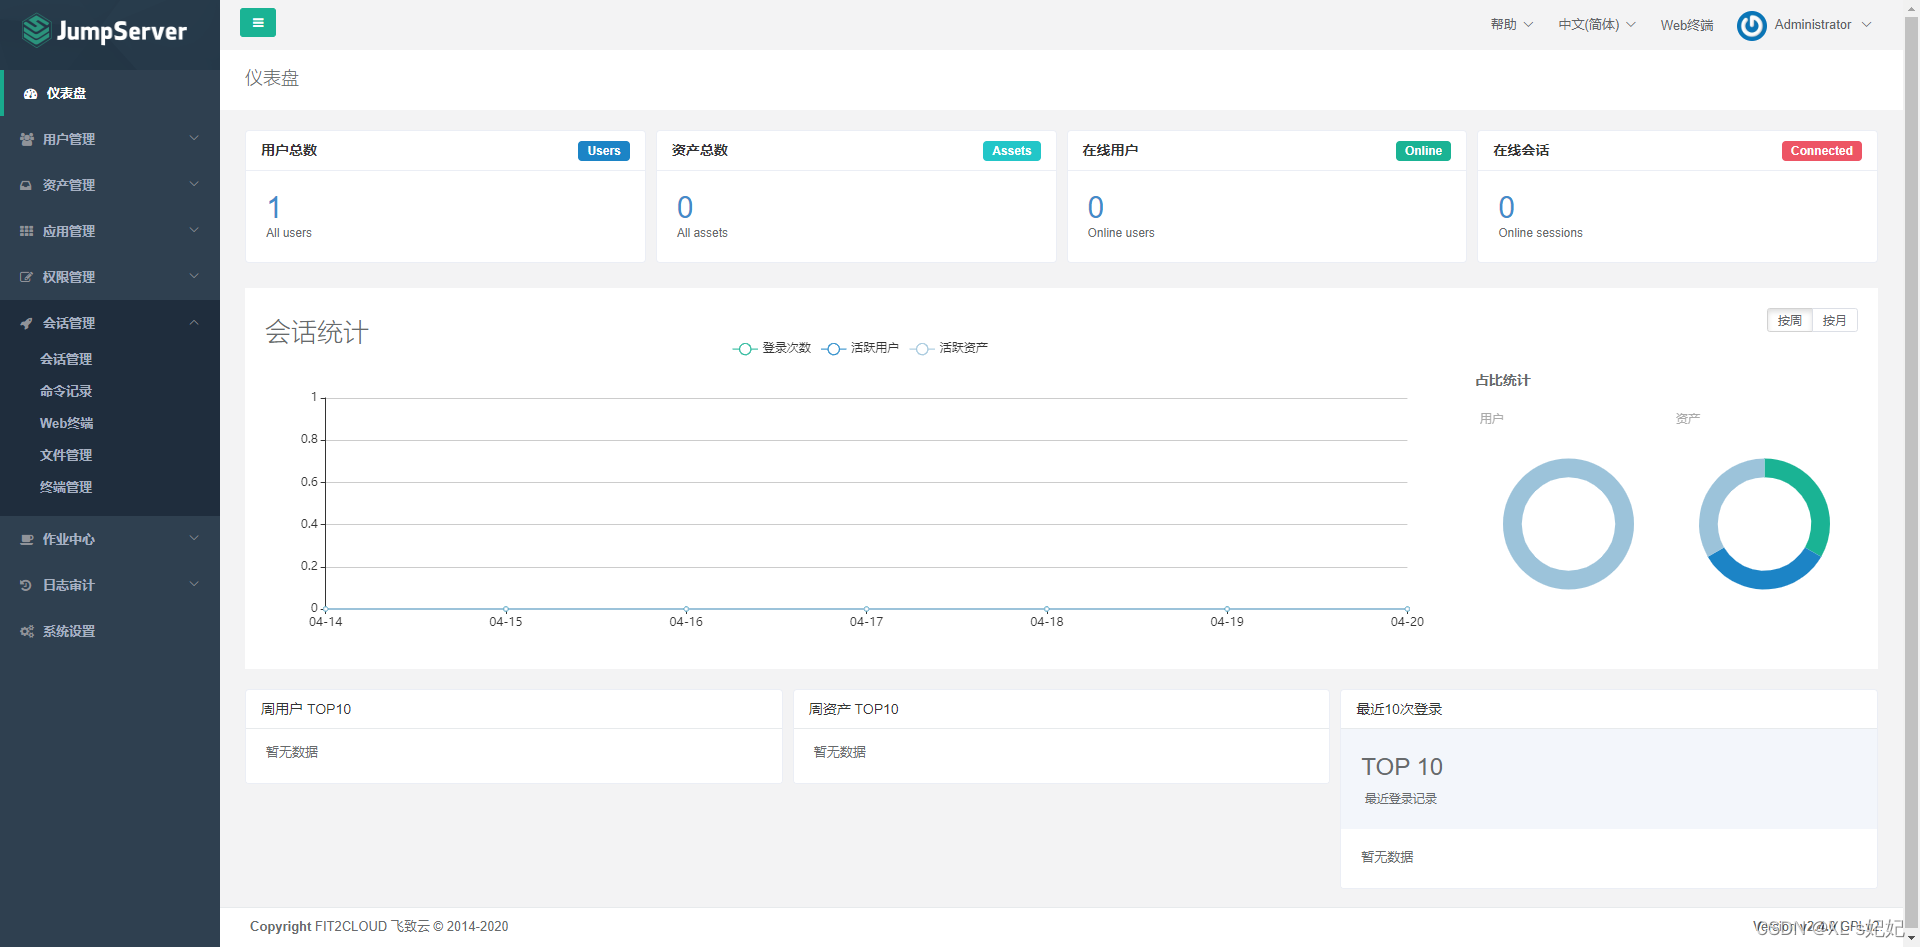
九、进入jumpserver首页并登录
http://192.168.29.128:80
默认用户名:admin
默认密码:admin
十、修改admin原始密码

十一、添加目标机器的防火墙规则
只允许通过堡垒机的ip登录控制目标服务器
# 设置进入规则,允许192.168.29.128通过tcp协议访问本机的22端口
[root@localhost ~]# iptables -A INPUT -s 192.168.29.128 -p tcp --dport 22 -j ACCEPT
# 设置进入规则,拒绝其他所有设备访问22端口(这条命令回车之后,当前终端将会直接被断开)
[root@localhost ~]# iptables -A INPUT  -p tcp --dport 22 -j REJECT
[root@localhost ~]#
Network error: Software caused connection abort
# 用192.168.29.128登录目标服务器
```bash
(jmp_venv1) [root@localhost keys]# ssh root@192.168.29.139
The authenticity of host '192.168.29.139 (192.168.29.139)' can't be established.
ECDSA key fingerprint is SHA256:ZBwfh616U68WknlqCPXnpf6YuPfhGZE4I0t9HEDwtko.
ECDSA key fingerprint is MD5:ab:d0:63:8b:de:ca:21:0e:ac:46:61:27:a0:00:ce:f7.
Are you sure you want to continue connecting (yes/no)? yes
Warning: Permanently added '192.168.29.139' (ECDSA) to the list of known hosts.
root@192.168.29.139's password:
Last login: Wed Apr 20 10:43:23 2022 from 192.168.29.1
[root@localhost ~]# iptables -L
Chain INPUT (policy ACCEPT)
target     prot opt source               destination
ACCEPT     tcp  --  192.168.29.128       anywhere             tcp dpt:ssh
REJECT     tcp  --  anywhere             anywhere             tcp dpt:ssh reject-with icmp-port-unreachable

Chain FORWARD (policy DROP)
十二、jumpserver邮件管理
1、基础设置
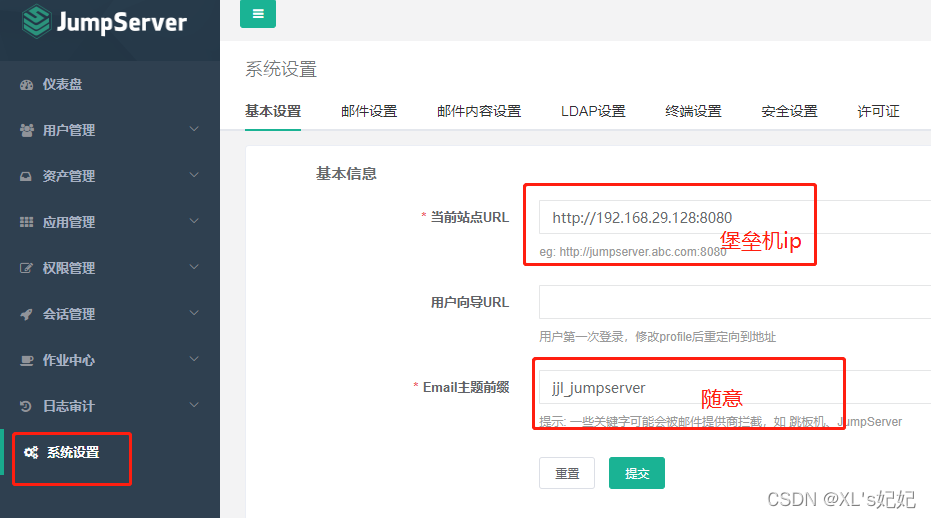
提交
2、邮件配置

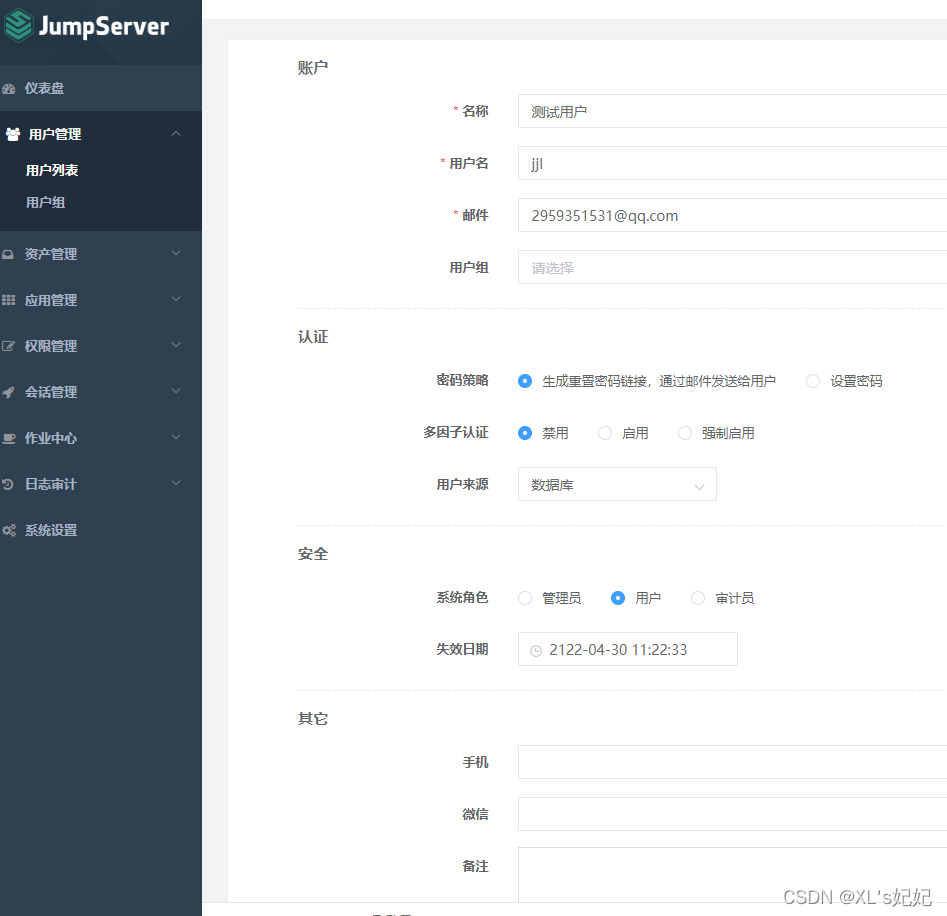
十三、jumpserver用户管理
1、创建用户
用户管理——用户列表——创建——输入用户信息——提交
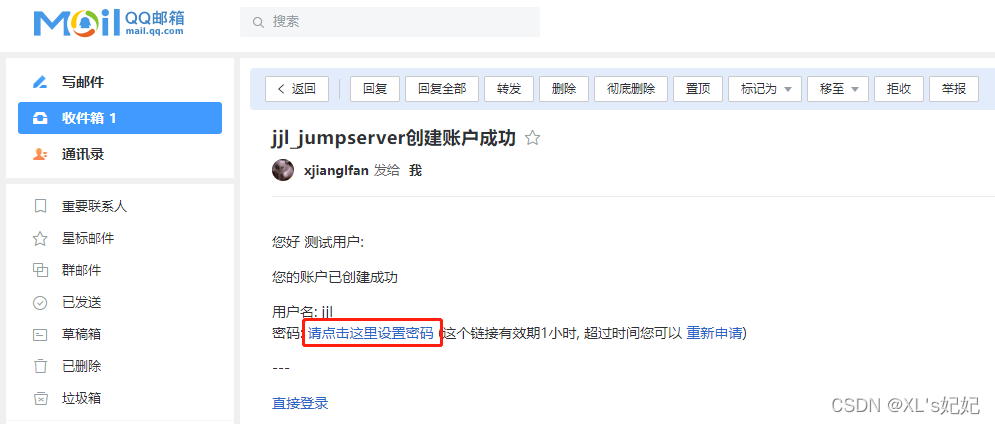
2、新用户修改密码
用户收到的修改密码的邮件

3、用新用户登录,并写相关信息
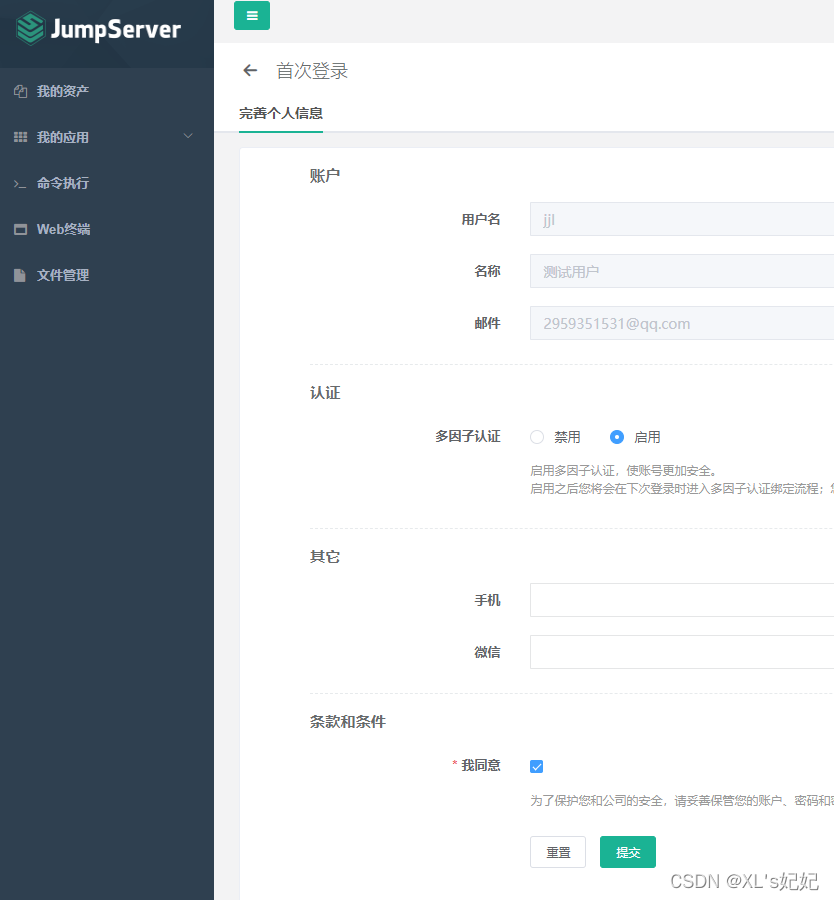
十四、jumpserver资产管理
资产:服务器、路由器、交换机等设备
1、管理用户
admin:管理员
普通用户:权限较低
管理用户:指的是被管理机器上的root用户,或者可以使用sudo权限的用户,jumpserver利用改管理用户在目标机器上,进行远程的命令执行,推送系统用户,获取资产引荐信息、指标等等。
创建管理用户
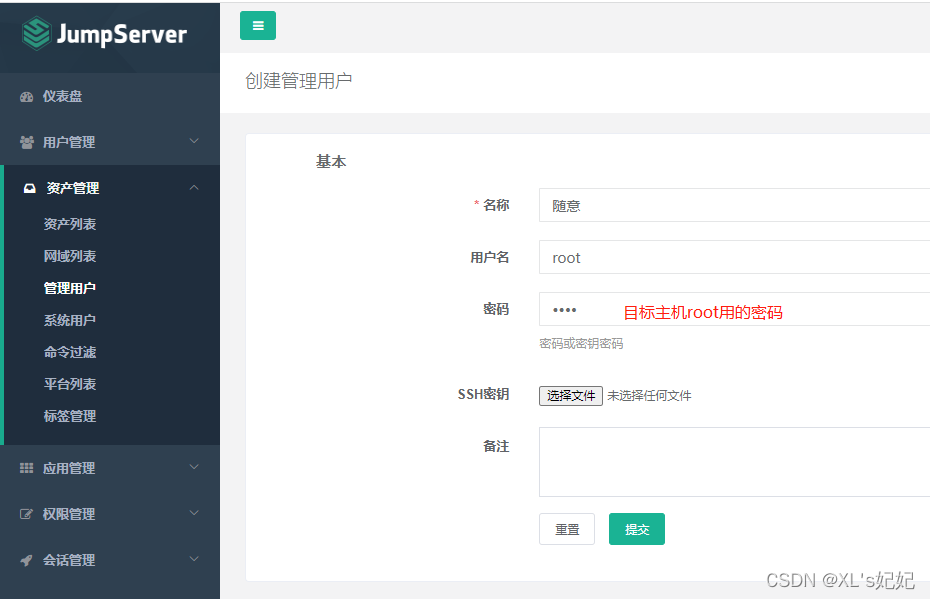
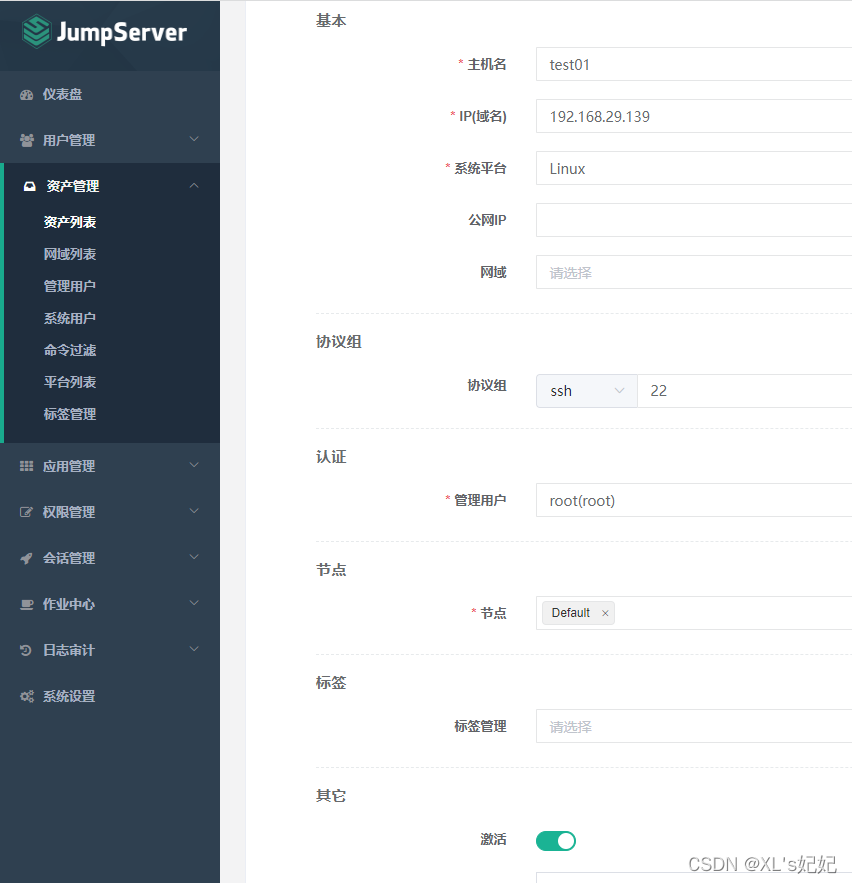
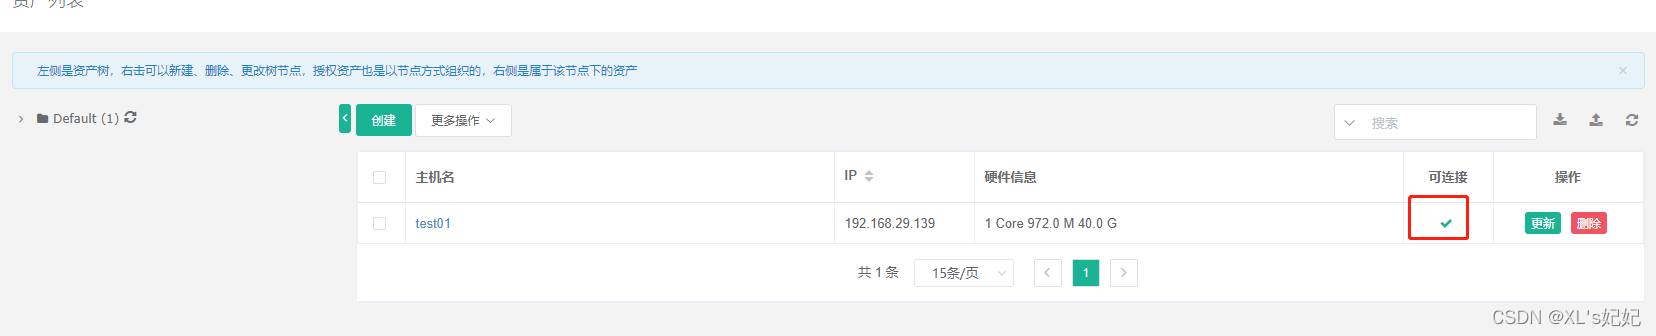
创建资产主机
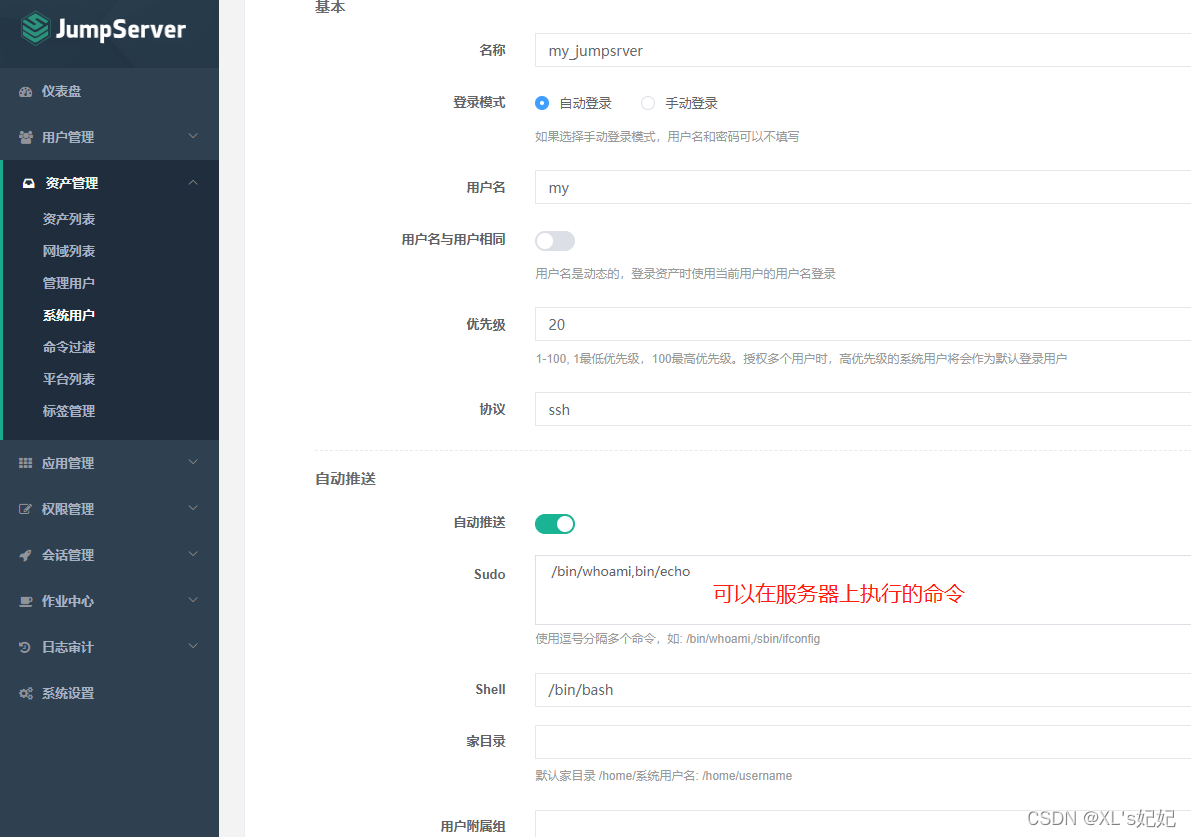
十五、创建系统用户与资产授权
jumpserver的系统用户,针对jumpserver操控,登录普通机器,做使用的一些特有用户
1、创建系统用户
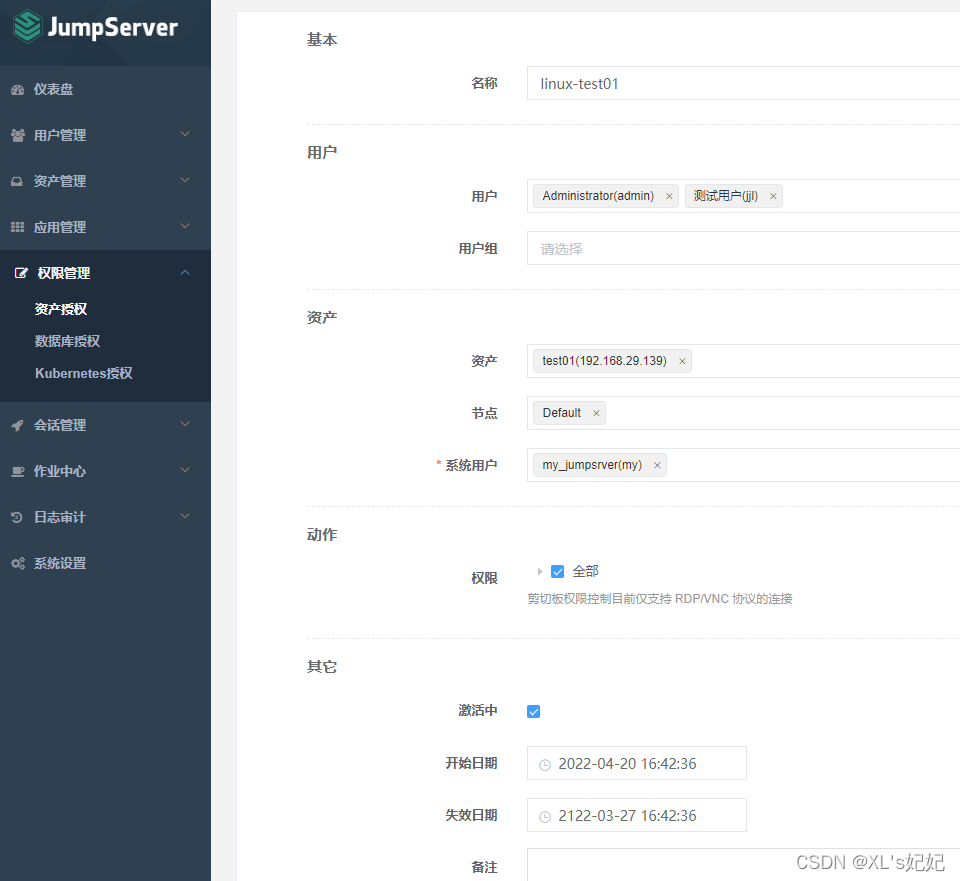
2、资产授权
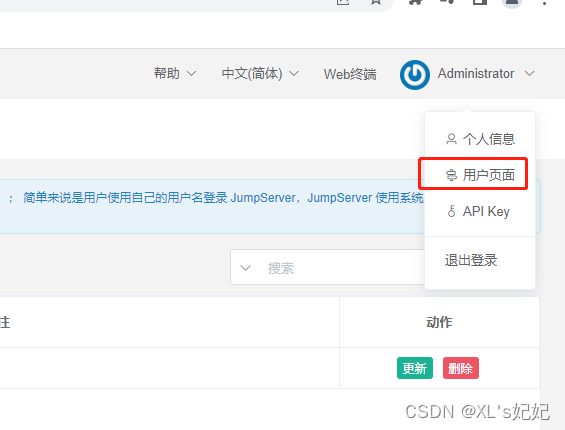
3、进入用户页面

命令执行:可以批量执行命令
web终端:可以连接服务器终端
4、用命令行登录jumpserver终端
[root@localhost koko]# ssh admin@192.168.29.128 -p 2222
The authenticity of host '[192.168.29.128]:2222 ([192.168.29.128]:2222)' can't be established.
RSA key fingerprint is SHA256:fz6jy01uf1khJDWyH4cxCME6HsK2o4XUwO1OG/6oNCQ.
RSA key fingerprint is MD5:80:0e:5c:8d:cf:83:fb:5e:f9:3a:a6:1f:44:ad:3a:4e.
Are you sure you want to continue connecting (yes/no)? yes
Warning: Permanently added '[192.168.29.128]:2222' (RSA) to the list of known hosts.
admin@192.168.29.128's password:
                Administrator,  欢迎使用Jumpserver开源堡垒机系统

        1) 输入 部分IP、主机名、备注 进行搜索登录(如果唯一).
        2) 输入 / + IP,主机名 or 备注 进行搜索,如:/192.168.
        3) 输入 p 进行显示您有权限的主机.
        4) 输入 g 进行显示您有权限的节点.
        5) 输入 d 进行显示您有权限的数据库.
        6) 输入 r 进行刷新最新的机器和节点信息.
        7) 输入 h 进行显示帮助.
        8) 输入 q 进行退出.
Opt> node1
复用SSH连接(cc@node1)[连接数量: 2]
Last login: Thu Apr 21 14:50:45 2022 from 192.168.29.128
[cc@node1 ~]$ exit
登出
Opt> 192.168.29.137
复用SSH连接(cc@node1)[连接数量: 2]
Last login: Thu Apr 21 14:58:17 2022 from 192.168.29.128
[cc@node1 ~]$ exit
登出
Opt>  <enter键>
  ID    | 主机名                                                                      | IP                                       | 备注
+-------+-----------------------------------------------------------------------------+------------------------------------------+--------------------------------------------------------------------------+
  1     | node1                                                                       | 192.168.29.137                           |
页码:1,每页行数:50,总页数:1,总数量:1
提示:输入资产ID直接登录,二级搜索使用 // + 字段,如://192 上一页:b 下一页:n
搜索: 所有
Opt> h
                Administrator,  欢迎使用Jumpserver开源堡垒机系统

        1) 输入 部分IP、主机名、备注 进行搜索登录(如果唯一).
        2) 输入 / + IP,主机名 or 备注 进行搜索,如:/192.168.
        3) 输入 p 进行显示您有权限的主机.
        4) 输入 g 进行显示您有权限的节点.
        5) 输入 d 进行显示您有权限的数据库.
        6) 输入 r 进行刷新最新的机器和节点信息.
        7) 输入 h 进行显示帮助.
        8) 输入 q 进行退出.
Opt> p
  ID    | 主机名                                                                      | IP                                       | 备注
+-------+-----------------------------------------------------------------------------+------------------------------------------+--------------------------------------------------------------------------+
  1     | node1                                                                       | 192.168.29.137                           |
页码:1,每页行数:50,总页数:1,总数量:1
提示:输入资产ID直接登录,二级搜索使用 // + 字段,如://192 上一页:b 下一页:n
搜索: 所有
Opt> h
                Administrator,  欢迎使用Jumpserver开源堡垒机系统

        1) 输入 部分IP、主机名、备注 进行搜索登录(如果唯一).
        2) 输入 / + IP,主机名 or 备注 进行搜索,如:/192.168.
        3) 输入 p 进行显示您有权限的主机.
        4) 输入 g 进行显示您有权限的节点.
        5) 输入 d 进行显示您有权限的数据库.
        6) 输入 r 进行刷新最新的机器和节点信息.
        7) 输入 h 进行显示帮助.
        8) 输入 q 进行退出.
Opt> g

节点:[ ID.名称(资产数量) ].
├── 1.收藏夹(0)
└── 2.Default(1)
提示:输入 g+节点ID 显示节点下主机,如: g1
Opt> d
无数据库
Opt> r
刷新完成
Opt>
十六、jumpserver会话管理
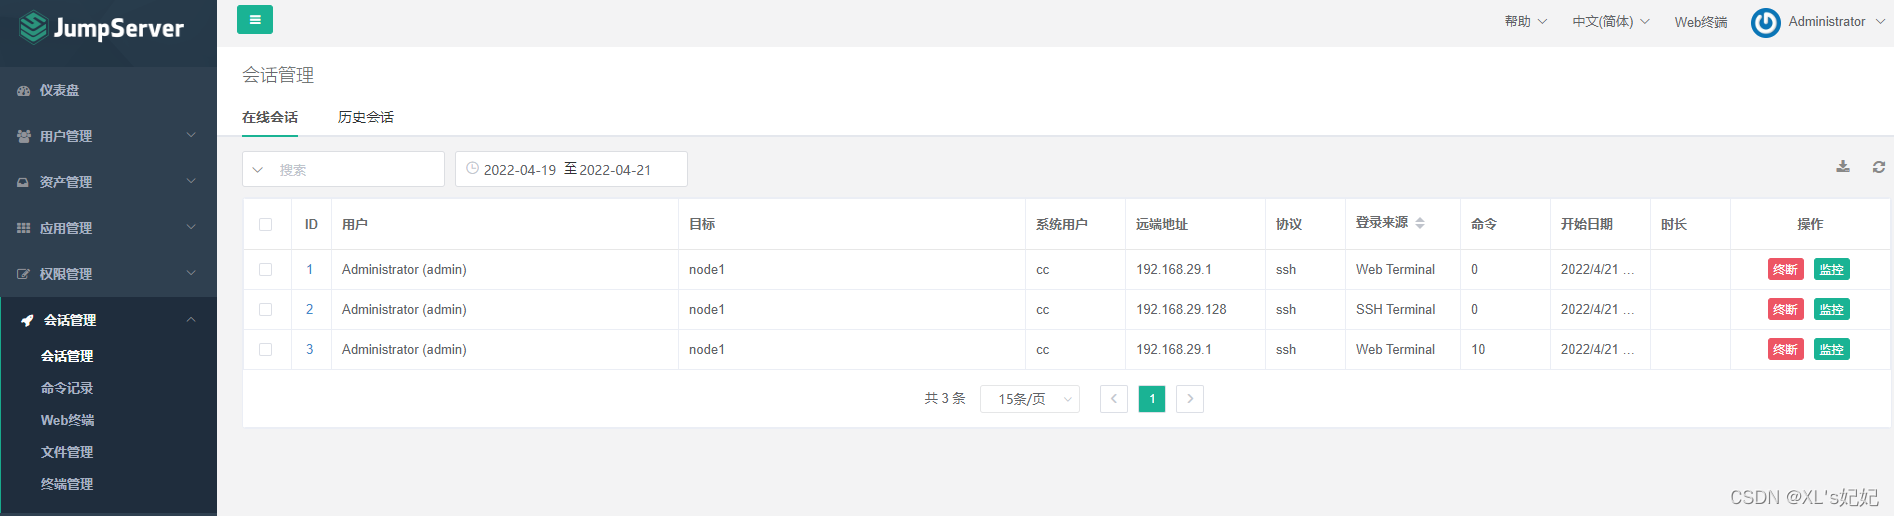
- 终断:可以强制终端某个会话;
- 监控:可以实时监控该会话正在干什么;
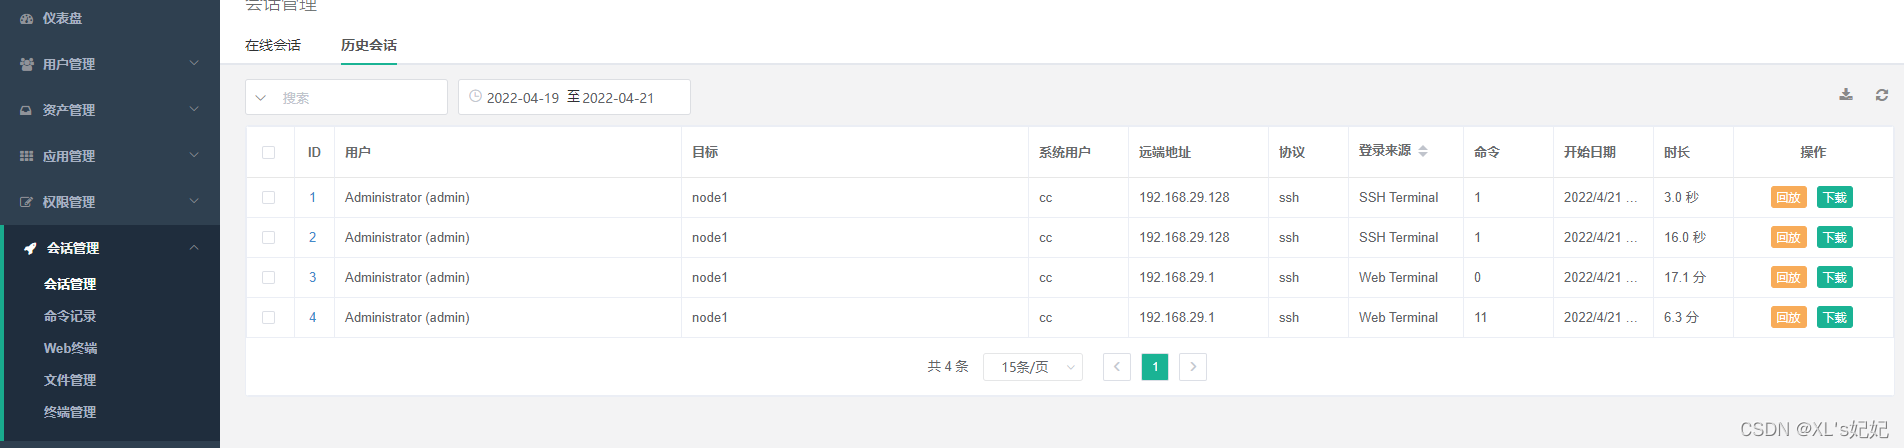
- 回放:可以视频的方式,播放出该会话曾经干过什么
- 下载:下载视频
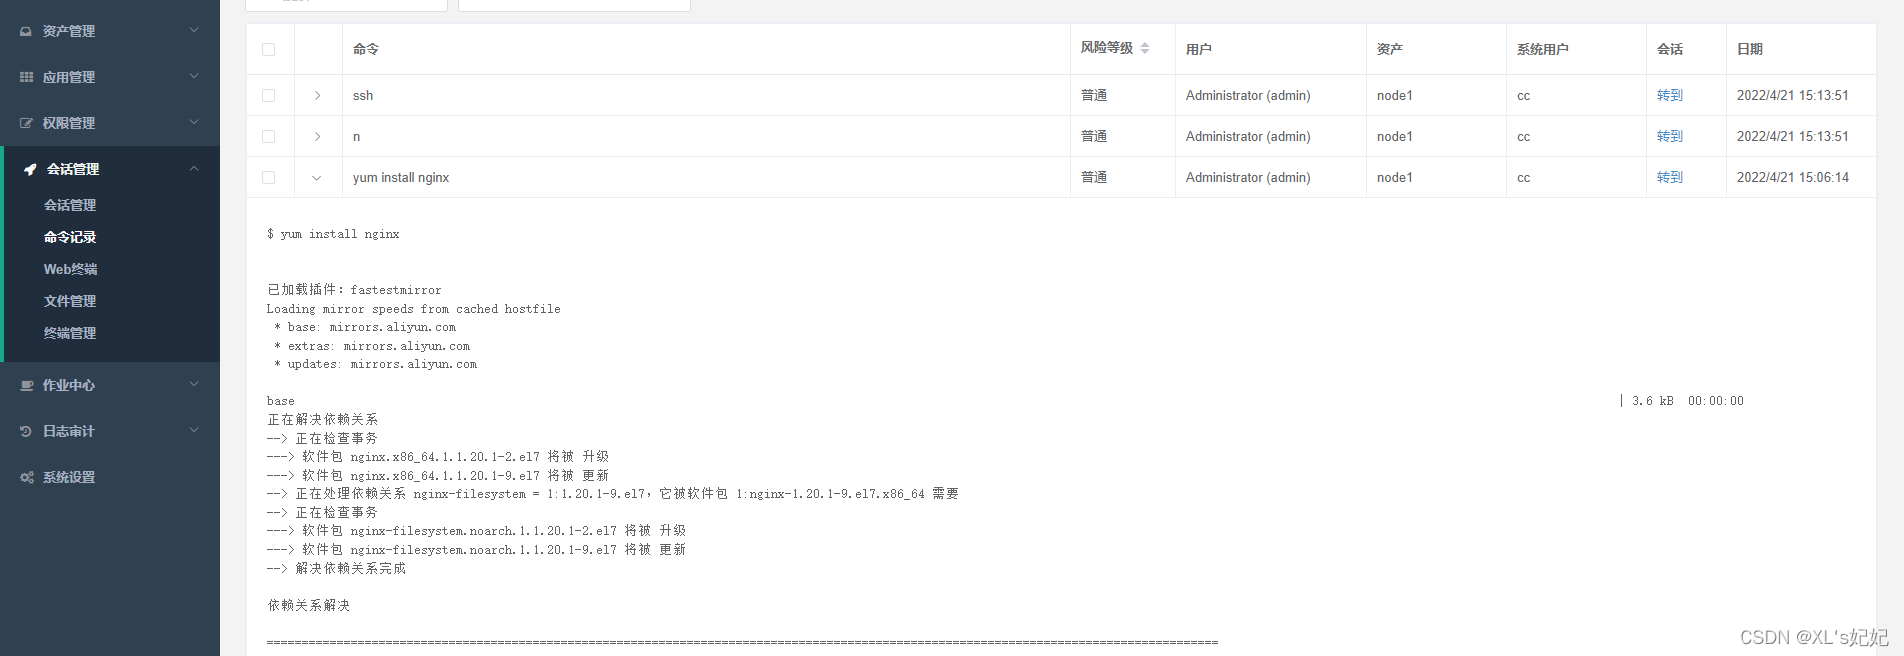
命令记录:查看用户执行过的所有命令,执行结果