1. 连通分量是什么
无向图G的极大连通子图称为G的连通分量( Connected Component)。任何连通图的连通分量只有一个,即是其自身,非连通的无向图有多个连通分量。
2. 案例
2.1.图极其数据结构初始化
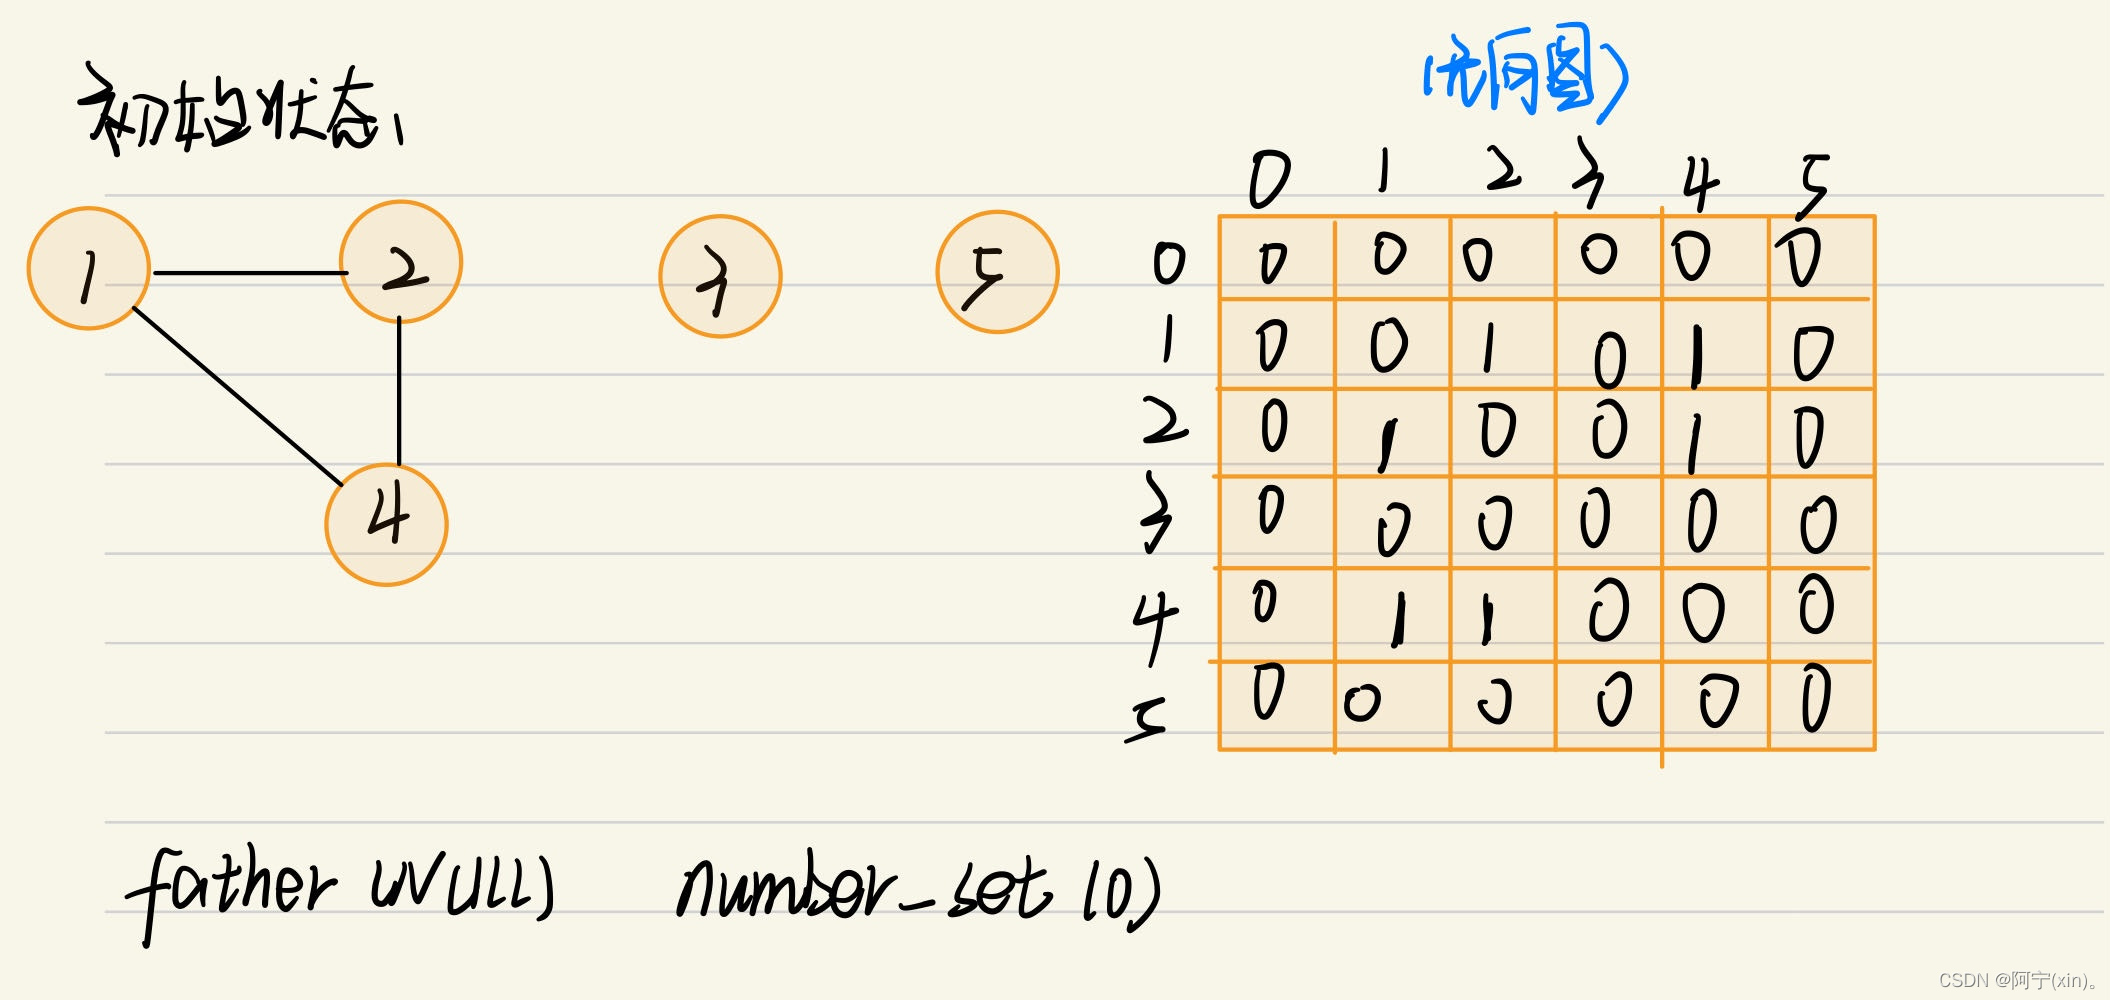
2.2.求连通分量的方法
从每个顶点出发,判断是否有连通分量
BFS[BFS](https://blog.csdn.net/qq_44423388/article/details/127591933?spm=1001.2014.3001.5501)
DFS[DFS](https://blog.csdn.net/qq_44423388/article/details/127583096?spm=1001.2014.3001.5501)
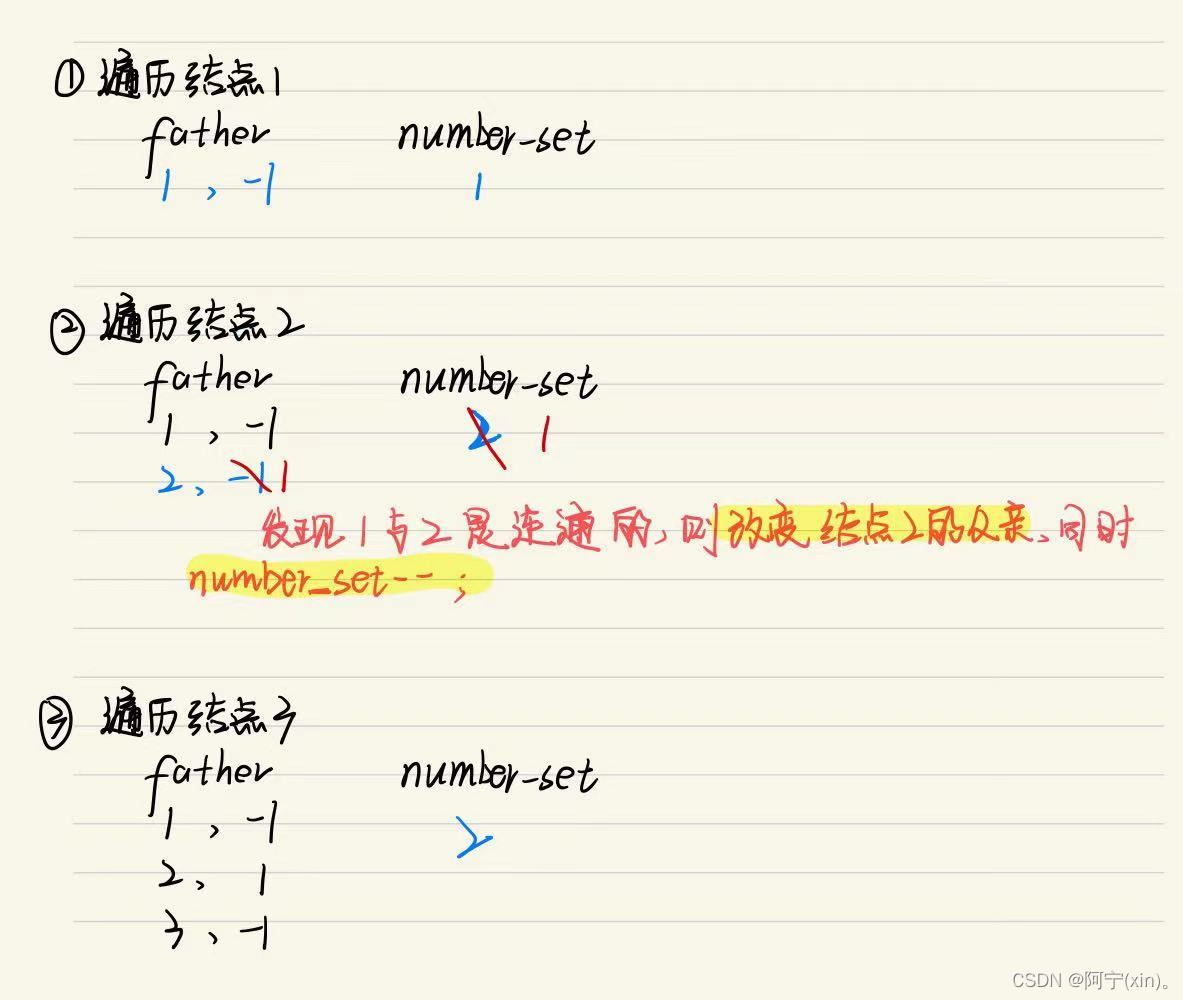
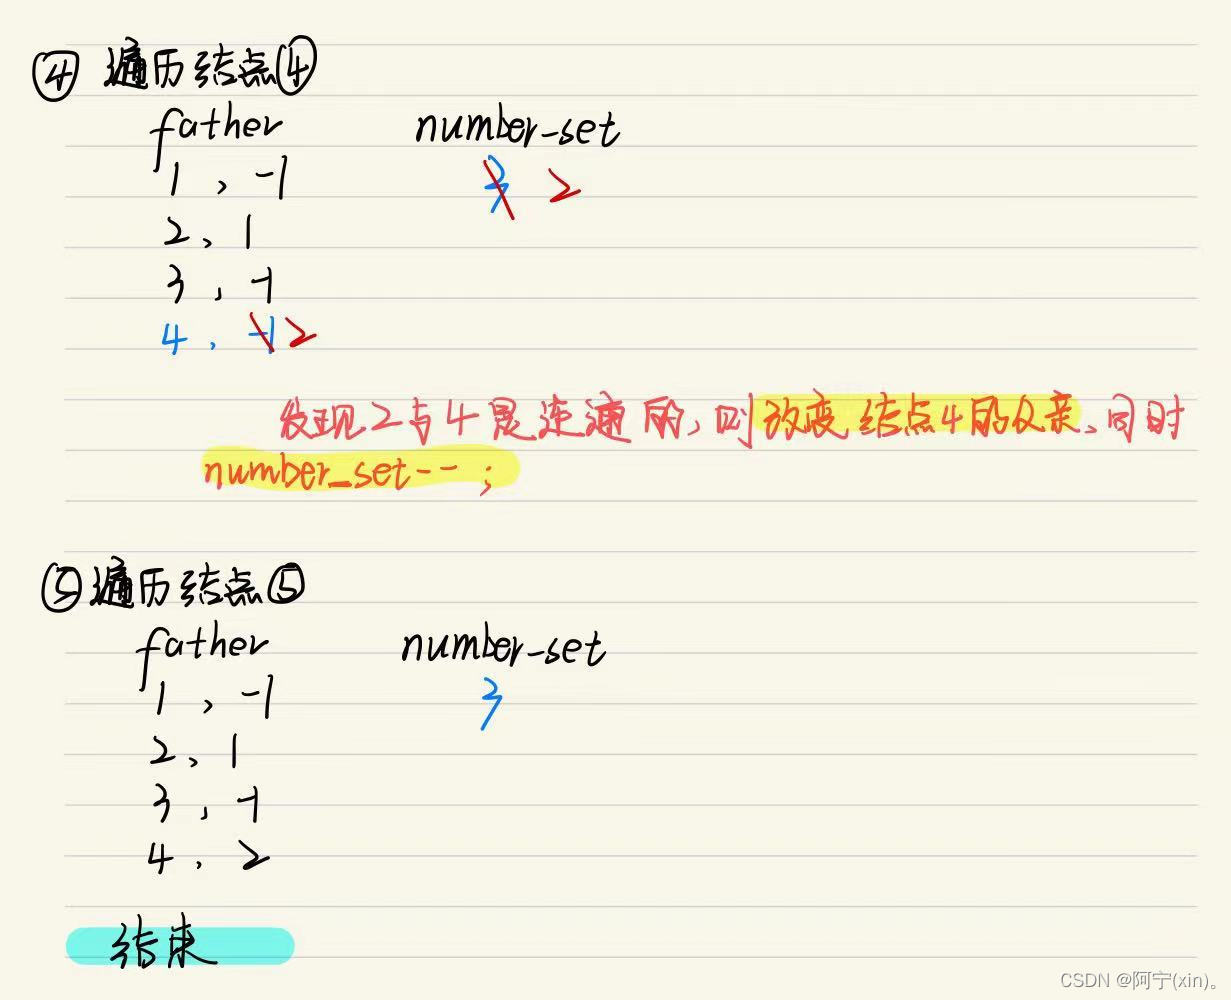
并查集(本篇主讲,实现步骤见下)
2.3 具体实现
#include <vector>
#include <iostream>
#include <queue>
#include <unordered_map>
using namespace std;
class UnionFind {
private:
unordered_map<int, int> father;
int num_of_sets = 0;
public:
int find(int x)
{
int root = x;
while (father[root] != -1)
{
root = father[root];
}
while (x != root)
{
int original_father = father[x];
father[x] = root;
x = original_father;
}
return root;
}
bool is_connected(int x, int y)
{
return find(x) == find(y);
}
void merge(int x, int y)
{
int root_x = find(x);
int root_y = find(y);
if (root_x != root_y)
{
father[root_y] = root_x;
num_of_sets--;
}
}
void add(int x)
{
if (!father.count(x))
{
father[x] = -1;
num_of_sets++;
}
}
int get_num_of_sets()
{
auto it = father.begin();
while (it != father.end())
{
cout << it->first<<" ->"<<it->second << endl;
it++;
}
return num_of_sets;
}
};
class Connectedcomponent:protected UnionFind
{
private:
int vertice = 0;
int edge = 0;
vector<vector<int>> e;
vector<bool> book;
vector<bool> book1;
queue<int> qu;
void DFS_Alg(int current, int sum)
{
sum++;
if (sum == vertice)
{
cout << current << endl;
return;
}
else
{
cout << current << " ->";
}
for (int k = 1; k <= vertice; k++)
{
if (e[current][k] != 0 && book[k] == 0)
{
book[k] = 1;
DFS_Alg(k, sum);
}
}
}
public:
Connectedcomponent(int x, int y) :vertice(x), edge(y)
{
e.resize(vertice + 1);
for (int i = 0; i <= vertice; i++)
{
e[i].resize(vertice + 1,0);
}
book.resize(vertice + 1);
book1.resize(vertice + 1);
}
void Init_tu()
{
for (int i = 0; i <= vertice; i++)
{
for (int j = 0; j <= vertice; j++)
{
if (i == 0 || j == 0)
{
e[i][j] = 0;
}
if (i == j)
{
e[i][j] = 0;
}
else
{
e[i][j] = INT_MAX;
}
}
}
}
void GetEdgeInfo()
{
cout << "输入边的信息(节点1,节点2):" << endl;
int e1 = 0, e2 = 0, weigth = 0;
for (int i = 1; i <= edge; i++)
{
cin >> e1 >> e2;
e[e1][e2] = 1;
e[e2][e1] = 1;
}
}
void Print()
{
for (int i = 1; i <= vertice; i++)
{
for (int j = 1; j <= vertice; j++)
{
cout << e[i][j] << " ";
}
cout << endl;
}
cout << endl;
}
int DFS_Num()
{
int num = 0;
for (int i = 1; i <= vertice; i++)
{
if (book[i] == false)
{
DFS_Alg(i,0);
cout <<"end" <<endl;
num++;
}
}
return num;
}
int BFS_Num()
{
int num = 0;
for (int i = 1; i <= vertice; i++)
{
if (book1[i] == false)
{
qu.push(i);
while (!qu.empty())
{
int v = qu.front();
qu.pop();
book1[v] = true;
cout << v << "->";
for (int i = 1; i <= vertice; i++)
{
if (e[v][i] != 0 && book1[i] == false)
{
qu.push(i);
book1[i] = true;
}
}
}
num++;
}
cout << "end" << endl;
}
return num;
}
int UnionFindSet()
{
UnionFind uf;
for (int i = 1; i <= vertice; i++)
{
uf.add(i);
for (int j = 1; j < i; j++)
{
if (e[i][j] == 1)
{
uf.merge(i, j);
}
}
}
return uf.get_num_of_sets();
}
};
int main()
{
int num1 = 0, num2 = 0,num3 = 0;
Connectedcomponent Conn(5, 3);
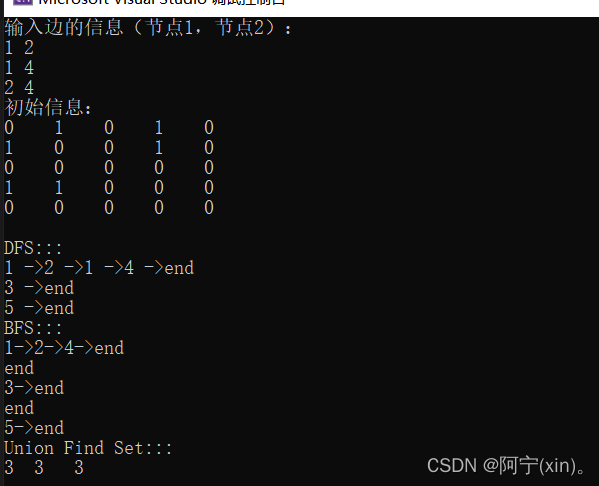
Conn.GetEdgeInfo();
cout << "初始信息:" << endl;
Conn.Print();
cout << "DFS:::" << endl;
num1 = Conn.DFS_Num();
cout << "BFS:::" << endl;
num2 = Conn.BFS_Num();
cout << "Union Find Set:::" << endl;
num3 = Conn.UnionFindSet();
cout << num1 << " " << num2 <<" "<<num3<< endl;
return 0;
}
本文内容由网友自发贡献,版权归原作者所有,本站不承担相应法律责任。如您发现有涉嫌抄袭侵权的内容,请联系:hwhale#tublm.com(使用前将#替换为@)