我确信Todoist正在以另一种方式做这件事,但仍然......
这里是XML布局。主要思想是,应该固定的视图应该位于内部Toolbar,当您想要隐藏的另一个视图应该在里面时CollapsingToolbarLayout具有适当的上边距,以防止重叠:
<android.support.design.widget.CoordinatorLayout
    xmlns:android="http://schemas.android.com/apk/res/android"
    xmlns:app="http://schemas.android.com/apk/res-auto"
    android:layout_width="match_parent"
    android:layout_height="match_parent">

    <android.support.design.widget.AppBarLayout
        android:id="@+id/appbar"
        android:layout_width="match_parent"
        android:layout_height="wrap_content">

        <android.support.design.widget.CollapsingToolbarLayout
            android:id="@+id/collapsing_tool_bar_layout"
            android:layout_width="match_parent"
            android:layout_height="wrap_content"
            app:layout_scrollFlags="scroll|exitUntilCollapsed"
            app:statusBarScrim="?attr/colorAccent">

            <FrameLayout
                android:layout_width="match_parent"
                android:layout_height="wrap_content"
                app:layout_collapseMode="parallax"
                android:layout_marginLeft="72dp"
                android:layout_marginRight="16dp"
                android:layout_marginBottom="32dp"
                android:layout_marginTop="136dp">

                <android.support.design.widget.TextInputLayout
                    android:id="@+id/lNameLayout2"
                    android:layout_width="match_parent"
                    android:layout_height="wrap_content"
                    android:theme="@style/ThemeOverlay.AppCompat.Dark.ActionBar">

                    <android.support.design.widget.TextInputEditText
                        android:id="@+id/ldesc"
                        android:layout_width="match_parent"
                        android:layout_height="wrap_content"
                        android:ems="10"
                        android:hint="Description"/>
                </android.support.design.widget.TextInputLayout>

            </FrameLayout>

            <android.support.v7.widget.Toolbar
                android:id="@+id/toolbar"
                android:layout_width="match_parent"
                android:layout_height="wrap_content"
                android:background="@color/primary"
                android:minHeight="?attr/actionBarSize"
                android:theme="@style/ThemeOverlay.AppCompat.Dark.ActionBar"
                app:layout_collapseMode="pin"
                app:popupTheme="@style/ThemeOverlay.AppCompat.Light">

                <android.support.design.widget.TextInputLayout
                    android:id="@+id/lNameLayout"
                    android:layout_width="match_parent"
                    android:layout_height="wrap_content"
                    android:layout_marginRight="16dp"
                    android:layout_marginBottom="16dp"
                    android:layout_marginTop="48dp">

                    <android.support.design.widget.TextInputEditText
                        android:id="@+id/title"
                        android:layout_width="match_parent"
                        android:layout_height="wrap_content"
                        android:hint="Title"
                        android:textSize="30sp"
                        android:textColor="@android:color/white"
                        android:ems="10"/>
                </android.support.design.widget.TextInputLayout>

            </android.support.v7.widget.Toolbar>

        </android.support.design.widget.CollapsingToolbarLayout>
    </android.support.design.widget.AppBarLayout>


    <android.support.v4.widget.NestedScrollView
        android:layout_width="match_parent"
        android:layout_height="match_parent"
        android:scrollbars="none"
        app:layout_behavior="@string/appbar_scrolling_view_behavior">

        <!-- your content here -->

    </android.support.v4.widget.NestedScrollView>

</android.support.design.widget.CoordinatorLayout>
然后,要实现相同的字体大小和上边距动画,我们可以实现AppBarLayout.OnOffsetChangedListener并根据滚动偏移变化对我们的属性进行动画处理。这里是活动课:
public class MainActivity extends AppCompatActivity
    implements AppBarLayout.OnOffsetChangedListener {

    private static final float COLLAPSED_TEXT_SIZE_SP = 18f;

    private static final float COLLAPSED_TOP_MARGIN_DP = 24f;

    private static final float MARGIN_SCROLLER_MULTIPLIER = 4f;

    private float expandedTextSize;
    private float collapsedTextSize;

    private int expandedTopMargin;
    private int collapsedTopMargin;

    private AppBarLayout mAppBarLayout;
    private Toolbar mToolbar;
    private TextInputEditText editText;
    private TextInputLayout textInputLayout;

    @Override
    protected void onCreate(Bundle savedInstanceState) {
        super.onCreate(savedInstanceState);
        setContentView(R.layout.activity_main);

        mToolbar = (Toolbar) findViewById(R.id.toolbar);
        mAppBarLayout = (AppBarLayout) findViewById(R.id.appbar);
        editText = (TextInputEditText) findViewById(R.id.title);
        textInputLayout = (TextInputLayout) findViewById(R.id.lNameLayout);

        setSupportActionBar(mToolbar);
        getSupportActionBar().setDisplayHomeAsUpEnabled(true);

        mAppBarLayout.addOnOffsetChangedListener(this);

        expandedTextSize = editText.getTextSize();
        collapsedTextSize = (int) TypedValue.applyDimension(TypedValue.COMPLEX_UNIT_SP, COLLAPSED_TEXT_SIZE_SP, getResources().getDisplayMetrics());

        expandedTopMargin = ((ViewGroup.MarginLayoutParams) textInputLayout.getLayoutParams()).topMargin;
        collapsedTopMargin = (int) TypedValue.applyDimension(TypedValue.COMPLEX_UNIT_DIP, COLLAPSED_TOP_MARGIN_DP, getResources().getDisplayMetrics());
    }

    @Override
    public void onOffsetChanged(AppBarLayout appBarLayout, int offset) {
        int maxScroll = appBarLayout.getTotalScrollRange();
        float percentage = (float) Math.abs(offset) / maxScroll;
        float textSizeDiff = Math.abs(expandedTextSize - collapsedTextSize);
        int marginDiff = Math.abs(expandedTopMargin - collapsedTopMargin);
        //change text size along with scrolling
        editText.setTextSize(TypedValue.COMPLEX_UNIT_PX, expandedTextSize - textSizeDiff * percentage);
        //change top view margin along with scrolling
        ((ViewGroup.MarginLayoutParams) textInputLayout.getLayoutParams()).topMargin = (int) (expandedTopMargin - marginDiff * Math.min(1, percentage * MARGIN_SCROLLER_MULTIPLIER));
    }

    @Override
    public boolean onOptionsItemSelected(MenuItem item) {
        if (item.getItemId() == android.R.id.home) {
            finish();
            return true;
        }
        return super.onOptionsItemSelected(item);
    }
}
因此,对于扩展状态,我使用了我们在 xml 中应用的默认值。对于折叠状态,我定义了简单的常量。请随意满足您的需求。
Note,当您添加后退按钮或菜单项时Toolbar,你应该玩弄left and right第二个视图(您要隐藏的视图)的边距,因为第一个EditText是一部分Toolbar,因此它的边距将根据您添加的内容而改变。
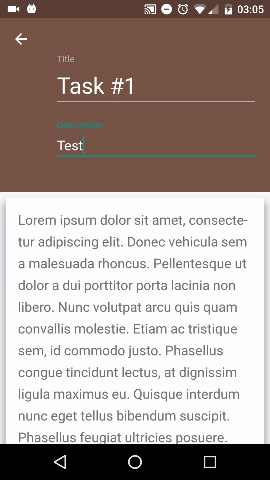
Result:
快乐编码!

