1.简介
官网:https://www.baomidou.com/
2.相关依赖以及配置
2.1. pom引入依赖
<dependency>
<groupId>com.baomidou</groupId>
<artifactId>mybatis-plus-boot-starter</artifactId>
<version>3.5.3</version>
</dependency>
<dependency>
<groupId>com.baomidou</groupId>
<artifactId>mybatis-plus-generator</artifactId>
<version>3.5.3</version>
</dependency>
<dependency>
<groupId>org.freemarker</groupId>
<artifactId>freemarker</artifactId>
<version>2.3.31</version>
</dependency>
2.2. 配置application.yml
spring:
datasource:
driver-class-name: com.mysql.cj.jdbc.Driver
url: jdbc:mysql://localhost:3306/mybatis_plus
username: root
password: 2002
mybatis-plus:
configuration:
log-impl: org.apache.ibatis.logging.stdout.StdOutImpl
map-underscore-to-camel-case: true
type-aliases-package: com.huntouzai.mybatisplus.pojo
3.基本crud
3.1.BaseMapper
MyBatis-Plus中的基本CRUD在内置的BaseMapper中都已得到了实现,我们可以直接使用,案例如
下:
package com.baomidou.mybatisplus.core.mapper;
public interface BaseMapper<T> extends Mapper<T> {
int insert(T entity);
}
3.2.通用Service – IService
MyBatis-Plus中有一个接口 IService和其实现类 ServiceImpl,封装了常见的业务层逻辑
详情查看源码IService和ServiceImpl
使用方法如下:
创建Service接口和实现类
public interface UserService extends IService<User> {
}
**
* ServiceImpl实现了IService,提供了IService中基础功能的实现
* 若ServiceImpl无法满足业务需求,则可以使用自定的UserService定义方法,并在实现类中实现
*/
@Service
public class UserServiceImpl extends ServiceImpl<UserMapper, User> implements
UserService {

}
可以在测试方法中直接使用
@Autowired
private UserService userService;
@Test
public void testGetCount(){
  long count = userService.count();
  System.out.println("总记录数:" + count);
}
4.常用注解
4.1. @TableName处理数据库表名
- 问题:之前BaseMapper中设置了泛型User,自动匹配操作的表为user,如果命名不一致,则无法匹配
- 解决方案:需要在实体类上增加该注解@TableName(“t_user”)
- 属性:注解内的属性为数据库表名
也可以使用全局配置解决
mybatis-plus:
configuration:
log-impl: org.apache.ibatis.logging.stdout.StdOutImpl
global-config:
db-config:
table-prefix: t_
4.2. @TableId处理主键
- 问题:默认将ID作为主键列,用雪花算法生成id
- 解决方案:在主键属性上增加@TableId(value=“uid”,type=idType.ASSIGN_ID)
- 属性:将这个属性对应的字段作为当前主键,通过value属性设置数据库主键字段名,type属性设置主键id生成算法,递增(IdType.AUTO)、雪花算法(idType.ASSIGN_ID)等等
也可以配置全局主键策略
mybatis-plus:
configuration:
log-impl: org.apache.ibatis.logging.stdout.StdOutImpl
global-config:
db-config:
table-prefix: t_
id-type: auto
4.2.1. 雪花算法
长度共64bit(一个long型)。
首先是一个符号位,1bit标识,由于long基本类型在Java中是带符号的,最高位是符号位,正数是0,负
数是1,所以id一般是正数,最高位是0。
41bit时间截(毫秒级),存储的是时间截的差值(当前时间截 - 开始时间截),结果约等于69.73年。
10bit作为机器的ID(5个bit是数据中心,5个bit的机器ID,可以部署在1024个节点)。
12bit作为毫秒内的流水号(意味着每个节点在每毫秒可以产生 4096 个 ID)。
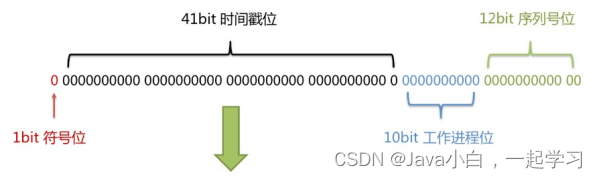
优点:整体上按照时间自增排序,并且整个分布式系统内不会产生ID碰撞,并且效率较高。
4.3. @TableField处理数据库字段名
- 问题:实体类属性名和类名不一致
- 解决方案:在实体类属性上使用@TableField(“数据库对应字段名”)设置属性所对应的字段名
4.4. @TableLogic逻辑删除
- 物理删除:真实删除,将对应数据从数据库中删除,之后查询不到此条被删除的数据
- 逻辑删除:假删除,将对应数据中代表是否被删除字段的状态修改为“被删除状态”,之后在数据库
中仍旧能看到此条数据记录 - 可用于数据恢复
- 使用方式:一般定义实体类的删除属性,数据库真添加删除字段
@TableLogic
private Integer isDeleted;
5. wapper条件构造器
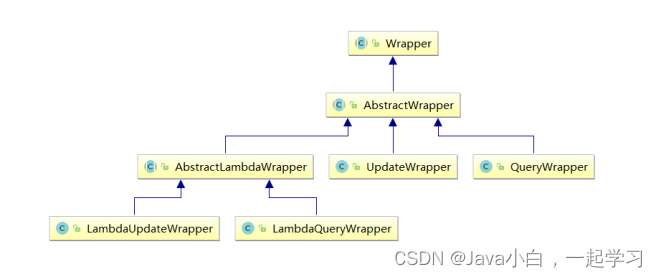
- Wrapper : 条件构造抽象类,最顶端父类
- AbstractWrapper : 用于查询条件封装,生成 sql 的 where 条件
- QueryWrapper : 查询条件封装
- UpdateWrapper : Update 条件封装
- AbstractLambdaWrapper : 使用Lambda 语法
- LambdaQueryWrapper :用于Lambda语法使用的查询Wrapper
- LambdaUpdateWrapper : Lambda 更新封装Wrapper
5.1. QueryWrapper查询条件封装
@Test
public void test04() {
QueryWrapper<User> queryWrapper = new QueryWrapper<>();
queryWrapper.like("username", "a")
.and(i -> i.gt("age", 20).or().isNull("email"));
User user = new User();
user.setAge(18);
user.setEmail("user@atguigu.com");
int result = userMapper.update(user, queryWrapper);
System.out.println("受影响的行数:" + result);
}
总结:并且直接链式编程,或者用or(),括号里的则写在and()的括号里边
5.2. UpdateWrapper更新条件封装
@Test
public void test07() {
UpdateWrapper<User> updateWrapper = new UpdateWrapper<>();
updateWrapper
.set("age", 18)
.set("email", "user@atguigu.com")
.like("username", "a")
.and(i -> i.gt("age", 20).or().isNull("email"));
int result = userMapper.update(null, updateWrapper);
System.out.println(result);
}
5.3. 条件查询
在条件构造器调用的方法中可以判空,注意使用的StringUtils是MyBatisPlus中的
@Test
public void test08UseCondition() {
String username = null;
Integer ageBegin = 10;
Integer ageEnd = 24;
QueryWrapper<User> queryWrapper = new QueryWrapper<>();
queryWrapper
.like(StringUtils.isNotBlank(username), "username", "a")
.ge(ageBegin != null, "age", ageBegin)
.le(ageEnd != null, "age", ageEnd);
? AND age <= ?)
List<User> users = userMapper.selectList(queryWrapper);
users.forEach(System.out::println);
}
5.4. LambdaQueryWrapper
//避免使用字符串表示字段,防止运行时错误,“name”写为User::getName
@Test
public void test09() {
String username = "a";
Integer ageBegin = 10;
Integer ageEnd = 24;
LambdaQueryWrapper<User> queryWrapper = new LambdaQueryWrapper<>();
queryWrapper
.like(StringUtils.isNotBlank(username), User::getName, username)
.ge(ageBegin != null, User::getAge, ageBegin)
.le(ageEnd != null, User::getAge, ageEnd);
List<User> users = userMapper.selectList(queryWrapper);
users.forEach(System.out::println);
}
5.5. LambdaUpdateWrapper
@Test
public void test10() {
LambdaUpdateWrapper<User> updateWrapper = new LambdaUpdateWrapper<>();
updateWrapper
.set(User::getAge, 18)
.set(User::getEmail, "user@atguigu.com")
.like(User::getName, "a")
.and(i -> i.lt(User::getAge, 24).or().isNull(User::getEmail));
User user = new User();
int result = userMapper.update(user, updateWrapper);
System.out.println("受影响的行数:" + result);
}
6.插件
6.1. 分页
6.1.1. 分页插件
实现步骤
@Configuration
public class MybatisPlusConfig {
@Bean
public MybatisPlusInterceptor mybatisPlusInterceptor() {
MybatisPlusInterceptor interceptor = new MybatisPlusInterceptor();
interceptor.addInnerInterceptor(new PaginationInnerInterceptor(DbType.MYSQL));
return interceptor;
}
}
@Test
public void testPage(){
Page<User> page = new Page<>(1, 5);
userMapper.selectPage(page, null);
List<User> list = page.getRecords();
list.forEach(System.out::println);
System.out.println("当前页:"+page.getCurrent());
System.out.println("每页显示的条数:"+page.getSize());
System.out.println("总记录数:"+page.getTotal());
System.out.println("总页数:"+page.getPages());
System.out.println("是否有上一页:"+page.hasPrevious());
System.out.println("是否有下一页:"+page.hasNext());
}
6.1.2. xml自定义分页
Mapper接口方法
Page<User> selectPageVo(@Param("page") Page<User> page, @Param("age") Integer age);
Mapper.xml中编写SQL
    <select id="selectPageVo" resultType="User">
        select *
        from user where age > #{age}
    </select>
6.2.乐观锁
- 1.给实体类和数据库分别新增属性和字段:version,加上并在实体列的属性名上加注解:@Version
- 2.添加配置乐观锁插件
@Bean
public MybatisPlusInterceptor mybatisPlusInterceptor(){
MybatisPlusInterceptor interceptor = new MybatisPlusInterceptor();
interceptor.addInnerInterceptor(new
PaginationInnerInterceptor(DbType.MYSQL));
interceptor.addInnerInterceptor(new OptimisticLockerInnerInterceptor());
return interceptor;
}
代码实现
@Test
public void testConcurrentVersionUpdate() {
Product p1 = productMapper.selectById(1L);
Product p2 = productMapper.selectById(1L);
p1.setPrice(p1.getPrice() + 50);
int result1 = productMapper.updateById(p1);
System.out.println("小李修改的结果:" + result1);
p2.setPrice(p2.getPrice() - 30);
int result2 = productMapper.updateById(p2);
System.out.println("小王修改的结果:" + result2);
if(result2 == 0){
p2 = productMapper.selectById(1L);
p2.setPrice(p2.getPrice() - 30);
result2 = productMapper.updateById(p2);
}
System.out.println("小王修改重试的结果:" + result2);
Product p3 = productMapper.selectById(1L);
System.out.println("老板看价格:" + p3.getPrice());
}
7.通用枚举
创建通用枚举类型
package com.atguigu.mp.enums;
import com.baomidou.mybatisplus.annotation.EnumValue;
import lombok.Getter;
@Getter
public enum SexEnum {
  MALE(1, "男"),
  FEMALE(2, "女");
  @EnumValue
  private Integer sex;
  private String sexName;
  SexEnum(Integer sex, String sexName) {
    this.sex = sex;
    this.sexName = sexName;
     }
}
扫描通用枚举
mybatis-plus:
configuration:
log-impl: org.apache.ibatis.logging.stdout.StdOutImpl
global-config:
db-config:
table-prefix: t_
id-type: auto
type-enums-package: com.atguigu.mybatisplus.enums
测试
@Test
public void testSexEnum(){
User user = new User();
user.setName("Enum");
user.setAge(20);
user.setSex(SexEnum.MALE);
userMapper.insert(user);
}
8.代码生成器
自行查看MyBatisPlus官网
9.多数据源
引入依赖
<dependency>
  <groupId>com.baomidou</groupId>
  <artifactId>dynamic-datasource-spring-boot-starter</artifactId>
  <version>3.5.0</version>
</dependency>
配置多数据源
spring:
datasource:
dynamic:
primary: master
strict: false
datasource:
master:
url: jdbc:mysql://localhost:3306/mybatis_plus?characterEncoding=utf-8&useSSL=false
driver-class-name: com.mysql.cj.jdbc.Driver
username: root
password: 123456
slave_1:
url: jdbc:mysql://localhost:3306/mybatis_plus_1?characterEncoding=utf-8&useSSL=false
driver-class-name: com.mysql.cj.jdbc.Driver
username: root
password: 123456
在用户service中,在类上增加@DS(“数据源名称”)来指定所操作的数据源
10. MyBatisX插件
MyBatisX插件用法:https://baomidou.com/pages/ba5b24/
本文内容由网友自发贡献,版权归原作者所有,本站不承担相应法律责任。如您发现有涉嫌抄袭侵权的内容,请联系:hwhale#tublm.com(使用前将#替换为@)