本文包含SpringBoot基础篇的所有知识点,大家一起来学习吧,开启一段新的旅程,加油吧。springboot是由Picotal团队提供的全新框架,用来简化spring的搭建和开发过程的配置,因为spring的配置比较繁琐,故引入了springboot。
目录
一、springboot入门案例
1.1、入门案例之IDEA联网版
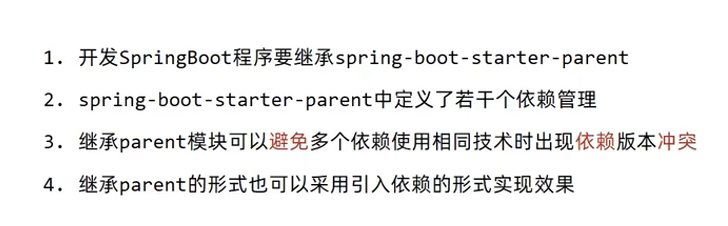
1.2、入门案例解析-parent
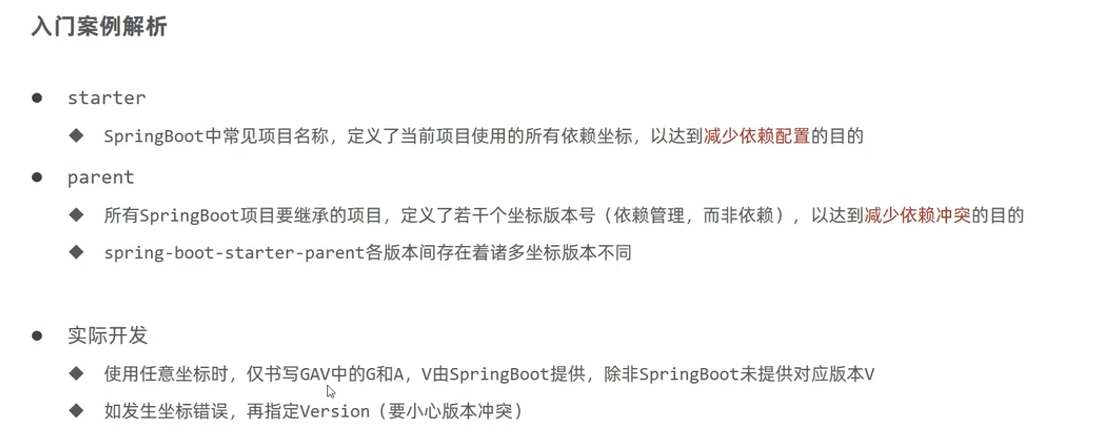
1.3、入门案例解析-starter
1.4、引导类
1.5、内嵌Tomcat
二、REST风格补充
2.1、REST风格简介
2.2、Restful风格入门案例
2.3、Restful快速开发
三、配置修改
3.1、属性配置方式
3.2、文件配置格式及优先级
3.3、yaml基本语法规则
3.4、yaml读取单一属性数据
3.5、读取yaml全部属性数据
3.6、读取yaml引用类型数据
四、SpringBoot整合第三方技术
4.1、整合junit
4.2、整合MyBatis
4.3、整合MyBatis-Plus
4.4、整合Druid
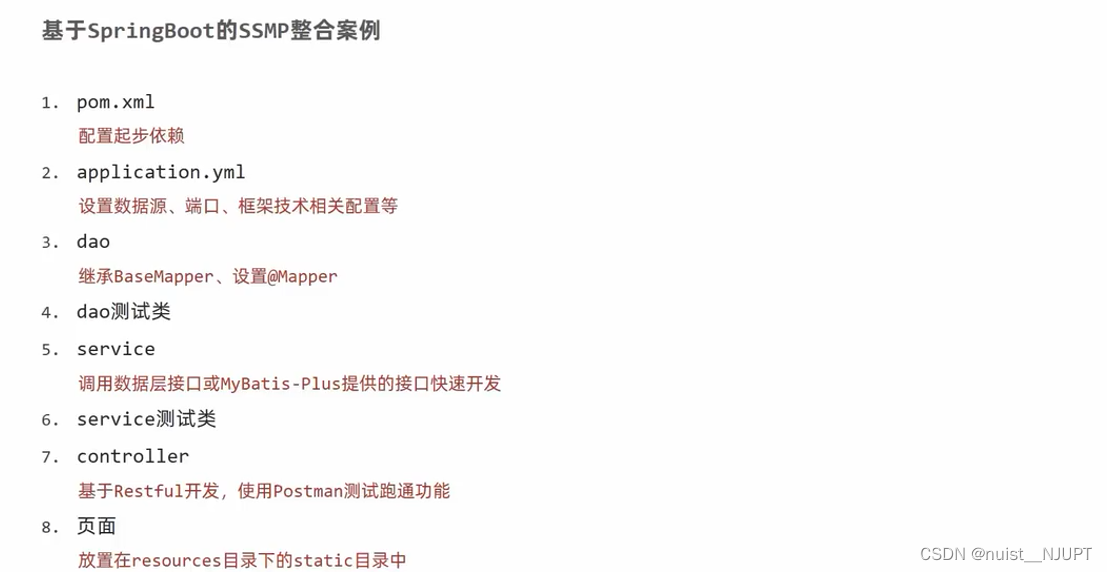
五、基于SpringBoot的SSMP案例整合
5.1、案例实现方案分析
5.2、模块创建
5.3、快速创建实体类
5.4、数据层快速开发
5.5、分页查询
5.6、数据层的按条件查询
5.7、业务层的开发(crud)
5.8、业务层的开发(基于MyBatis-Plus构建)
5.9、表现层标准开发
5.10、前后端协议联调
一、springboot入门案例
1.1、入门案例之IDEA联网版
直接创建一个控制器,响应浏览器的请求,并在控制台打印,如下:
import org.springframework.web.bind.annotation.GetMapping;
import org.springframework.web.bind.annotation.RequestMapping;
import org.springframework.web.bind.annotation.RestController;

@RestController
@RequestMapping("/books")
public class BookController {

    @GetMapping
    public String getById(){
        System.out.println("Springboot is running ...");
        return "springboot is running ..." ;
    }
}
启动Application:
import org.springframework.boot.SpringApplication;
import org.springframework.boot.autoconfigure.SpringBootApplication;

@SpringBootApplication
public class DemoApplication {

	public static void main(String[] args) {
		SpringApplication.run(DemoApplication.class, args);
	}

}
1.2、入门案例解析-parent
使用parent可以更好地管理依赖,快速引入依赖,防止 依赖冲突等。
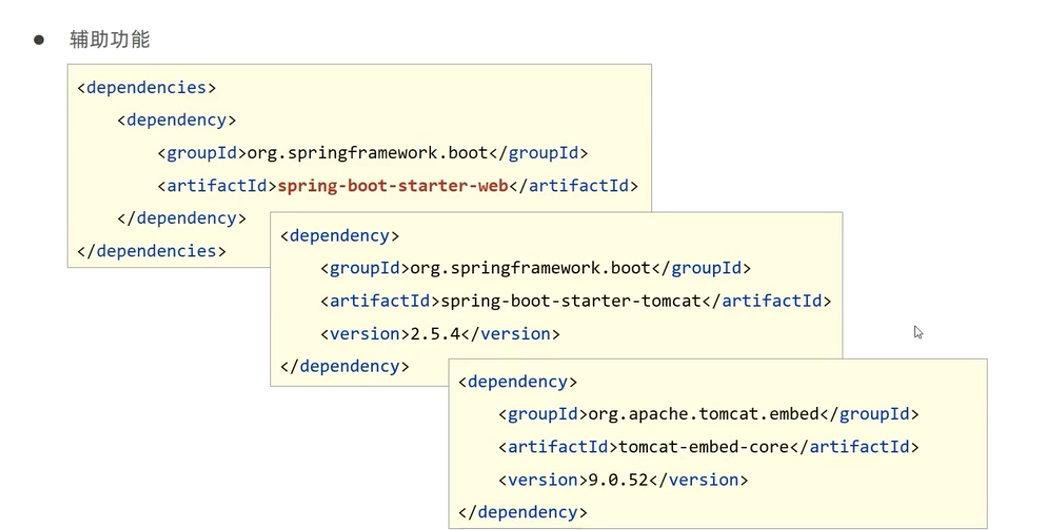
1.3、入门案例解析-starter
使用starter一般可以包含多个多个依赖坐标,可以简化配置。
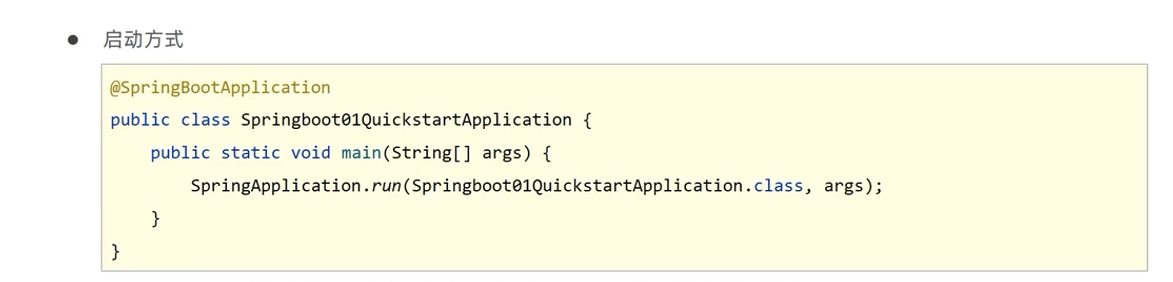
1.4、引导类
springboot的引导类是boot工程的执行入口,运行main方法就可以启动程序。springboot运行后初始化spring容器,扫描类所在的包和加载bean。
1.5、内嵌Tomcat
内嵌Tomcat,将Tomcat容器以对象的形式在SpringBoot容器中运行,如果不想用这个服务器,可以用exclusion排除掉,再添加新的服务器即可。
二、REST风格补充
2.1、REST风格简介
REST全称是表现形式状态转换,其实就是设置访问资源的描述形式。
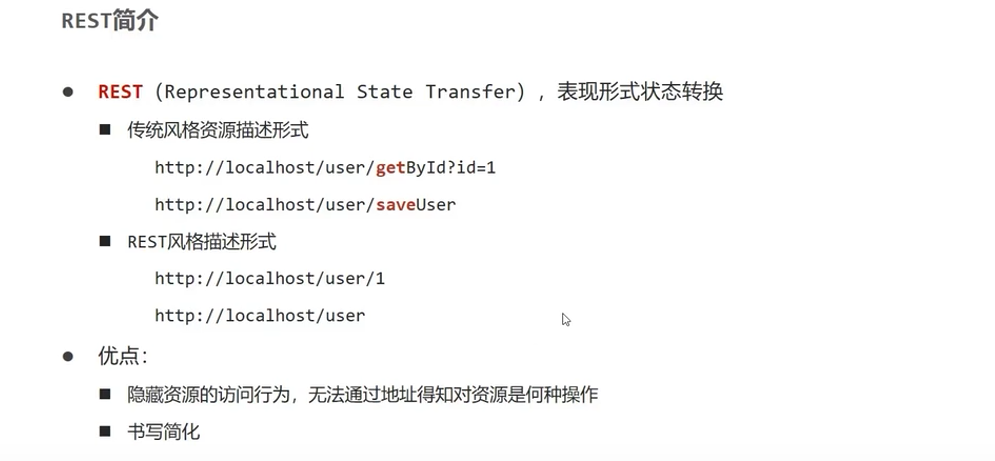
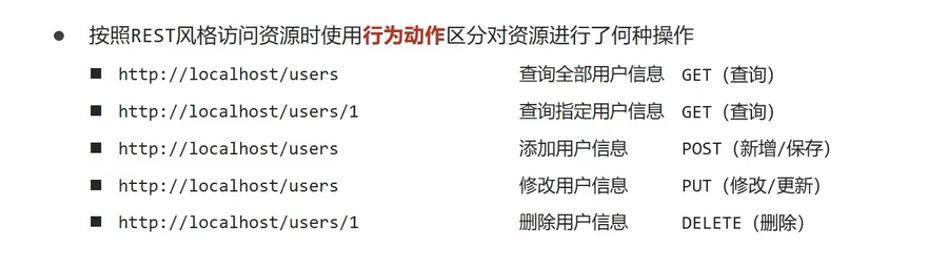
REST风格是隐藏资源的访问行为的,一般的使用如下动作行为区分对资源做了何种操作。
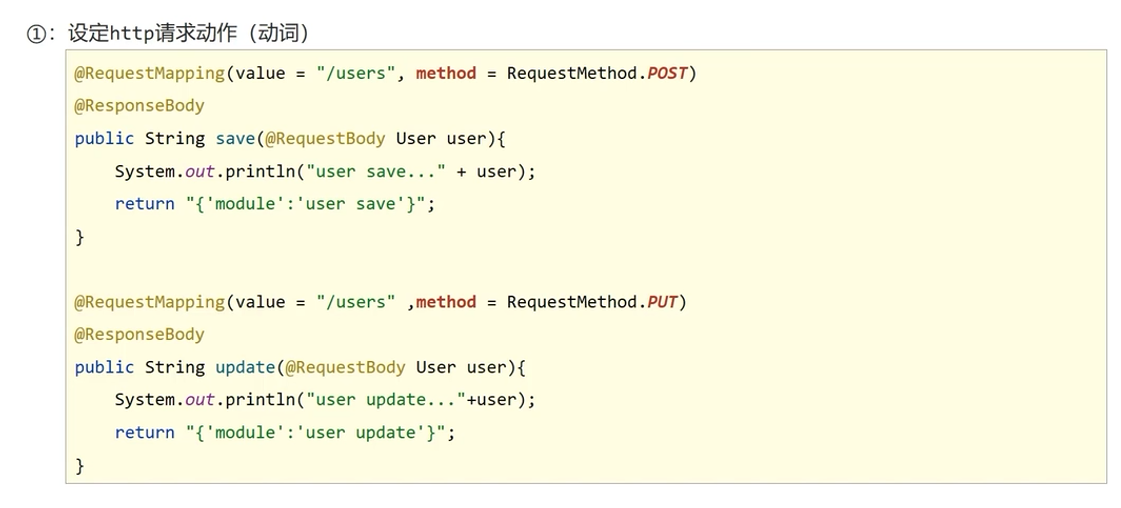
2.2、Restful风格入门案例
请求就是隐藏了访问路径的具体动作,使用method指定访问动作即可。
对于又请求参数的,需要设置路劲参数,具体如下:
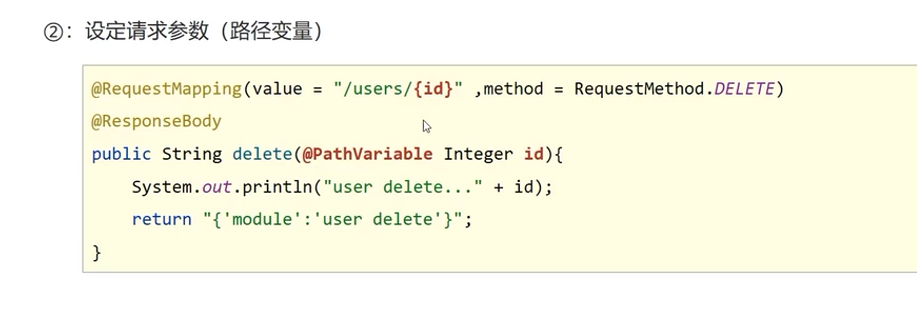
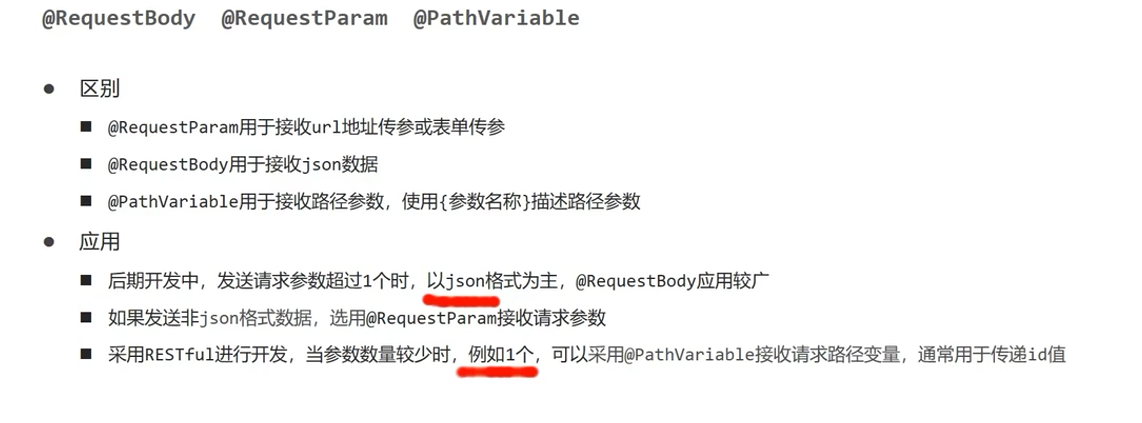
三种接收参数传递的注解,@PathVariable一般用于接收单个路径参数,@RequetBody一般用于接收封装好的json数据,最后一种用于接收非json数据,用的较少。
使用Restful进行增删改查的代码如下:
import com.domain.User;
import org.springframework.stereotype.Controller;
import org.springframework.web.bind.annotation.*;

@Controller
public class UserController {
    //保存用户信息
    @RequestMapping(value = "/users",method = RequestMethod.POST)
    @ResponseBody
    public String save(){
        System.out.println("user save ...");
        return "{'module':'user save'}" ;
    }
    //删除指定id的用户信息
    @RequestMapping(value = "/users/{id}",method = RequestMethod.DELETE)
    @ResponseBody
    public String delete(@PathVariable Integer id){
        System.out.println("user delete ...");
        return "{'module':'user delete'}" ;
    }
    //添加用户数据
    @RequestMapping(value = "/users", method = RequestMethod.PUT)
    @ResponseBody
    public String update(@RequestBody User user){
        System.out.println("user update ...");
        return "{'module':'user update'}" ;
    }
    //查询指定id的用户
    @RequestMapping(value = "/users/{id}", method = RequestMethod.GET)
    @ResponseBody
    public String getById(@PathVariable Integer id){
        System.out.println("user getById ...");
        return "{'module':'user getById'}" ;
    }
    //查询所有用户的信息
    @RequestMapping(value = "/users", method = RequestMethod.GET)
    @ResponseBody
    public String getAll(){
        System.out.println("user getAll");
        return "{'module':'user getAll'}" ;
    }

}
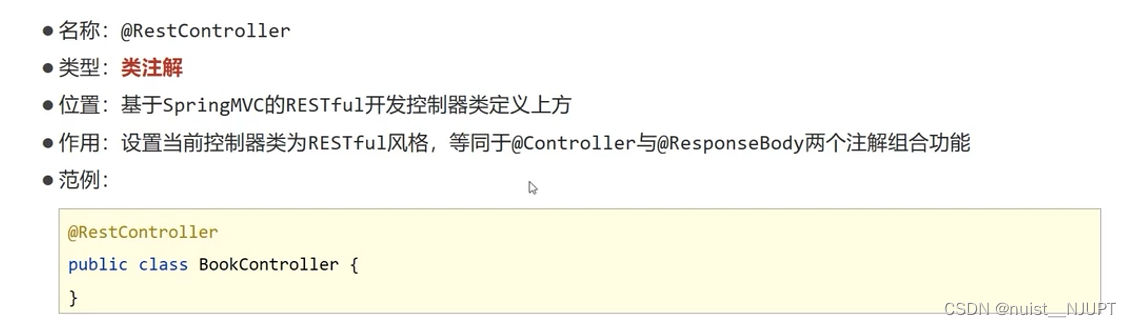
2.3、Restful快速开发
两个注解,如下,是两个注解的组合。
两外是请求映射注解的四个,如下:

简化后的增删改查如下:
import com.domain.User;
import org.springframework.web.bind.annotation.*;


@RequestMapping("/users")
@RestController //该注解是Controller和ResponseBody注解的组合
public class UserController {
    //保存用户信息
    //@RequestMapping(method = RequestMethod.POST)
    @PostMapping
    public String save(){
        System.out.println("user save ...");
        return "{'module':'user save'}" ;
    }
    //删除指定id的用户信息
    //@RequestMapping(value = "/{id}",method = RequestMethod.DELETE)
    @DeleteMapping("/{id}")
    public String delete(@PathVariable Integer id){
        System.out.println("user delete ...");
        return "{'module':'user delete'}" ;
    }
    //添加用户数据
    //@RequestMapping( method = RequestMethod.PUT)
    @PutMapping
    public String update(@RequestBody User user){
        System.out.println("user update ...");
        return "{'module':'user update'}" ;
    }
    //查询指定id的用户
    //@RequestMapping(value = "/{id}", method = RequestMethod.GET)
    @GetMapping("/{id}")
    public String getById(@PathVariable Integer id){
        System.out.println("user getById ...");
        return "{'module':'user getById'}" ;
    }
    //查询所有用户的信息
   // @RequestMapping(method = RequestMethod.GET)
    @GetMapping
    public String getAll(){
        System.out.println("user getAll");
        return "{'module':'user getAll'}" ;
    }

}
三、配置修改
3.1、属性配置方式
直接在application.properties中修改就可以,比如修改服务器端口号,如下:
#修改服务器端口号
server.port=80
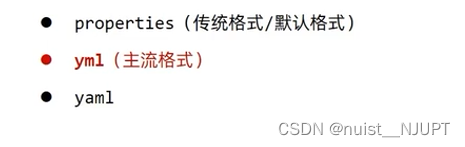
3.2、文件配置格式及优先级
springboot中有三种文件配置格式,三种都可以用,优先级properties>yml>yaml
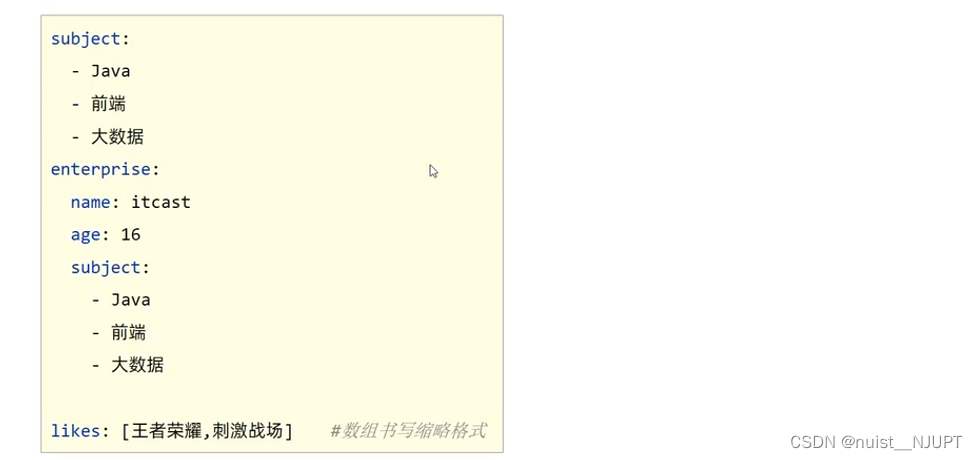
3.3、yaml基本语法规则
就是简单的层级关系,注意冒号后面与数据之间需要一个空格即可。
另外,在yaml中表示数组,可以使用减号作为开始,也可以直接用中括号,如下:
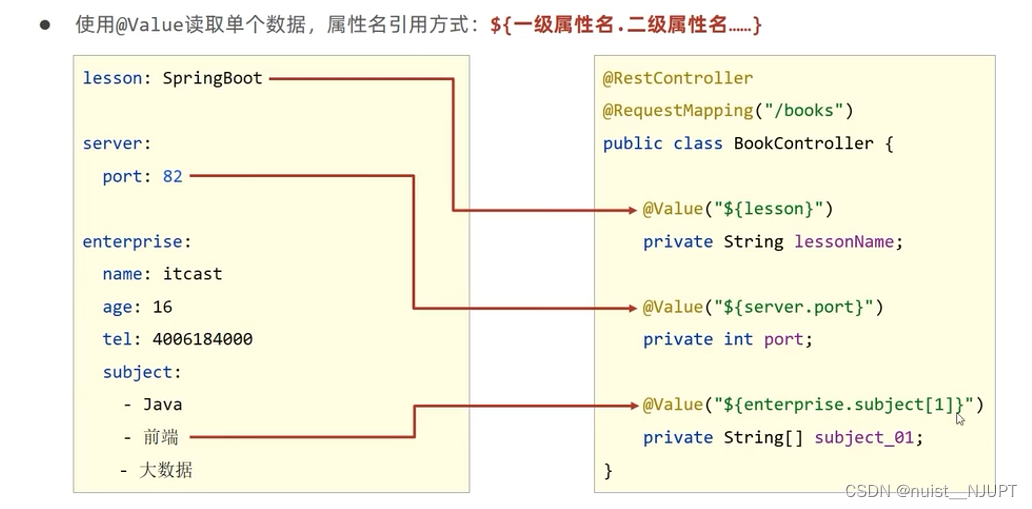
3.4、yaml读取单一属性数据
就是使用@Value进行读取单个数据,里面用$符号,遇到数组用中括号读取即可。
演示代码如下:
server:
  port: 8080

lesson:
  springboot

subject:
  s1: English
  s2: math

hobby:
  - running
  - basketball
  - volleyball
  - reading

movies: ['西红柿首富','你好李焕英']
import org.springframework.beans.factory.annotation.Value;
import org.springframework.web.bind.annotation.GetMapping;
import org.springframework.web.bind.annotation.RequestMapping;
import org.springframework.web.bind.annotation.RestController;


@RestController
@RequestMapping("/books")
public class BookController {
    @Value("${lesson}")
    private String lessonName ;

    @Value("${hobby[2]}")
    private String hobby ;

    @Value("${subject.s2}")
    private String subject ;

    @Value("${movies[1]}")
    private String movies ;


    @GetMapping("/print")
    public String print(){
        System.out.println(lessonName);
        System.out.println(hobby);
        System.out.println(subject);
        System.out.println(movies);
        return "success !!!" ;
    }
}
3.5、读取yaml全部属性数据
使用Enviroment对象封装全部配置信息,使用@Autowired注解自动装配数据到Enviroment对象中。
import org.springframework.beans.factory.annotation.Autowired;
import org.springframework.core.env.Environment;
import org.springframework.web.bind.annotation.GetMapping;
import org.springframework.web.bind.annotation.RequestMapping;
import org.springframework.web.bind.annotation.RestController;

@RestController
@RequestMapping("/books")
public class BookController {


    //封装全部数据到Enviroment对象中
    @Autowired
    private Environment environment ;

    @GetMapping("/print")
    public String print(){
        System.out.println(environment.getProperty("lesson"));
        System.out.println(environment.getProperty("hobby[1]"));
        return "success !!!" ;
    }
}
3.6、读取yaml引用类型数据
使用注解绑定配置信息到封装类,另外需要将封装类定义为bean,然后将bean注入。

yaml文件的配置如下:
datasource:
  driver: com.mysql.jdbc.Driver
  username: root
  password: 123456
将配置信息封装到类中,再将类变成bean,交给Spring管理。
import org.springframework.boot.context.properties.ConfigurationProperties;
import org.springframework.stereotype.Component;

@Component //将该类变成bean,可以进行依赖注入
@ConfigurationProperties(prefix = "datasource")  //绑定yaml文件中的datasource配置到该类中
public class MyDataSource {
    private String driver ;
    private String username ;
    private String password ;

    public String getDriver() {
        return driver;
    }

    public void setDriver(String driver) {
        this.driver = driver;
    }

    public String getUsername() {
        return username;
    }

    public void setUsername(String username) {
        this.username = username;
    }

    public String getPassword() {
        return password;
    }

    public void setPassword(String password) {
        this.password = password;
    }

    @Override
    public String toString() {
        return "MyDataSource{" +
                "driver='" + driver + '\'' +
                ", username='" + username + '\'' +
                ", password='" + password + '\'' +
                '}';
    }
}
四、SpringBoot整合第三方技术
4.1、整合junit
springboot整合junit主要包含下面三个步骤,具体如下,其实第一步都是自动生成的。

创建接口和实现类,并进行测试。
public interface BookDao {
    public void save() ;
}
import org.springframework.stereotype.Repository;

@Repository
public class BookImpl implements BookDao {

    @Override
    public void save() {
        System.out.println("save ...");
    }
}
注入测试对象,调用测方法。
import com.dao.BookDao;
import org.junit.jupiter.api.Test;
import org.springframework.beans.factory.annotation.Autowired;
import org.springframework.boot.test.context.SpringBootTest;

@SpringBootTest
class DemoApplicationTests {

	//注入要测试的对象
	@Autowired
	private BookDao bookDao ;

	@Test
	void contextLoads() {
		//执行测试对象相应的方法
		bookDao.save();
	}

}
注:若测试类如果存在于引导类的包或者子包中无需指定引导类。
测试类不存在于引导类的包或者子包中需要使用classes属性执行引导类。
4.2、整合MyBatis
创建mybatis所需环境,在application.yml文件配置数据源,用于连接数据库。
spring:
  datasource:
    driver-class-name: com.mysql.cj.jdbc.Driver
    url: jdbc:mysql://localhost:3306/test
    username: root
    password: 123456
创建一个Goods实体类,如下:
public class Goods {
    private Integer id ;
    private String name ;
    private Integer count ;
    private Double price ;

    public Integer getId() {
        return id;
    }

    public void setId(Integer id) {
        this.id = id;
    }

    public String getName() {
        return name;
    }

    public void setName(String name) {
        this.name = name;
    }

    public Integer getCount() {
        return count;
    }

    public void setCount(Integer count) {
        this.count = count;
    }

    public Double getPrice() {
        return price;
    }

    public void setPrice(Double price) {
        this.price = price;
    }

    @Override
    public String toString() {
        return "Goods{" +
                "id=" + id +
                ", name='" + name + '\'' +
                ", count=" + count +
                ", price=" + price +
                '}';
    }
}
写个接口,添加Mapper注解映射,并标记为Bean对象。
import com.mybatis02.domain.Goods;
import org.apache.ibatis.annotations.Mapper;
import org.apache.ibatis.annotations.Select;
import org.springframework.stereotype.Repository;

import java.util.List;

@Repository
@Mapper
public interface BookDao {
    @Select("select * from product")
    public List<Goods> getAll() ;
}
在测试类中中注入bean,调用方法完成测试。
import com.mybatis02.dao.BookDao;
import com.mybatis02.dao.BookDaoImpl;
import org.junit.jupiter.api.Test;
import org.springframework.beans.factory.annotation.Autowired;
import org.springframework.boot.test.context.SpringBootTest;

@SpringBootTest
class Mybatis02ApplicationTests {

	@Autowired
	private BookDao bookDao ;

	@Test
	void contextLoads() {
		System.out.println(bookDao.getAll());
	}

}
4.3、整合MyBatis-Plus
创建mybatis-Plus所需环境,在application.yml文件中进行配置数据源。
spring:
  datasource:
    driver-class-name: com.mysql.cj.jdbc.Driver
    url: jdbc:mysql://localhost:3306/test
    username: root
    password: 123456
创建实体类,如下:
public class Product {
    private Integer id ;
    private String name ;
    private Integer count ;
    private Double price ;

    public Integer getId() {
        return id;
    }

    public void setId(Integer id) {
        this.id = id;
    }

    public String getName() {
        return name;
    }

    public void setName(String name) {
        this.name = name;
    }

    public Integer getCount() {
        return count;
    }

    public void setCount(Integer count) {
        this.count = count;
    }

    public Double getPrice() {
        return price;
    }

    public void setPrice(Double price) {
        this.price = price;
    }

    @Override
    public String toString() {
        return "Goods{" +
                "id=" + id +
                ", name='" + name + '\'' +
                ", count=" + count +
                ", price=" + price +
                '}';
    }
}
定义数据层的接口和映射配置,直接继承BaseMapper类,就可以直接使用增删改查方法
import com.baomidou.mybatisplus.core.mapper.BaseMapper;
import com.mybatisplus.domain.Product;
import org.apache.ibatis.annotations.Mapper;
import org.springframework.stereotype.Repository;

@Mapper
@Repository
public interface BookDao extends BaseMapper<Product> {

}
将bean注入,完成测试。
import com.mybatisplus.dao.BookDao;
import org.junit.jupiter.api.Test;
import org.springframework.beans.factory.annotation.Autowired;
import org.springframework.boot.test.context.SpringBootTest;

@SpringBootTest
class MybatisplusApplicationTests {

    @Autowired
    private BookDao bookDao ;

    @Test
    void contextLoads() {
        System.out.println(bookDao.selectById(1));
    }

}
4.4、整合Druid
导入Druid对应的starter坐标,配置数据源,写个接口完成增删改查,最后测试。
先导入druid的坐标,直接从该网站复制过来,放到pom.xml文件中。
<?xml version="1.0" encoding="UTF-8"?>
<project xmlns="http://maven.apache.org/POM/4.0.0" xmlns:xsi="http://www.w3.org/2001/XMLSchema-instance"
	xsi:schemaLocation="http://maven.apache.org/POM/4.0.0 https://maven.apache.org/xsd/maven-4.0.0.xsd">
	<modelVersion>4.0.0</modelVersion>
	<parent>
		<groupId>org.springframework.boot</groupId>
		<artifactId>spring-boot-starter-parent</artifactId>
		<version>2.7.5</version>
		<relativePath/> <!-- lookup parent from repository -->
	</parent>
	<groupId>com.druid</groupId>
	<artifactId>demo</artifactId>
	<version>0.0.1-SNAPSHOT</version>
	<name>druid</name>
	<description>Demo project for Spring Boot</description>
	<properties>
		<java.version>1.8</java.version>
	</properties>
	<dependencies>
		<dependency>
			<groupId>org.mybatis.spring.boot</groupId>
			<artifactId>mybatis-spring-boot-starter</artifactId>
			<version>2.2.2</version>
		</dependency>
		<!-- https://mvnrepository.com/artifact/com.alibaba/druid-spring-boot-starter -->
		<dependency>
			<groupId>com.alibaba</groupId>
			<artifactId>druid-spring-boot-starter</artifactId>
			<version>1.2.14</version>
		</dependency>


		<dependency>
			<groupId>com.mysql</groupId>
			<artifactId>mysql-connector-j</artifactId>
			<scope>runtime</scope>
		</dependency>
		<dependency>
			<groupId>org.springframework.boot</groupId>
			<artifactId>spring-boot-starter-test</artifactId>
			<scope>test</scope>
		</dependency>
	</dependencies>

	<build>
		<plugins>
			<plugin>
				<groupId>org.springframework.boot</groupId>
				<artifactId>spring-boot-maven-plugin</artifactId>
			</plugin>
		</plugins>
	</build>

</project>
配置数据源,如下:
spring:
  datasource:
    druid:
      driver-class-name: com.mysql.cj.jdbc.Driver
      url: jdbc:mysql://localhost:3306/test?serverTimezone=UTC
      username: root
      password: 123456
写个接口完成查找功能,然后测试即可。
import com.druid.domain.Goods;
import org.apache.ibatis.annotations.Mapper;
import org.apache.ibatis.annotations.Select;
import org.springframework.stereotype.Repository;

import java.util.List;

@Repository
@Mapper
public interface BookDao {
    @Select("select * from product")
    public List<Goods> getAll() ;
}
import com.druid.dao.BookDao;
import org.junit.jupiter.api.Test;
import org.springframework.beans.factory.annotation.Autowired;
import org.springframework.boot.test.context.SpringBootTest;

@SpringBootTest
class DruidApplicationTests {

	@Autowired
	private BookDao bookDao ;

	@Test
	void contextLoads() {
		System.out.println(bookDao.getAll()) ;
	}

}
五、基于SpringBoot的SSMP案例整合
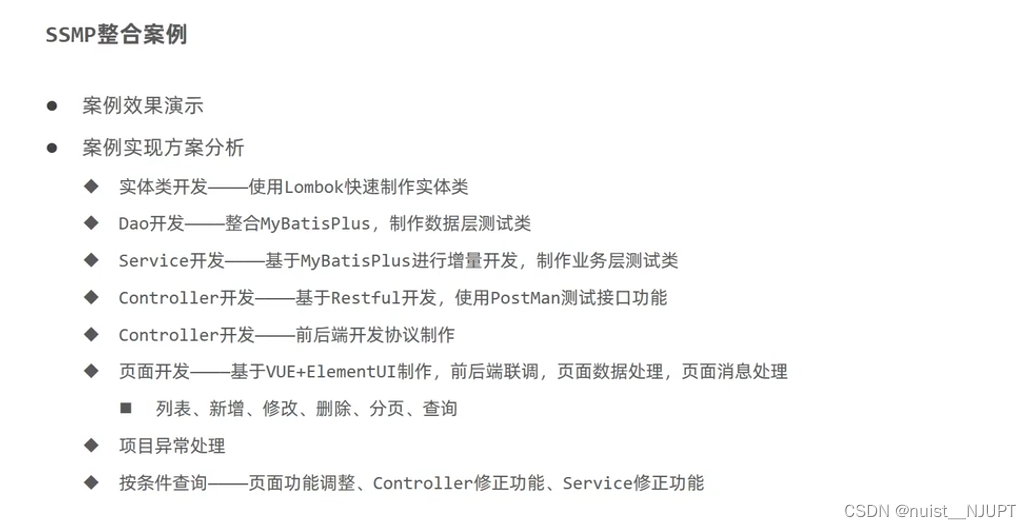
5.1、案例实现方案分析
5.2、模块创建
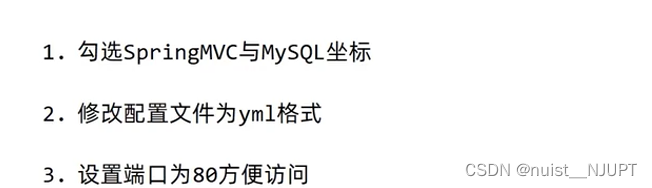
主要包含以下三步,在第1步是在创建springboot项目的时候导入相应的坐标,然后修改配置文件,我们不使用.properties的配置文件,我们使用.yml配置文件,同时我们修改端口号为80.
5.3、快速创建实体类
使用lombok可以简化开发,在pom.xml中加入lombok依赖,使用@Data注解就可以了,里面自动封装了setter和getter方法等,但是没有构造方法,如果需要还要自己写。
import lombok.Data;

@Data
public class Product {
    private Integer id ;
    private String name ;
    private Integer count ;
    private Double price ;

    public Product() {
    }

    public Product(Integer id, String name, Integer count, Double price) {
        this.id = id;
        this.name = name;
        this.count = count;
        this.price = price;
    }
}
5.4、数据层快速开发
首先导入mybatis-plus和druid坐标依赖,配置数据源,开发dao接口(直接继承BaseMapper),最后在测试类进行测试增删改查的api。
1)配置依赖坐标。
<?xml version="1.0" encoding="UTF-8"?>
<project xmlns="http://maven.apache.org/POM/4.0.0" xmlns:xsi="http://www.w3.org/2001/XMLSchema-instance"
	xsi:schemaLocation="http://maven.apache.org/POM/4.0.0 https://maven.apache.org/xsd/maven-4.0.0.xsd">
	<modelVersion>4.0.0</modelVersion>
	<parent>
		<groupId>org.springframework.boot</groupId>
		<artifactId>spring-boot-starter-parent</artifactId>
		<version>2.7.5</version>
		<relativePath/> <!-- lookup parent from repository -->
	</parent>
	<groupId>com.items</groupId>
	<artifactId>item</artifactId>
	<version>0.0.1-SNAPSHOT</version>
	<name>item</name>
	<description>Demo project for Spring Boot</description>
	<properties>
		<java.version>1.8</java.version>
	</properties>
	<dependencies>
		<dependency>
			<groupId>org.springframework.boot</groupId>
			<artifactId>spring-boot-starter-web</artifactId>
		</dependency>
		<!-- https://mvnrepository.com/artifact/com.baomidou/mybatis-plus-boot-starter -->
		<dependency>
			<groupId>com.baomidou</groupId>
			<artifactId>mybatis-plus-boot-starter</artifactId>
			<version>3.5.2</version>
		</dependency>

		<!-- https://mvnrepository.com/artifact/com.alibaba/druid-spring-boot-starter -->
		<dependency>
			<groupId>com.alibaba</groupId>
			<artifactId>druid-spring-boot-starter</artifactId>
			<version>1.2.14</version>
		</dependency>

		<!-- https://mvnrepository.com/artifact/org.projectlombok/lombok -->
		<dependency>
			<groupId>org.projectlombok</groupId>
			<artifactId>lombok</artifactId>
		</dependency>


		<dependency>
			<groupId>com.mysql</groupId>
			<artifactId>mysql-connector-j</artifactId>
			<scope>runtime</scope>
		</dependency>
		<dependency>
			<groupId>org.springframework.boot</groupId>
			<artifactId>spring-boot-starter-test</artifactId>
			<scope>test</scope>
		</dependency>
	</dependencies>

	<build>
		<plugins>
			<plugin>
				<groupId>org.springframework.boot</groupId>
				<artifactId>spring-boot-maven-plugin</artifactId>
			</plugin>
		</plugins>
	</build>

</project>
2)配置数据源。
server:
  port: 80

spring:
  datasource:
    druid:
      driver-class-name: com.mysql.cj.jdbc.Driver
      url: jdbc:mysql://localhost:3306/test?serverTimezone=UTC
      username: root
      password: 123456


#设置id默认自动递增
mybatis-plus:
  global-config:
    db-config:
      id-type: auto
3)开发Dao接口
import com.baomidou.mybatisplus.core.mapper.BaseMapper;
import com.items.domain.Product;
import org.apache.ibatis.annotations.Mapper;
import org.springframework.stereotype.Repository;

@Mapper
@Repository
public interface ProductDao extends BaseMapper<Product> {

}
4)编写测试类,对Dao接口的增删改查方法进行测试。
import com.items.domain.Product;
import org.junit.jupiter.api.Test;
import org.springframework.beans.factory.annotation.Autowired;
import org.springframework.boot.test.context.SpringBootTest;

@SpringBootTest
class DaoApplicationTests {

	@Autowired
	private ProductDao productDao ;

	@Test
	void testGetById() { //按照id查询
		System.out.println(productDao.selectById(2)) ;
	}

	@Test
	void testGetAll() { //查询所有
		System.out.println(productDao.selectList(null)) ;
	}

	@Test
	void testSave(){ //添加
		//如果setter和getter方法不能用,需要在设置->插件中下载lombok的差件,重启IDE就可以劣
		Product product = new Product() ;
		product.setName("测试案例1");
		product.setCount(1234);
		product.setPrice(1234.0);
		productDao.insert(product) ;
	}

	@Test
	void testUpdate(){ //修改
		Product product = new Product() ;
		product.setId(1);
		product.setName("修改id=1的案例");
		product.setCount(10000);
		product.setPrice(12000.00);
		productDao.updateById(product) ;
	}

	@Test
	void testDelete(){ //删除指定数据行
		productDao.deleteById(11) ;
	}

}
5.5、分页查询
使用Ipage封装分页数据,分页操作依赖MyBatis-Plus的拦截器实现。
设置拦截器,内部是动态拼接SQL语句。
import com.baomidou.mybatisplus.extension.plugins.MybatisPlusInterceptor;
import com.baomidou.mybatisplus.extension.plugins.inner.PaginationInnerInterceptor;
import org.springframework.context.annotation.Bean;
import org.springframework.context.annotation.Configuration;

@Configuration
public class MPConfig {

    @Bean //将拦截器交给Spring管理
    public MybatisPlusInterceptor mybatisPlusInterceptor(){
        MybatisPlusInterceptor mybatisPlusInterceptor = new MybatisPlusInterceptor() ;
        mybatisPlusInterceptor.addInnerInterceptor(new PaginationInnerInterceptor());
        return mybatisPlusInterceptor ;
    }
}
使用Ipage封装分页数据,并进行查询,如下:
	@Test
	void testGetPage(){ //分页查询
		IPage page = new Page(1,5) ;
		productDao.selectPage(page,null) ;
	}
5.6、数据层的按条件查询
可以使用Querywrapper和LambdaQuerywrapper完成条件查询,所有查询封装成方法调用。
	@Test
	void testGetBy1(){ //按条件查询方式1
		String name = "洗衣机" ;
		QueryWrapper<Product> queryWrapper = new QueryWrapper<>() ;
		queryWrapper.like(name!=null,"name","洗衣机") ;
		productDao.selectList(queryWrapper) ;
	}
	@Test
	void testGetBy2(){ //按条件查询方式2
		String name = "洗衣机" ;
		LambdaQueryWrapper<Product> queryWrapper = new LambdaQueryWrapper<>() ;
		queryWrapper.like(name!=null,Product::getName,name) ;
		productDao.selectList(queryWrapper) ;
	}
5.7、业务层的开发(crud)
首先写业务层的接口,如下:
import com.baomidou.mybatisplus.core.metadata.IPage;
import com.items.domain.Product;

import java.util.List;

public interface ProductService {
    Boolean save(Product product) ;
    Boolean update(Product product) ;
    Boolean delete(Integer id) ;
    Product getById(Integer id) ;
    List<Product> getAll() ;
    IPage<Product> getPage(Integer currentPage, Integer pageSize) ;
}
将bean注入,根据接口,写具体的实现类,如下:
import com.baomidou.mybatisplus.core.metadata.IPage;
import com.baomidou.mybatisplus.extension.plugins.pagination.Page;
import com.items.dao.ProductDao;
import com.items.domain.Product;
import com.items.service.ProductService;
import org.springframework.beans.factory.annotation.Autowired;
import org.springframework.stereotype.Service;

import java.util.List;

@Service
public class ProductServiceImpl implements ProductService {

    @Autowired
    private ProductDao productDao ;

    @Override
    public Boolean save(Product product) {
        return productDao.insert(product) > 0 ;
    }

    @Override
    public Boolean update(Product product) {
        return productDao.updateById(product) > 0 ;
    }

    @Override
    public Boolean delete(Integer id) {
        return productDao.deleteById(id) > 0 ;
    }

    @Override
    public Product getById(Integer id) {
        return productDao.selectById(id) ;
    }

    @Override
    public List<Product> getAll() {
        return productDao.selectList(null) ;
    }

    @Override
    public IPage<Product> getPage(Integer currentPage, Integer pageSize) {
        IPage page = new Page(currentPage,pageSize) ;
        productDao.selectPage(page,null) ;
        return page;
    }
}
最后,编写测试类完成业务层的测试,如下:
import com.baomidou.mybatisplus.core.conditions.query.LambdaQueryWrapper;
import com.baomidou.mybatisplus.core.conditions.query.QueryWrapper;
import com.baomidou.mybatisplus.core.metadata.IPage;
import com.baomidou.mybatisplus.extension.plugins.pagination.Page;
import com.items.dao.ProductDao;
import com.items.domain.Product;
import org.junit.jupiter.api.Test;
import org.springframework.beans.factory.annotation.Autowired;
import org.springframework.boot.test.context.SpringBootTest;

@SpringBootTest
class ServiceApplicationTests {

	@Autowired
	private ProductService productService ;

	@Test
	void testGetById() { //按照id查询
		System.out.println(productService.getById(1)) ;
	}

	@Test
	void testGetAll() { //查询所有
		System.out.println(productService.getAll()) ;
	}

	@Test
	void testSave(){ //添加
		//如果setter和getter方法不能用,需要在设置->插件中下载lombok的差件,重启IDE就可以劣
		Product product = new Product() ;
		product.setName("测试案例1");
		product.setCount(1234);
		product.setPrice(1234.0);
		productService.save(product) ;
	}

	@Test
	void testUpdate(){ //修改
		Product product = new Product() ;
		product.setId(1);
		product.setName("修改id=1的案例");
		product.setCount(10000);
		product.setPrice(12000.00);
		productService.update(product) ;
	}

	@Test
	void testDelete(){ //删除指定数据行
		productService.delete(10) ;
	}

	@Test
	void testGetPage(){ //分页查询
		productService.getPage(1,5) ;
	}


}
5.8、业务层的开发(基于MyBatis-Plus构建)
使用MP进行业务层的开发有业务层通用接口Iservice和业务层通用实现类ServiceImpl,可以帮助完成业务层的快速开发,可以在其继续添加方法,注意不要覆盖方法即可。
1)继承Iservice接口就可以实现增删改查,内部不需要再写具体接口方法
import com.baomidou.mybatisplus.extension.service.IService;
import com.items.domain.Product;

public interface IProductService extends IService<Product> {
    //这是追加的方法,原始的方法直接继承了,不用再写
    Boolean insert(Product product) ;
    Boolean modify(Product product) ;
    Boolean delete(Integer id) ;
    Product get(Integer id) ;
}
2)接口实现类,为了不重写所有的方法,可以直接继承ServiceImpl即可
import com.baomidou.mybatisplus.extension.service.impl.ServiceImpl;
import com.items.dao.ProductDao;
import com.items.domain.Product;
import com.items.service.IProductService;
import org.springframework.beans.factory.annotation.Autowired;
import org.springframework.stereotype.Service;

@Service
public class ProductServiceImpl extends ServiceImpl<ProductDao, Product> implements IProductService {
    //里面是追加方法的实现
   @Autowired
   private ProductDao productDao ;

    @Override
    public Boolean insert(Product product) {
        return productDao.insert(product) > 0 ;
    }

    @Override
    public Boolean modify(Product product) {
        return productDao.updateById(product) > 0 ;
    }

    @Override
    public Boolean delete(Integer id) {
        return productDao.deleteById(id) > 0 ;
    }

    @Override
    public Product get(Integer id) {
        return productDao.selectById(id) ;
    }
}
3)最后创建一个测试类进行测试,如下:
import com.baomidou.mybatisplus.core.metadata.IPage;
import com.baomidou.mybatisplus.extension.plugins.pagination.Page;
import com.items.domain.Product;
import org.junit.jupiter.api.Test;
import org.springframework.beans.factory.annotation.Autowired;
import org.springframework.boot.test.context.SpringBootTest;

@SpringBootTest
class Service1ApplicationTests {

	@Autowired
	private IProductService iProductService ;

	@Test
	void testGetById() { //按照id查询
		System.out.println(iProductService.getById(1)) ;
	}

	@Test
	void testGetAll() { //查询所有
		System.out.println(iProductService.list()) ;
	}

	@Test
	void testSave(){ //添加
		//如果setter和getter方法不能用,需要在设置->插件中下载lombok的差件,重启IDE就可以劣
		Product product = new Product() ;
		product.setName("测试案例1");
		product.setCount(1234);
		product.setPrice(1234.0);
		iProductService.save(product) ;
	}

	@Test
	void testUpdate(){ //修改
		Product product = new Product() ;
		product.setId(1);
		product.setName("修改id=1的案例");
		product.setCount(10000);
		product.setPrice(12000.00);
		iProductService.updateById(product) ;
	}

	@Test
	void testDelete(){ //删除指定数据行
		iProductService.removeById(15) ;
	}

	@Test
	void testGetPage(){ //分页查询
		IPage<Product> page = new Page<>(1,5) ;
		iProductService.page(page) ;
		System.out.println(page.getCurrent());
		System.out.println(page.getSize());
		System.out.println(page.getTotal());
		System.out.println(page.getPages());
		System.out.println(page.getRecords());
	}


}
5.9、表现层标准开发
基于Restful风格的变现层开发,新增POST,删除DELETE,修改PUT,查询GET,接收实体参数使用@RequestBody注解,接收路径变量参数使用@PathVariable注解。
import com.baomidou.mybatisplus.core.metadata.IPage;
import com.items.domain.Product;
import com.items.service.IProductService;
import org.springframework.beans.factory.annotation.Autowired;
import org.springframework.web.bind.annotation.*;

import java.util.List;

@RestController
@RequestMapping("/products")
public class ProductController {

    @Autowired
    private IProductService productService ;

    @GetMapping
    public List<Product> getAll() {
        return productService.list() ;
    }

    @PostMapping
    public Boolean save(@RequestBody Product product){
        return productService.save(product) ;
    }

    @PutMapping
    public Boolean update(@RequestBody Product product){
        return productService.updateById(product) ;
    }

    @DeleteMapping("/{id}")
    public Boolean delete(@PathVariable Integer id){
        return productService.removeById(id) ;
    }

    @GetMapping("/{id}")
    public Product getById(@PathVariable Integer id){
        return productService.getById(id) ;
    }

    //按条件查询页面数据
    @GetMapping("/{currentPage}/{pageSize}")
    public IPage<Product> getPage(@PathVariable Integer currentPage, @PathVariable Integer pageSize){
        return productService.getPage(currentPage, pageSize) ;
    }

}
下面对表现层进行数据一致化处理,把所有的格式统一为一样的。我们需要设计表现层返回结果的模型类,用于前后端数据格式统一,也叫做前后端数据协议。
将数据都返回成flag标记是否操作成功,object标记操作结果。
import lombok.Data;

@Data //可以不用写setter和getter方法之类的
public class R {
    private Boolean flag ;
    private Object data ;

    public R() {
    }

    public R(Boolean flag) {
        this.flag = flag;
    }

    public R(Boolean flag, Object data) {
        this.flag = flag;
        this.data = data ;
    }
}
import com.baomidou.mybatisplus.core.metadata.IPage;
import com.items.domain.Product;
import com.items.service.IProductService;
import com.items.utils.R;
import org.springframework.beans.factory.annotation.Autowired;
import org.springframework.web.bind.annotation.*;

import java.util.List;

@RestController
@RequestMapping("/products")
public class ProductController {

    @Autowired
    private IProductService productService ;

    @GetMapping
    public R getAll() {
        return new R(true,productService.list()) ;
    }

    @PostMapping
    public R save(@RequestBody Product product){
        return new R(productService.save(product)) ;
    }

    @PutMapping
    public R update(@RequestBody Product product){
        return new R(productService.updateById(product)) ;
    }

    @DeleteMapping("/{id}")
    public R delete(@PathVariable Integer id){
        return new R(productService.removeById(id)) ;
    }

    @GetMapping("/{id}")
    public R getById(@PathVariable Integer id){
        return new R(true , productService.getById(id)) ;
    }

    //按条件查询页面数据
    @GetMapping("/{currentPage}/{pageSize}")
    public R getPage(@PathVariable Integer currentPage, @PathVariable Integer pageSize){
        return new R(true, productService.getPage(currentPage, pageSize)) ;
    }

}
5.10、前后端协议联调
前端发送异步请求,调用后端接口。前端页面代码如下:
<!DOCTYPE html>
<html>

<head>

    <!-- 页面meta -->

    <meta charset="utf-8">

    <meta http-equiv="X-UA-Compatible" content="IE=edge">

    <title>基于SpringBoot整合SSM案例</title>

    <meta content="width=device-width,initial-scale=1,maximum-scale=1,user-scalable=no" name="viewport">

    <!-- 引入样式 -->

    <link rel="stylesheet" href="../plugins/elementui/index.css">

    <link rel="stylesheet" href="../plugins/font-awesome/css/font-awesome.min.css">

    <link rel="stylesheet" href="../css/style.css">

</head>

<body class="hold-transition">

<div id="app">

    <div class="content-header">

        <h1>仓库管理系统</h1>

    </div>

    <div class="app-container">

        <div class="box">

            <div class="filter-container">
                <el-input v-model="pagination.count" placeholder="数量" style="width: 200px;" class="filter-item"></el-input>
                <el-input v-model="pagination.name" placeholder="名称" style="width: 200px;" class="filter-item"></el-input>
                <el-input v-model="pagination.price" placeholder="价格" style="width: 200px;" class="filter-item"></el-input>
                <el-button @click="getAll()" class="dalfBut">查询</el-button>
                <el-button type="primary" class="butT" @click="handleCreate()">新建</el-button>
            </div>

            <el-table size="small" current-row-key="id" :data="dataList" stripe highlight-current-row>

                <el-table-column type="index" align="center" label="序号"></el-table-column>

                <el-table-column prop="count" label="数量" align="center"></el-table-column>

                <el-table-column prop="name" label="名称" align="center"></el-table-column>

                <el-table-column prop="price" label="价格" align="center"></el-table-column>

                <el-table-column label="操作" align="center">

                    <template slot-scope="scope">

                        <el-button type="primary" size="mini" @click="handleUpdate(scope.row)">编辑</el-button>

                        <el-button type="danger" size="mini" @click="handleDelete(scope.row)">删除</el-button>

                    </template>

                </el-table-column>

            </el-table>

            <!--分页组件-->
            <!--分页组件-->
            <div class="pagination-container">

                <el-pagination
                        class="pagiantion"

                        @current-change="handleCurrentChange"

                        :current-page="pagination.currentPage"

                        :page-size="pagination.pageSize"

                        layout="total, prev, pager, next, jumper"

                        :total="pagination.total">

                </el-pagination>

            </div>

            <!-- 新增标签弹层 -->

            <div class="add-form">

                <el-dialog title="新增商品" :visible.sync="dialogFormVisible">

                    <el-form ref="dataAddForm" :model="formData" :rules="rules" label-position="right" label-width="100px">

                        <el-row>

                            <el-col :span="12">

                                <el-form-item label="数量" prop="count">

                                    <el-input v-model="formData.count"/>

                                </el-form-item>

                            </el-col>

                            <el-col :span="12">

                                <el-form-item label="名称" prop="name">

                                    <el-input v-model="formData.name"/>

                                </el-form-item>

                            </el-col>

                        </el-row>


                        <el-row>

                            <el-col :span="24">

                                <el-form-item label="价格">

                                    <el-input v-model="formData.price" type="textarea"></el-input>

                                </el-form-item>

                            </el-col>

                        </el-row>

                    </el-form>

                    <div slot="footer" class="dialog-footer">

                        <el-button @click="cancel()">取消</el-button>

                        <el-button type ="primary" @click="handleAdd()">确定</el-button>

                    </div>

                </el-dialog>

            </div>

            <!-- 编辑标签弹层 -->

            <div class="add-form">

                <el-dialog title="编辑检查项" :visible.sync="dialogFormVisible4Edit">

                    <el-form ref="dataEditForm" :model="formData" :rules="rules" label-position="right" label-width="100px">

                        <el-row>

                            <el-col :span="12">

                                <el-form-item label="数量" prop="count">

                                    <el-input v-model="formData.count"/>

                                </el-form-item>

                            </el-col>

                            <el-col :span="12">

                                <el-form-item label="名称" prop="name">

                                    <el-input v-model="formData.name"/>

                                </el-form-item>

                            </el-col>

                        </el-row>

                        <el-row>

                            <el-col :span="24">

                                <el-form-item label="价格">

                                    <el-input v-model="formData.price" type="textarea"></el-input>

                                </el-form-item>

                            </el-col>

                        </el-row>

                    </el-form>

                    <div slot="footer" class="dialog-footer">

                        <el-button @click="cancel()">取消</el-button>

                        <el-button type="primary" @click="handleEdit()">确定</el-button>

                    </div>

                </el-dialog>

            </div>

        </div>

    </div>

</div>

</body>

<!-- 引入组件库 -->

<script src="../js/vue.js"></script>

<script src="../plugins/elementui/index.js"></script>

<script type ="text/javascript" src="../js/jquery.min.js"></script>

<script src="../js/axios-0.18.0.js"></script>

<script>
    var vue = new Vue({
        el: '#app',
        data:{
            dataList: [],//当前页要展示的列表数据
            dialogFormVisible: false,//添加表单是否可见
            dialogFormVisible4Edit:false,//编辑表单是否可见
            formData: {},//表单数据
            rules: {//校验规则
                count: [{ required: true, message: '必填项', trigger: 'blur' }],
                name: [{ required: true, message: '必填项', trigger: 'blur' }]
            },
            pagination: {//分页相关模型数据
                currentPage: 1,//当前页码
                pageSize:10,//每页显示的记录数
                total:0,//总记录数
                count: "",
                name: "",
                price: ""
            }
        },

        //钩子函数,VUE对象初始化完成后自动执行
        created() {
            this.getAll();
        },

        methods: {
           //分页查询
            getAll() {
                // 组织参数,拼接url请求地址
                var paramStr = "?name=" + this.pagination.name
                    + "&count=" + this.pagination.count
                    + "&price=" + this.pagination.price;
                console.log(paramStr);
                axios.get("/products/" + this.pagination.currentPage + "/" + this.pagination.pageSize + paramStr).then(res => {
                    // console.log(res.data);
                    this.pagination.currentPage = res.data.data.current;
                    this.pagination.pageSize = res.data.data.size;
                    this.pagination.total = res.data.data.total;
                    this.dataList = res.data.data.records;
                });
            },
            //切换页码
            handleCurrentChange(currentPage) {
                // 修改页码值为当前选中的页码值
                this.pagination.currentPage = currentPage;
                // 执行查询
                this.getAll();
            },

            //弹出添加窗口
            handleCreate() {
                this.dialogFormVisible = true;
                this.resetForm();
            },

            //重置表单
            resetForm() {
                this.formData = {};
            },

            //添加
            handleAdd () {
                axios.post("/products", this.formData).then(res => {
                    // 判断当前操作是否成功
                    if(res.data.flag) {
                        // 1.关闭弹层
                        this.dialogFormVisible = false;
                        this.$message.success(res.data.msg);
                    } else {
                        this.$message.error(res.data.msg);
                    }
                }).finally(() => {
                    // 2.重新加载数据
                    this.getAll();
                });
            },

            //取消
            cancel(){
                this.dialogFormVisible = false;
                this.dialogFormVisible4Edit = false;
                this.$message.info("当前操作取消!");
            },
            // 删除
            handleDelete(row) {
                // console.log(row);
                this.$confirm("删除的数据将不可恢复,是否继续?", "提示", {type : "info"}).then(() => {
                    axios.delete("/products/" + row.id).then(res => {
                        if (res.data.flag) {
                            this.$message.success(res.data.msg);
                        } else {
                            this.$message.error(res.data.msg);
                        }
                    }).finally(() => {
                        this.getAll();
                    });
                }).catch(() => {
                    this.$message.info("取消操作");
                });
            },

            //弹出编辑窗口,以便于修改操作
            handleUpdate(row) {
                // 发送异步请求
                axios.get("/products/" + row.id).then(res => {
                    // console.log(res.data);
                    if (res.data.flag && res.data.data != null) {
                        this.dialogFormVisible4Edit = true;
                        this.formData = res.data.data;
                    } else {
                        this.$message.error(res.data.msg);
                    }
                }).finally(() => { //不管弹出与否,自动刷新
                    this.getAll();
                });
            },

            //修改
            handleEdit() {
                axios.put("/products", this.formData).then(res => {
                    // 判断当前操作是否成功
                    if(res.data.flag) {
                        // 1.关闭弹层
                        this.dialogFormVisible4Edit = false;
                        this.$message.success(res.data.msg);
                    } else {
                        this.$message.error(res.data.msg);
                    }
                }).finally(() => {
                    // 2.重新加载数据
                    this.getAll();
                });
            },

            //条件查询
        }
    })

</script>

</html>
后端的代码做了修改,加了异常处理:
import org.springframework.web.bind.annotation.ExceptionHandler;
import org.springframework.web.bind.annotation.RestControllerAdvice;

//作为SpringMVC的异常处理
@RestControllerAdvice
public class ExceptionAdvice {

    @ExceptionHandler //拦截异常信息
    public R doException(Exception e){
        e.printStackTrace();
        return new R(false, "服务器故障,请您稍后再试!") ;
    }
}
对于业务层的添加功能,增加了添加成功和添加失败的提示信息msg,直接在前端获取。
    @PostMapping
    public R save(@RequestBody Product product){
        Boolean flag = productService.save(product) ;
        return new R(flag, flag ? "添加成功" : "添加失败") ;
    }
    public R(Boolean flag, String msg){
        this.flag = flag ;
        this.msg = msg ;
    }
对于按条件查询问题,在控制层引入了实体类product,并覆盖业务层的方法和实现类。
//按条件查询页面数据
    @GetMapping("/{currentPage}/{pageSize}")
    public R getPage(@PathVariable Integer currentPage, @PathVariable Integer pageSize, Product product){
        return new R(true, productService.getPage(currentPage, pageSize,product)) ;
    }
IPage<Product> getPage(Integer currentPage, Integer pageSize, Product product);
    @Override
    public IPage<Product> getPage(Integer currentPage, Integer pageSize, Product product) {
        IPage iPage = new Page (currentPage,pageSize) ;
        LambdaQueryWrapper<Product> lambdaQueryWrapper = new LambdaQueryWrapper<>() ;
        lambdaQueryWrapper.like(Strings.isNotEmpty(product.getName()),Product::getName,product.getName()) ;
        lambdaQueryWrapper.like(!(product.getCount() == null), Product::getCount, product.getCount()) ;
        lambdaQueryWrapper.eq(!(product.getPrice() == null), Product::getPrice, product.getPrice()) ;
        return productDao.selectPage(iPage, lambdaQueryWrapper) ;
    }
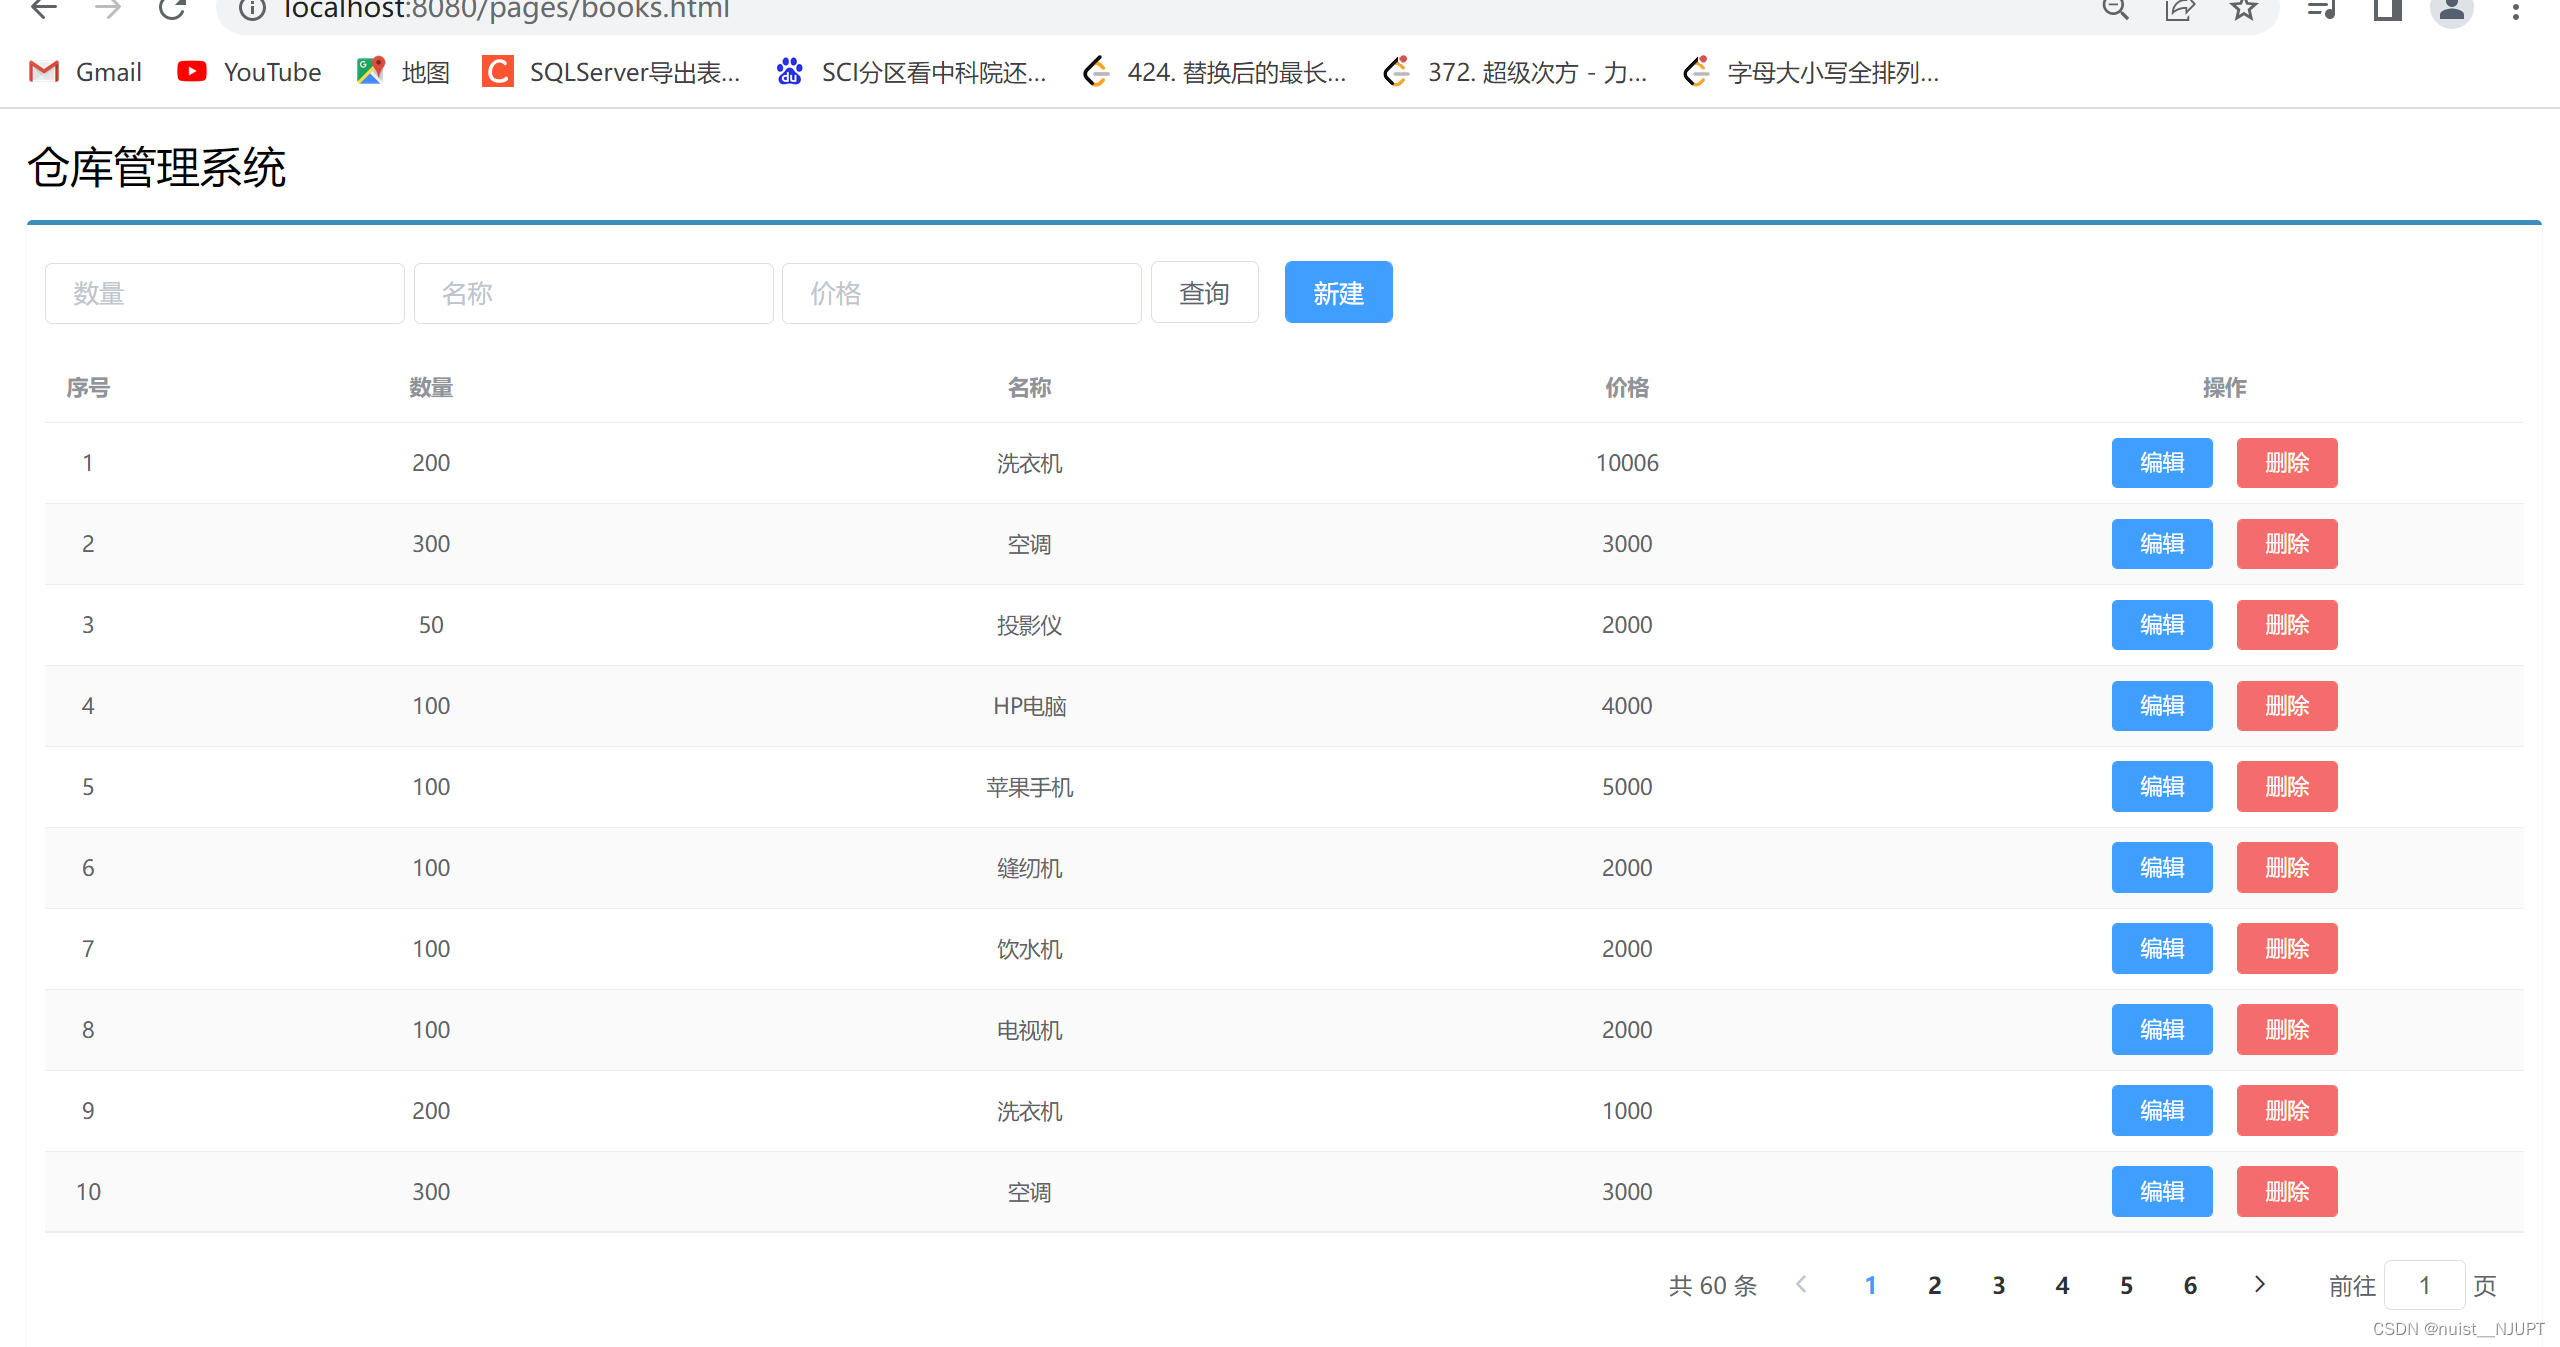
查询全部的数据页面如下:
按数量查询如下:
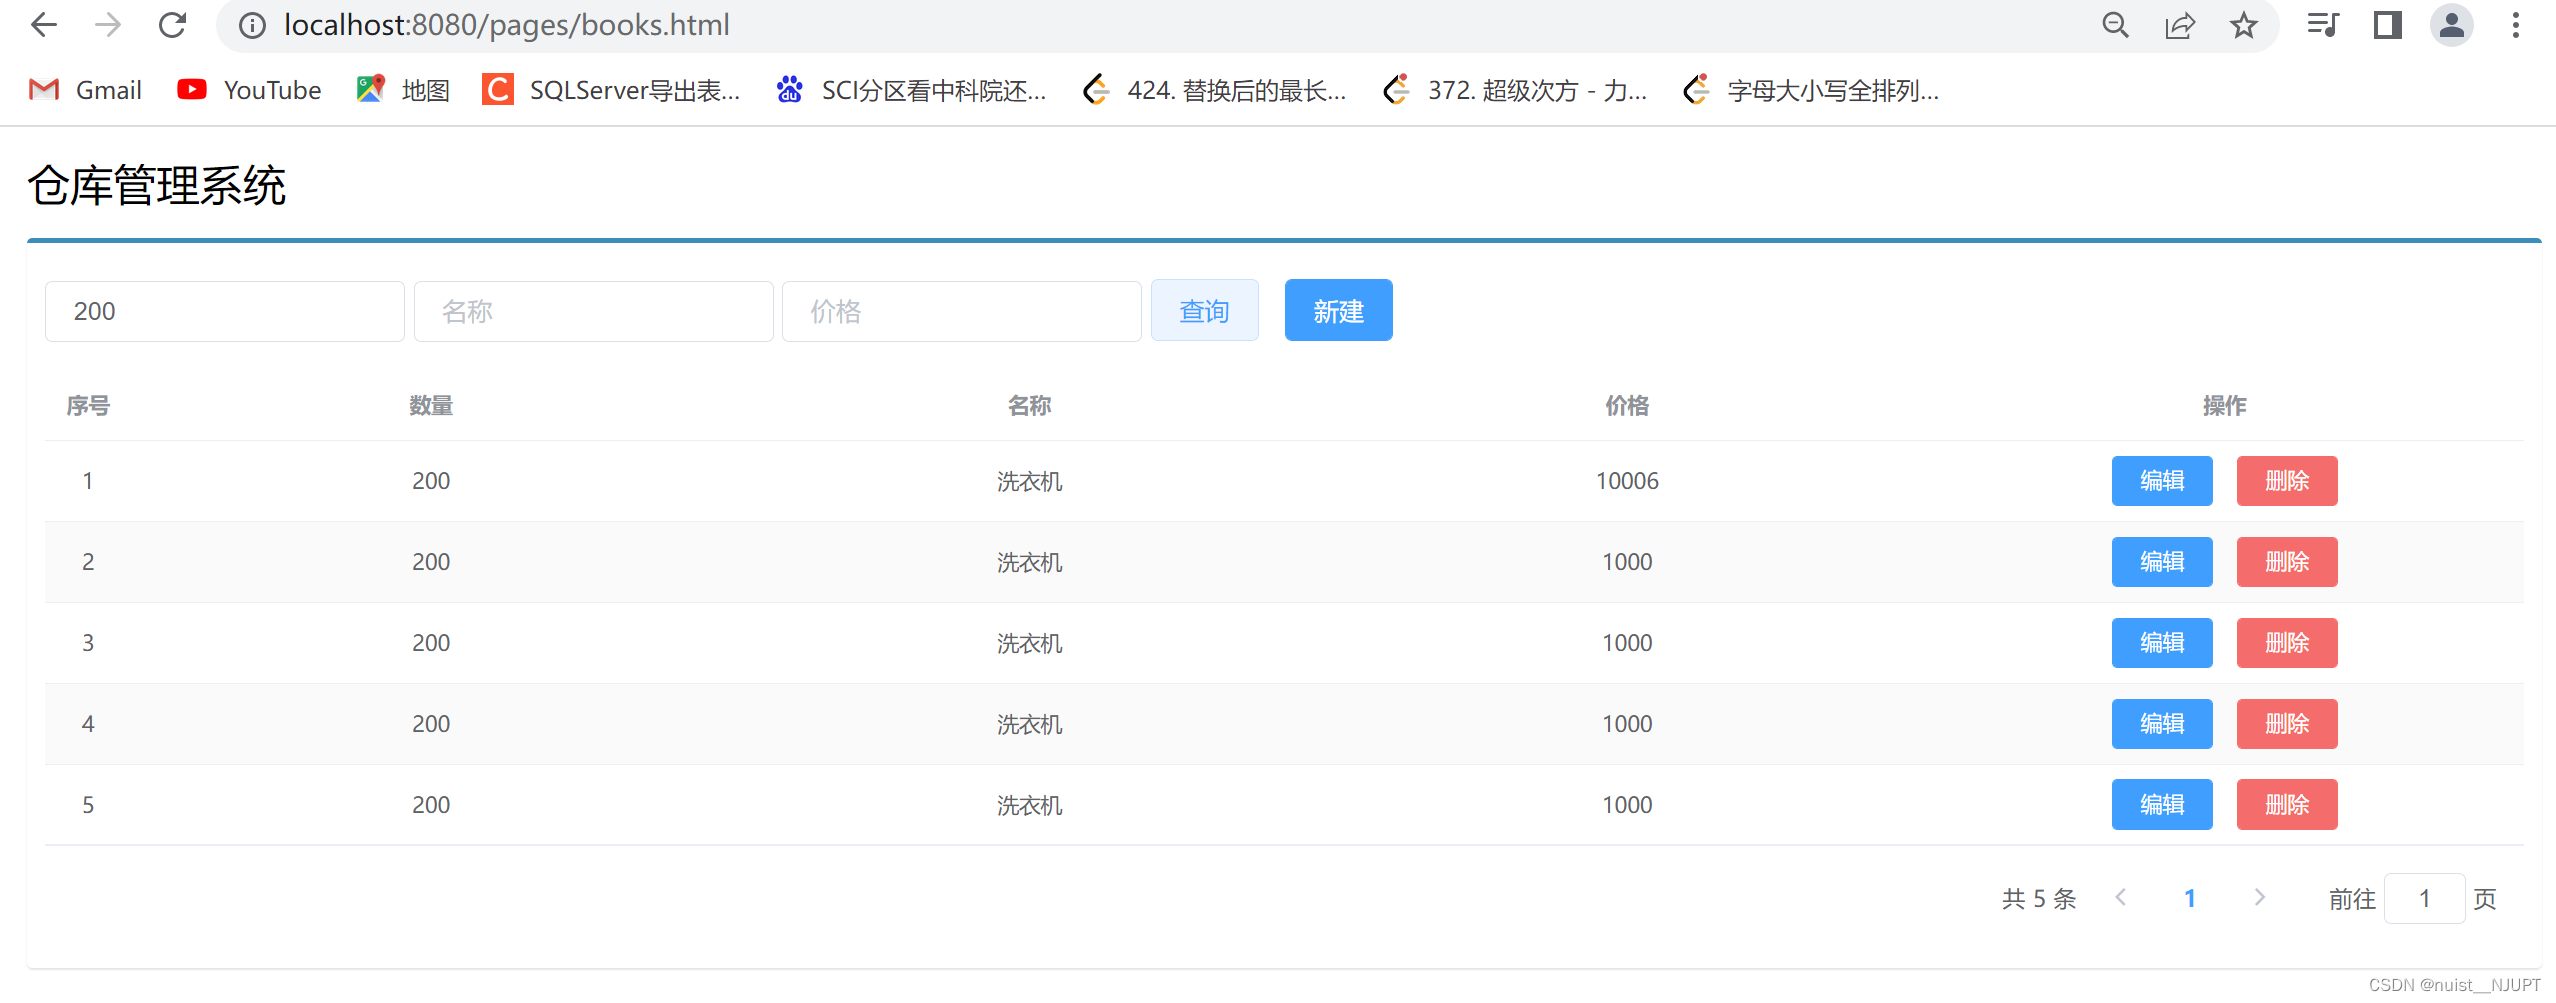
按名称查询如下:

按价格查询如下:

修改功能如下:

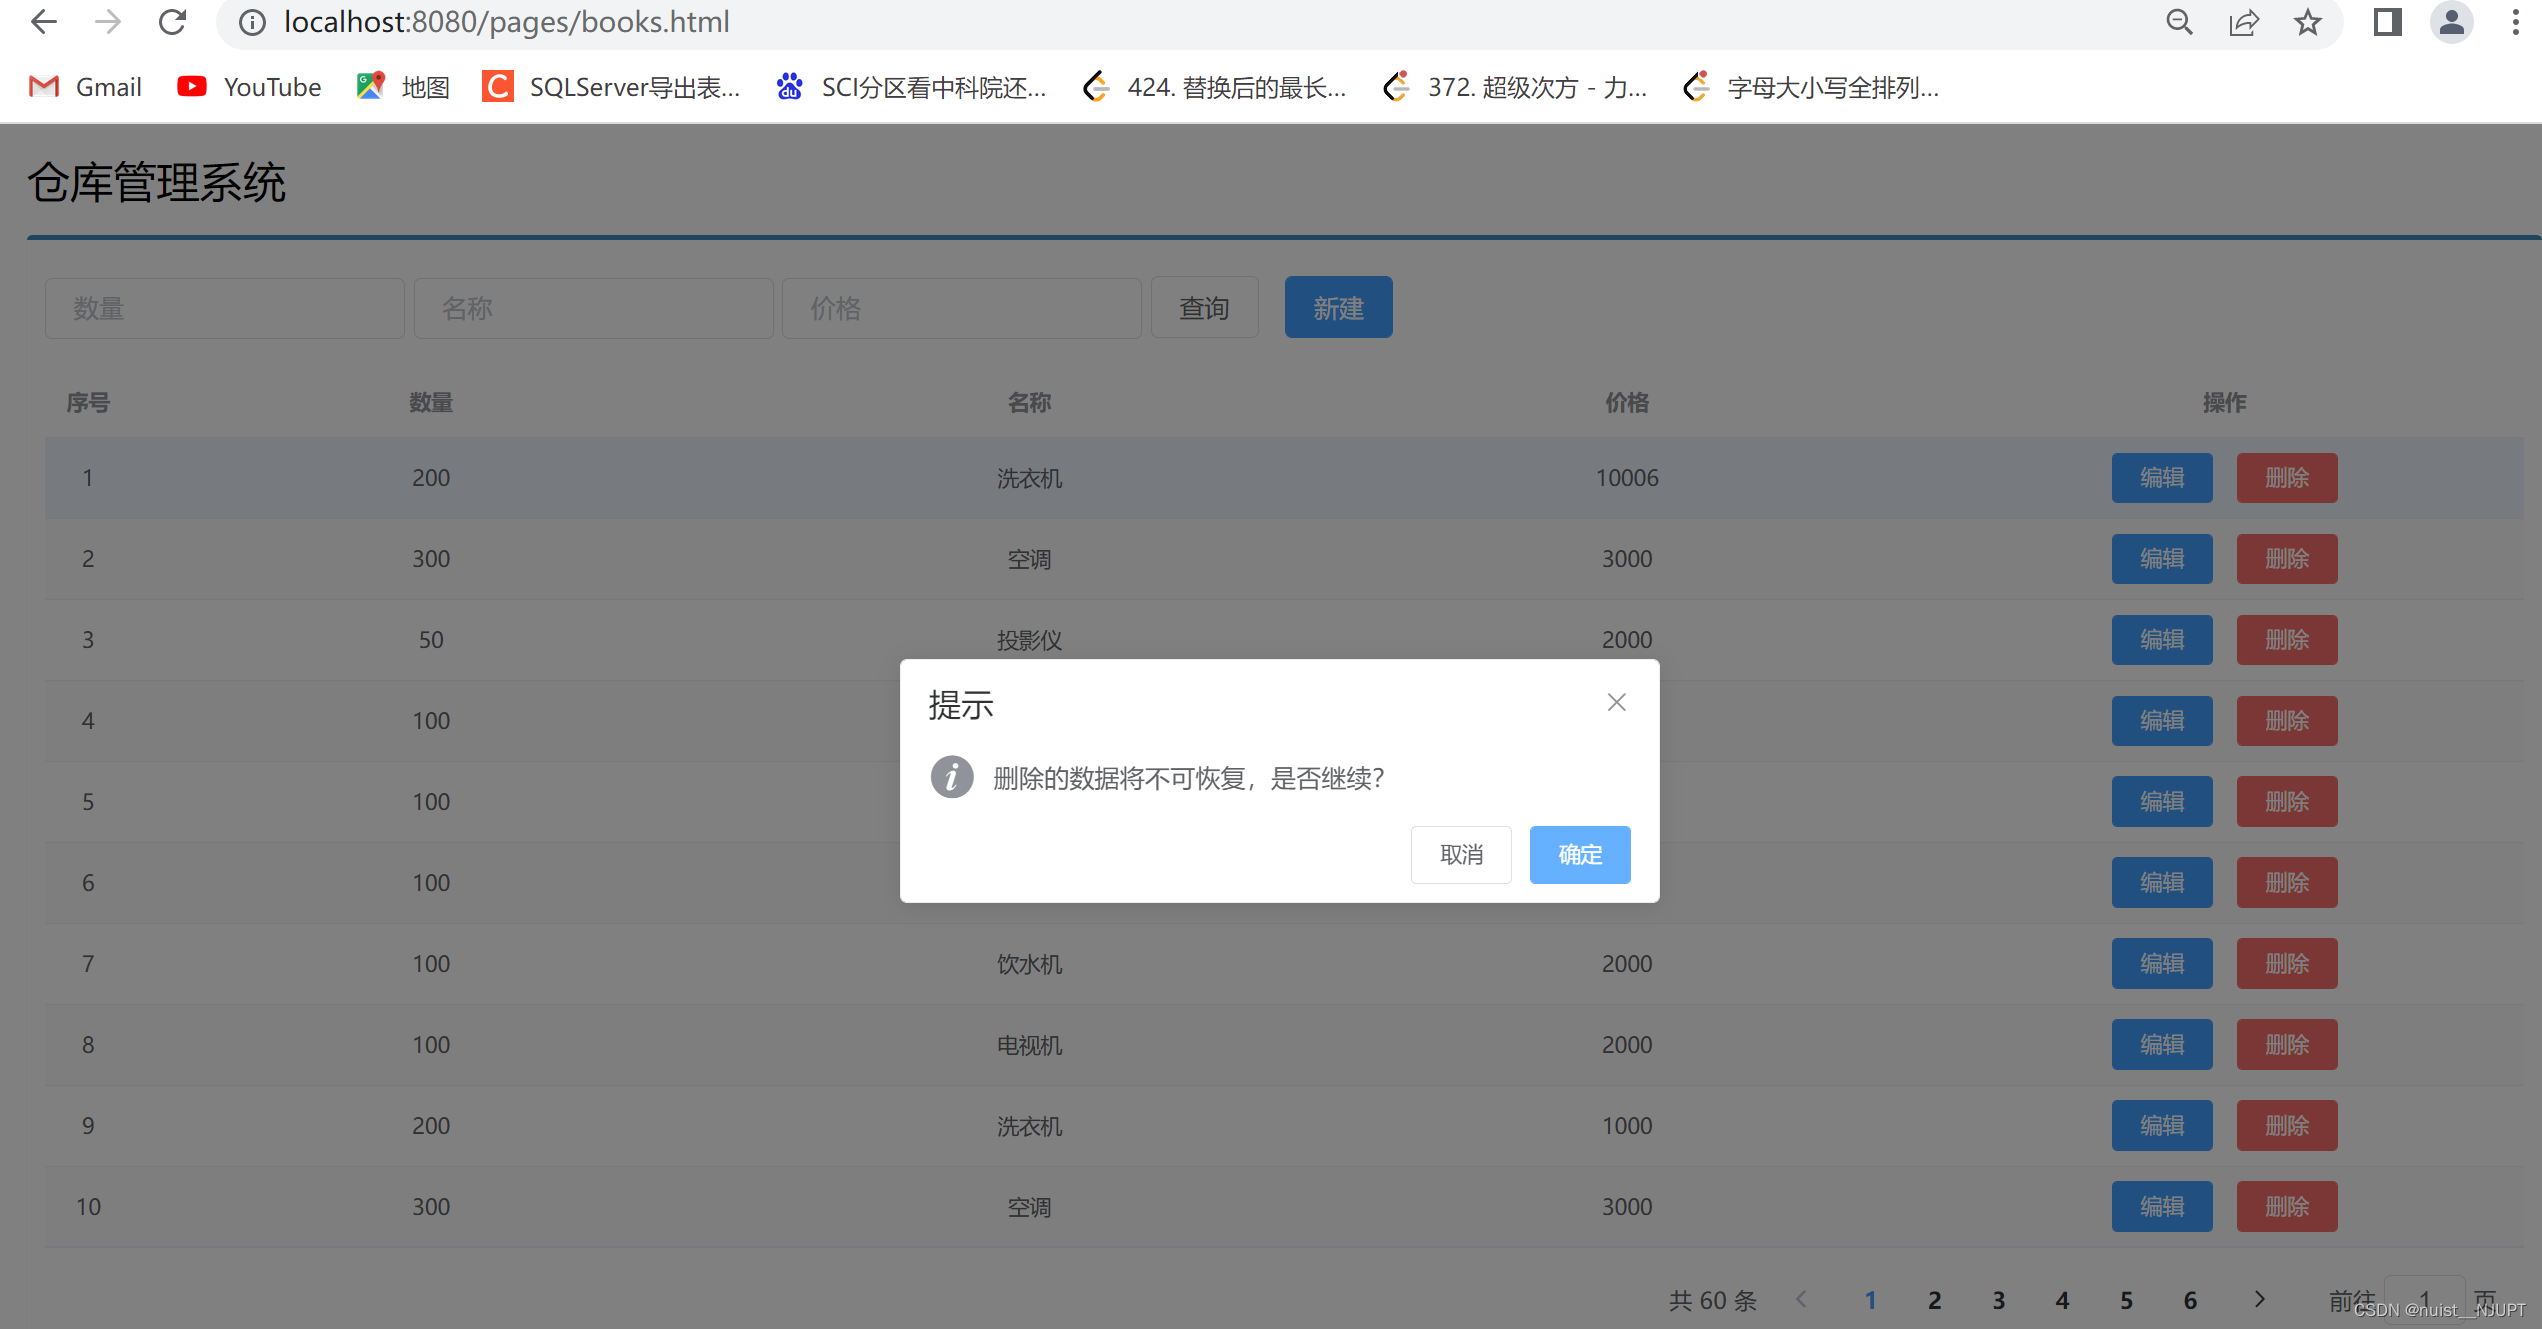
删除功能如下:
添加功能如下:

最后的总结如下: