1.概述
MyBatis-Plus (opens new window)(简称 MP)是一个 MyBatis (opens new window)的增强工具,在 MyBatis 的基础上只做增强不做改变,为简化开发、提高效率而生。--单表操作的都不需要自己在写sql语句。--
愿景
我们的愿景是成为 MyBatis 最好的搭档,就像 魂斗罗 中的 1P、2P,基友搭配,效率翻倍。
2.特点
-
无侵入:只做增强不做改变,引入它不会对现有工程产生影响,如丝般顺滑
-
损耗小:启动即会自动注入基本 CURD,性能基本无损耗,直接面向对象操作
-
强大的 CRUD 操作:内置通用 Mapper、通用 Service,仅仅通过少量配置即可实现-单表大部分 CRUD 操作,更有强大的条件构造器[条件封装成一个条件类],满足各类使用需求
-
支持 Lambda 形式调用:通过 Lambda 表达式,方便的编写各类查询条件,无需再担心字段写错
-
支持主键自动生成:支持多达 4 种主键策略(内含分布式唯一 ID 生成器 - Sequence),可自由配置,完美解决主键问题
-
支持 ActiveRecord 模式:支持 ActiveRecord 形式调用,实体类只需继承 Model 类即可进行强大的 CRUD 操作
-
支持自定义全局通用操作:支持全局通用方法注入( Write once, use anywhere )
-
内置代码生成器:采用代码或者 Maven 插件可快速生成 Mapper 、 Model 、 Service 、 Controller 层代码,支持模板引擎,更有超多自定义配置等您来使用
-
内置分页插件:基于 MyBatis 物理分页,开发者无需关心具体操作,配置好插件之后,写分页等同于普通 List 查询。
-
分页插件支持多种数据库:支持 MySQL、MariaDB、Oracle、DB2、H2、HSQL、SQLite、Postgre、SQLServer 等多种数据库.
-
内置性能分析插件:可输出 SQL 语句以及其执行时间,建议开发测试时启用该功能,能快速揪出慢查询
-
内置全局拦截插件:提供全表 delete 、 update 操作智能分析阻断,也可自定义拦截规则,预防误操作.
3.快速使用
快速开始 | MyBatis-Plus (baomidou.com) https://baomidou.com/pages/226c21/(1)创建数据库和表
DROP TABLE IF EXISTS user;

CREATE TABLE user
(
    id BIGINT(20) NOT NULL COMMENT '主键ID',
    name VARCHAR(30) NULL DEFAULT NULL COMMENT '姓名',
    age INT(11) NULL DEFAULT NULL COMMENT '年龄',
    email VARCHAR(50) NULL DEFAULT NULL COMMENT '邮箱',
    PRIMARY KEY (id)
);
DELETE FROM user;

INSERT INTO user (id, name, age, email) VALUES
(1, 'Jone', 18, 'test1@baomidou.com'),
(2, 'Jack', 20, 'test2@baomidou.com'),
(3, 'Tom', 28, 'test3@baomidou.com'),
(4, 'Sandy', 21, 'test4@baomidou.com'),
(5, 'Billie', 24, 'test5@baomidou.com');
(2)添加依赖
  <!--mp的依赖-->
        <dependency>
            <groupId>com.baomidou</groupId>
            <artifactId>mybatis-plus-boot-starter</artifactId>
            <version>3.5.1</version>
        </dependency>
(3)创建实体类
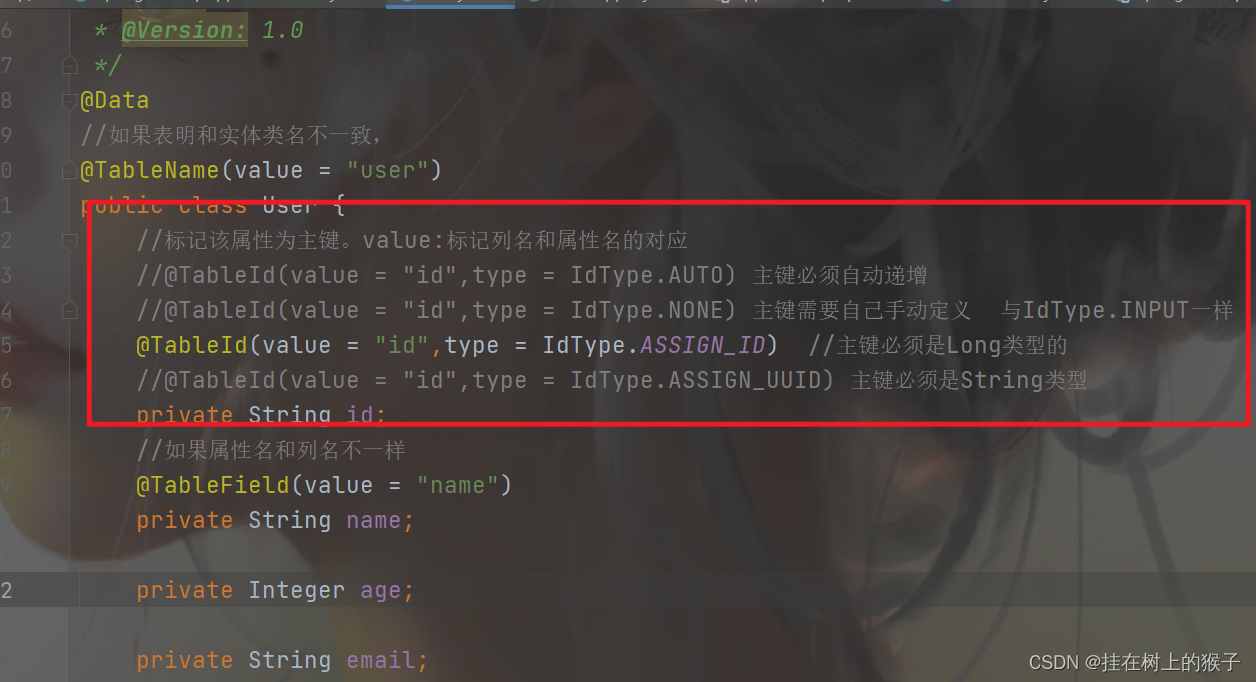
package com.wzh.entity;

import com.baomidou.mybatisplus.annotation.TableField;
import com.baomidou.mybatisplus.annotation.TableId;
import com.baomidou.mybatisplus.annotation.TableName;
import lombok.Data;

/**
 * @ProjectName: springboot-mp
 * @Package: com.wzh.entity
 * @ClassName: User
 * @Author: 王振华
 * @Description:
 * @Date: 2022/7/25 19:22
 * @Version: 1.0
 */
@Data
//如果表明和实体类名不一致,
@TableName(value = "user")
public class User {
    //标记该属性为主键。value:标记列名和属性名的对应
    @TableId(value = "id")
    private Integer id;
    //如果属性名和列名不一样
    @TableField(value = "name")
    private String name;

    private Integer age;

    private String email;
}
(4)mapper操作层
package com.wzh.mapper;

import com.baomidou.mybatisplus.core.mapper.BaseMapper;
import com.wzh.entity.User;

//BaseMapper接口中提供了单表的所有操作,连表不行,需要自己实现
// @Mapper
public interface UserMapper extends BaseMapper<User> {
}
(5)测试
package com.wzh;

import com.wzh.entity.User;
import com.wzh.mapper.UserMapper;
import org.junit.jupiter.api.Test;
import org.springframework.beans.factory.annotation.Autowired;
import org.springframework.boot.test.context.SpringBootTest;

@SpringBootTest
class SpringbootMpApplicationTests {
    @Autowired
    private UserMapper userMapper;
    @Test
    void contextLoads() {
        User user = userMapper.selectById(2);
        System.out.println(user);
    }
}
1.mybatis-plus不需要引入数据源jdbc jar包,因为它默认集成了jdbc

2.mybatis-plus不需要配置映射路径,因为有默认配置

3.逻辑列可以在application.properties自定义配置,有默认配置 0表示未删除 1表示删除
# 配置日志
mybatis-plus.configuration.log-impl=org.apache.ibatis.logging.stdout.StdOutImpl

# 配置逻辑删除
mybatis-plus.global-config.db-config.logic-delete-value=1
mybatis-plus.global-config.db-config.logic-not-delete-value=0
4.mp-增加
主键mp提供相应的生成策略:
AUTO(0),递增策略,如果使用该策略必须要求数据表的列也是递增。
NONE(1),没有策略,必须人为的输入id值
INPUT(2),没有策略,必须人为的输入id值
ASSIGN_ID(3), 随机生成一个Long类型的值。该值一定是唯一。而且每次生成都不会相同。算法:雪花算法。 适合分布式主键。
ASSIGN_UUID(4); 随机产生一个String类型的值。该值也是唯一的。
@Test
    public void testInsert(){
        User user = new User();
        user.setName("李四");
        user.setAge(22);
        user.setEmail("12051256@qq.com");
        System.out.println("添加前:==="+user);
        int row = userMapper.insert(user);
        System.out.println("添加后:==="+user);

    }
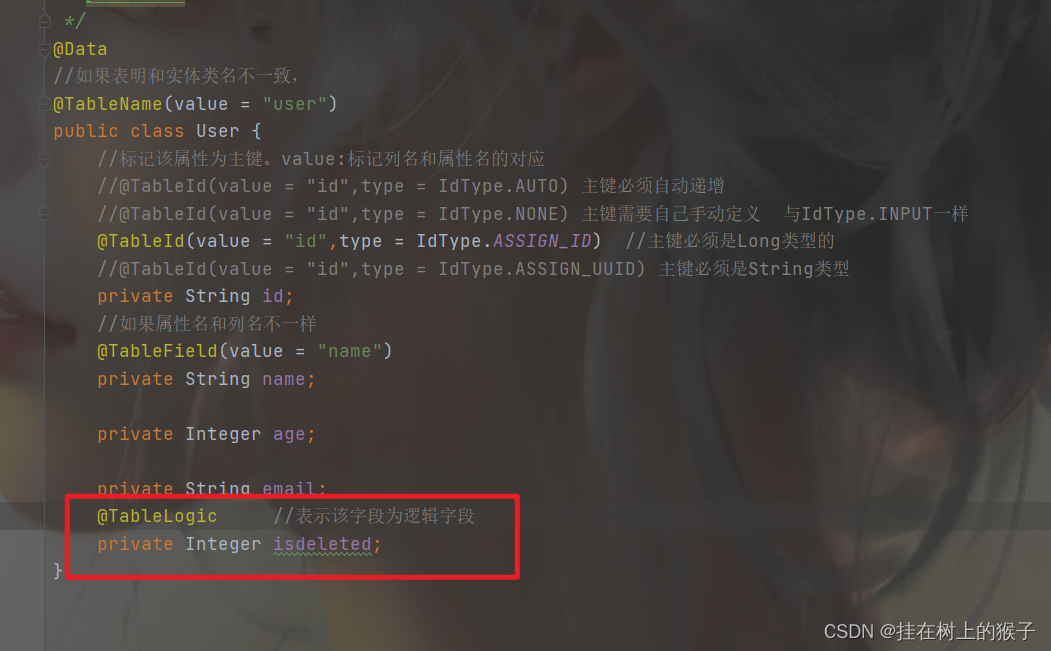
5.mp-删除
* 实际开发中: 我们的删除可能是逻辑删除。所谓的逻辑删除就是修改功能。把某个列修改以删除的状态值。
* 只对自动注入的 sql 起效:
* 插入: 不作限制---
* 查找: 追加 where 条件过滤掉已删除数据,且使用 wrapper.entity 生成的 where 条件会忽略该字段
* 更新: 追加 where 条件防止更新到已删除数据,且使用 wrapper.entity 生成的 where 条件会忽略该字段
* 删除: 转变为 更新
* (1)增加一个逻辑字段: isdeleted 0表示未删除 1表示删除.
* (2)实体类上的字段isdeleted上添加 @TableLogic.
(1)添加列

(2)实体类添加属性并添加注解@TableLogic
(3)测试
 @Test
    public void testDelete(){
        //根据主键删除
        int i = userMapper.deleteById(1);
        System.out.println(i);
    }
6.mp-修改
* 自动填充功能:
* 在阿里规则中我们的每一张表必须具备的三个字段 id,create_time,update_time.
* 这两个字段要不要自己添加。
*
* (1)在需要自动填充属性上@TableField(fill=”“)
* (2)创建mp自动填充类
(1)user表添加列gmt_created,gmt_updated

(2)user实体类添加属性

(3)自定义实现类 MyMetaObjectHandler
package com.wzh.config;

import com.baomidou.mybatisplus.core.handlers.MetaObjectHandler;
import lombok.extern.slf4j.Slf4j;
import org.apache.ibatis.reflection.MetaObject;
import org.springframework.stereotype.Component;

import java.time.LocalDateTime;

@Slf4j
@Component
public class MyMetaObjectHandler implements MetaObjectHandler {
    //当添加时自动填充的值
    @Override
    public void insertFill(MetaObject metaObject) {
        log.info("start insert fill ....");
        //this.strictInsertFill(metaObject, "createTime", LocalDateTime.class, LocalDateTime.now()); // 起始版本 3.3.0(推荐使用)
        //  切记这里是表的列名  不是实体类的属性名
        this.strictInsertFill(metaObject, "gmtCreated", () -> LocalDateTime.now(), LocalDateTime.class); // 起始版本 3.3.3(推荐)
        this.strictInsertFill(metaObject, "isdeleted", () -> 0, Integer.class);
        // 或者
        //this.fillStrategy(metaObject, "createTime", LocalDateTime.now()); // 也可以使用(3.3.0 该方法有bug)
    }
    //当修改时自动填充的值
    @Override
    public void updateFill(MetaObject metaObject) {
        log.info("start update fill ....");
        //this.strictUpdateFill(metaObject, "updateTime", LocalDateTime.class, LocalDateTime.now()); // 起始版本 3.3.0(推荐)
        // 或者
        this.strictUpdateFill(metaObject, "gmtUpdated", () -> LocalDateTime.now(), LocalDateTime.class); // 起始版本 3.3.3(推荐)
        // 或者
        //this.fillStrategy(metaObject, "updateTime", LocalDateTime.now()); // 也可以使用(3.3.0 该方法有bug)
    }
}
列名如果是 如is_deleted格式的,这里会自动转换驼峰命名isDeleted,所以这里用驼峰命名
(4)测试
 @Test
    public void testUpdate(){
        User user = new User();
        user.setId(2L);
        user.setName("张学友");
        //根据主键进行修改
        int i = userMapper.updateById(user);
        System.out.println(i);
    }
7.mp-查询
7.1.根据主键查询
@Test
    public void testSelectById(){
        User user = userMapper.selectById(2);
        System.out.println(user);
    }
7.2.根据各种条件查询
Wrapper:封装了关于查询的各种条件方法。
有三个子类最常用: QueryWrapper查询条件 UpdateWrapper修改条件 LambdaQueryWrapper查询使用lambda表达式条件
@Test
    public void testSelectByCondition(){
        QueryWrapper<User> wrapper=new QueryWrapper<>();
        wrapper.between("age", 15, 25); //age在15-25
        wrapper.select("name","age");   //查询name,age这两列
        //wrapper.or();   //默认中间都是and连接
        wrapper.like("name","a");   //name like %a%
        System.out.println(userMapper.selectList(wrapper));
    }
7.3.根据条件查询一条记录
@Test
    public void testSelectOne(){
        QueryWrapper<User> wrapper = new QueryWrapper<>();
        wrapper.eq("name","李四");
        wrapper.gt("age",15);   //age大于15
        wrapper.lt("age",30);   //age小于30
        //wrapper.ge("age",20);   age大于等于20
        //wrapper.le("age",30);   age小于等于30
        //String sqlSelect = wrapper.getSqlSelect();  //要查询的字段列
        User user = userMapper.selectOne(wrapper);
        System.out.println(user);
    }
7.4 分页查询
(1)添加分页拦截器
package com.wzh.config;

import com.baomidou.mybatisplus.annotation.DbType;
import com.baomidou.mybatisplus.autoconfigure.ConfigurationCustomizer;
import com.baomidou.mybatisplus.extension.plugins.MybatisPlusInterceptor;
import com.baomidou.mybatisplus.extension.plugins.inner.PaginationInnerInterceptor;
import org.mybatis.spring.annotation.MapperScan;
import org.springframework.context.annotation.Bean;
import org.springframework.context.annotation.Configuration;

@Configuration
public class MybatisPlusConfig {

    /**
     * 新的分页插件,一缓和二缓遵循mybatis的规则,需要设置 MybatisConfiguration#useDeprecatedExecutor = false 避免缓存出现问题(该属性会在旧插件移除后一同移除)
     */
    @Bean
    public MybatisPlusInterceptor mybatisPlusInterceptor() {
        MybatisPlusInterceptor interceptor = new MybatisPlusInterceptor();
        interceptor.addInnerInterceptor(new PaginationInnerInterceptor(DbType.MYSQL));  //数据库类型
        return interceptor;
    }

}
(2)调用分页方法
@Test
    public void testPage(){
        //P page, 分页对象  Page
        // @Param("ew") Wrapper<T> queryWrapper
        IPage<User> page = new Page<>(1,5);
        QueryWrapper<User> wrapper = new QueryWrapper<>();
        wrapper.eq("age",22);
        IPage<User> page1 = userMapper.selectPage(page, wrapper);//把查询的结果自动封装到Page对象中
        System.out.println("总页码:"+page.getPages());
        System.out.println("总条数:"+page.getTotal());
        System.out.println("当前页记录:"+page.getRecords());

    }
7.5 联表查询也使用mp的分页
(1)实体类添加对象属性并添加注解@TableField(exist = false),并在user表中添加连表列did


(2)创建实体类Dept
@Data
@TableName(value = "tb_dept")
public class Dept {
    @TableId
    private Integer id;

    private String name;

    private String imgUrl;
}
(3)UserMapper写连表方法(根据单表查询的分页方法模仿写)
package com.wzh.mapper;

import com.baomidou.mybatisplus.core.conditions.Wrapper;
import com.baomidou.mybatisplus.core.mapper.BaseMapper;
import com.baomidou.mybatisplus.core.metadata.IPage;
import com.wzh.entity.User;
import org.apache.ibatis.annotations.Param;

/**
 * @ProjectName: springboot-mp
 * @Package: com.wzh.mapper
 * @ClassName: UserMapper
 * @Author: 王振华
 * @Description:
 * @Date: 2022/7/25 20:43
 * @Version: 1.0
 */
//BaseMapper接口中提供了单表的所有操作,连表不行,需要自己实现
// @Mapper
public interface UserMapper extends BaseMapper<User> {
    //连表查询
    IPage<User> selectUserWithDept(IPage<User> page, @Param("ew") Wrapper<User> wrapper);
}
(4)UserMapper.xml
<?xml version="1.0" encoding="UTF-8"?>
<!DOCTYPE mapper PUBLIC "-//mybatis.org//DTD Mapper 3.0//EN" "http://mybatis.org/dtd/mybatis-3-mapper.dtd">
<mapper namespace="com.wzh.mapper.UserMapper">
    <resultMap id="baseMaper" type="com.wzh.entity.User" autoMapping="true">
        <id property="id" column="uid"/>
        <result property="name" column="uname"/>
        <association property="dept" javaType="com.wzh.entity.Dept" autoMapping="true">
            <id column="did" property="id"/>
            <result column="dname" property="name"/>
        </association>
    </resultMap>
    <sql id="selectCondition">
        u.id uid,u.name uname,age,email,d.id did,d.name dname,imgUrl
    </sql>
    <select id="selectUserWithDept" resultMap="baseMaper">
        select <include refid="selectCondition"/> from user u join tb_dept d on u.did=d.id where u.isdeleted = 0
        <if test="ew!=null">
            and ${ew.sqlSegment}
        </if>
    </select>
</mapper>
(5)测试
@Test
    public void testPage() {
        //P page, 分页对象  Page
        // @Param("ew") Wrapper<T> queryWrapper
        IPage<User> page = new Page<>(1, 5);
        QueryWrapper<User> wrapper = new QueryWrapper<>();
        wrapper.eq("age", 22);
        IPage<User> page1 = userMapper.selectPage(page, wrapper);//把查询的结果自动封装到Page对象中
        System.out.println("总页码:" + page.getPages());
        System.out.println("总条数:" + page.getTotal());
        System.out.println("当前页记录:" + page.getRecords());
    }
${ew.sqlSegment}必须用${},不能用#{}
8. mp的代码生成器
8.1.旧版本
(1)引入依赖
        <dependency>
            <groupId>com.baomidou</groupId>
            <artifactId>mybatis-plus-generator</artifactId>
            <version>3.4.1</version>
        </dependency>
        <dependency>
            <groupId>org.apache.velocity</groupId>
            <artifactId>velocity-engine-core</artifactId>
            <version>2.3</version>
        </dependency>

        <dependency>
            <groupId>org.freemarker</groupId>
            <artifactId>freemarker</artifactId>
            <version>2.3.30</version>
        </dependency>
(2)创建类并配置代码生成器
import com.baomidou.mybatisplus.core.exceptions.MybatisPlusException;
import com.baomidou.mybatisplus.core.toolkit.StringPool;
import com.baomidou.mybatisplus.generator.AutoGenerator;
import com.baomidou.mybatisplus.generator.InjectionConfig;
import com.baomidou.mybatisplus.generator.config.*;
import com.baomidou.mybatisplus.generator.config.po.TableInfo;
import com.baomidou.mybatisplus.generator.config.rules.NamingStrategy;
import com.baomidou.mybatisplus.generator.engine.FreemarkerTemplateEngine;

import java.util.ArrayList;
import java.util.List;

// 演示例子,执行 main 方法控制台输入模块表名回车自动生成对应项目目录中
public class CodeGenerator {

    public static void main(String[] args) {
        // 代码生成器
        AutoGenerator mpg = new AutoGenerator();

        // 全局配置
        GlobalConfig gc = new GlobalConfig();
        String projectPath = System.getProperty("user.dir");
        gc.setOutputDir(projectPath + "/src/main/java");
        gc.setAuthor("wzh");
        gc.setOpen(false);
        gc.setSwagger2(true); //实体属性 Swagger2 注解
        mpg.setGlobalConfig(gc);

        // 数据源配置
        DataSourceConfig dsc = new DataSourceConfig();
        dsc.setUrl("jdbc:mysql://localhost:3306/mycc?serverTimezone=Asia/Shanghai");
        // dsc.setSchemaName("public");
        dsc.setDriverName("com.mysql.cj.jdbc.Driver");
        dsc.setUsername("root");
        dsc.setPassword("123456");
        mpg.setDataSource(dsc);

        // 包配置
        PackageConfig pc = new PackageConfig();
        pc.setModuleName(("system"));
        pc.setParent("com.wzh");
        mpg.setPackageInfo(pc);

        // 自定义配置
        InjectionConfig cfg = new InjectionConfig() {
            @Override
            public void initMap() {
                // to do nothing
            }
        };

        // 如果模板引擎是 freemarker
        String templatePath = "/templates/mapper.xml.ftl";
        // 如果模板引擎是 velocity
        // String templatePath = "/templates/mapper.xml.vm";

        // 自定义输出配置
        List<FileOutConfig> focList = new ArrayList<>();
        // 自定义配置会被优先输出
        focList.add(new FileOutConfig(templatePath) {
            @Override
            public String outputFile(TableInfo tableInfo) {
                // 自定义输出文件名 , 如果你 Entity 设置了前后缀、此处注意 xml 的名称会跟着发生变化!!
                return projectPath + "/src/main/resources/mapper/" + pc.getModuleName()
                        + "/" + tableInfo.getEntityName() + "Mapper" + StringPool.DOT_XML;
            }
        });
        /*
        cfg.setFileCreate(new IFileCreate() {
            @Override
            public boolean isCreate(ConfigBuilder configBuilder, FileType fileType, String filePath) {
                // 判断自定义文件夹是否需要创建
                checkDir("调用默认方法创建的目录,自定义目录用");
                if (fileType == FileType.MAPPER) {
                    // 已经生成 mapper 文件判断存在,不想重新生成返回 false
                    return !new File(filePath).exists();
                }
                // 允许生成模板文件
                return true;
            }
        });
        */
        cfg.setFileOutConfigList(focList);
        mpg.setCfg(cfg);

        // 配置模板
        TemplateConfig templateConfig = new TemplateConfig();

        // 配置自定义输出模板
        //指定自定义模板路径,注意不要带上.ftl/.vm, 会根据使用的模板引擎自动识别
        // templateConfig.setEntity("templates/entity2.java");
        // templateConfig.setService();
        // templateConfig.setController();

        templateConfig.setXml(null);
        mpg.setTemplate(templateConfig);

        // 策略配置
        StrategyConfig strategy = new StrategyConfig();
        strategy.setNaming(NamingStrategy.underline_to_camel);
        strategy.setColumnNaming(NamingStrategy.underline_to_camel);
        strategy.setEntityLombokModel(true);
        strategy.setRestControllerStyle(true);
        // 公共父类
        // 写于父类中的公共字段
        strategy.setTablePrefix("tb_");
        strategy.setControllerMappingHyphenStyle(true);
        mpg.setStrategy(strategy);
        mpg.setTemplateEngine(new FreemarkerTemplateEngine());
        mpg.execute();
    }

}
8.2.新版本
仅适用 3.5.1 以上版本,对历史版本的不兼容
(1)添加依赖
        <dependency>
            <groupId>com.baomidou</groupId>
            <artifactId>mybatis-plus-generator</artifactId>
            <version>3.5.2</version>
        </dependency>
        <dependency>
            <groupId>org.freemarker</groupId>
            <artifactId>freemarker</artifactId>
            <version>2.3.31</version>
        </dependency>
(2)创建类并配置代码生成器
package com.wzh;

import com.baomidou.mybatisplus.generator.FastAutoGenerator;
import com.baomidou.mybatisplus.generator.config.OutputFile;
import com.baomidou.mybatisplus.generator.engine.FreemarkerTemplateEngine;

import java.util.Collections;

/**
 * @ProjectName: springboot-mp
 * @Package: com.wzh
 * @ClassName: CodeGeneratorNew
 * @Author: 王振华
 * @Description:
 * @Date: 2022/7/26 12:28
 * @Version: 1.0
 */
public class CodeGeneratorNew {
    public static void main(String[] args) {
        FastAutoGenerator.create("jdbc:mysql://localhost:3306/mycc?serverTimezone=Asia/Shanghai", "root", "123456")
                .globalConfig(builder -> {
                    builder.author("王振华") // 设置作者
                            .enableSwagger() // 开启 swagger 模式
                            .fileOverride() // 覆盖已生成文件
                            .outputDir(".\\src\\main\\java\\"); // 指定输出目录
                })
                .packageConfig(builder -> {
                    builder.parent("com.wzh") // 设置父包名
                            .moduleName("system2") // 设置父包模块名
                            .pathInfo(Collections.singletonMap(OutputFile.xml, ".\\src\\main\\resources\\mapper")); // 设置mapperXml生成路径
                })
                .strategyConfig(builder -> {
                    builder.addInclude("user") // 设置需要生成的表名
                            .addTablePrefix("t_", "c_"); // 设置过滤表前缀
                })
                .templateEngine(new FreemarkerTemplateEngine()) // 使用Freemarker引擎模板,默认的是Velocity引擎模板
                .execute();
    }
}
MyBatis-Plus——代码自动生成器_一心同学的博客-CSDN博客_mybatisplus代码生成器https://blog.csdn.net/Huang_ZX_259/article/details/122540801
本文内容由网友自发贡献,版权归原作者所有,本站不承担相应法律责任。如您发现有涉嫌抄袭侵权的内容,请联系:hwhale#tublm.com(使用前将#替换为@)