预备工作
#开启防火墙端口
sudo ufw allow 3389
#安装ssh
sudo apt-get install openssh-server
一、windows直连Ubuntu16.04共享桌面
1、打开终端,安装xrdp,vncserver
sudo apt-get install xrdp vnc4server xbase-clients
2、安装desktop sharing(Ubuntu16.04默认已经安装),可以到应用商店下载。打开desktop sharing,设置如下

3、 安装安装dconf-editor,取消权限限制
sudo apt-get install dconf-editor
dconf-editor设置:org > gnome > desktop > remote-access,取消 “requlre-encryption”
4、 windows 远程登陆
cmd
mstsc
选择vnc-any
输入Ubuntu IP地址
端口 5900
桌面共享设定的密码
xrdp支持xfce4和mate桌面,不支持gnome和ubuntu桌面
准备工作:
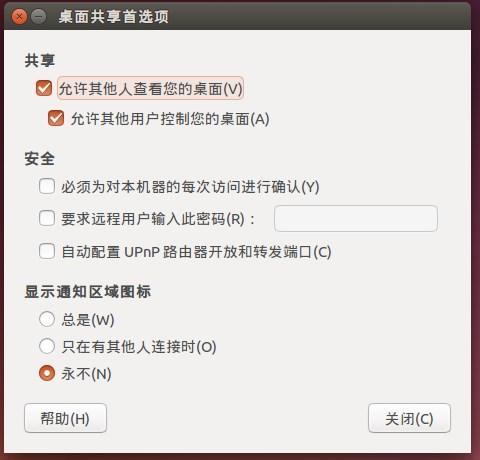
在**/usr/share/applications**目录下打开“桌面共享”选项,桌面共享选项中首先要开启共享,关于是否允许其他用户控制,远程连接时是否需要本机确认,远程连接的密码等项目根据需要自己设定。如果需要从公网即外部网络访问此ubuntu计算机需要开启”自动配置UPnP路由器开放和转发端口项目”。一般建议如下图(可以按自己的要求设置):
很多情况下 xrdp 支持不了gnome,解决办法就是装个xface 界面。
××××××××××××××××××××××××××××
xrdp的配置文档在/etc/xrdp目录下的xrdp.ini和sesman.ini
xrdp.ini 关键部分在globals
[globals]
bitmap_cache=yes       #位图缓存
bitmap_compression=yes #位图压缩
port=3389              #监听端口
crypt_level=low        #加密程度(low为40位,high为128位,medium为双40位)
channel_code=1         #不知道是什么
max_bpp=24 XRDP最大连接数
[xrdp1]
name=sesman-Xvnc XRDP的连接模式
lib=libvnc.so
username=ask
password=ask
ip=127.0.0.1
port=-1
sesman.ini
[Globals]
ListenAddress=127.0.0.1      #监听ip地址(默认即可)
ListenPort=3350              #监听端口(默认即可)
EnableUserWindowManager=1    #1为开启,可让用户自定义自己的启动脚本
UserWindowManager=startwm.sh
DefaultWindowManager=startwm.sh

[Security]
AllowRootLogin=1              #允许root登陆
MaxLoginRetry=4               #最大重试次数
TerminalServerUsers=tSUSErs   #允许连接的用户组(如果不存在则默认全部用户允许连接)
TerminalServerAdmins=tsadmins #允许连接的超级用户(如果不存在则默认全部用户允许连接)

[Sessions]
MaxSessions=10           #最大会话数

KillDisconnected=0       #是否立即关闭断开的连接(如果为1,则断开连接后会自动注销)
IdleTimeLimit=0          #空闲会话时间限制(0为没有限制)
DisconnectedTimeLimit=0  #断开连接的存活时间(0为没有限制)

[Logging]
LogFile=./sesman.log     #登陆日志文件
LogLevel=DEBUG           #登陆日志记录等级(级别分别为,core,error,warn,info,debug)
EnableSyslog=0           #是否开启日志
SyslogLevel=DEBUG        #系统日志记录等级
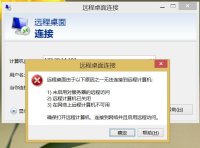
运行一段时间后,出现xrdp_mm_process_login_response: login failed
问题原因:远程桌面没有正确关闭,虽然在windows 系统关闭远程桌面连接,但是在里linux上的进程还在运行,导致连接数量达到上限,出现问题。
解决:通过设置sesman.in文件内的参数,解决。
Set session limits to avoid login failed error
[Sessions]
X11DisplayOffset=10
MaxSessions=100 #将最大会话限制改大
KillDisconnected=0
IdleTimeLimit=0
DisconnectedTimeLimit=0
将KillDisconnected=1;则每次断开连接时,linux都会关闭会话进程。不建议修改KillDisconnected,否则会自动关闭回话进程。最后重启xrdp即可。
#重启xrdp
sudo /etc/init.d/xrdp restart
或者
sudo service xrdp restart
××××××××××××××××××××××××××××
二、ubuntu16.04搭建xrdp远程xface桌面链接,xface桌面太难看且不好使用
1. 安装 XRDP及 vncserver
 sudo apt-get install tightvncserver xrdp
 sudo apt-get install vnc4server tightvncserver
** 2. 安装 Xfce桌面环境**
sudo apt-get install xubuntu-desktop
** 3. 设置 xRDP**
 cd /home/youruser(youruser 是每个人自己的用户名)
 echo “xfce4-session” >~/.xsession
** 4. 设置配置文件**
#重启xrdp
sudo /etc/init.d/xrdp restart
或者
sudo service xrdp restart
此方法不需要额外修改配置文件
$ : sudo gedit ~/.vnc/xstartup
三、ubuntu16.04搭建xrdp远程mate桌面链接
安装mate桌面
sudo apt-get install mate-core mate-desktop-environment mate-notification-daemon
安装tightvncserver
sudo apt-get install tightvncserver
安装xrdp
sudo apt-get install xrdp
配置xrdp
echo mate-session >~/.xsession
gedit /etc/xrdp/startwm.sh
#在./etc/X11/Xsession前插入
mate-session
#重启xrdp
sudo /etc/init.d/xrdp restart
或者
sudo service xrdp restart
要注意地方
一定要先装tightvncserver后装xrdp,不能够装vnc4server,已改为tightvncserver.
卸载xrdp和tightvncserver
sudo apt-get purge xrdp
sudo apt-get purge tightvncserver
四、Ubuntu 16.04: Remote connect to Unity with VNC/XRDP
1 Install tigervnc
Running the following script will install tigervnc
#!/bin/sh

# Refresh repository.
sudo apt update -y

# Install git and devscript.
sudo apt install -y git devscript

# Remove vnc4server.
sudo apt remove -y vnc4server

# Create working directory.
mkdir tigervnc
cd tigervnc

# Download source code.
git clone https://github.com/TigerVNC/tigervnc
cd tigervnc/

# Avoid compiler error.
git checkout ff872614b507d0aa8bfbd09ef41550390cfe658a

# Prepare to build package.
ln -s contrib/packages/deb/ubuntu-xenial/debian
chmod a+x debian/rules
sudo apt install -y -o 'apt::install-recommends=true' \
     `dpkg-checkbuilddeps 2>&1 | \
sed -e 's/.*build dependencies://g' -e 's/([^)]*)//g'`

# Build package.
fakeroot debian/rules binary
cd ..

# Install package with resolving dependent package.
sudo dpkg -i *.deb || (sudo apt-get -f install -y ; sudo dpkg -i *.deb || exit 1)
cd ..
2 ${HOME}/.xsession
Create the following .xsession
$ cat ~/.xsession
/usr/lib/gnome-session/gnome-session-binary --session=ubuntu &
/usr/lib/x86_64-linux-gnu/unity/unity-panel-service &
/usr/lib/unity-settings-daemon/unity-settings-daemon &

for indicator in /usr/lib/x86_64-linux-gnu/indicator-*; do
  basename=`basename ${indicator}`
  dirname=`dirname ${indicator}`
  service=${dirname}/${basename}/${basename}-service
  ${service} &
done

unity
3 Add gnome-control-center
With this article’s configuration, selecting “Sytem settings…” at the upper right will call gnome-control-center instead of unity-control-center. Add gnome-control-center which is symbolic link to unity-control-center.
$ sudo ln -s /usr/bin/unity-control-center /usr/bin/gnome-control-center
4 Run VNC server
Create password with vncpasswd
$ vncpasswd
Password:
Verify:
Would you like to enter a view-only password (y/n)? n
Run vncserver. Remote access port is 5900 + display nummber. A port of below example is 5901
$ vncserver

New 'ubuntu-16:1 (hiroom2)' desktop is ubuntu-16:1

Starting applications specified in /home/hiroom2/.vnc/xstartup
Log file is /home/hiroom2/.vnc/ubuntu-16:1.log
5 Run XRDP server
$ sudo apt install -y xrdp
五、Ubuntu 16.04: Remote connect to GNOME Classic Desktop with VNC/XRDP
1 Preparation
Remove vnc4server and tightvncserver.
You can also switch vncserver to tigervncserver with update-alternatives command.
$ sudo apt remove -y vnc4server tightvncserver
Install git and devscripts
$ sudo apt install -y git and devscripts
Install packages for GNOME Classic Desktop
$ sudo apt install -y gnome-panel metacity
2 Install tigervncserver
tigervnc repository already has a devscripts files for Ubuntu 16.04.
I with that tigervnc ported to xenial-update.
Download tigervnc from repository. Checkout with hash which was used by this article.
$ mkdir tigervnc
$ cd tigervnc
$ git clone https://github.com/TigerVNC/tigervnc
$ cd tigervnc/
$ git checkout 044e2b87da7121ef6cbd59e88b101d7d8e282896 -b 044e2b87da7121ef6cbd59e88b101d7d8e282896
Move devscripts files to the top of directory with symbolic link
$ ln -s contrib/packages/deb/ubuntu-xenial/debian
Install packages for building tigervnc.
$ sudo apt install -y $(grep Build-Depends: debian/control | \
sed -e 's/Build-Depends://g' -e 's/([^\)]*)//g' -e 's/,//g')
Build tigervnc.
$ chmod a+x debian/rules
$ fakeroot debian/rules binary
Install deb files while installing depend package with running “apt -f install”.
$ cd ..
$ sudo dpkg -i *.deb || (sudo apt -f install -y; sudo dpkg -i *.deb)
$ cd ..
3 ${HOME}/.xsessionrc
This article will not use .vnc/.xstartup and .xsession, will use .xsessionrc which run program for GNOME Classic Desktop.
$ cat <<EOF > ~/.xsessionrc
gnome-panel &
metacity &
EOF
$ rm ~/.xsession
4 Run VNC server
Create password with vncpasswd
$ vncpasswd
Password:
Verify:
Would you like to enter a view-only password (y/n)? n
Run vncserver. Remote access port is 5900 + display nummber.
A port of below example is 5901.
$ vncserver

New 'ubuntu-16:1 (hiroom2)' desktop is ubuntu-16:1

Starting applications specified in /home/hiroom2/.vnc/xstartup
Log file is /home/hiroom2/.vnc/ubuntu-16:1.log
5 Run XRDP server
Install and run xrdp
$ sudo apt install -y xrdp
$ sudo systemctl enable xrdp
$ sudo systemctl restart xrdp
六、ubuntu中通过remmina远程连接终端软件通过rdp协议连接win7
1. 在win7中开启允许远程访问
2. ubuntu中打开remmina软件,输入win7的ip,username,password就可以连接了
可能出现的问题
  1. 安装 XRDP及 vncserver
  sudo apt-get install tightvncserver xrdp
  sudo apt-get install vnc4server tightvncserver
  2. 安装 Gnome桌面环境
    sudo apt-get install gnome-panel
  3. 设置 xRDP
    cd /home/youruser(youruser 是每个人自己的用户名)
     echo “gnome-session --session=ubuntu-2d" >.xsession
  4. 设置配置文件
      sudo /etc/init.d/xrdp restart
sudo apt-get install tightvncserver xrdp
sudo apt-get install vnc4server tightvncserver
echo “gnome-session --session=gnome-classic” >~/.xsession
sudo /etc/init.d/xrdp restart
配置后,结果会出现背景是灰色的情况,说明xrdp不支持GNOME,建议安装xface界面。
经常会出现 windows无法远程连接的情况,ssh 也是可以的。虽然IP都是正确的,这是因为你没有安装xrdp
打开终端:依次安装
sudo apt-get install tightvncserver xrdp
sudo apt-get install vnc4server tightvncserver
安装完毕以后,执行以下命令(该命令的作用是由于安装了 gnome桌面,ubuntu12.04中同时存在unity、GNOME多个桌面管理器,需要启动的时候指定一个,不然即使远程登录验证成功以后,也只是背景,其他什么也没有)
sudo /etc/init.d/xrdp restart
还有一种可能性是 you have to permit firewall to listen to connections on port 3389 that xrdp is working on. For this execute:
sudo ufw allow 3389
https://askubuntu.com/questions/234856/unable-to-do-remote-desktop-using-xrdp
若出现出现connecting to sesman ip 127.0.0.1 port 3350,而无其他问题显示**,则需要重启服务器**。
connecting to sesman ip 127.0.0.1 port 3350
sesman connect ok
seding login info to session manager, please wait…
xrdp_mm_process_login_response: login successful for display
started connecting
connecting to 127.0.0.1 5916
tcp connected
security level is 2 (1=none, 2=standard)
password failed
error - problem connecting
sudo apt-get install xrdp=0.6.1-2
https://askubuntu.com/questions/1108550/xrdp-failed-problem-connecting-when-package-was-auto-updated
七、Ubuntu 16.04: Remote connect to windows Desktop with rdesktop
rdesktop IP
八、SSH远程连接 Ubuntu
1. 安装 open ssh
sudo apt-get install openssh-server
2. 修改root密码
sudo passwd root
3. 辑配置文件,允许以 root 用户通过 ssh 登录
sudo vi /etc/ssh/sshd_config
找到:PermitRootLogin prohibit-password禁用
添加:PermitRootLogin yes
sudo service ssh restart
参考文献
putty+xming远程登录Ubuntu16.04图形界面
使用Windows 10远程控制Ubuntu 16.04
ubuntu16.04搭建xrdp远程mate桌面链接
Ubuntu 16.04: Remote connect to Unity with VNC/XRDP
windows远程连接ubuntu 16.04的unity桌面
Ubuntu 16.04: Remote connect to GNOME Classic Desktop with VNC/XRDP
XRDP – How To Remote Connect to Unity Desktop on Ubuntu 16.04
Linux下全能远程桌面高手Remmina使用说明
如何使用Ubuntu自带的远程连接
xrdp完美实现windows 远程桌面 ubuntu 16.04
解决Ubuntu 16.04 SSH 无法远程登录问题
学习ubuntu远程桌面(一):配置远程桌面
Windows通过远程桌面访问Ubuntu
使用xrdp实现windows 远程桌面 ubuntu linux
本文内容由网友自发贡献,版权归原作者所有,本站不承担相应法律责任。如您发现有涉嫌抄袭侵权的内容,请联系:hwhale#tublm.com(使用前将#替换为@)