一、auto-sklearn
1.1 环境依赖
-
额外安装swig 第三方库
-
linux 支持, mac,windows不支持
1.2 示例代码
time_left_for_this_task 设定任务最大时间
per_run_time_limit 每个子任务最大训练时间
include 可以限制任务训练的模型
import autosklearn.classification
import sklearn.model_selection
from sklearn import datasets
import sklearn.metrics

if __name__ == "__main__":
    X, y = datasets.load_breast_cancer(return_X_y=True)

    X_train, X_test, y_train, y_test = \
        sklearn.model_selection.train_test_split(X, y, random_state=1)
    automl = autosklearn.classification.AutoSklearnClassifier(
        time_left_for_this_task=120,
        per_run_time_limit=30,
        tmp_folder="/tmp/autosklearn_classification_example_tmp",
        include={
            'classifier': ["random_forest"],
            'feature_preprocessor': ["no_preprocessing"]
        }
    )
    automl.fit(X_train, y_train)
    y_hat = automl.predict(X_test)
    automl.get_models_with_weights()
    print("Accuracy score", sklearn.metrics.accuracy_score(y_test, y_hat))
    print(automl.leaderboard())
    models_with_weights = automl.get_models_with_weights()
    with open('../../preprocess/models_report.txt', 'w') as f:
        for model in models_with_weights:
            f.write(str(model) + '\n')
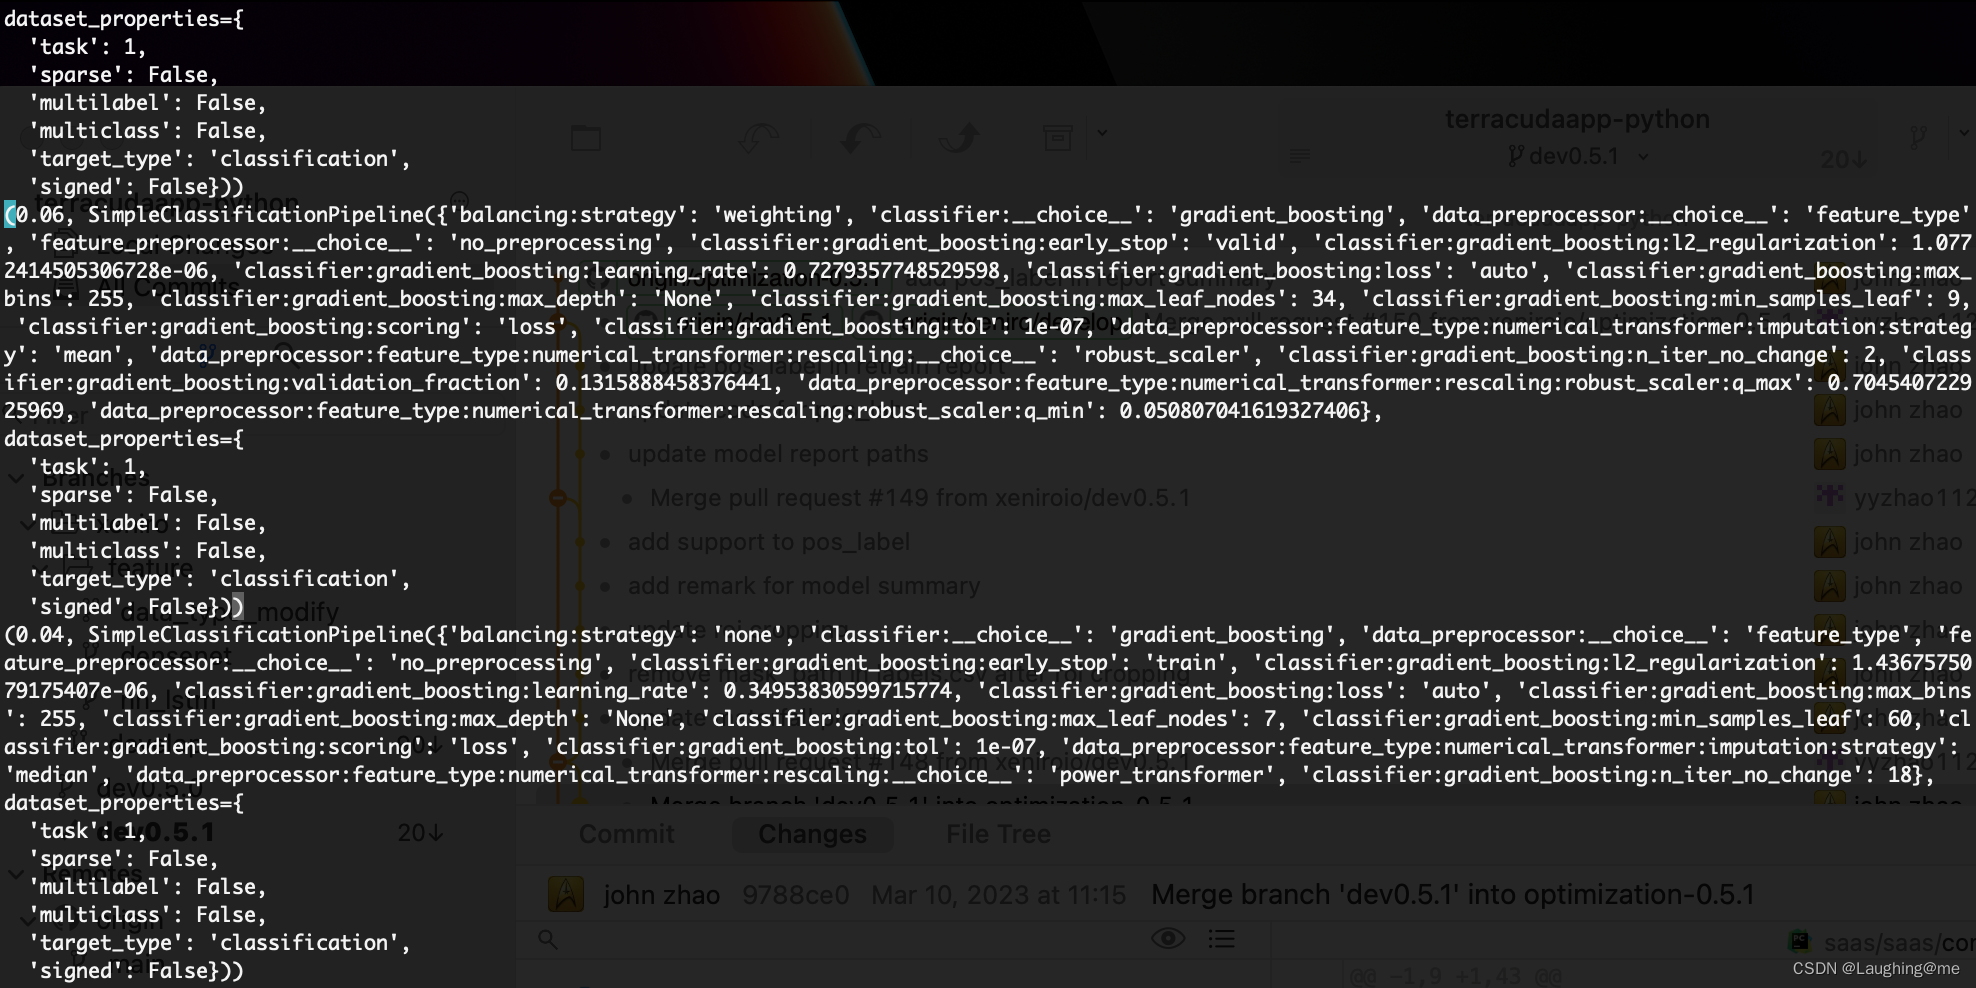
结果展示:
可以展示参数任务cost值排列顺序
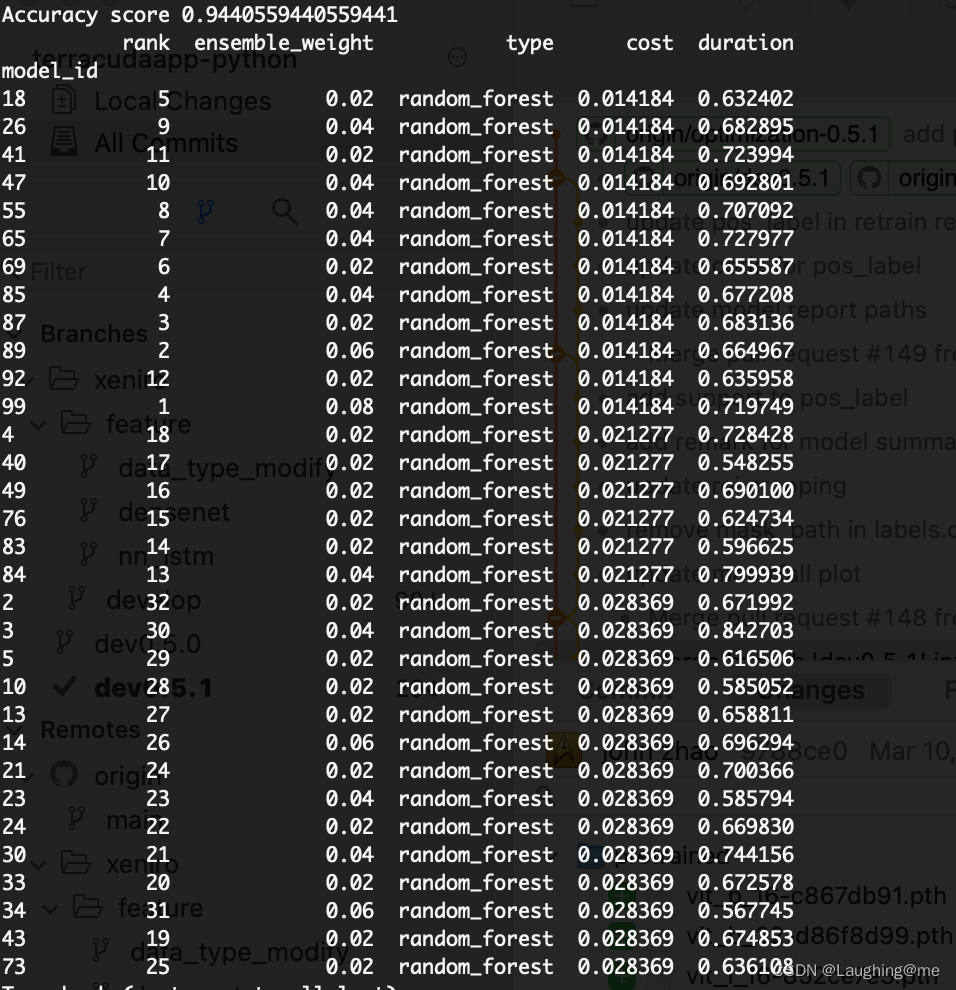
以及训练参数配置:
1.3 模块扩展
在不支持的训练模块,可以扩展及自定义模型进行自动调参
代码示例:
继承AutoSklearnClassificationAlgorithm 并重写子方法
autosklearn.pipeline.components.classification.add_classifier(MLPClassifier) 将自定义模块注册至模块中
include 参数添加既可调用
"""
====================================================
Extending Auto-Sklearn with Classification Component
====================================================
The following example demonstrates how to create a new classification
component for using in auto-sklearn.
"""
from typing import Optional
from pprint import pprint
from ConfigSpace.configuration_space import ConfigurationSpace
from ConfigSpace.hyperparameters import (
CategoricalHyperparameter,
UniformIntegerHyperparameter,
UniformFloatHyperparameter,
)
import sklearn.metrics
from autosklearn.askl_typing import FEAT_TYPE_TYPE
import autosklearn.classification
import autosklearn.pipeline.components.classification
from autosklearn.pipeline.components.base import AutoSklearnClassificationAlgorithm
from autosklearn.pipeline.constants import (
DENSE,
SIGNED_DATA,
UNSIGNED_DATA,
PREDICTIONS,
)
from sklearn.datasets import load_breast_cancer
from sklearn.model_selection import train_test_split
class MLPClassifier(AutoSklearnClassificationAlgorithm):
def __init__(
self,
hidden_layer_depth,
num_nodes_per_layer,
activation,
alpha,
solver,
random_state=None,
):
self.hidden_layer_depth = hidden_layer_depth
self.num_nodes_per_layer = num_nodes_per_layer
self.activation = activation
self.alpha = alpha
self.solver = solver
self.random_state = random_state
def fit(self, X, y):
self.num_nodes_per_layer = int(self.num_nodes_per_layer)
self.hidden_layer_depth = int(self.hidden_layer_depth)
self.alpha = float(self.alpha)
from sklearn.neural_network import MLPClassifier
hidden_layer_sizes = tuple(
self.num_nodes_per_layer for i in range(self.hidden_layer_depth)
)
self.estimator = MLPClassifier(
hidden_layer_sizes=hidden_layer_sizes,
activation=self.activation,
alpha=self.alpha,
solver=self.solver,
random_state=self.random_state,
)
self.estimator.fit(X, y)
return self
def predict(self, X):
if self.estimator is None:
raise NotImplementedError()
return self.estimator.predict(X)
def predict_proba(self, X):
if self.estimator is None:
raise NotImplementedError()
return self.estimator.predict_proba(X)
@staticmethod
def get_properties(dataset_properties=None):
return {
"shortname": "MLP Classifier",
"name": "MLP CLassifier",
"handles_regression": False,
"handles_classification": True,
"handles_multiclass": True,
"handles_multilabel": False,
"handles_multioutput": False,
"is_deterministic": False,
"input": [DENSE, SIGNED_DATA, UNSIGNED_DATA],
"output": [PREDICTIONS],
}
@staticmethod
def get_hyperparameter_search_space(
feat_type: Optional[FEAT_TYPE_TYPE] = None, dataset_properties=None
):
cs = ConfigurationSpace()
hidden_layer_depth = UniformIntegerHyperparameter(
name="hidden_layer_depth", lower=1, upper=3, default_value=1
)
num_nodes_per_layer = UniformIntegerHyperparameter(
name="num_nodes_per_layer", lower=16, upper=216, default_value=32
)
activation = CategoricalHyperparameter(
name="activation",
choices=["identity", "logistic", "tanh", "relu"],
default_value="relu",
)
alpha = UniformFloatHyperparameter(
name="alpha", lower=0.0001, upper=1.0, default_value=0.0001
)
solver = CategoricalHyperparameter(
name="solver", choices=["lbfgs", "sgd", "adam"], default_value="adam"
)
cs.add_hyperparameters(
[
hidden_layer_depth,
num_nodes_per_layer,
activation,
alpha,
solver,
]
)
return cs
autosklearn.pipeline.components.classification.add_classifier(MLPClassifier)
cs = MLPClassifier.get_hyperparameter_search_space()
print(cs)
def get_local_csv():
import pandas as pd
import numpy as np
df = pd.read_csv("/data/projects/example/auto_ml/Radiomics-2D/features.csv")
label = pd.read_csv("/data/projects/example/auto_ml/Radiomics-2D/labels.csv")["label"]
label = np.array([1 if l == "Positive" else 0 for l in label])
return df.to_numpy(), label
X, y = get_local_csv()
X_train, X_test, y_train, y_test = train_test_split(X, y)
clf = autosklearn.classification.AutoSklearnClassifier(
time_left_for_this_task=60,
per_run_time_limit=30,
include={"classifier": ["gradient_boosting", "adaboost", "MLPClassifier"],
'feature_preprocessor': ["no_preprocessing"]},
)
clf.fit(X_train, y_train)
y_pred = clf.predict(X_test)
print("accuracy: ", sklearn.metrics.accuracy_score(y_pred, y_test))
print(clf.sprint_statistics())
print(clf.leaderboard(detailed=False,top_k=30))
pprint(clf.show_models(), indent=4)
models_with_weights = clf.get_models_with_weights()
with open('./models_report.txt', 'w') as f:
for model in models_with_weights:
f.write(str(model) + '\n')
二、auto-pytorch
1. 1 环境依赖
额外安装brew install cmake
lightgbm 库依赖第三方库 pip install lightgbm
brew install libomp
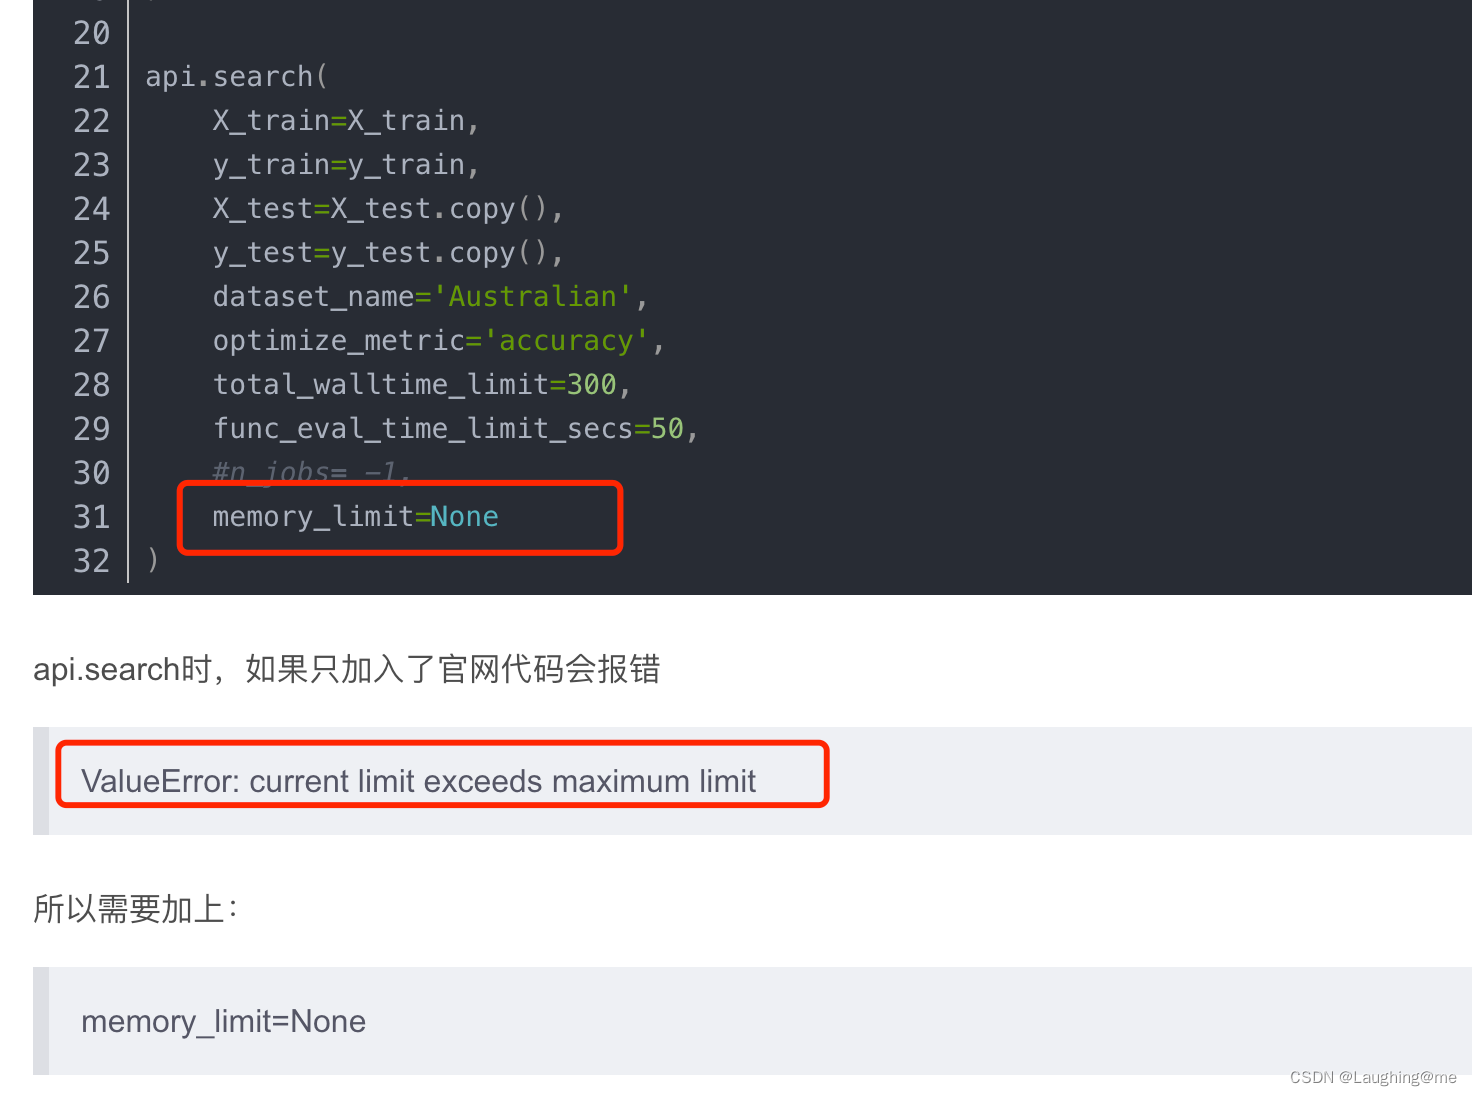
pip install autoPyTorch
mac 允许不限制memory, M1 芯片对内容限制的操作目前还有bug
1.2 支持用法
支持大量的表格型数据,图片数据支持少,且不支持扩展
代码示例:
用法比较固定,没有更多的文档来作为参考,且无法扩展。
import numpy as np
import sklearn.model_selection
import torchvision.datasets
from autoPyTorch.pipeline.image_classification import ImageClassificationPipeline
trainset = torchvision.datasets.FashionMNIST(root='../datasets/', train=True, download=True)
data = trainset.data.numpy()
data = np.expand_dims(data, axis=3)
dataset_properties = dict()
pipeline = ImageClassificationPipeline(dataset_properties=dataset_properties)
train_indices, val_indices = sklearn.model_selection.train_test_split(
list(range(data.shape[0])),
random_state=1,
test_size=0.25,
)
pipeline_cs = pipeline.get_hyperparameter_search_space()
print("Pipeline CS:\n", '_' * 40, f"\n{pipeline_cs}")
config = pipeline_cs.sample_configuration()
print("Pipeline Random Config:\n", '_' * 40, f"\n{config}")
pipeline.set_hyperparameters(config)
print("Fitting the pipeline...")
pipeline.fit(X=dict(X_train=data,
is_small_preprocess=True,
dataset_properties=dict(mean=np.array([np.mean(data[:, :, :, i]) for i in range(1)]),
std=np.array([np.std(data[:, :, :, i]) for i in range(1)]),
num_classes=10,
num_features=data.shape[1] * data.shape[2],
image_height=data.shape[1],
image_width=data.shape[2],
is_small_preprocess=True),
train_indices=train_indices,
val_indices=val_indices,
)
)
print(pipeline)
本文内容由网友自发贡献,版权归原作者所有,本站不承担相应法律责任。如您发现有涉嫌抄袭侵权的内容,请联系:hwhale#tublm.com(使用前将#替换为@)