目录
- 一、修改根目录 pom.xml
- 二、修改 ruoyi-common-core 的 pom.xml
- 三、去掉 nacos 配置文件中的 mybatis 配置,添加 mybatis-plus 配置
- 四、添加配置类并注入
- 五、注入类
- 六、启动验证
一、修改根目录 pom.xml
添加:
<properties>
    <mybatis-plus.version>3.5.3.1</mybatis-plus.version>
    <lombok.version>1.18.24</lombok.version>
</properties>
和
<dependency>
<groupId>com.baomidou</groupId>
<artifactId>mybatis-plus-boot-starter</artifactId>
<version>${mybatis-plus.version}</version>
</dependency>
<dependency>
<groupId>org.projectlombok</groupId>
<artifactId>lombok</artifactId>
<version>${lombok.version}</version>
</dependency>
二、修改 ruoyi-common-core 的 pom.xml
<dependency>
<groupId>com.baomidou</groupId>
<artifactId>mybatis-plus-boot-starter</artifactId>
</dependency>
<dependency>
<groupId>org.projectlombok</groupId>
<artifactId>lombok</artifactId>
</dependency>
三、去掉 nacos 配置文件中的 mybatis 配置,添加 mybatis-plus 配置
mybatis-plus:
typeAliasesPackage: com.ruoyi.*
mapper-locations: classpath:mapper/**/*.xml
四、添加配置类并注入
config 目录和 配置类 MybatisPlusConfig 均为新增:
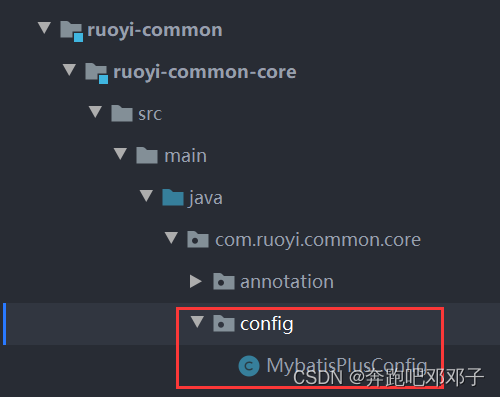
MybatisPlusConfig.java 内容如下:
package com.ruoyi.common.core.config;
import com.baomidou.mybatisplus.annotation.DbType;
import com.baomidou.mybatisplus.extension.plugins.MybatisPlusInterceptor;
import com.baomidou.mybatisplus.extension.plugins.inner.BlockAttackInnerInterceptor;
import com.baomidou.mybatisplus.extension.plugins.inner.OptimisticLockerInnerInterceptor;
import com.baomidou.mybatisplus.extension.plugins.inner.PaginationInnerInterceptor;
import org.springframework.context.annotation.Bean;
import org.springframework.context.annotation.Configuration;
import org.springframework.transaction.annotation.EnableTransactionManagement;
@EnableTransactionManagement(proxyTargetClass = true)
@Configuration
public class MybatisPlusConfig
{
@Bean
public MybatisPlusInterceptor mybatisPlusInterceptor()
{
MybatisPlusInterceptor interceptor = new MybatisPlusInterceptor();
interceptor.addInnerInterceptor(paginationInnerInterceptor());
interceptor.addInnerInterceptor(optimisticLockerInnerInterceptor());
interceptor.addInnerInterceptor(blockAttackInnerInterceptor());
return interceptor;
}
public PaginationInnerInterceptor paginationInnerInterceptor()
{
PaginationInnerInterceptor paginationInnerInterceptor = new PaginationInnerInterceptor();
paginationInnerInterceptor.setDbType(DbType.MYSQL);
paginationInnerInterceptor.setMaxLimit(-1L);
return paginationInnerInterceptor;
}
public OptimisticLockerInnerInterceptor optimisticLockerInnerInterceptor()
{
return new OptimisticLockerInnerInterceptor();
}
public BlockAttackInnerInterceptor blockAttackInnerInterceptor()
{
return new BlockAttackInnerInterceptor();
}
}
五、注入类
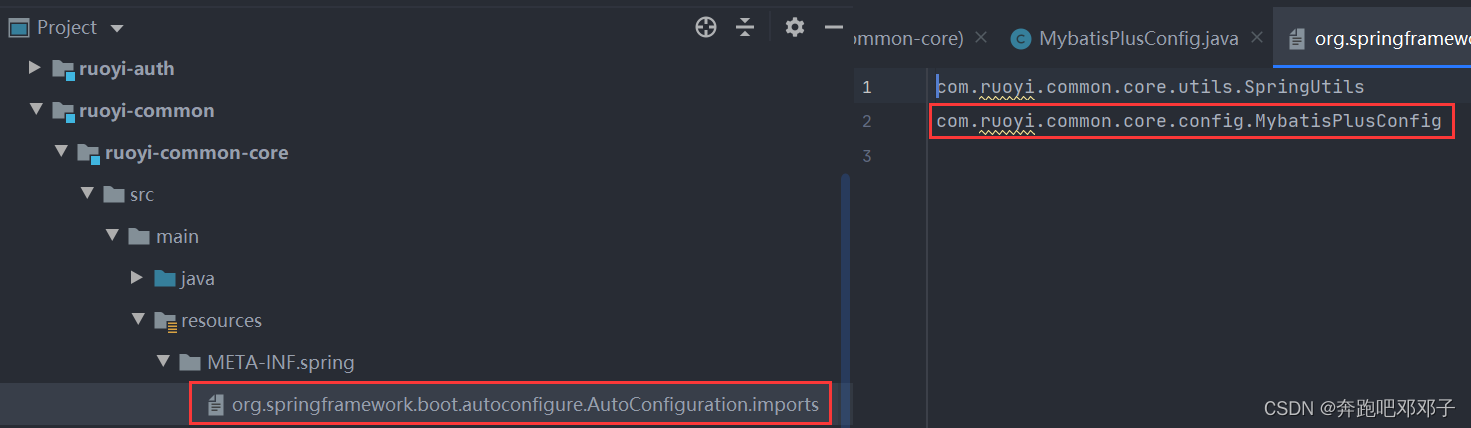
注入内容为:
com.ruoyi.common.core.config.MybatisPlusConfig
六、启动验证
本文内容由网友自发贡献,版权归原作者所有,本站不承担相应法律责任。如您发现有涉嫌抄袭侵权的内容,请联系:hwhale#tublm.com(使用前将#替换为@)