这些示例演示了如何使用 SDK 的 python 包装器。
设备:RealSense D435i相机
代码链接:https://github.com/IntelRealSense/librealsense/tree/master/wrappers/python/examples
01
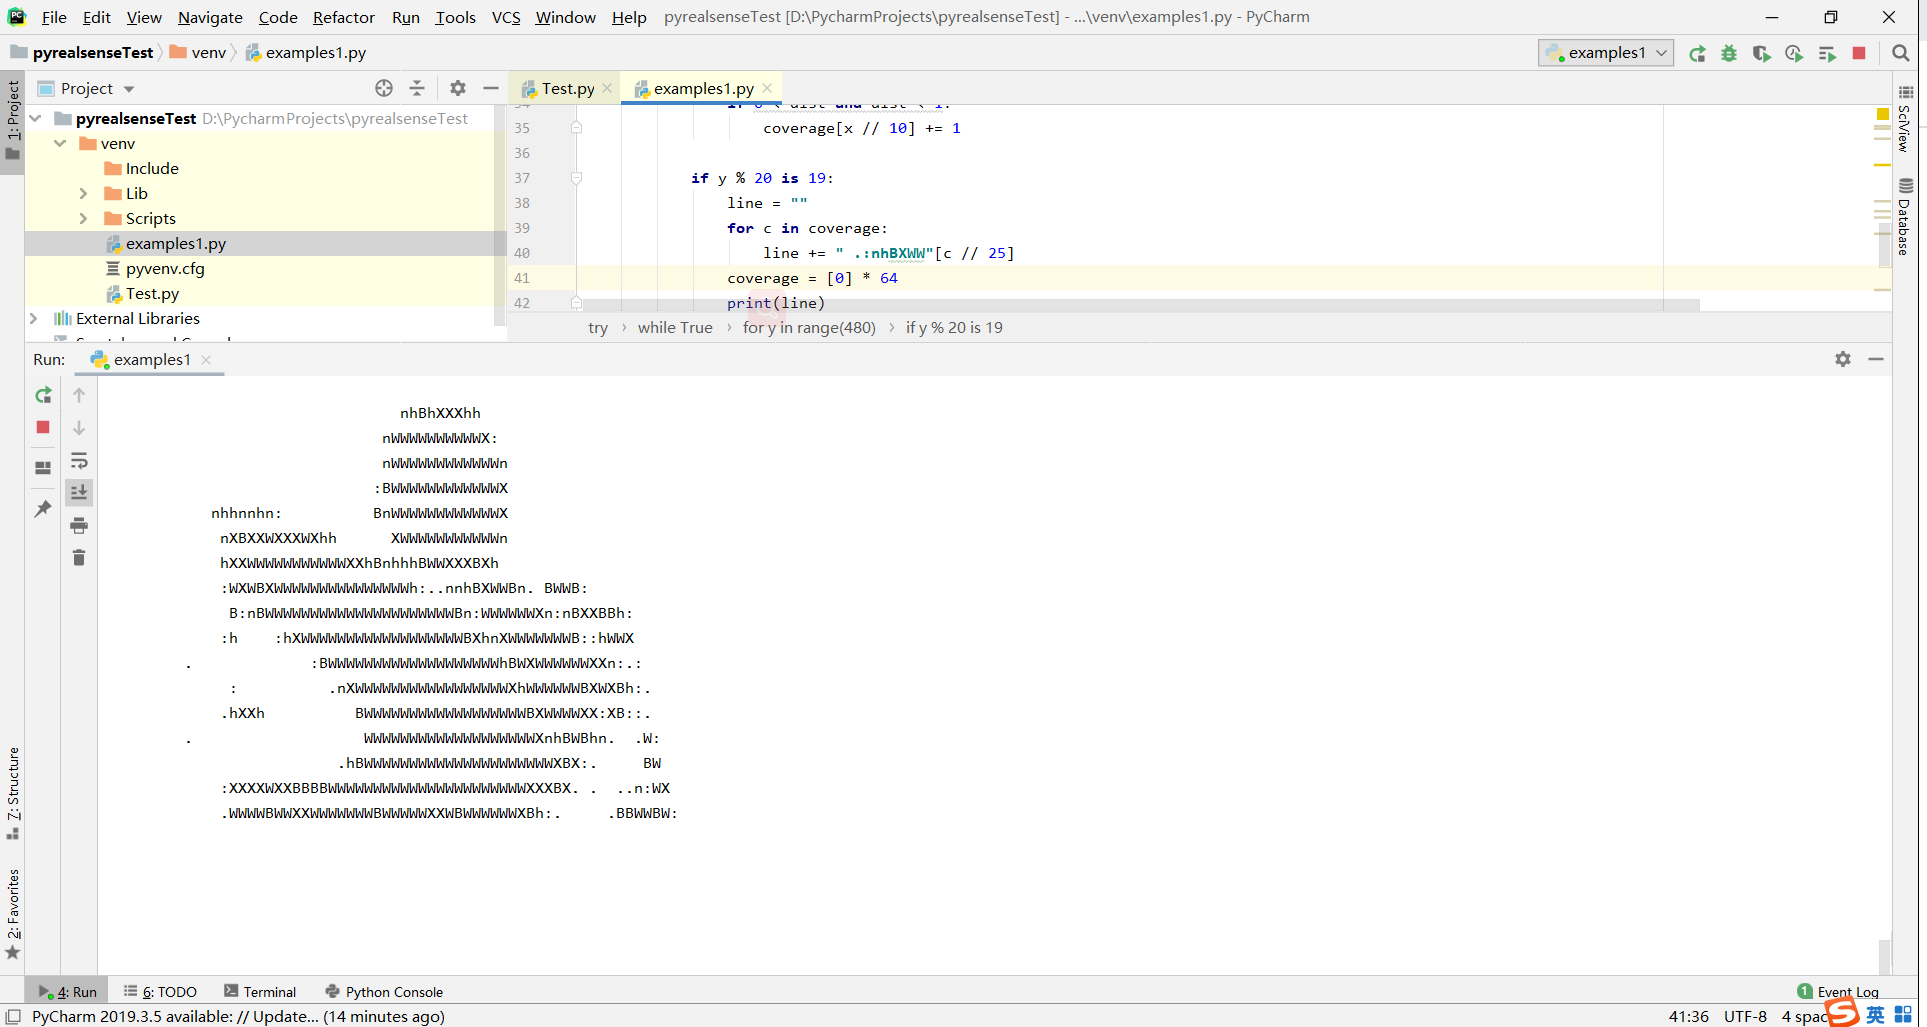
Tutorial 1 - Demonstrates how to start streaming depth frames from the camera and display the image in the console as an ASCII art.
演示如何从相机开始流式传输深度帧并将图像在控制台中显示为 ASCII 艺术。
## License: Apache 2.0. See LICENSE file in root directory.
## Copyright(c) 2015-2017 Intel Corporation. All Rights Reserved.

#####################################################
## librealsense tutorial #1 - Accessing depth data ##
#####################################################

# First import the library
import pyrealsense2 as rs

try:
    # Create a context object. This object owns the handles to all connected realsense devices
    pipeline = rs.pipeline()

    # Configure streams
    config = rs.config()
    config.enable_stream(rs.stream.depth, 640, 480, rs.format.z16, 30)

    # Start streaming
    pipeline.start(config)

    while True:
        # This call waits until a new coherent set of frames is available on a device
        # Calls to get_frame_data(...) and get_frame_timestamp(...) on a device will return stable values until wait_for_frames(...) is called
        frames = pipeline.wait_for_frames()
        depth = frames.get_depth_frame()
        if not depth: continue

        # Print a simple text-based representation of the image, by breaking it into 10x20 pixel regions and approximating the coverage of pixels within one meter
        coverage = [0] * 64
        for y in range(480):
            for x in range(640):
                dist = depth.get_distance(x, y)
                if 0 < dist and dist < 1:
                    coverage[x // 10] += 1

            if y % 20 is 19:
                line = ""
                for c in coverage:
                    line += " .:nhBXWW"[c // 25]
                coverage = [0] * 64
                print(line)
    exit(0)
# except rs.error as e:
#    # Method calls agaisnt librealsense objects may throw exceptions of type pylibrs.error
#    print("pylibrs.error was thrown when calling %s(%s):\n", % (e.get_failed_function(), e.get_failed_args()))
#    print("    %s\n", e.what())
#    exit(1)
except Exception as e:
    print(e)
    pass
运行结果:
02
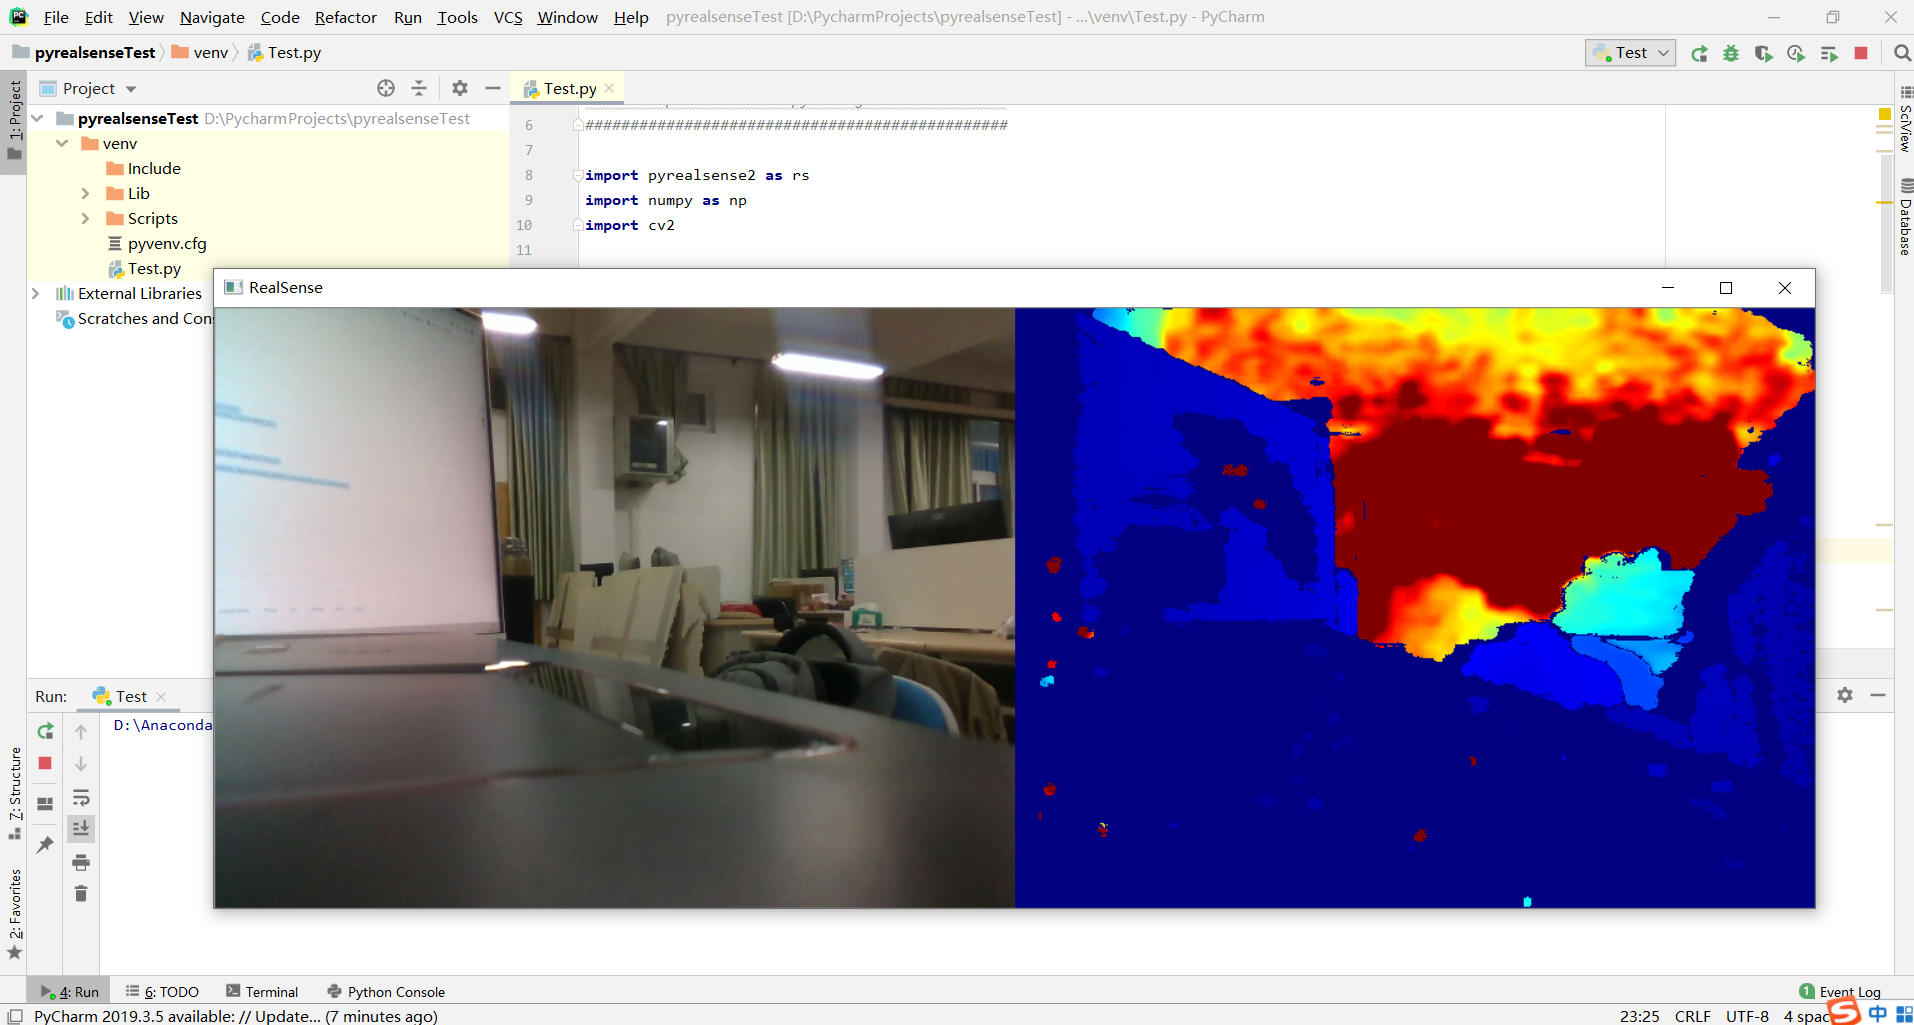
NumPy and OpenCV - Example of rendering depth and color images using the help of OpenCV and Numpy
使用 OpenCV 和 Numpy 渲染深度和彩色图像的示例
## License: Apache 2.0. See LICENSE file in root directory.
## Copyright(c) 2015-2017 Intel Corporation. All Rights Reserved.

###############################################
##      Open CV and Numpy integration        ##
###############################################

import pyrealsense2 as rs
import numpy as np
import cv2

# Configure depth and color streams
pipeline = rs.pipeline()
config = rs.config()

# Get device product line for setting a supporting resolution
pipeline_wrapper = rs.pipeline_wrapper(pipeline)
pipeline_profile = config.resolve(pipeline_wrapper)
device = pipeline_profile.get_device()
device_product_line = str(device.get_info(rs.camera_info.product_line))

found_rgb = False
for s in device.sensors:
    if s.get_info(rs.camera_info.name) == 'RGB Camera':
        found_rgb = True
        break
if not found_rgb:
    print("The demo requires Depth camera with Color sensor")
    exit(0)

config.enable_stream(rs.stream.depth, 640, 480, rs.format.z16, 30)

if device_product_line == 'L500':
    config.enable_stream(rs.stream.color, 960, 540, rs.format.bgr8, 30)
else:
    config.enable_stream(rs.stream.color, 640, 480, rs.format.bgr8, 30)

# Start streaming
pipeline.start(config)

try:
    while True:

        # Wait for a coherent pair of frames: depth and color
        frames = pipeline.wait_for_frames()
        depth_frame = frames.get_depth_frame()
        color_frame = frames.get_color_frame()
        if not depth_frame or not color_frame:
            continue

        # Convert images to numpy arrays
        depth_image = np.asanyarray(depth_frame.get_data())
        color_image = np.asanyarray(color_frame.get_data())

        # Apply colormap on depth image (image must be converted to 8-bit per pixel first)
        depth_colormap = cv2.applyColorMap(cv2.convertScaleAbs(depth_image, alpha=0.03), cv2.COLORMAP_JET)

        depth_colormap_dim = depth_colormap.shape
        color_colormap_dim = color_image.shape

        # If depth and color resolutions are different, resize color image to match depth image for display
        if depth_colormap_dim != color_colormap_dim:
            resized_color_image = cv2.resize(color_image, dsize=(depth_colormap_dim[1], depth_colormap_dim[0]), interpolation=cv2.INTER_AREA)
            images = np.hstack((resized_color_image, depth_colormap))
        else:
            images = np.hstack((color_image, depth_colormap))

        # Show images
        cv2.namedWindow('RealSense', cv2.WINDOW_AUTOSIZE)
        cv2.imshow('RealSense', images)
        cv2.waitKey(1)

finally:

    # Stop streaming
    pipeline.stop()
运行结果:
03
Stream Alignment - Demonstrate a way of performing background removal by aligning depth images to color images and performing simple calculation to strip the background.
通过将深度图像与彩色图像对齐并执行简单的计算以去除背景,演示一种执行背景去除的方法。
## License: Apache 2.0. See LICENSE file in root directory.
## Copyright(c) 2017 Intel Corporation. All Rights Reserved.
#####################################################
## Align Depth to Color ##
#####################################################
# First import the library
import pyrealsense2 as rs
# Import Numpy for easy array manipulation
import numpy as np
# Import OpenCV for easy image rendering
import cv2
# Create a pipeline
pipeline = rs.pipeline()
# Create a config and configure the pipeline to stream
# different resolutions of color and depth streams
config = rs.config()
# Get device product line for setting a supporting resolution
pipeline_wrapper = rs.pipeline_wrapper(pipeline)
pipeline_profile = config.resolve(pipeline_wrapper)
device = pipeline_profile.get_device()
device_product_line = str(device.get_info(rs.camera_info.product_line))
found_rgb = False
for s in device.sensors:
if s.get_info(rs.camera_info.name) == 'RGB Camera':
found_rgb = True
break
if not found_rgb:
print("The demo requires Depth camera with Color sensor")
exit(0)
config.enable_stream(rs.stream.depth, 640, 480, rs.format.z16, 30)
if device_product_line == 'L500':
config.enable_stream(rs.stream.color, 960, 540, rs.format.bgr8, 30)
else:
config.enable_stream(rs.stream.color, 640, 480, rs.format.bgr8, 30)
# Start streaming
profile = pipeline.start(config)
# Getting the depth sensor's depth scale (see rs-align example for explanation)
depth_sensor = profile.get_device().first_depth_sensor()
depth_scale = depth_sensor.get_depth_scale()
print("Depth Scale is: " , depth_scale)
# We will be removing the background of objects more than
# clipping_distance_in_meters meters away
clipping_distance_in_meters = 1 #1 meter
clipping_distance = clipping_distance_in_meters / depth_scale
# Create an align object
# rs.align allows us to perform alignment of depth frames to others frames
# The "align_to" is the stream type to which we plan to align depth frames.
align_to = rs.stream.color
align = rs.align(align_to)
# Streaming loop
try:
while True:
# Get frameset of color and depth
frames = pipeline.wait_for_frames()
# frames.get_depth_frame() is a 640x360 depth image
# Align the depth frame to color frame
aligned_frames = align.process(frames)
# Get aligned frames
aligned_depth_frame = aligned_frames.get_depth_frame() # aligned_depth_frame is a 640x480 depth image
color_frame = aligned_frames.get_color_frame()
# Validate that both frames are valid
if not aligned_depth_frame or not color_frame:
continue
depth_image = np.asanyarray(aligned_depth_frame.get_data())
color_image = np.asanyarray(color_frame.get_data())
# Remove background - Set pixels further than clipping_distance to grey
grey_color = 153
depth_image_3d = np.dstack((depth_image,depth_image,depth_image)) #depth image is 1 channel, color is 3 channels
bg_removed = np.where((depth_image_3d > clipping_distance) | (depth_image_3d <= 0), grey_color, color_image)
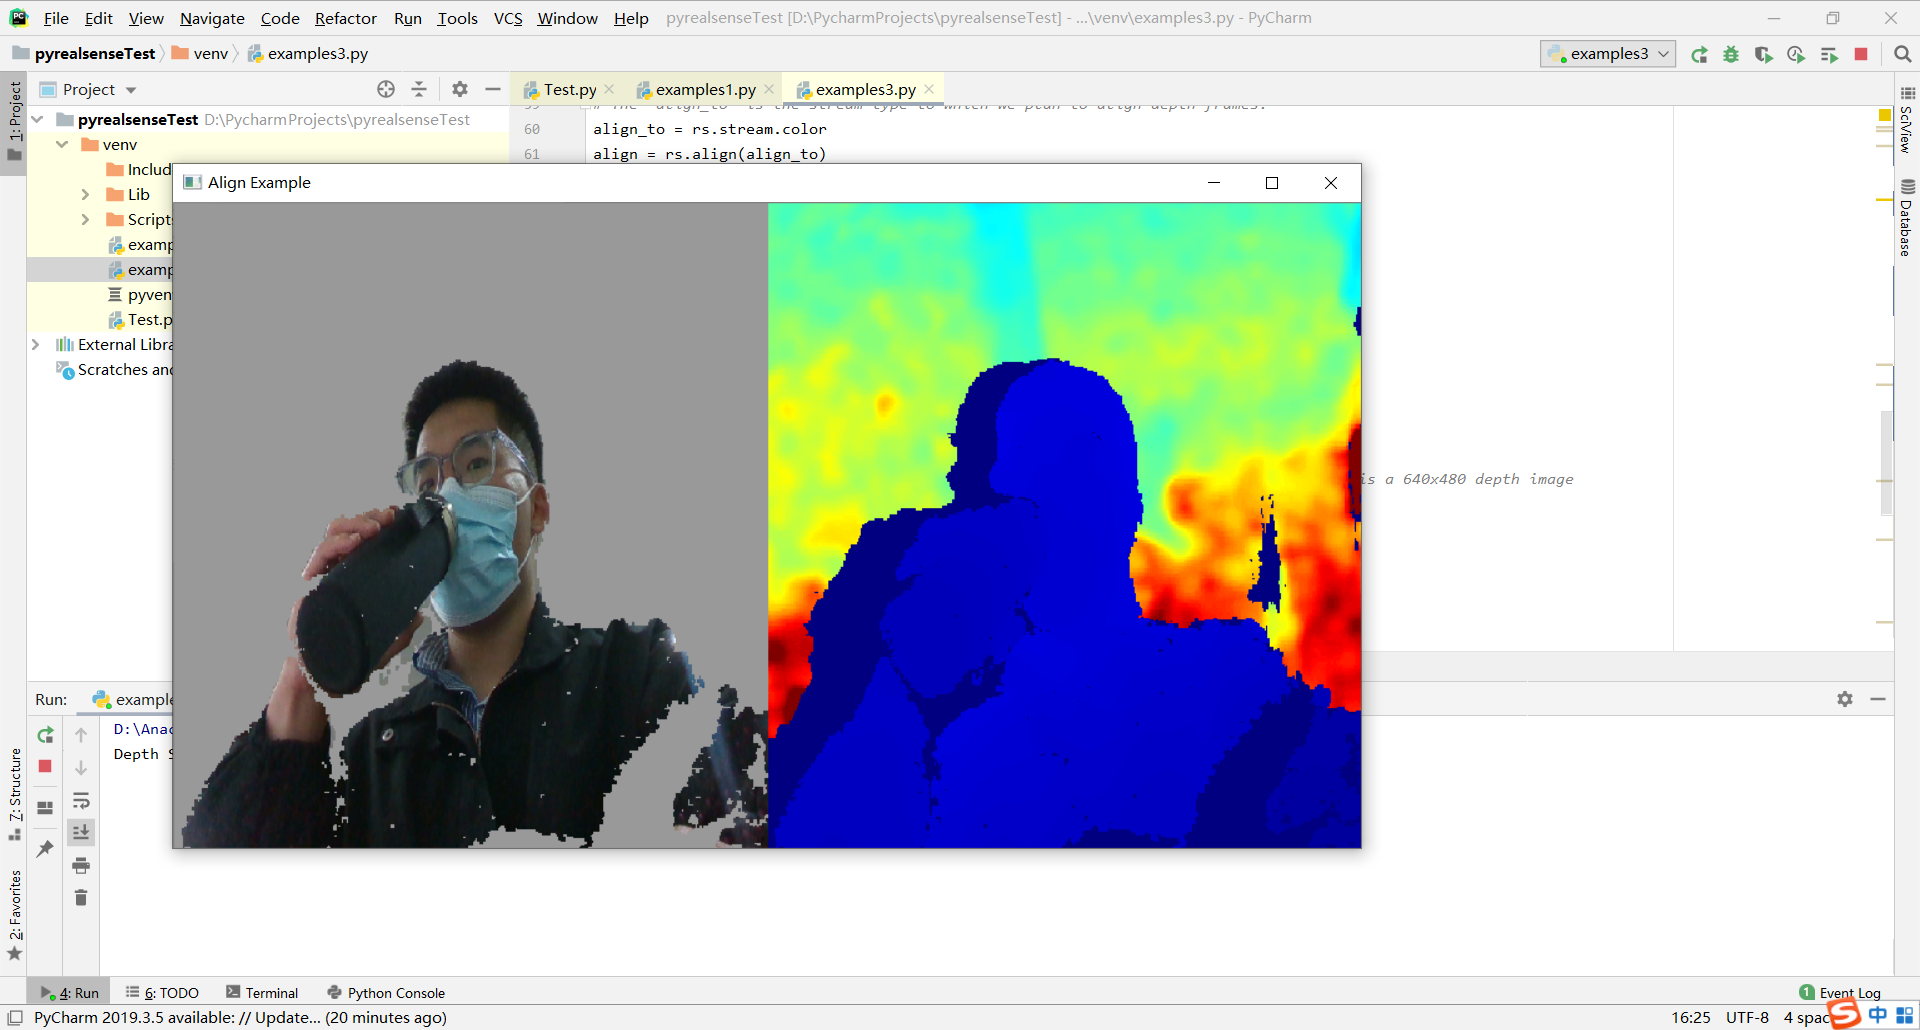
# Render images:
# depth align to color on left
# depth on right
depth_colormap = cv2.applyColorMap(cv2.convertScaleAbs(depth_image, alpha=0.03), cv2.COLORMAP_JET)
images = np.hstack((bg_removed, depth_colormap))
cv2.namedWindow('Align Example', cv2.WINDOW_NORMAL)
cv2.imshow('Align Example', images)
key = cv2.waitKey(1)
# Press esc or 'q' to close the image window
if key & 0xFF == ord('q') or key == 27:
cv2.destroyAllWindows()
break
finally:
pipeline.stop()
运行结果:
04
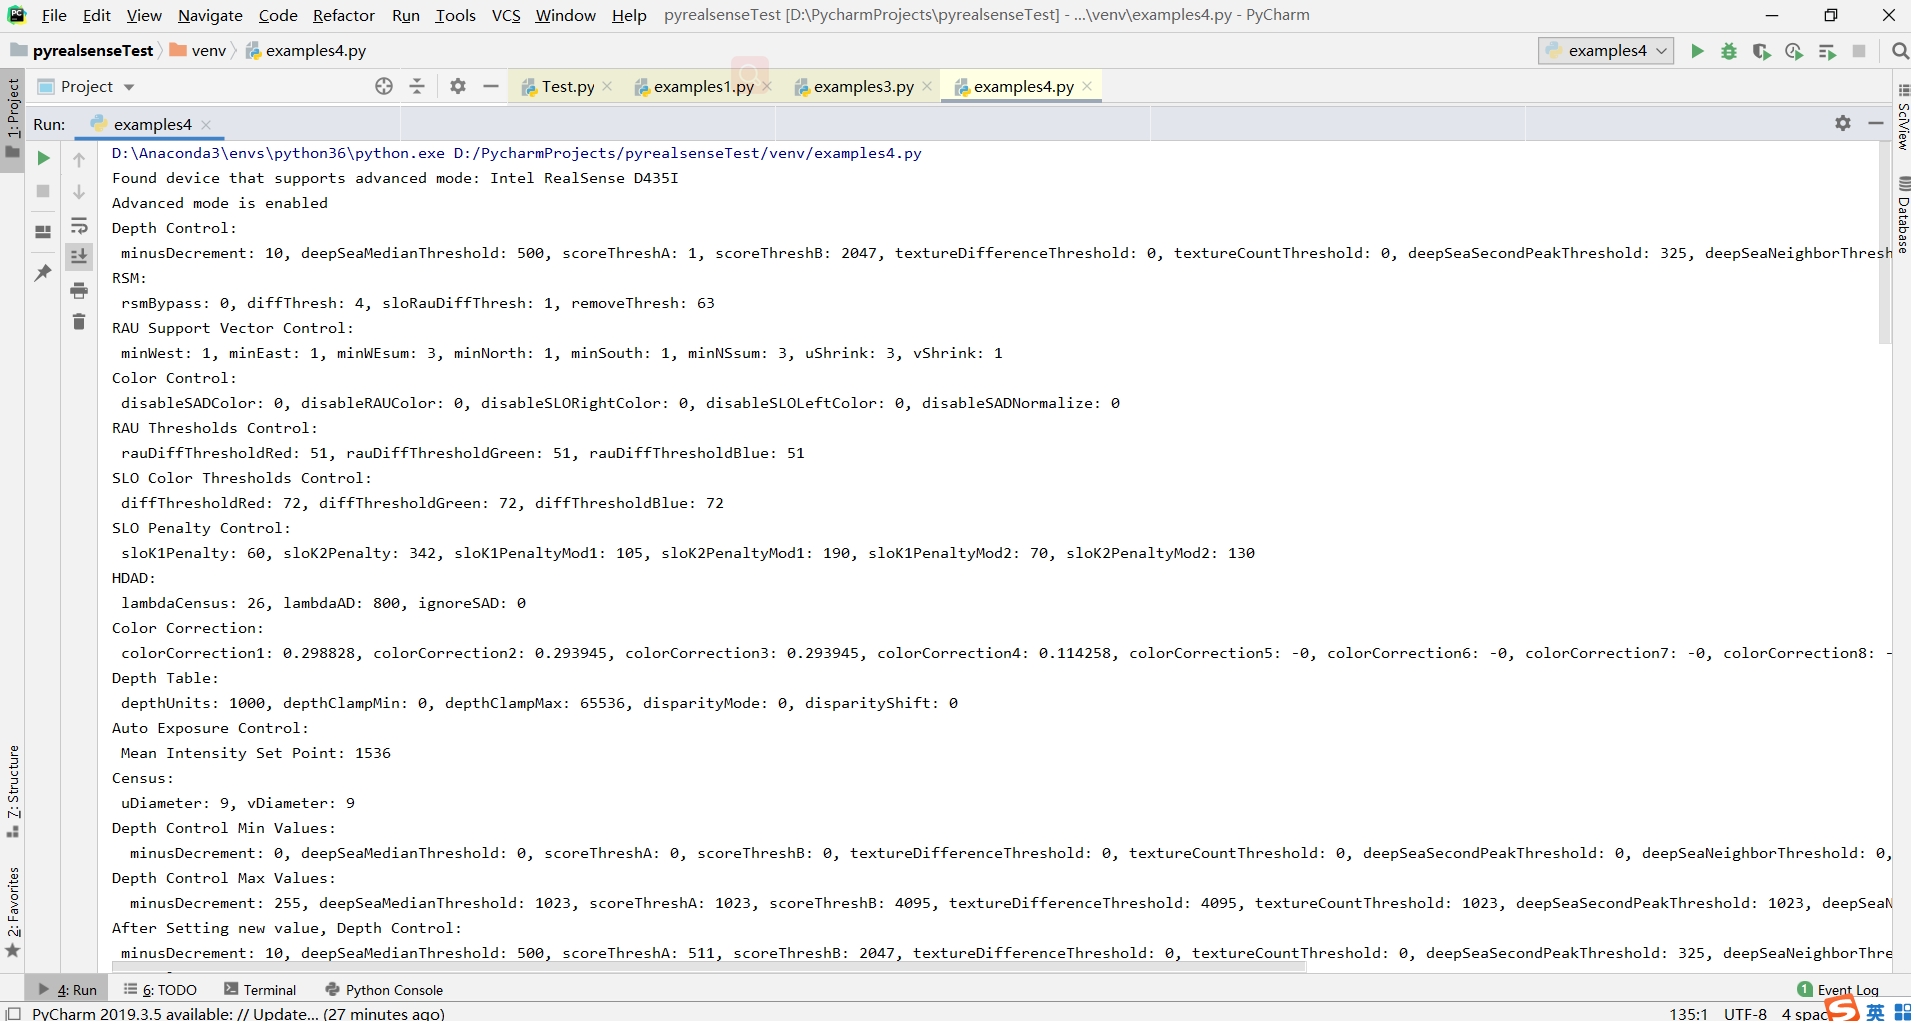
RS400 Advanced Mode - Example of the advanced mode interface for controlling different options of the D400 cameras
用于控制 D400 相机不同选项的高级模式接口示例
## License: Apache 2.0. See LICENSE file in root directory.
## Copyright(c) 2017 Intel Corporation. All Rights Reserved.
#####################################################
## rs400 advanced mode tutorial ##
#####################################################
# First import the library
import pyrealsense2 as rs
import time
import json
DS5_product_ids = ["0AD1", "0AD2", "0AD3", "0AD4", "0AD5", "0AF6", "0AFE", "0AFF", "0B00", "0B01", "0B03", "0B07", "0B3A", "0B5C"]
def find_device_that_supports_advanced_mode() :
ctx = rs.context()
ds5_dev = rs.device()
devices = ctx.query_devices();
for dev in devices:
if dev.supports(rs.camera_info.product_id) and str(dev.get_info(rs.camera_info.product_id)) in DS5_product_ids:
if dev.supports(rs.camera_info.name):
print("Found device that supports advanced mode:", dev.get_info(rs.camera_info.name))
return dev
raise Exception("No D400 product line device that supports advanced mode was found")
try:
dev = find_device_that_supports_advanced_mode()
advnc_mode = rs.rs400_advanced_mode(dev)
print("Advanced mode is", "enabled" if advnc_mode.is_enabled() else "disabled")
# Loop until we successfully enable advanced mode
while not advnc_mode.is_enabled():
print("Trying to enable advanced mode...")
advnc_mode.toggle_advanced_mode(True)
# At this point the device will disconnect and re-connect.
print("Sleeping for 5 seconds...")
time.sleep(5)
# The 'dev' object will become invalid and we need to initialize it again
dev = find_device_that_supports_advanced_mode()
advnc_mode = rs.rs400_advanced_mode(dev)
print("Advanced mode is", "enabled" if advnc_mode.is_enabled() else "disabled")
# Get each control's current value
print("Depth Control: \n", advnc_mode.get_depth_control())
print("RSM: \n", advnc_mode.get_rsm())
print("RAU Support Vector Control: \n", advnc_mode.get_rau_support_vector_control())
print("Color Control: \n", advnc_mode.get_color_control())
print("RAU Thresholds Control: \n", advnc_mode.get_rau_thresholds_control())
print("SLO Color Thresholds Control: \n", advnc_mode.get_slo_color_thresholds_control())
print("SLO Penalty Control: \n", advnc_mode.get_slo_penalty_control())
print("HDAD: \n", advnc_mode.get_hdad())
print("Color Correction: \n", advnc_mode.get_color_correction())
print("Depth Table: \n", advnc_mode.get_depth_table())
print("Auto Exposure Control: \n", advnc_mode.get_ae_control())
print("Census: \n", advnc_mode.get_census())
#To get the minimum and maximum value of each control use the mode value:
query_min_values_mode = 1
query_max_values_mode = 2
current_std_depth_control_group = advnc_mode.get_depth_control()
min_std_depth_control_group = advnc_mode.get_depth_control(query_min_values_mode)
max_std_depth_control_group = advnc_mode.get_depth_control(query_max_values_mode)
print("Depth Control Min Values: \n ", min_std_depth_control_group)
print("Depth Control Max Values: \n ", max_std_depth_control_group)
# Set some control with a new (median) value
current_std_depth_control_group.scoreThreshA = int((max_std_depth_control_group.scoreThreshA - min_std_depth_control_group.scoreThreshA) / 2)
advnc_mode.set_depth_control(current_std_depth_control_group)
print("After Setting new value, Depth Control: \n", advnc_mode.get_depth_control())
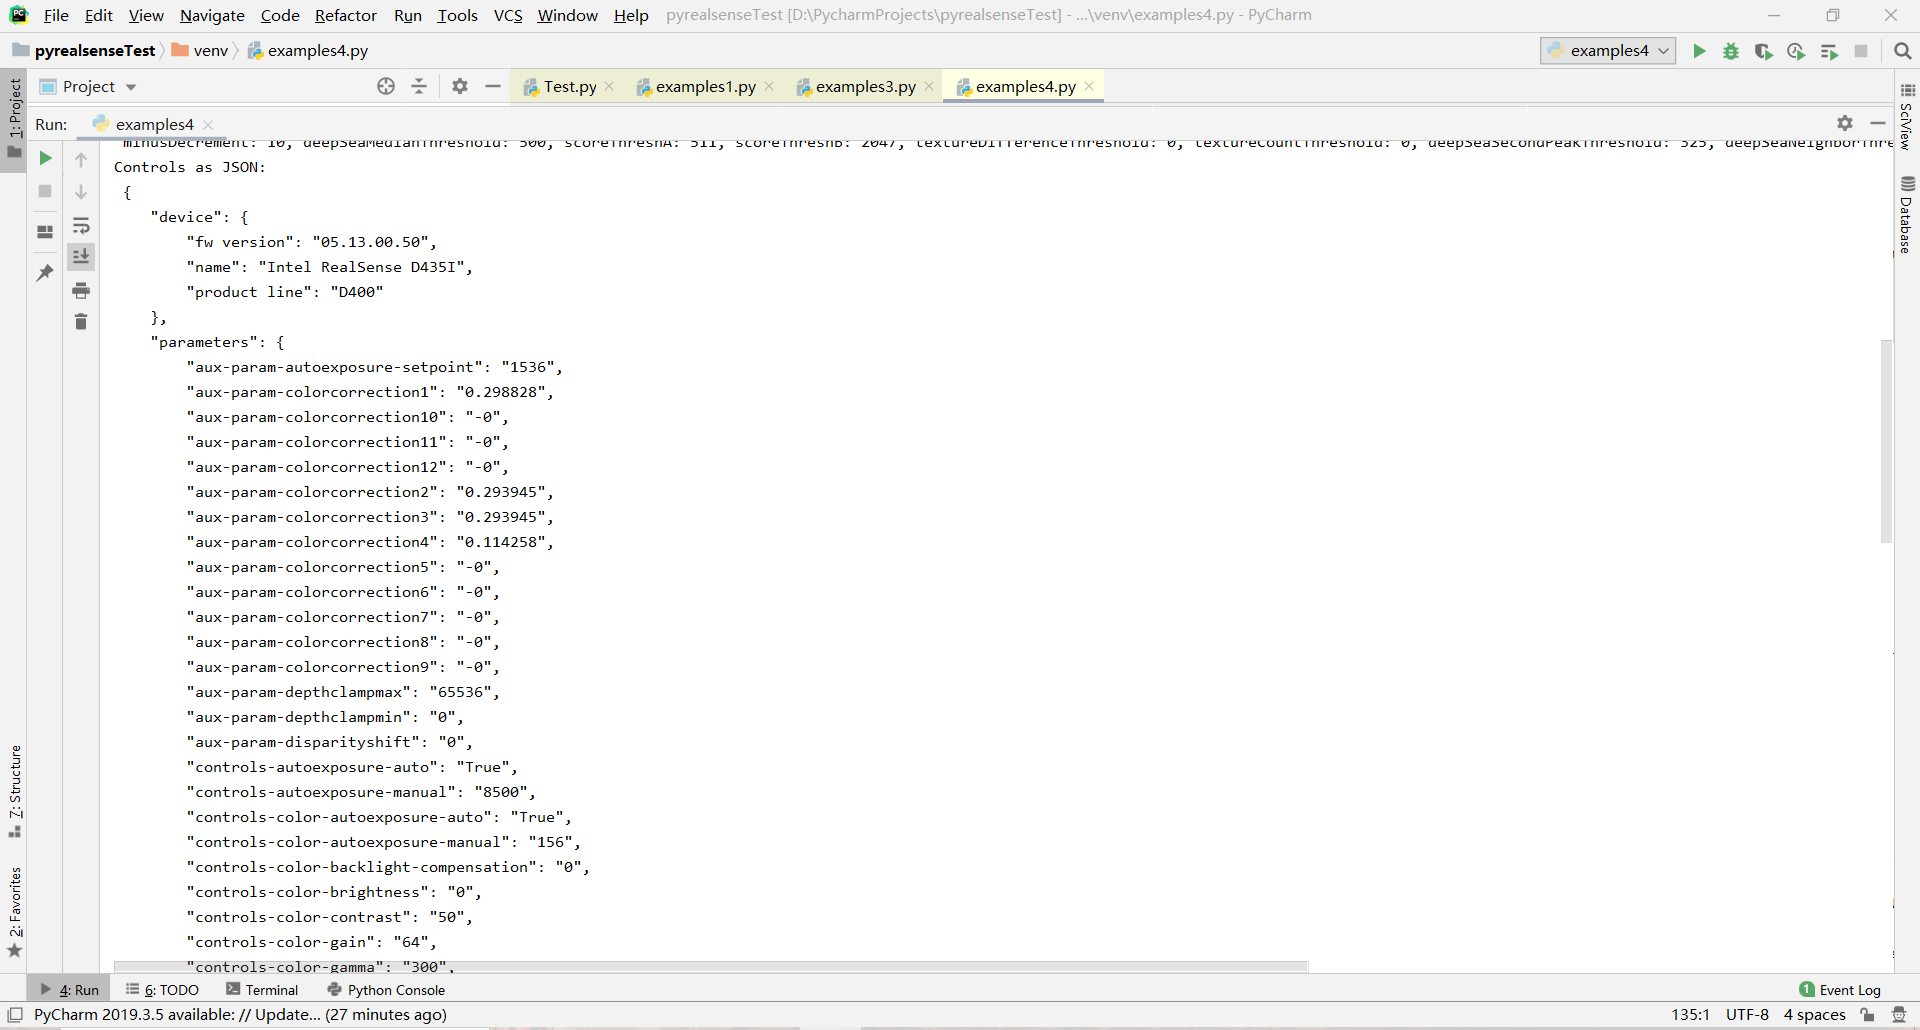
# Serialize all controls to a Json string
serialized_string = advnc_mode.serialize_json()
print("Controls as JSON: \n", serialized_string)
as_json_object = json.loads(serialized_string)
# We can also load controls from a json string
# For Python 2, the values in 'as_json_object' dict need to be converted from unicode object to utf-8
if type(next(iter(as_json_object))) != str:
as_json_object = {k.encode('utf-8'): v.encode("utf-8") for k, v in as_json_object.items()}
# The C++ JSON parser requires double-quotes for the json object so we need
# to replace the single quote of the pythonic json to double-quotes
json_string = str(as_json_object).replace("'", '\"')
advnc_mode.load_json(json_string)
except Exception as e:
print(e)
pass
运行结果
05
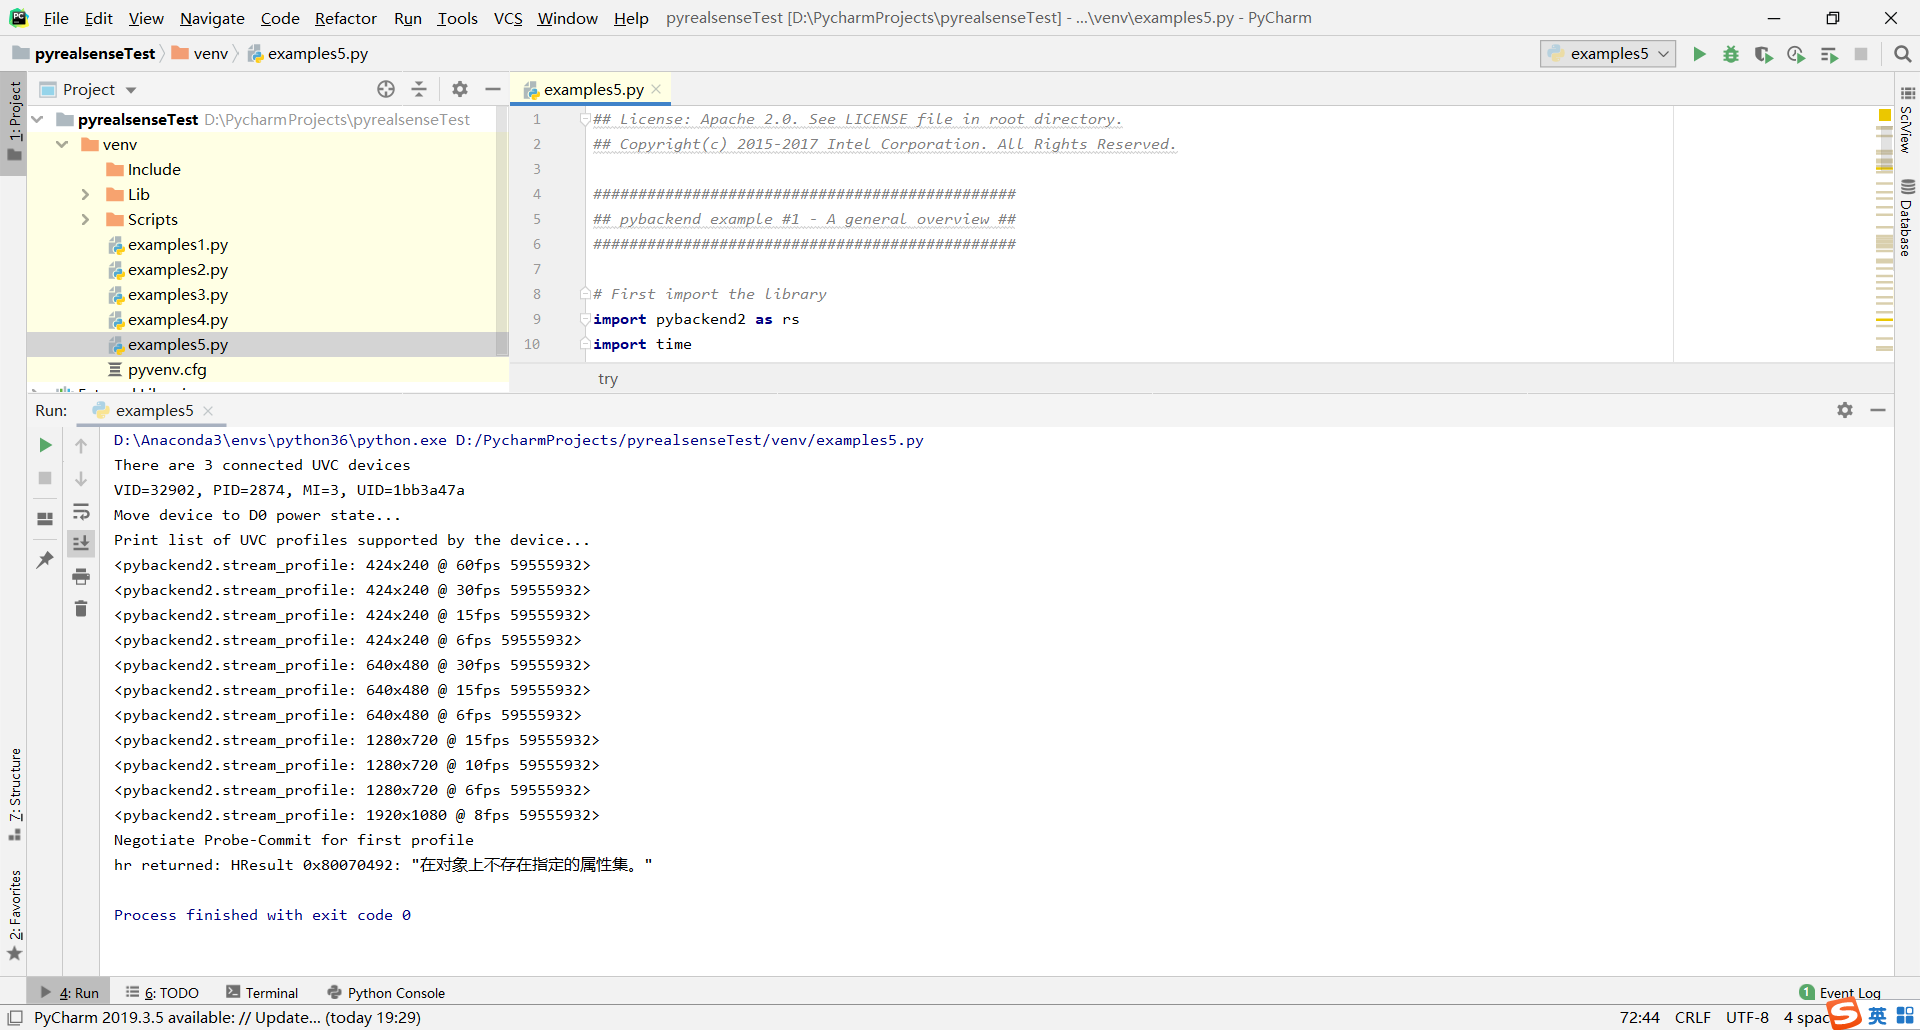
Realsense Backend - Example of controlling devices using the backend interface
使用后端接口控制设备的示例
## License: Apache 2.0. See LICENSE file in root directory.
## Copyright(c) 2015-2017 Intel Corporation. All Rights Reserved.

###############################################
## pybackend example #1 - A general overview ##
###############################################

# First import the library
import pybackend2 as rs
import time

def on_frame(profile, f):
    print ("Received %d bytes" % f.frame_size)

    # Accessing image pixels
    p = f.pixels
    print ("First 10 bytes are: ")
    for i in range(10):
        print (hex(p[i]))
    print

try:
    # Building a device
    backend = rs.create_backend()
    infos = backend.query_uvc_devices()
    print("There are %d connected UVC devices" % len(infos))
    if len(infos) is 0: exit(1)
    info = infos[2]
    dev = backend.create_uvc_device(info)

    print ("VID=%d, PID=%d, MI=%d, UID=%s" % (info.vid, info.pid, info.mi, info.unique_id))

    # Turn on power
    print ("Move device to D0 power state...")
    dev.set_power_state(rs.D0)

    # Configure streaming
    print ("Print list of UVC profiles supported by the device...")
    profiles = dev.get_profiles()
    for p in profiles:
        print (p)
        # save IR VGA setting for later
        if p.width == 640 and p.height == 480 and p.fps == 30 and p.format == 1196574041:
            vga = p
    first = profiles[0]

    print ("Negotiate Probe-Commit for first profile")
    dev.probe_and_commit(first, on_frame)

    # XU controls
    xu = rs.extension_unit(0, 3, 2, rs.guid("C9606CCB-594C-4D25-af47-ccc496435995")) # Define the Depth XU
    dev.init_xu(xu) # initialize depth XU
    ae = dev.get_xu(xu, 0xB, 1) # get XU value. args: XU, control #, # of bytes
    print ("Auto Exposure option is:", ae)
    print ("Setting Auto Exposure option to new value")
    dev.set_xu(xu, 0x0B, [0x00]) # set XU value. args: XU, control #, list of bytes
    ae = dev.get_xu(xu, 0xB, 1)
    print ("New Auto Exposure setting is:", ae)

    # PU controls
    gain = dev.get_pu(rs.option.gain)
    print ("Gain = %d" % gain)
    print ("Setting gain to new value")
    dev.set_pu(rs.option.gain, 32)
    gain = dev.get_pu(rs.option.gain)
    print ("New gain = %d" % gain)

    # Start streaming
    print ("Start listening for callbacks (for all pins)...")
    dev.start_callbacks()

    print ("Start streaming (from all pins)...")
    dev.stream_on()

    print ("Wait for 5 seconds while frames are expected:")
    time.sleep(5)

    # Close device
    print ("Stop listening for new callbacks...")
    dev.stop_callbacks()

    print ("Close the specific pin...")
    dev.close(first)

    # saving frames to disk
    def save_frame(profile, f):
        f.save_png("pybackend_example_1_general_depth_frame.png", 640, 480, f.frame_size / (640*480))

    print ("Saving an IR VGA frame using profile:", vga)
    dev.probe_and_commit(vga, save_frame)

    dev.set_xu(xu, 0x0B, [0x01]) # turn autoexposure back on
    dev.start_callbacks()
    dev.stream_on()
    time.sleep(1)
    dev.close(vga)

    print ("Move device to D3")
    dev.set_power_state(rs.D3)
    pass
except Exception as e:
    print (e)
    pass
分析:
直接运行,出现报错:ModuleNotFoundError:没有名为“pybackend2”的模块
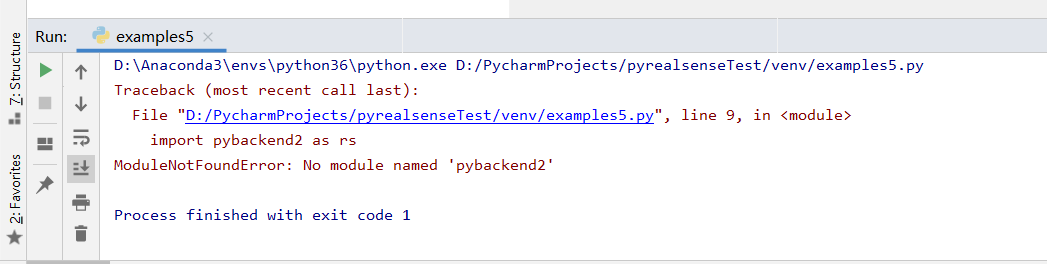
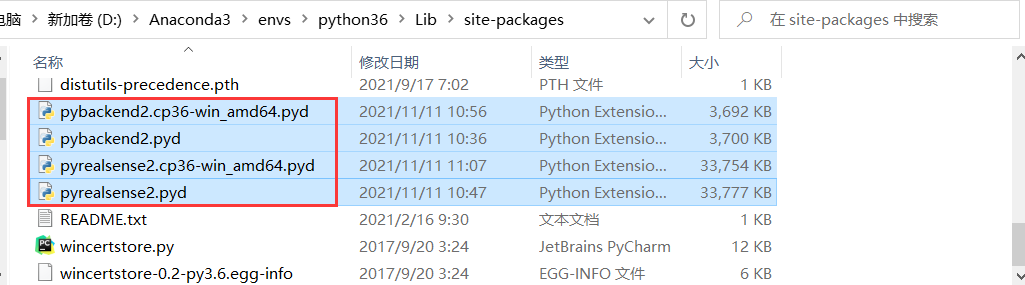
把Intel RealSense SDK安装目录中的bin\x64下的带.pyd的文件,放在/Anaconda3/envs/Python36/Lib/site-packages路径下,解决了这个问题。
运行结果:
06
Read bag file - Example on how to read bag file and use colorizer to show recorded depth stream in jet colormap.
有关如何读取包文件并使用着色器在喷射颜色图中显示记录的深度流的示例。
#####################################################
##               Read bag from file                ##
#####################################################


# First import library
import pyrealsense2 as rs
# Import Numpy for easy array manipulation
import numpy as np
# Import OpenCV for easy image rendering
import cv2
# Import argparse for command-line options
import argparse
# Import os.path for file path manipulation
import os.path

# Create object for parsing command-line options
parser = argparse.ArgumentParser(description="Read recorded bag file and display depth stream in jet colormap.\
                                Remember to change the stream fps and format to match the recorded.")
# Add argument which takes path to a bag file as an input
parser.add_argument("-i", "--input", type=str, help="Path to the bag file")
# Parse the command line arguments to an object
args = parser.parse_args()
# Safety if no parameter have been given
if not args.input:
    print("No input paramater have been given.")
    print("For help type --help")
    exit()
# Check if the given file have bag extension
if os.path.splitext(args.input)[1] != ".bag":
    print("The given file is not of correct file format.")
    print("Only .bag files are accepted")
    exit()
try:
    # Create pipeline
    pipeline = rs.pipeline()

    # Create a config object
    config = rs.config()

    # Tell config that we will use a recorded device from file to be used by the pipeline through playback.
    rs.config.enable_device_from_file(config, args.input)

    # Configure the pipeline to stream the depth stream
    # Change this parameters according to the recorded bag file resolution
    config.enable_stream(rs.stream.depth, rs.format.z16, 30)

    # Start streaming from file
    pipeline.start(config)

    # Create opencv window to render image in
    cv2.namedWindow("Depth Stream", cv2.WINDOW_AUTOSIZE)

    # Create colorizer object
    colorizer = rs.colorizer()

    # Streaming loop
    while True:
        # Get frameset of depth
        frames = pipeline.wait_for_frames()

        # Get depth frame
        depth_frame = frames.get_depth_frame()

        # Colorize depth frame to jet colormap
        depth_color_frame = colorizer.colorize(depth_frame)

        # Convert depth_frame to numpy array to render image in opencv
        depth_color_image = np.asanyarray(depth_color_frame.get_data())

        # Render image in opencv window
        cv2.imshow("Depth Stream", depth_color_image)
        key = cv2.waitKey(1)
        # if pressed escape exit program
        if key == 27:
            cv2.destroyAllWindows()
            break

finally:
    pass
07
Box Dimensioner Multicam - Simple demonstration for calculating the length, width and height of an object using multiple cameras.
使用多个相机计算对象的长度、宽度和高度的简单演示
###########################################################################################################################
##                      License: Apache 2.0. See LICENSE file in root directory.                                         ##
###########################################################################################################################
##                  Simple Box Dimensioner with multiple cameras: Main demo file                                         ##
###########################################################################################################################
## Workflow description:                                                                                                 ##
## 1. Place the calibration chessboard object into the field of view of all the realsense cameras.                       ##
##    Update the chessboard parameters in the script in case a different size is chosen.                                 ##
## 2. Start the program.                                                                                                 ##
## 3. Allow calibration to occur and place the desired object ON the calibration object when the program asks for it.    ##
##    Make sure that the object to be measured is not bigger than the calibration object in length and width.            ##
## 4. The length, width and height of the bounding box of the object is then displayed in millimeters.                   ##
###########################################################################################################################

# Import RealSense, OpenCV and NumPy
import pyrealsense2 as rs
import cv2
import numpy as np

# Import helper functions and classes written to wrap the RealSense, OpenCV and Kabsch Calibration usage
from collections import defaultdict
from realsense_device_manager import DeviceManager
from calibration_kabsch import PoseEstimation
from helper_functions import get_boundary_corners_2D
from measurement_task import calculate_boundingbox_points, calculate_cumulative_pointcloud, visualise_measurements


def run_demo():
    # Define some constants
    L515_resolution_width = 1024  # pixels
    L515_resolution_height = 768  # pixels
    L515_frame_rate = 30

    resolution_width = 1280  # pixels
    resolution_height = 720  # pixels
    frame_rate = 15  # fps

    dispose_frames_for_stablisation = 30  # frames

    chessboard_width = 6  # squares
    chessboard_height = 9  # squares
    square_size = 0.0253  # meters

    try:
        # Enable the streams from all the intel realsense devices
        L515_rs_config = rs.config()
        L515_rs_config.enable_stream(rs.stream.depth, L515_resolution_width, L515_resolution_height, rs.format.z16,
                                     L515_frame_rate)
        L515_rs_config.enable_stream(rs.stream.infrared, 0, L515_resolution_width, L515_resolution_height, rs.format.y8,
                                     L515_frame_rate)
        L515_rs_config.enable_stream(rs.stream.color, resolution_width, resolution_height, rs.format.bgr8, frame_rate)

        rs_config = rs.config()
        rs_config.enable_stream(rs.stream.depth, resolution_width, resolution_height, rs.format.z16, frame_rate)
        rs_config.enable_stream(rs.stream.infrared, 1, resolution_width, resolution_height, rs.format.y8, frame_rate)
        rs_config.enable_stream(rs.stream.color, resolution_width, resolution_height, rs.format.bgr8, frame_rate)

        # Use the device manager class to enable the devices and get the frames
        device_manager = DeviceManager(rs.context(), rs_config, L515_rs_config)
        device_manager.enable_all_devices()

        # Allow some frames for the auto-exposure controller to stablise
        for frame in range(dispose_frames_for_stablisation):
            frames = device_manager.poll_frames()

        assert (len(device_manager._available_devices) > 0)
        """
        1: Calibration
        Calibrate all the available devices to the world co-ordinates.
        For this purpose, a chessboard printout for use with opencv based calibration process is needed.

        """
        # Get the intrinsics of the realsense device
        intrinsics_devices = device_manager.get_device_intrinsics(frames)

        # Set the chessboard parameters for calibration
        chessboard_params = [chessboard_height, chessboard_width, square_size]

        # Estimate the pose of the chessboard in the world coordinate using the Kabsch Method
        calibrated_device_count = 0
        while calibrated_device_count < len(device_manager._available_devices):
            frames = device_manager.poll_frames()
            pose_estimator = PoseEstimation(frames, intrinsics_devices, chessboard_params)
            transformation_result_kabsch = pose_estimator.perform_pose_estimation()
            object_point = pose_estimator.get_chessboard_corners_in3d()
            calibrated_device_count = 0
            for device_info in device_manager._available_devices:
                device = device_info[0]
                if not transformation_result_kabsch[device][0]:
                    print("Place the chessboard on the plane where the object needs to be detected..")
                else:
                    calibrated_device_count += 1

        # Save the transformation object for all devices in an array to use for measurements
        transformation_devices = {}
        chessboard_points_cumulative_3d = np.array([-1, -1, -1]).transpose()
        for device_info in device_manager._available_devices:
            device = device_info[0]
            transformation_devices[device] = transformation_result_kabsch[device][1].inverse()
            points3D = object_point[device][2][:, object_point[device][3]]
            points3D = transformation_devices[device].apply_transformation(points3D)
            chessboard_points_cumulative_3d = np.column_stack((chessboard_points_cumulative_3d, points3D))

        # Extract the bounds between which the object's dimensions are needed
        # It is necessary for this demo that the object's length and breath is smaller than that of the chessboard
        chessboard_points_cumulative_3d = np.delete(chessboard_points_cumulative_3d, 0, 1)
        roi_2D = get_boundary_corners_2D(chessboard_points_cumulative_3d)

        print("Calibration completed... \nPlace the box in the field of view of the devices...")

        """
                2: Measurement and display
                Measure the dimension of the object using depth maps from multiple RealSense devices
                The information from Phase 1 will be used here
                """

        # Enable the emitter of the devices
        device_manager.enable_emitter(True)

        # Load the JSON settings file in order to enable High Accuracy preset for the realsense
        device_manager.load_settings_json("./HighResHighAccuracyPreset.json")

        # Get the extrinsics of the device to be used later
        extrinsics_devices = device_manager.get_depth_to_color_extrinsics(frames)

        # Get the calibration info as a dictionary to help with display of the measurements onto the color image instead of infra red image
        calibration_info_devices = defaultdict(list)
        for calibration_info in (transformation_devices, intrinsics_devices, extrinsics_devices):
            for key, value in calibration_info.items():
                calibration_info_devices[key].append(value)

        # Continue acquisition until terminated with Ctrl+C by the user
        while 1:
            # Get the frames from all the devices
            frames_devices = device_manager.poll_frames()

            # Calculate the pointcloud using the depth frames from all the devices
            point_cloud = calculate_cumulative_pointcloud(frames_devices, calibration_info_devices, roi_2D)

            # Get the bounding box for the pointcloud in image coordinates of the color imager
            bounding_box_points_color_image, length, width, height = calculate_boundingbox_points(point_cloud,
                                                                                                  calibration_info_devices)

            # Draw the bounding box points on the color image and visualise the results
            visualise_measurements(frames_devices, bounding_box_points_color_image, length, width, height)

    except KeyboardInterrupt:
        print("The program was interupted by the user. Closing the program...")

    finally:
        device_manager.disable_streams()
        cv2.destroyAllWindows()


if __name__ == "__main__":
    run_demo()
08
T265 Basic - Demonstrates how to retrieve pose data from a T265
演示如何从 T265 检索姿势数据
#!/usr/bin/python
# -*- coding: utf-8 -*-
## License: Apache 2.0. See LICENSE file in root directory.
## Copyright(c) 2019 Intel Corporation. All Rights Reserved.

#####################################################
##           librealsense T265 example             ##
#####################################################

# First import the library
import pyrealsense2 as rs

# Declare RealSense pipeline, encapsulating the actual device and sensors
pipe = rs.pipeline()

# Build config object and request pose data
cfg = rs.config()
cfg.enable_stream(rs.stream.pose)

# Start streaming with requested config
pipe.start(cfg)

try:
    for _ in range(50):
        # Wait for the next set of frames from the camera
        frames = pipe.wait_for_frames()

        # Fetch pose frame
        pose = frames.get_pose_frame()
        if pose:
            # Print some of the pose data to the terminal
            data = pose.get_pose_data()
            print("Frame #{}".format(pose.frame_number))
            print("Position: {}".format(data.translation))
            print("Velocity: {}".format(data.velocity))
            print("Acceleration: {}\n".format(data.acceleration))

finally:
    pipe.stop()
09
T265 Coordinates - This example shows how to change coordinate systems of a T265 pose
此示例显示如何更改 T265 姿势的坐标系
#!/usr/bin/python
# -*- coding: utf-8 -*-
## License: Apache 2.0. See LICENSE file in root directory.
## Copyright(c) 2019 Intel Corporation. All Rights Reserved.

#####################################################
##           librealsense T265 rpy example         ##
#####################################################

# First import the library
import pyrealsense2 as rs
import math as m

# Declare RealSense pipeline, encapsulating the actual device and sensors
pipe = rs.pipeline()

# Build config object and request pose data
cfg = rs.config()
cfg.enable_stream(rs.stream.pose)

# Start streaming with requested config
pipe.start(cfg)

try:
    while (True):
        # Wait for the next set of frames from the camera
        frames = pipe.wait_for_frames()

        # Fetch pose frame
        pose = frames.get_pose_frame()
        if pose:
            # Print some of the pose data to the terminal
            data = pose.get_pose_data()

            # Euler angles from pose quaternion
            # See also https://github.com/IntelRealSense/librealsense/issues/5178#issuecomment-549795232
            # and https://github.com/IntelRealSense/librealsense/issues/5178#issuecomment-550217609

            w = data.rotation.w
            x = -data.rotation.z
            y = data.rotation.x
            z = -data.rotation.y

            pitch =  -m.asin(2.0 * (x*z - w*y)) * 180.0 / m.pi;
            roll  =  m.atan2(2.0 * (w*x + y*z), w*w - x*x - y*y + z*z) * 180.0 / m.pi;
            yaw   =  m.atan2(2.0 * (w*z + x*y), w*w + x*x - y*y - z*z) * 180.0 / m.pi;

            print("Frame #{}".format(pose.frame_number))
            print("RPY [deg]: Roll: {0:.7f}, Pitch: {1:.7f}, Yaw: {2:.7f}".format(roll, pitch, yaw))


finally:
    pipe.stop()
10
T265 Stereo - This example shows how to use T265 intrinsics and extrinsics in OpenCV to asynchronously compute depth maps from T265 fisheye images on the host.
这个例子展示了如何在 OpenCV 中使用 T265 内在函数和外在函数从主机上的 T265 鱼眼图像异步计算深度图。
#!/usr/bin/python
# -*- coding: utf-8 -*-
## License: Apache 2.0. See LICENSE file in root directory.
## Copyright(c) 2019 Intel Corporation. All Rights Reserved.
# Python 2/3 compatibility
from __future__ import print_function

"""
This example shows how to use T265 intrinsics and extrinsics in OpenCV to
asynchronously compute depth maps from T265 fisheye images on the host.
T265 is not a depth camera and the quality of passive-only depth options will
always be limited compared to (e.g.) the D4XX series cameras. However, T265 does
have two global shutter cameras in a stereo configuration, and in this example
we show how to set up OpenCV to undistort the images and compute stereo depth
from them.
Getting started with python3, OpenCV and T265 on Ubuntu 16.04:
First, set up the virtual enviroment:
$ apt-get install python3-venv  # install python3 built in venv support
$ python3 -m venv py3librs      # create a virtual environment in pylibrs
$ source py3librs/bin/activate  # activate the venv, do this from every terminal
$ pip install opencv-python     # install opencv 4.1 in the venv
$ pip install pyrealsense2      # install librealsense python bindings
Then, for every new terminal:
$ source py3librs/bin/activate  # Activate the virtual environment
$ python3 t265_stereo.py        # Run the example
"""

# First import the library
import pyrealsense2 as rs

# Import OpenCV and numpy
import cv2
import numpy as np
from math import tan, pi

"""
In this section, we will set up the functions that will translate the camera
intrinsics and extrinsics from librealsense into parameters that can be used
with OpenCV.
The T265 uses very wide angle lenses, so the distortion is modeled using a four
parameter distortion model known as Kanalla-Brandt. OpenCV supports this
distortion model in their "fisheye" module, more details can be found here:
https://docs.opencv.org/3.4/db/d58/group__calib3d__fisheye.html
"""

"""
Returns R, T transform from src to dst
"""
def get_extrinsics(src, dst):
    extrinsics = src.get_extrinsics_to(dst)
    R = np.reshape(extrinsics.rotation, [3,3]).T
    T = np.array(extrinsics.translation)
    return (R, T)

"""
Returns a camera matrix K from librealsense intrinsics
"""
def camera_matrix(intrinsics):
    return np.array([[intrinsics.fx,             0, intrinsics.ppx],
                     [            0, intrinsics.fy, intrinsics.ppy],
                     [            0,             0,              1]])

"""
Returns the fisheye distortion from librealsense intrinsics
"""
def fisheye_distortion(intrinsics):
    return np.array(intrinsics.coeffs[:4])

# Set up a mutex to share data between threads
from threading import Lock
frame_mutex = Lock()
frame_data = {"left"  : None,
              "right" : None,
              "timestamp_ms" : None
              }

"""
This callback is called on a separate thread, so we must use a mutex
to ensure that data is synchronized properly. We should also be
careful not to do much work on this thread to avoid data backing up in the
callback queue.
"""
def callback(frame):
    global frame_data
    if frame.is_frameset():
        frameset = frame.as_frameset()
        f1 = frameset.get_fisheye_frame(1).as_video_frame()
        f2 = frameset.get_fisheye_frame(2).as_video_frame()
        left_data = np.asanyarray(f1.get_data())
        right_data = np.asanyarray(f2.get_data())
        ts = frameset.get_timestamp()
        frame_mutex.acquire()
        frame_data["left"] = left_data
        frame_data["right"] = right_data
        frame_data["timestamp_ms"] = ts
        frame_mutex.release()

# Declare RealSense pipeline, encapsulating the actual device and sensors
pipe = rs.pipeline()

# Build config object and stream everything
cfg = rs.config()

# Start streaming with our callback
pipe.start(cfg, callback)

try:
    # Set up an OpenCV window to visualize the results
    WINDOW_TITLE = 'Realsense'
    cv2.namedWindow(WINDOW_TITLE, cv2.WINDOW_NORMAL)

    # Configure the OpenCV stereo algorithm. See
    # https://docs.opencv.org/3.4/d2/d85/classcv_1_1StereoSGBM.html for a
    # description of the parameters
    window_size = 5
    min_disp = 0
    # must be divisible by 16
    num_disp = 112 - min_disp
    max_disp = min_disp + num_disp
    stereo = cv2.StereoSGBM_create(minDisparity = min_disp,
                                   numDisparities = num_disp,
                                   blockSize = 16,
                                   P1 = 8*3*window_size**2,
                                   P2 = 32*3*window_size**2,
                                   disp12MaxDiff = 1,
                                   uniquenessRatio = 10,
                                   speckleWindowSize = 100,
                                   speckleRange = 32)

    # Retreive the stream and intrinsic properties for both cameras
    profiles = pipe.get_active_profile()
    streams = {"left"  : profiles.get_stream(rs.stream.fisheye, 1).as_video_stream_profile(),
               "right" : profiles.get_stream(rs.stream.fisheye, 2).as_video_stream_profile()}
    intrinsics = {"left"  : streams["left"].get_intrinsics(),
                  "right" : streams["right"].get_intrinsics()}

    # Print information about both cameras
    print("Left camera:",  intrinsics["left"])
    print("Right camera:", intrinsics["right"])

    # Translate the intrinsics from librealsense into OpenCV
    K_left  = camera_matrix(intrinsics["left"])
    D_left  = fisheye_distortion(intrinsics["left"])
    K_right = camera_matrix(intrinsics["right"])
    D_right = fisheye_distortion(intrinsics["right"])
    (width, height) = (intrinsics["left"].width, intrinsics["left"].height)

    # Get the relative extrinsics between the left and right camera
    (R, T) = get_extrinsics(streams["left"], streams["right"])

    # We need to determine what focal length our undistorted images should have
    # in order to set up the camera matrices for initUndistortRectifyMap.  We
    # could use stereoRectify, but here we show how to derive these projection
    # matrices from the calibration and a desired height and field of view

    # We calculate the undistorted focal length:
    #
    #         h
    # -----------------
    #  \      |      /
    #    \    | f  /
    #     \   |   /
    #      \ fov /
    #        \|/
    stereo_fov_rad = 90 * (pi/180)  # 90 degree desired fov
    stereo_height_px = 300          # 300x300 pixel stereo output
    stereo_focal_px = stereo_height_px/2 / tan(stereo_fov_rad/2)

    # We set the left rotation to identity and the right rotation
    # the rotation between the cameras
    R_left = np.eye(3)
    R_right = R

    # The stereo algorithm needs max_disp extra pixels in order to produce valid
    # disparity on the desired output region. This changes the width, but the
    # center of projection should be on the center of the cropped image
    stereo_width_px = stereo_height_px + max_disp
    stereo_size = (stereo_width_px, stereo_height_px)
    stereo_cx = (stereo_height_px - 1)/2 + max_disp
    stereo_cy = (stereo_height_px - 1)/2

    # Construct the left and right projection matrices, the only difference is
    # that the right projection matrix should have a shift along the x axis of
    # baseline*focal_length
    P_left = np.array([[stereo_focal_px, 0, stereo_cx, 0],
                       [0, stereo_focal_px, stereo_cy, 0],
                       [0,               0,         1, 0]])
    P_right = P_left.copy()
    P_right[0][3] = T[0]*stereo_focal_px

    # Construct Q for use with cv2.reprojectImageTo3D. Subtract max_disp from x
    # since we will crop the disparity later
    Q = np.array([[1, 0,       0, -(stereo_cx - max_disp)],
                  [0, 1,       0, -stereo_cy],
                  [0, 0,       0, stereo_focal_px],
                  [0, 0, -1/T[0], 0]])

    # Create an undistortion map for the left and right camera which applies the
    # rectification and undoes the camera distortion. This only has to be done
    # once
    m1type = cv2.CV_32FC1
    (lm1, lm2) = cv2.fisheye.initUndistortRectifyMap(K_left, D_left, R_left, P_left, stereo_size, m1type)
    (rm1, rm2) = cv2.fisheye.initUndistortRectifyMap(K_right, D_right, R_right, P_right, stereo_size, m1type)
    undistort_rectify = {"left"  : (lm1, lm2),
                         "right" : (rm1, rm2)}

    mode = "stack"
    while True:
        # Check if the camera has acquired any frames
        frame_mutex.acquire()
        valid = frame_data["timestamp_ms"] is not None
        frame_mutex.release()

        # If frames are ready to process
        if valid:
            # Hold the mutex only long enough to copy the stereo frames
            frame_mutex.acquire()
            frame_copy = {"left"  : frame_data["left"].copy(),
                          "right" : frame_data["right"].copy()}
            frame_mutex.release()

            # Undistort and crop the center of the frames
            center_undistorted = {"left" : cv2.remap(src = frame_copy["left"],
                                          map1 = undistort_rectify["left"][0],
                                          map2 = undistort_rectify["left"][1],
                                          interpolation = cv2.INTER_LINEAR),
                                  "right" : cv2.remap(src = frame_copy["right"],
                                          map1 = undistort_rectify["right"][0],
                                          map2 = undistort_rectify["right"][1],
                                          interpolation = cv2.INTER_LINEAR)}

            # compute the disparity on the center of the frames and convert it to a pixel disparity (divide by DISP_SCALE=16)
            disparity = stereo.compute(center_undistorted["left"], center_undistorted["right"]).astype(np.float32) / 16.0

            # re-crop just the valid part of the disparity
            disparity = disparity[:,max_disp:]

            # convert disparity to 0-255 and color it
            disp_vis = 255*(disparity - min_disp)/ num_disp
            disp_color = cv2.applyColorMap(cv2.convertScaleAbs(disp_vis,1), cv2.COLORMAP_JET)
            color_image = cv2.cvtColor(center_undistorted["left"][:,max_disp:], cv2.COLOR_GRAY2RGB)

            if mode == "stack":
                cv2.imshow(WINDOW_TITLE, np.hstack((color_image, disp_color)))
            if mode == "overlay":
                ind = disparity >= min_disp
                color_image[ind, 0] = disp_color[ind, 0]
                color_image[ind, 1] = disp_color[ind, 1]
                color_image[ind, 2] = disp_color[ind, 2]
                cv2.imshow(WINDOW_TITLE, color_image)
        key = cv2.waitKey(1)
        if key == ord('s'): mode = "stack"
        if key == ord('o'): mode = "overlay"
        if key == ord('q') or cv2.getWindowProperty(WINDOW_TITLE, cv2.WND_PROP_VISIBLE) < 1:
            break
finally:
    pipe.stop()
11
Realsense over Ethernet - This example shows how to stream depth data from RealSense depth cameras over ethernet
此示例显示如何通过以太网从 RealSense 深度相机传输深度数据。
12
Realsense Network Device Viewer - Shows how to connect to rs-server over network.
展示如何通过网络连接到 rs-server。
## License: Apache 2.0. See LICENSE file in root directory.
## Copyright(c) 2021 Intel Corporation. All Rights Reserved.

###############################################
##      Network viewer                       ##
###############################################

import sys
import numpy as np
import cv2
import pyrealsense2 as rs
import pyrealsense2_net as rsnet


if len(sys.argv) == 1:
    print( 'syntax: python net_viewer <server-ip-address>' )
    sys.exit(1)

ip = sys.argv[1]

ctx = rs.context()
print ('Connecting to ' + ip)
dev = rsnet.net_device(ip)
print ('Connected')
print ('Using device 0,', dev.get_info(rs.camera_info.name), ' Serial number: ', dev.get_info(rs.camera_info.serial_number))
dev.add_to(ctx)
pipeline = rs.pipeline(ctx)


# Start streaming
print ('Start streaming, press ESC to quit...')
pipeline.start()

try:
    while True:

        # Wait for a coherent pair of frames: depth and color
        frames = pipeline.wait_for_frames()
        depth_frame = frames.get_depth_frame()
        color_frame = frames.get_color_frame()
        if not depth_frame or not color_frame:
            continue

        # Convert images to numpy arrays
        depth_image = np.asanyarray(depth_frame.get_data())
        color_image = np.asanyarray(color_frame.get_data())

        # Apply colormap on depth image (image must be converted to 8-bit per pixel first)
        depth_colormap = cv2.applyColorMap(cv2.convertScaleAbs(depth_image, alpha=0.03), cv2.COLORMAP_JET)

        depth_colormap_dim = depth_colormap.shape
        color_colormap_dim = color_image.shape

        # If depth and color resolutions are different, resize color image to match depth image for display
        if depth_colormap_dim != color_colormap_dim:
            resized_color_image = cv2.resize(color_image, dsize=(depth_colormap_dim[1], depth_colormap_dim[0]), interpolation=cv2.INTER_AREA)
            images = np.hstack((resized_color_image, depth_colormap))
        else:
            images = np.hstack((color_image, depth_colormap))

        # Show images
        cv2.namedWindow('RealSense', cv2.WINDOW_AUTOSIZE)
        cv2.imshow('RealSense', images)
        k = cv2.waitKey(1) & 0xFF
        if k == 27:    # Escape
            cv2.destroyAllWindows()
            break

finally:
    # Stop streaming
    pipeline.stop()

print ("Finished")
13
D400 self-calibration demo - Provides a reference implementation for D400 Self-Calibration Routines flow. The scripts performs On-Chip Calibration, followed by Focal-Length calibration and finally, the Tare Calibration sub-routines. Follow the White Paper Link for in-depth description of the provided calibration methods.
为 D400 自校准例程流程提供参考实施。这些脚本执行片上校准,然后是焦距校准,最后是皮重校准子程序。按照白皮书链接深入了解所提供的校准方法。
## License: Apache 2.0. See LICENSE file in root directory.
## Copyright(c) 2021 Intel Corporation. All Rights Reserved.

#####################################################
##                   auto calibration              ##
#####################################################

import argparse
import json
import sys
import time

import pyrealsense2 as rs

__desc__ = """
This script demonstrates usage of Self-Calibration (UCAL) APIs
"""

# mappings
occ_speed_map = {
    'very_fast': 0,
    'fast': 1,
    'medium': 2,
    'slow': 3,
    'wall': 4,
}
tare_accuracy_map = {
    'very_high': 0,
    'high': 1,
    'medium': 2,
    'low': 3,
}
scan_map = {
    'intrinsic': 0,
    'extrinsic': 1,
}
fl_adjust_map = {
    'right_only': 0,
    'both_sides': 1
}

ctx = rs.context()


def main(arguments=None):
    args = parse_arguments(arguments)

    try:
        device = ctx.query_devices()[0]
    except IndexError:
        print('Device is not connected')
        sys.exit(1)

    # Verify Preconditions:
    # 1. The script is applicable for D400-series devices only
    cam_name = device.get_info(rs.camera_info.name) if device.supports(rs.camera_info.name) else "Unrecognized camera"
    if device.supports(rs.camera_info.product_line):
        device_product_line = str(device.get_info(rs.camera_info.product_line))
        if device_product_line != 'D400':
            print(f'The example is intended for RealSense D400 Depth cameras, and is not', end =" ")
            print(f'applicable with {cam_name}')
            sys.exit(1)
    # 2. The routine assumes USB3 connection type
    #    In case of USB2 connection, the streaming profiles should be readjusted
    if device.supports(rs.camera_info.usb_type_descriptor):
        usb_type = device.get_info(rs.camera_info.usb_type_descriptor)
        if not usb_type.startswith('3.'):
            print('The script is designed to run with USB3 connection type.')
            print('In order to enable it with USB2.1 mode the fps rates for the Focal Length and Ground Truth calculation stages should be re-adjusted')
            sys.exit(1)


    # prepare device
    depth_sensor = device.first_depth_sensor()
    depth_sensor.set_option(rs.option.emitter_enabled, 0)
    if depth_sensor.supports(rs.option.thermal_compensation):
        depth_sensor.set_option(rs.option.thermal_compensation, 0)
    if args.exposure == 'auto':
        depth_sensor.set_option(rs.option.enable_auto_exposure, 1)
    else:
        depth_sensor.set_option(rs.option.enable_auto_exposure, 0)
        depth_sensor.set_option(rs.option.exposure, int(args.exposure))

    print("Starting UCAL...")
    try:
        # The recomended sequence of procedures: On-Chip -> Focal Length -> Tare Calibration
        run_on_chip_calibration(args.onchip_speed, args.onchip_scan)
        run_focal_length_calibration((args.target_width, args.target_height), args.focal_adjustment)
        run_tare_calibration(args.tare_accuracy, args.tare_scan, args.tare_gt, (args.target_width, args.target_height))
    finally:
        if depth_sensor.supports(rs.option.thermal_compensation):
            depth_sensor.set_option(rs.option.thermal_compensation, 1)
    print("UCAL finished successfully")


def progress_callback(progress):
    print(f'\rProgress  {progress}% ... ', end ="\r")

def run_on_chip_calibration(speed, scan):
    data = {
        'calib type': 0,
        'speed': occ_speed_map[speed],
        'scan parameter': scan_map[scan],
        'white_wall_mode': 1 if speed == 'wall' else 0,
    }

    args = json.dumps(data)

    cfg = rs.config()
    cfg.enable_stream(rs.stream.depth, 256, 144, rs.format.z16, 90)
    pipe = rs.pipeline(ctx)
    pp = pipe.start(cfg)
    dev = pp.get_device()

    try:

        print('Starting On-Chip calibration...')
        print(f'\tSpeed:\t{speed}')
        print(f'\tScan:\t{scan}')
        adev = dev.as_auto_calibrated_device()
        table, health = adev.run_on_chip_calibration(args, progress_callback, 30000)
        print('On-Chip calibration finished')
        print(f'\tHealth: {health}')
        adev.set_calibration_table(table)
        adev.write_calibration()
    finally:
        pipe.stop()


def run_focal_length_calibration(target_size, adjust_side):
    number_of_images = 25
    timeout_s = 30

    cfg = rs.config()
    cfg.enable_stream(rs.stream.infrared, 1, 1280, 720, rs.format.y8, 30)
    cfg.enable_stream(rs.stream.infrared, 2, 1280, 720, rs.format.y8, 30)

    lq = rs.frame_queue(capacity=number_of_images, keep_frames=True)
    rq = rs.frame_queue(capacity=number_of_images, keep_frames=True)

    counter = 0
    flags = [False, False]

    def cb(frame):
        nonlocal counter, flags
        if counter > number_of_images:
            return
        for f in frame.as_frameset():
            p = f.get_profile()
            if p.stream_index() == 1:
                lq.enqueue(f)
                flags[0] = True
            if p.stream_index() == 2:
                rq.enqueue(f)
                flags[1] = True
            if all(flags):
                counter += 1
        flags = [False, False]

    pipe = rs.pipeline(ctx)
    pp = pipe.start(cfg, cb)
    dev = pp.get_device()

    try:
        print('Starting Focal-Length calibration...')
        print(f'\tTarget Size:\t{target_size}')
        print(f'\tSide Adjustment:\t{adjust_side}')
        stime = time.time()
        while counter < number_of_images:
            time.sleep(0.5)
            if timeout_s < (time.time() - stime):
                raise RuntimeError(f"Failed to capture {number_of_images} frames in {timeout_s} seconds, got only {counter} frames")

        adev = dev.as_auto_calibrated_device()
        table, ratio, angle = adev.run_focal_length_calibration(lq, rq, target_size[0], target_size[1],
                                                                fl_adjust_map[adjust_side],progress_callback)
        print('Focal-Length calibration finished')
        print(f'\tRatio:\t{ratio}')
        print(f'\tAngle:\t{angle}')
        adev.set_calibration_table(table)
        adev.write_calibration()
    finally:
        pipe.stop()


def run_tare_calibration(accuracy, scan, gt, target_size):
    data = {'scan parameter': scan_map[scan],
            'accuracy': tare_accuracy_map[accuracy],
            }
    args = json.dumps(data)

    print('Starting Tare calibration...')
    if gt == 'auto':
        target_z = calculate_target_z(target_size)
    else:
        target_z = float(gt)

    cfg = rs.config()
    cfg.enable_stream(rs.stream.depth, 256, 144, rs.format.z16, 90)
    pipe = rs.pipeline(ctx)
    pp = pipe.start(cfg)
    dev = pp.get_device()

    try:
        print(f'\tGround Truth:\t{target_z}')
        print(f'\tAccuracy:\t{accuracy}')
        print(f'\tScan:\t{scan}')
        adev = dev.as_auto_calibrated_device()
        table = adev.run_tare_calibration(target_z, args, progress_callback, 30000)
        print('Tare calibration finished')
        adev.set_calibration_table(table)
        adev.write_calibration()

    finally:
        pipe.stop()


def calculate_target_z(target_size):
    number_of_images = 50 # The required number of frames is 10+
    timeout_s = 30

    cfg = rs.config()
    cfg.enable_stream(rs.stream.infrared, 1, 1280, 720, rs.format.y8, 30)

    q = rs.frame_queue(capacity=number_of_images, keep_frames=True)
    # Frame queues q2, q3 should be left empty. Provision for future enhancements.
    q2 = rs.frame_queue(capacity=number_of_images, keep_frames=True)
    q3 = rs.frame_queue(capacity=number_of_images, keep_frames=True)

    counter = 0

    def cb(frame):
        nonlocal counter
        if counter > number_of_images:
            return
        for f in frame.as_frameset():
            q.enqueue(f)
            counter += 1

    pipe = rs.pipeline(ctx)
    pp = pipe.start(cfg, cb)
    dev = pp.get_device()

    try:
        stime = time.time()
        while counter < number_of_images:
            time.sleep(0.5)
            if timeout_s < (time.time() - stime):
                raise RuntimeError(f"Failed to capture {number_of_images} frames in {timeout_s} seconds, got only {counter} frames")

        adev = dev.as_auto_calibrated_device()
        print('Calculating distance to target...')
        print(f'\tTarget Size:\t{target_size}')
        target_z = adev.calculate_target_z(q, q2, q3, target_size[0], target_size[1])
        print(f'Calculated distance to target is {target_z}')
    finally:
        pipe.stop()

    return target_z


def parse_arguments(args):
    parser = argparse.ArgumentParser(description=__desc__)

    parser.add_argument('--exposure', default='auto', help="Exposure value or 'auto' to use auto exposure")
    parser.add_argument('--target-width', default=175, type=int, help='The target width')
    parser.add_argument('--target-height', default=100, type=int, help='The target height')

    parser.add_argument('--onchip-speed', default='medium', choices=occ_speed_map.keys(), help='On-Chip speed')
    parser.add_argument('--onchip-scan', choices=scan_map.keys(), default='intrinsic', help='On-Chip scan')

    parser.add_argument('--focal-adjustment', choices=fl_adjust_map.keys(), default='right_only',
                        help='Focal-Length adjustment')

    parser.add_argument('--tare-gt', default='auto',
                        help="Target ground truth, set 'auto' to calculate using target size"
                             "or the distance to target in mm to use a custom value")
    parser.add_argument('--tare-accuracy', choices=tare_accuracy_map.keys(), default='medium', help='Tare accuracy')
    parser.add_argument('--tare-scan', choices=scan_map.keys(), default='intrinsic', help='Tare scan')

    return parser.parse_args(args)


if __name__ == '__main__':
    main()
本文内容由网友自发贡献,版权归原作者所有,本站不承担相应法律责任。如您发现有涉嫌抄袭侵权的内容,请联系:hwhale#tublm.com(使用前将#替换为@)