YOLOv3 从入门到部署:(五)YOLOv3模型的部署(基于C++ opencv)

2023-05-16

文章目录

  • YOLOv3 从入门到部署:(五)YOLOv3模型的部署(基于C++ opencv)
    • 目录
    • 关于opencv的DNN介绍
    • 代码讲解
    • 效果展示

YOLOv3 从入门到部署:(五)YOLOv3模型的部署(基于C++ opencv)

目录

关于opencv的DNN介绍

DNN是一个opencv的前向推理模块,支持从.onnx,.weights等格式的文件导入网络模型,然后进行前向推理。但是目前DNN有很多网络层不被支持,在我所使用的4.5.1版本中,即使是简单的torch.arange和torch.exp都不被支持。不过我最近发现在4.5.2预览版本的api文档中,DNN已经支持了这些网络层,也就是说以后使用DNN部署模型会更加方便。对于没有的网络层,我们可以使用自定义的方法,详细内容见下面的代码.

参考代码
链接1
链接2

本博客代码
https://github.com/qqsuhao/yolo-fastest-xl-based-on-opencv-DNN-using-onnx

代码讲解

yolo.h

#pragma once
#include <fstream>
#include <sstream>
#include <iostream>
#include <opencv2/dnn.hpp>
#include <opencv2/imgproc.hpp>
#include <opencv2/highgui.hpp>
#include <opencv2/core.hpp>
#include <opencv2/dnn/layer.details.hpp>

using namespace cv;
using namespace dnn;
using namespace std;

struct Net_config				// 网络配置
{
	float confThreshold;		// 置信度门限
	float nmsThreshold;			// NMS门限
	int inpWidth;				// 模型输入图像宽度
	int inpHeight;				// 模型输出图像高度
	string classesFile;			// 存放类别名称的文件 coco.name
	string modelConfiguration;	// 模型文件  .cfg
	string modelWeights;		// 模型权重文件
	string netname;				// 网络名称
};


class YOLO {
public:
	YOLO(Net_config config);				// 构造函数
	void detect(Mat& frame);				// 进行检测
	void setcapSize(int width, int height);		// 获取摄像头的分辨率
private:
	float confThreshold;			// 置信度门限
	float nmsThreshold;				// nms门限
	int inpWidth;					// 模型输入图像宽度
	int inpHeight;					// 模型输入图像高度
	int capWidth;					// 相机拍摄图像的宽度
	int capHeight;					// 相机拍摄图像的高度
	float scaleHeight;				// 模型输入图像到相机拍摄图像的高度缩放因子
	float scaleWidth;				// 模型输入图像到相机拍摄图像的宽度缩放因子
	char netname[20];				// 网络名字
	vector<string> classes;			// 存放类别的名字
	Net net;						// dnn::net类型
	void postprocess(Mat& frame, const vector<Mat>& outs);			// 后处理,主要是使用nms筛选目标
	void drawPred(int classId, float conf, int left, int top, int right, int bottom, Mat& frame);	// 绘制目标的检测结果以及置信度等参数
};


class ExpLayer : public cv::dnn::Layer {       // 自定义网络层Exp,参考https://github.com/berak/opencv_smallfry/blob/605f5fdb4b55d8e5fe7e4c859cb0784d1007ffdd/demo/cpp/pnet.cpp
public:
	ExpLayer(const cv::dnn::LayerParams &params) : Layer(params) {
	}

	static cv::Ptr<cv::dnn::Layer> create(cv::dnn::LayerParams& params) {
		return cv::Ptr<cv::dnn::Layer>(new ExpLayer(params));
	}

	virtual bool getMemoryShapes(const std::vector<std::vector<int> > &inputs,
		const int requiredOutputs,
		std::vector<std::vector<int> > &outputs,
		std::vector<std::vector<int> > &internals) const CV_OVERRIDE {
		CV_UNUSED(requiredOutputs); CV_UNUSED(internals);
		std::vector<int> outShape(4);
		outShape[0] = inputs[0][0];  // batch size
		outShape[1] = inputs[0][1];  // number of channels
		outShape[2] = inputs[0][2];
		outShape[3] = inputs[0][3];
		outputs.assign(1, outShape);
		return false;
	}

	virtual void forward(cv::InputArrayOfArrays inputs_arr,
		cv::OutputArrayOfArrays outputs_arr,
		cv::OutputArrayOfArrays internals_arr) CV_OVERRIDE {
		std::vector<cv::Mat> inputs, outputs;
		inputs_arr.getMatVector(inputs);
		outputs_arr.getMatVector(outputs);

		cv::Mat& inp = inputs[0];
		cv::Mat& out = outputs[0];

		exp(inp, out);			// 关键的一句代码
	}
};

yolo.cpp

#include "yolo.h"

YOLO::YOLO(Net_config config) {
	cout << "Net use " << config.netname << endl;
	this->confThreshold = config.confThreshold;				// 初始化置信度门限
	this->nmsThreshold = config.nmsThreshold;				// 初始化nms门限
	this->inpWidth = config.inpWidth;						// 初始化输入图像宽度
	this->inpHeight = config.inpHeight;						// 初始化输入图像高度
	strcpy_s(this->netname, config.netname.c_str());	// 初始化网络名称

	ifstream ifs(config.classesFile.c_str());
	string line;
	while (getline(ifs, line)) this->classes.push_back(line);		// 从coco.name加载类别名称

	this->net = readNetFromONNX(config.modelConfiguration);		// 加载网络文件和权重文件
	this->net.setPreferableBackend(DNN_BACKEND_OPENCV);		 // 根据计算机的配置设置加速方法,支持cpu,cuda,fpga,具体可以看源码
	this->net.setPreferableTarget(DNN_TARGET_CPU);
}


void YOLO::setcapSize(int width, int height) {
	this->capHeight = height;
	this->capWidth = width;
	this->scaleHeight = float(this->capHeight) / this->inpHeight;
	this->scaleWidth = float(this->capWidth) / this->inpWidth;
}


void YOLO::postprocess(Mat& frame, const vector<Mat>& outs)   // Remove the bounding boxes with low confidence using non-maxima suppression
{
	vector<int> classIds;
	vector<float> confidences;
	vector<float> scores;
	vector<Rect> boxes;

	for (size_t i = 0; i < outs.size(); ++i) {
		// Scan through all the bounding boxes output from the network and keep only the
		// ones with high confidence scores. Assign the box's class label as the class
		// with the highest score for the box.
		float* data = (float*)outs[i].data;
		for (int j = 0; j < outs[i].rows; ++j, data += outs[i].cols) {
			Mat score = outs[i].row(j).colRange(5, outs[i].cols);		// 使用80个类别的概率作为score
			Point classIdPoint;
			double max_score;
			// Get the value and location of the maximum score
			minMaxLoc(score, 0, &max_score, 0, &classIdPoint);		// 查询score中最大的元素及其位置
			if (data[4] > this->confThreshold) {		// data[4]是置信度
				int centerX = (int)(data[0] * this->scaleWidth);		// yolo的输出位置是相对于模型输入图像大小的
				int centerY = (int)(data[1] * this->scaleHeight);		// 因此需要进行简单的缩放
				int width = (int)(data[2] * this->scaleWidth);
				int height = (int)(data[3] * this->scaleHeight);
				int left = centerX - width / 2;
				int top = centerY - height / 2;

				classIds.push_back(classIdPoint.x);
				confidences.push_back(data[classIdPoint.x+5]);
				scores.push_back(max_score*data[4]);			
				boxes.push_back(Rect(left, top, width, height));
			}
		}
	}

	// Perform non maximum suppression to eliminate redundant overlapping boxes with
	// lower confidences
	vector<int> indices;
	NMSBoxes(boxes, scores, this->confThreshold, this->nmsThreshold, indices);  // 使用opencv自带的nms
	for (size_t i = 0; i < indices.size(); ++i) {
		int idx = indices[i];
		Rect box = boxes[idx];
		this->drawPred(classIds[idx], confidences[idx], box.x, box.y,
			box.x + box.width, box.y + box.height, frame);
	}
}

void YOLO::drawPred(int classId, float conf, int left, int top, int right, int bottom, Mat& frame)   // Draw the predicted bounding box
{
	//Draw a rectangle displaying the bounding box
	rectangle(frame, Point(left, top), Point(right, bottom), Scalar(0, 0, 255), 3);

	//Get the label for the class name and its confidence
	string label = format("%.2f", conf);
	if (!this->classes.empty()) {
		CV_Assert(classId < (int)this->classes.size());
		label = this->classes[classId] + ":" + label;
	}

	//Display the label at the top of the bounding box
	int baseLine;
	Size labelSize = getTextSize(label, FONT_HERSHEY_SIMPLEX, 0.5, 1, &baseLine);
	top = max(top, labelSize.height);
	// rectangle(frame, Point(left, top - int(1.5 * labelSize.height)), Point(left + int(1.5 * labelSize.width), top + baseLine), Scalar(0, 255, 0), FILLED);
	putText(frame, label, Point(left, top), FONT_HERSHEY_SIMPLEX, 0.75, Scalar(0, 255, 0), 2);
}

void YOLO::detect(Mat& frame) {
	Mat blob;
	blobFromImage(frame, blob, double(1 / 255.0), Size(this->inpWidth, this->inpHeight), Scalar(0, 0, 0), true, false);
	// blobFromImage进行预处理:归一化,resize,减去均值,交换绿色和蓝色通道,不进行裁剪
	this->net.setInput(blob);		// 输入模型
	vector<Mat> outs_blob;
	vector<Mat> outs;
	vector<String> names = this->net.getUnconnectedOutLayersNames();		// 获取网络输出层信息
	this->net.forward(outs_blob, names);		// 模型的输出结果存入outs_blob,由于我们的yolo模型有两个yolo层,因此输出有两个
	int i = 0;
	for (i = 0; i < outs_blob.size(); i++) {
		vector<Mat> out;
		// 我们的onnx的输出是一个维度为 num_samples*1*(num_anchors*grid*grid)*6 的4维度矩阵,这是一个blob类型
		// 因此需要使用imagesFromBlob将blob转为mat;一个blob可能对应多个mat,个数即为num_samples
		// 由于我们只有一个样本,所以我们只有out[0]
		// 两个yolo层分别产生一个blob
		imagesFromBlob(outs_blob[i], out);			
		outs.push_back(out[0]);
	}
	this->postprocess(frame, outs);			// 后处理

	vector<double> layersTimes;
	double freq = getTickFrequency() / 1000;   // 用于返回CPU的频率。get Tick Frequency。这里的单位是秒
	double t = net.getPerfProfile(layersTimes) / freq;		// getPerfProfile 网络推理次数   次数/频率=时间
	string label = format("%s Inference time : %.2f ms", this->netname, t);
	putText(frame, label, Point(0, 30), FONT_HERSHEY_SIMPLEX, 1, Scalar(0, 0, 255), 2);
	//imwrite(format("%s_out.jpg", this->netname), frame);
}

mian.cpp

#include "yolo.h"

using namespace cv;
using namespace std;


int main() {
	CV_DNN_REGISTER_LAYER_CLASS(Exp, ExpLayer);		// 添加自定义的网络层
	
	Net_config yolo_nets[1] = {
		{ 0.5f, 0.3f, 320, 320,"coco.names", "yolo-fastest-xl.onnx", "yolo-fastest-xl.onnx", "yolo-fastest-xl" }
	};

	YOLO yolo_model(yolo_nets[0]);

	static const string kWinName = "Deep learning object detection in OpenCV";
	namedWindow(kWinName, WINDOW_KEEPRATIO);
	VideoCapture cap;
	cap.open(0);
	Mat srcimg;
	while (1) {
		cap >> srcimg;
		yolo_model.setcapSize(srcimg.cols, srcimg.rows);
		yolo_model.detect(srcimg);
		imshow(kWinName, srcimg);
		waitKey(10);
	}
	destroyAllWindows();

	return 0;
}

效果展示

在这里插入图片描述
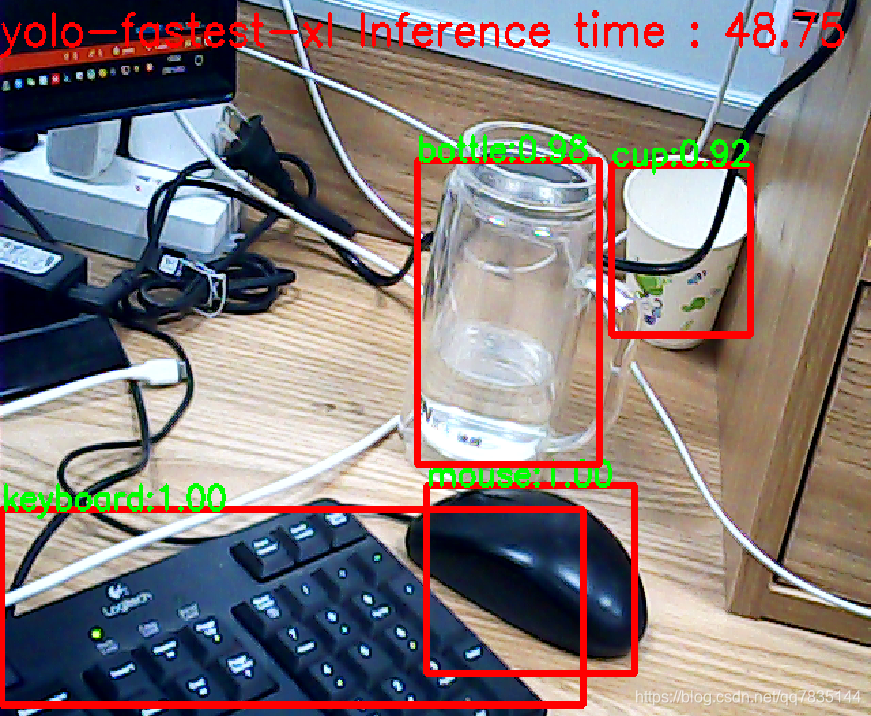
release模式下,推理速度大约是50ms左右。

本文内容由网友自发贡献,版权归原作者所有,本站不承担相应法律责任。如您发现有涉嫌抄袭侵权的内容,请联系:hwhale#tublm.com(使用前将#替换为@)

YOLOv3 从入门到部署:(五)YOLOv3模型的部署(基于C++ opencv) 的相关文章

  • 在 Python 3.5 64 位上通过 pip 安装 OpenCV

    我尝试安装 OpenCV 但找不到任何合适的 pip 软件包 我决定上网查找有关如何安装它的官方文档 并发现this https opencv python tutroals readthedocs io en latest py tuto
  • 使用 openCV 和 python 检测物体

    我正在尝试使用 OpenCV 和 Python 检测下图中的白点 我尝试使用函数 cv2 HoughCircles 但没有成功 我需要使用不同的方法吗 这是我的代码 import cv2 cv import numpy as np impo
  • opencv中矩阵的超快中值(与matlab一样快)

    我正在 openCV 中编写一些代码 想要找到一个非常大的矩阵数组 单通道灰度 浮点数 的中值 我尝试了几种方法 例如对数组进行排序 使用 std sort 和选择中间条目 但与 matlab 中的中值函数相比 它非常慢 准确地说 在 ma
  • 使用 opencv warpPerspective() 生成道路的自上而下视图

    我正在尝试实施逆透视映射计算与道路上另一辆车的距离 我知道在应用该函数之前我需要生成一个包含源点和目标点的变换矩阵warpPerspective 但我不知道如何计算目的地点 我在这个论坛和其他网站中搜索 但无法将第一张图片转换为第二张图片
  • 在 RGB 图像上绘制多类语义分割透明叠加

    我有语义分割掩码的结果 值在 0 1 之间 需要大津阈值来确定什么是积极的 我想直接在 RGB 图像上绘制 在 RGB 图像上每个预测类具有不同的随机颜色 我使用以下内容绘制了具有单一颜色的单个蒙版 是否有一个包或简单的策略可以为多类别做到
  • 如何在给定目标大小的情况下在 python 中调整图像大小,同时保留纵横比?

    首先 我觉得这是一个愚蠢的问题 对此感到抱歉 目前 我发现计算最佳缩放因子 目标像素数的最佳宽度和高度 同时保留纵横比 的最准确方法是迭代并选择最佳缩放因子 但是必须有更好的方法来做到这一点 一个例子 import cv2 numpy as
  • 来自 OpenCV 的外部参数

    我正在使用 OpenCV 来校准立体相机对 我拍摄了各种校准照片 并且使用 cv2 calibrateCamera 对内在参数进行了令人满意的拟合 然而 目前尚不清楚如何获取外部参数 该函数仅返回cameraMatrix 尽管它很有用 但实
  • 在加载“cv2”二进制扩展期间检测到递归

    我有一个小程序 在 pyinstaller 编译后返回 opencv 错误 但无需编译即可工作 我在 Windows 10 上使用 Python 3 8 10 Program 导入 pyautogui将 numpy 导入为 np导入CV2
  • 如何计算图像中的 RGB 或 HSV 通道组合?

    我使用 python opencv 加载形状为 30 100 3 的图像 现在想要按颜色计算所有颜色的频率 我不是指单个通道 而是指通道组合 含义 3 个频道列表 例如 255 0 0 表示红色 255 255 0 表示黄色 100 100
  • 在 QtCreator 中将 OpenCV 2.3 与 Qt 结合使用

    随着 OpenCV 2 3 版本终于发布 我想在我的系统上编译并安装这个最新版本 由于我经常使用 Qt 和 QtCreator 我当然希望能够在我的 Qt 项目中使用它 我已经尝试了几种方法几个小时 但总是出现错误 第一次尝试 使用WITH
  • OpenCV 错误:使用 COLOR_BGR2GRAY 函数时断言失败

    我在使用 opencv 时遇到了一个奇怪的问题 我在 jupyter 笔记本中工作时没有任何问题 但在尝试运行此 Sublime 时却出现问题 错误是 OpenCV错误 cvtColor中断言失败 深度 CV 8U 深度 CV 16U 深度
  • 来自连接到远程机器的相机的 Opencv 流

    我正在用 python 开发一个 wx 应用程序 用于流式传输和显示来自两个不同网络摄像头的视频 这工作正常 但现在我需要在不同的场景中执行此操作 其中两个摄像头连接在通过网络连接的 Windows 上运行的单独计算机中 我的应用程序将在机
  • 无法在 Windows 7 机器中使用 OpenCV 2.4.3、Python 2.7 打开“.mp4”视频文件

    我目前正在进行一个涉及读取 mp4 视频文件的项目 我遇到的问题是它在Windows 7机器上使用Python 2 7 32位 OpenCV 2 4 3 cv2 pyd 代码片段如下 try video cv2 VideoCapture v
  • 如何将输出视频保存到 OpenCV 中的文件中

    我想将输出视频保存到文件中而不是显示它并尝试使用 cvcaptureimage 但仍然无法获得结果 include
  • opencv 2.3.* 读取不工作

    我无法让 imread 工作 与这个人有同样的问题 OpenCV imwrite 2 2 在 Windows 7 上导致异常 并显示消息 OpenCV 错误 未指定错误 无法找到指定扩展名的编写器 https stackoverflow c
  • minAreaRect OpenCV 返回的裁剪矩形 [Python]

    minAreaRectOpenCV 中返回一个旋转的矩形 如何裁剪矩形内图像的这部分 boxPoints返回旋转矩形的角点的坐标 以便可以通过循环框内的点来访问像素 但是在 Python 中是否有更快的裁剪方法 EDIT See code在
  • OpenCV 2.4.3 中的阴影去除

    我正在使用 OpenCV 2 4 3 最新版本 使用内置的视频流检测前景GMG http docs opencv org modules gpu doc video html highlight gmg gpu 3a 3aGMG GPU算法
  • 在 Python 中将 OpenCV 帧流式传输为 HTML

    我正在尝试从 opencv Pyt hon 中的 URL 读取视频 然后逐帧处理它 然后将其发送到 HTML 页面 But I am only getting the first frame after that the program g
  • OpenCV VideoWriter 未写入 Output.avi

    我正在尝试编写一段简单的代码来获取视频 裁剪视频并写入输出文件 系统设置 OS Windows 10 Conda Environment Python Version 3 7 OpenCV Version 3 4 2 ffmpeg Vers
  • 在 Visual Studio C++ 2008 中包含 dll

    有没有办法将 dll 包含在项目中 这样我就不必在编译后将这些 dll 与可执行文件放在同一文件夹中 这样我就可以用它们编译我的项目 这是否有可能 如果是 有人可以指导我 我的项目是一个 opencv 项目 有很多 dll 我必须包含在文件

随机推荐

  • datetimepicker 控件验证问题

    34 baseStudents activistTime 34 trigger 39 blur 39 validators notEmpty message 39 确定积极分子时间不能为空 39 span class hljs tag lt
  • eclipse中SVN分支合并到主干

    在项目开发中 xff0c 需要添加一些新的功能 xff0c 但是又不想影响到其他开发人员的项目进度 xff0c 所以决定使用SVN分支进行开发 xff0c 分支开发完毕后再合并到主干 本文介绍如何在eclipse中合并分支到主干 要想将分支
  • 阿里云服务器

    一年多之前 xff0c 也就11年5月份的样子 xff0c 阿里云云服务器产品线终于上线了 但那时候 xff0c 国内完全没有能称得上云服务器的 xff0c 很多小公司就是搞个VPS就叫云服务器了 以至于阿里云云服务器刚出来的时候 xff0
  • mac 下 使用 iterm2 配置及快键键使用

    mac 下 使用 iterm2 配置及快键键使用 标签 xff08 空格分隔 xff09 xff1a mac 之前介绍过一篇关于mac 下使用和配置 iterm2的blog 今天这篇稍微详细一点介绍 并且搭配 zsh zsh 会单独开一篇博
  • Java实现快速排序

    一 原理 快速排序算法通过多次比较和交换来实现排序 xff0c 其排序流程如下 xff1a 1 首先设定一个分界值 xff0c 通过该分界值将数组分成左右两部分 2 将大于或等于分界值的数据集中到数组右边 xff0c 小于分界值的数据集中到
  • C#,生信软件实践(03)——DNA数据库GenBank格式详解及转为FASTA序列格式的源代码

    1 GenBank 1 1 NCBI 美国国家生物技术信息中心 xff08 美国国立生物技术信息中心 xff09 NCBI xff08 美国国立生物技术信息中心 xff09 是在NIH的国立医学图书馆 xff08 NLM xff09 的一个
  • 【坑】zsh和oh-my-zsh卸载后导致无法登陆

    apt get remove zsh 然后断开终端 xff0c 就再也连不上了 xff0c 崩溃啊 xff01 以下登陆为www用户登陆 各种找 xff0c 到这里 https www cnblogs com EasonJim p 7863
  • 获取最近使用应用列表

    获取最近使用的应用列表需要使用到UsageStatsManager类 xff0c 还需要申请允许防御应用使用情况的权限 private void getPackagesInfo UsageStatsManager manager 61 Us
  • 使用MediaProjectionManager进行截屏

    最近项目中有用到远程截屏并上传截屏文件的需求 一开始使用的是以下方法进行截屏 xff1a private void screenshot 获取屏幕 View dView 61 getWindow getDecorView dView set
  • 安卓TV开发遇到的那些坑

    最近公司需要开发一个TV的luancher xff0c 就是那种纯物理按键的遥控 xff0c 没有触摸屏 xff0c 现在说说我踩得那些坑 xff08 其实布局和代码逻辑和正常的安卓应用差不多 xff09 1 焦点 焦点 焦点 xff0c
  • 安卓TV列表刷新时焦点自动变成第一个

    最近在开发安卓TV项目 xff0c 列表调用notifyDataSetChanged xff08 xff09 方法刷新数据时 xff0c 焦点自动就变成第一个子item去了 xff0c 查了半天发现用notifyItemRangeChang
  • 安卓蓝牙BLE设备通讯发送和接受超过20个字节的问题

    最近做的项目是手机端和BLE设备通讯 xff0c 而BLE设备又做了限制一次包只能传递20个字节的数据 xff0c 多了就得分包发送 xff0c 在这里记录一下如何解决这个问题 xff08 PS xff1a 之前链接什么的回调什么的 就不过
  • 获取最近运行应用方法和杀进程的方法

    最近公司的项目有个需求就是获取最近手机正在运行的进程 xff0c 以及杀掉进程 就是类似于安卓手机中的长按home键的效果 先说说获取最近手机正在运行的进程方法 xff1a 直接上代码 xff0c 代码中有注释 xff1a appbeans
  • 把自己的应用程序push至system/app下,把自己的app改成系统级别的app

    想把一个应用程序放入到系统文件夹下的话 xff0c 手机必须的root的情况下才能push进去 下面我就说说步骤吧 xff1a 1 先把手机用USB和电脑连接 2 如果电脑配置了adb的环境的话直接cmd xff0c 未配置环境的话找到sd
  • ConcurrentModificationException异常出现原因以及解决方法

    今天在开发过程中遇到一个异常叫ConcurrentModificationException xff0c 这个异常用我的白话翻译是叫同时修改异常 这个异常是怎么出现的呢 xff0c 先看看已下的代码 xff1a span class hlj
  • retrofit中使用body标签传RequestBody

    现在的Android开发者基本上都用过retrofit这个第三方网络请求库吧 xff01 xff01 xff01 网络请求中有get post delete和put等等请求方式 现在我们需要用到post请求 xff1a span class
  • SpringBoot配置拦截器拦截器使用

    拦截器介绍 Java中的拦截器是动态拦截 action 调用的对象 xff0c 然后提供了可以在 action 执行前后增加一些操作 xff0c 也可以在 action执行前停止操作 xff0c 功能与过滤器类似 xff0c 但是标准和实现
  • 百度地图上根据经纬度集合绘制行车轨迹

    以下是素材 最近项目中用到了根据一段线路的经纬度集合来在地图上播放该车辆的行驶轨迹的需求 下面我就讲一下我实现步骤 效果图如下 因为制作gif图为了控制大小去掉了很多帧 不必在意这些细节 嘿嘿 1 首先在界面上展示百度地图 这不是废话么 如
  • skip-GANomaly复现总结

    文章目录 skip GANomaly复现总结附MvTec数据集介绍实验结果总结谈谈我对于skip GANomaly的看法最后的感想 代码 skip GANomaly复现总结 附MvTec数据集 链接 xff1a https pan baid
  • YOLOv3 从入门到部署:(五)YOLOv3模型的部署(基于C++ opencv)

    文章目录 YOLOv3 从入门到部署 xff1a xff08 五 xff09 YOLOv3模型的部署 xff08 基于C 43 43 opencv xff09 目录关于opencv的DNN介绍代码讲解效果展示 YOLOv3 从入门到部署 x