iOS里面的富文本
- 1、NSAttributedString属性概览表
- 2、属性详解及应用
- 2.1 NSAttributedString.Key.font --字体大小
- 2.2 NSAttributedString.Key.paragraphStyle -- 文本字、行间距,对齐等
- 2.3 NSAttributedString.Key.foregroundColor -- 字体颜色
- 2.4 NSAttributedString.Key.backgroundColor -- 背景色
- 2.5 NSAttributedString.Key.ligature -- 连字符
- 2.6 NSAttributedString.Key.kern -- 字符间距
- 2.7 设置删除线相关
- 2.8 设置下划线相关
- 2.9 描边颜色、描边宽度
- 2.10 文本阴影
- 2.11 文字效果
- 2.12 链接
- 2.13 基础偏移量
- 2.14 字体倾斜
- 2.15 文本扁平化(横向拉伸)
- 3、富文本加载html
- 4、图文混排
-
- 5、巧用UITextView实现富文本的点击效果
- 参考文章
ios项目中经常需要显示一些带有特殊样式的文本,比如说带有下划线、删除线、斜体、空心字体、背景色、阴影以及图文混排(一种文字中夹杂图片的显示效果)。通常想要实现这些效果要使用到iOS的Fundation框架提供的NSAttributeString类。
1、NSAttributedString属性概览表
| Key | Value | 说明 |
|---|
| .font | UIFont对象 | 字体大小:默认Helvetica(Neue) 12 |
| .paragraphStyle | NSParagraphStyle对象 | 文本字、行间距,对齐等:默认NSParagraphStyle.default |
| foregroundColor | UIColor对象 | 字体颜色:默认.black |
| .backgroundColor | UIColor对象 | 背景色:默认nil(无背景色) |
| .ligature | 包含整数的NSNumber对象 | 连字符:ios中有0和1两个值;0表示没有连字符,而1是默认的连字符 |
| .kern | 包含浮点数的NSNumber对象 | 字符间距:默认0(禁用) |
| .strikethroughStyle | 包含整数的NSNumber对象 | 删除线:默认0(无删除线) |
| .underlineStyle | 包含整数的NSNumber对象 | 下划线:默认0(无下划线) |
| .strikethroughColor | UIColor对象 | 删除线颜色:默认 nil(和文字的 foregroundColor一致) |
| .underlineColor | UIColor对象 | 下划线颜色:默认nil(和文字的 foregroundColor一致) |
| .strokeColor | UIColor对象 | 描边颜色:nil(和文字的 foregroundColor一致) |
| strokeWidth | 包含浮点数的NSNumber对象 | 描边宽度:正值空心描边,负值实心描边,默认0(不描边) |
| .shadow | NSShadow对象 | 文本阴影:默认nil(没有阴影) |
| .textEffect | NSString对象 | 文字效果:默认nil(没有文字效果) |
| .attachment | NSTextAttachment对象 | 附件(常用作图文混排) :默认nil(没有附件) |
| .link(原名:NSLinkAttributeName) | NSURL (优先) 或 NSString对象 | 链接 |
| .baselineOffset | 包含浮点数的NSNumber对象 | 基础偏移量:正值向上偏移,负值向下偏移,默认0(不偏移) |
| .obliqueness | 包含浮点数的NSNumber对象 | 字体倾斜 :正值向右倾斜,负值向左倾斜, 默认0(不倾斜) |
| .expansion | 包含浮点数的NSNumber对象 | 文本扁平化:正值横向拉伸,负值横向压缩,默认0(不拉伸) |
2、属性详解及应用
NSMutableAttributedString 是 NSAttributedString 的子类,一般来说我比较习惯使用NSMutableAttributedString来实现富文本。
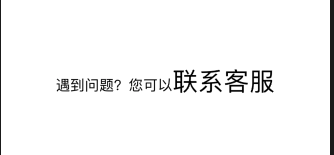
2.1 NSAttributedString.Key.font --字体大小
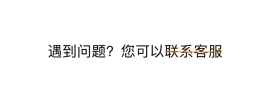
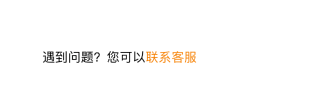
let title = "联系客服"
let text = "遇到问题?您可以\(title)"
let attributeString = NSMutableAttributedString(string: text)
attributeString.addAttribute(.font, value: UIFont.systemFont(ofSize: 30), range: NSMakeRange(text.count - title.count, title.count))
label.attributedText = attributeString
2.2 NSAttributedString.Key.paragraphStyle – 文本字、行间距,对齐等
let title = "联系客服"
let text = "遇到问题?您可以\(title)"
let attributeString = NSMutableAttributedString(string: text)
let paragraphStyle = NSMutableParagraphStyle()
paragraphStyle.alignment = .center
attributeString.addAttribute(.paragraphStyle, value: paragraphStyle, range: NSMakeRange(0, text.count))
label.attributedText = attributeString
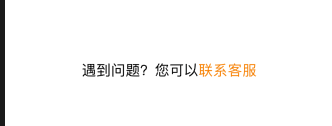
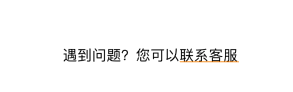
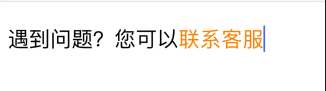
2.3 NSAttributedString.Key.foregroundColor – 字体颜色
let title = "联系客服"
let text = "遇到问题?您可以\(title)"
let attributeString = NSMutableAttributedString(string: text)
attributeString.addAttribute(.foregroundColor, value: UIColor.orange, range: NSMakeRange(text.count-title.count, title.count))
label.attributedText = attributeString
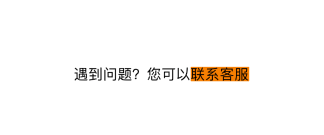
2.4 NSAttributedString.Key.backgroundColor – 背景色
let title = "联系客服"
let text = "遇到问题?您可以\(title)"
let attributeString = NSMutableAttributedString(string: text)
attributeString.addAttribute(.backgroundColor, value: UIColor.orange, range: NSMakeRange(text.count-title.count, title.count))
label.attributedText = attributeString
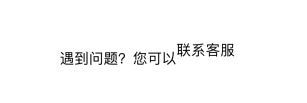
2.5 NSAttributedString.Key.ligature – 连字符
ios 中有 0 和 1 两个值:0表示没有连字符,而1是默认的连字符。(一般对连笔写的英文有效, 中文即使设置了连字符也很难表现出来)。
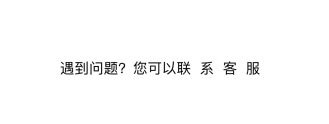
2.6 NSAttributedString.Key.kern – 字符间距
正值间距加宽,负值间距变窄,0表示默认效果
let title = "联系客服"
let text = "遇到问题?您可以\(title)"
let attributeString = NSMutableAttributedString(string: text)
attributeString.addAttribute(.kern, value: 10, range: NSMakeRange(text.count-title.count, title.count))
label.attributedText = attributeString
2.7 设置删除线相关
let title = "联系客服"
let text = "遇到问题?您可以\(title)"
let attributeString = NSMutableAttributedString(string: text)
attributeString.addAttribute(.strikethroughStyle, value: 1, range: NSMakeRange(text.count-title.count, title.count))
attributeString.addAttribute(.strikethroughColor, value: UIColor.orange, range: NSMakeRange(text.count-title.count, title.count))
label.attributedText = attributeString
2.8 设置下划线相关
let title = "联系客服"
let text = "遇到问题?您可以\(title)"
let attributeString = NSMutableAttributedString(string: text)
attributeString.addAttribute(.underlineStyle, value: 1, range: NSMakeRange(text.count-title.count, title.count))
attributeString.addAttribute(.underlineColor, value: UIColor.orange, range: NSMakeRange(text.count-title.count, title.count))
label.attributedText = attributeString
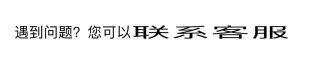
2.9 描边颜色、描边宽度
- 描边颜色要搭配非0的描边宽度才会生效,如果只设置了描边颜色,描边宽度为0,则没有描边效果
- 描边宽度是正数,会对文字进行描边,但文字中心不填充( 一种经典的空心文本样式是在该值为3.0)
- 描边宽度是负数,会对文字进行描边,而且会同时对文字中心进行填充(填充的颜色为文字本来的字体颜色)
let title = "联系客服"
let text = "遇到问题?您可以\(title)"
let attributeString = NSMutableAttributedString(string: text)
attributeString.addAttribute(.strokeWidth, value: 3, range: NSMakeRange(text.count-title.count, title.count))
attributeString.addAttribute(.strokeColor, value: UIColor.black, range: NSMakeRange(text.count-title.count, title.count))
label.attributedText = attributeString
2.10 文本阴影
let title = "联系客服"
let text = "遇到问题?您可以\(title)"
let attributeString = NSMutableAttributedString(string: text)
let shadow = NSShadow()
shadow.shadowColor = UIColor.black
shadow.shadowBlurRadius = 3
shadow.shadowOffset = CGSize(width: 0, height: 0.8)
attributeString.addAttribute(.shadow, value: shadow, range: NSMakeRange(text.count-title.count, title.count))
label.attributedText = attributeString

2.11 文字效果
let title = "联系客服"
let text = "遇到问题?您可以\(title)"
let attributeString = NSMutableAttributedString(string: text)
attributeString.addAttribute(.textEffect, value: NSAttributedString.TextEffectStyle.letterpressStyle, range: NSMakeRange(text.count-title.count, title.count))
label.attributedText = attributeString
2.12 链接
UILabel无法使用该属性, 但UITextView 控件可以使用。
let title = "联系客服"
let text = "遇到问题?您可以\(title)"
let attributeString = NSMutableAttributedString(string: text)
let url = URL(string: "http://www.baidu.com")!
attributeString.addAttribute(.link, value: url, range: NSMakeRange(text.count-title.count, title.count))
textView.attributedText = attributeString
textView.linkTextAttributes = [.foregroundColor:UIColor.orange]
2.13 基础偏移量
let title = "联系客服"
let text = "遇到问题?您可以\(title)"
let attributeString = NSMutableAttributedString(string: text)
attributeString.addAttribute(.baselineOffset, value: 10, range: NSMakeRange(text.count-title.count, title.count))
label.attributedText = attributeString
2.14 字体倾斜
注意:正值向右倾斜,负值向左倾斜, 默认0(不倾斜)
let title = "联系客服"
let text = "遇到问题?您可以\(title)"
let attributeString = NSMutableAttributedString(string: text)
attributeString.addAttribute(.obliqueness, value: 1, range: NSMakeRange(text.count-title.count, title.count))
label.attributedText = attributeString

2.15 文本扁平化(横向拉伸)
注意:正值横向拉伸,负值横向压缩,默认0(不拉伸)
let title = "联系客服"
let text = "遇到问题?您可以\(title)"
let attributeString = NSMutableAttributedString(string: text)
attributeString.addAttribute(.expansion, value: 1, range: NSMakeRange(text.count-title.count, title.count))
label.attributedText = attributeString
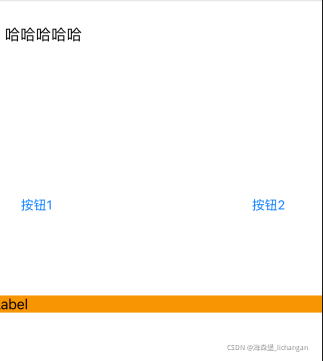
3、富文本加载html
    let str = "<div>哈哈哈哈哈</div>"
        do {
            let attributeStr = try NSMutableAttributedString(data: str.data(using: .unicode)!, options: [NSAttributedString.DocumentReadingOptionKey.documentType : NSAttributedString.DocumentType.html], documentAttributes: nil)
            textView.attributedText = attributeStr
        }catch {
        }
4、图文混排
现在方案:
1、HTML结合Webview
2、利用CoreText,手动解析手动布局
3、第三方库,如YYText。
4、NSMutableAttriteString
- 第一种方案,优点是:对于客户端来说,开发难度和代码量都是比较小的。同时也能做到随心所欲的布局,不需要考虑图片,缓存,和交互等等问题。缺点是:需要准备相应的Html页面,如果页面中涉及到权限验证,处理起来比较麻烦,另外,如果在业务场景复杂的情况下,针对性能和交互的优化需要花更多的时间。
- 第二种方案,通过原生的CoreText,使我们能接管整个图文排版过程中数据的管理以及界面的排布展示,优点是:自由度高,能够随心所欲展示排版样式、交互方式,效率上比较高。缺点是:代码量比较大,需要自己造好几个轮子,并且因为需要关注的地方比较多,如:图片缓存,排版交互等,开发周期上会比较长,同时前后端数据交互格式也需要相互配合。
- 第三种方案,这个方案省去造轮子的时间,可以将注意力放在排版和优化上,笔者采用的也是这个方案。
- 第四种方案,只适合简单的图文混排。
4.1 光标位置插入图片
enum ImageAttachmentMode {
case `default`
case fitTextLine
case fitTextView
}
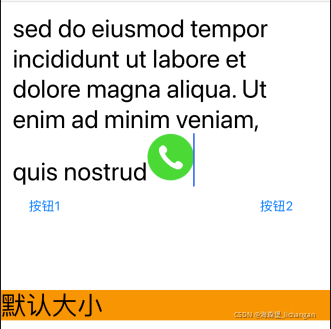
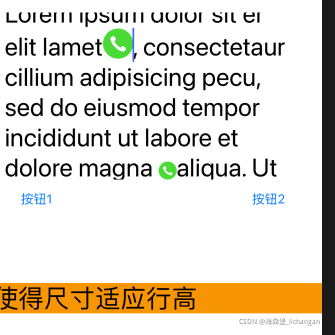
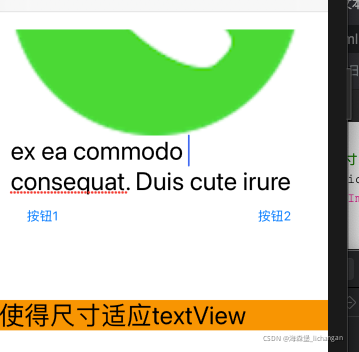
func insertPic(_ textView:UITextView,_ image:UIImage,mode:ImageAttachmentMode = .default){
let mutableStr = NSMutableAttributedString(attributedString: textView.attributedText)
let imgAttachment = NSTextAttachment(data: nil, ofType: nil)
imgAttachment.image = image
if mode == .fitTextLine {
imgAttachment.bounds = CGRect(x: 0, y: -4, width: textView.font!.lineHeight, height: textView.font!.lineHeight)
}else if mode == .fitTextView {
let imageWidth = textView.frame.width - 10
let imageHeight = image.size.height / image.size.width * imageWidth
imgAttachment.bounds = CGRect(x: 0, y: 0, width: imageWidth, height: imageHeight)
}
let imgAttachmentStr = NSAttributedString(attachment: imgAttachment)
let selectedRange = textView.selectedRange
mutableStr.insert(imgAttachmentStr, at: selectedRange.location)
mutableStr.addAttribute(.font, value: UIFont.systemFont(ofSize: 30), range: NSMakeRange(0, mutableStr.length))
let newSelectedRange = NSMakeRange(selectedRange.location + 1, 0)
textView.attributedText = mutableStr
textView.selectedRange = newSelectedRange
textView.scrollRangeToVisible(newSelectedRange)
}
4.2 光标位置插入文字
func insertStr(_ textView:UITextView,_ text:String){
let mutableStr = NSMutableAttributedString(attributedString: textView.attributedText)
let selectedRange = textView.selectedRange
let attrStr = NSAttributedString(string: text)
mutableStr.insert(attrStr, at: selectedRange.location)
mutableStr.addAttribute(.font, value: UIFont.systemFont(ofSize: 30), range: NSMakeRange(0, mutableStr.length))
let newSelectedRange = NSMakeRange(selectedRange.location + attrStr.length, 0)
textView.attributedText = mutableStr
textView.selectedRange = newSelectedRange
}
5、巧用UITextView实现富文本的点击效果
class RegisterController: BaseViewController {
override func viewDidLoad() {
super.viewDidLoad()
let textView = UITextView(frame: CGRect(x: 50, y: 200, width: 200, height: 100))
textView.isEditable = false
textView.isScrollEnabled = false
textView.delegate = self
view.addSubview(textView)
let title = "联系客服"
let text = "遇到问题?您可以\(title)"
let attributeString = NSMutableAttributedString(string: text)
attributeString.addAttribute(.font, value: UIFont.systemFont(ofSize: 15), range: NSMakeRange(0, text.count))
attributeString.addAttribute(.link, value: "contact://", range: NSMakeRange(text.count-title.count, title.count))
textView.attributedText = attributeString
textView.linkTextAttributes = [.foregroundColor : UIColor.orange]
}
}
extension RegisterController : UITextViewDelegate {
func textView(_ textView: UITextView, shouldInteractWith URL: URL, in characterRange: NSRange, interaction: UITextItemInteraction) -> Bool {
if URL.absoluteString.contains("contact://") {
return false
}
return true
}
}
参考文章
https://www.jianshu.com/p/1056d983bdfd
本文内容由网友自发贡献,版权归原作者所有,本站不承担相应法律责任。如您发现有涉嫌抄袭侵权的内容,请联系:hwhale#tublm.com(使用前将#替换为@)