一、课程添加分析
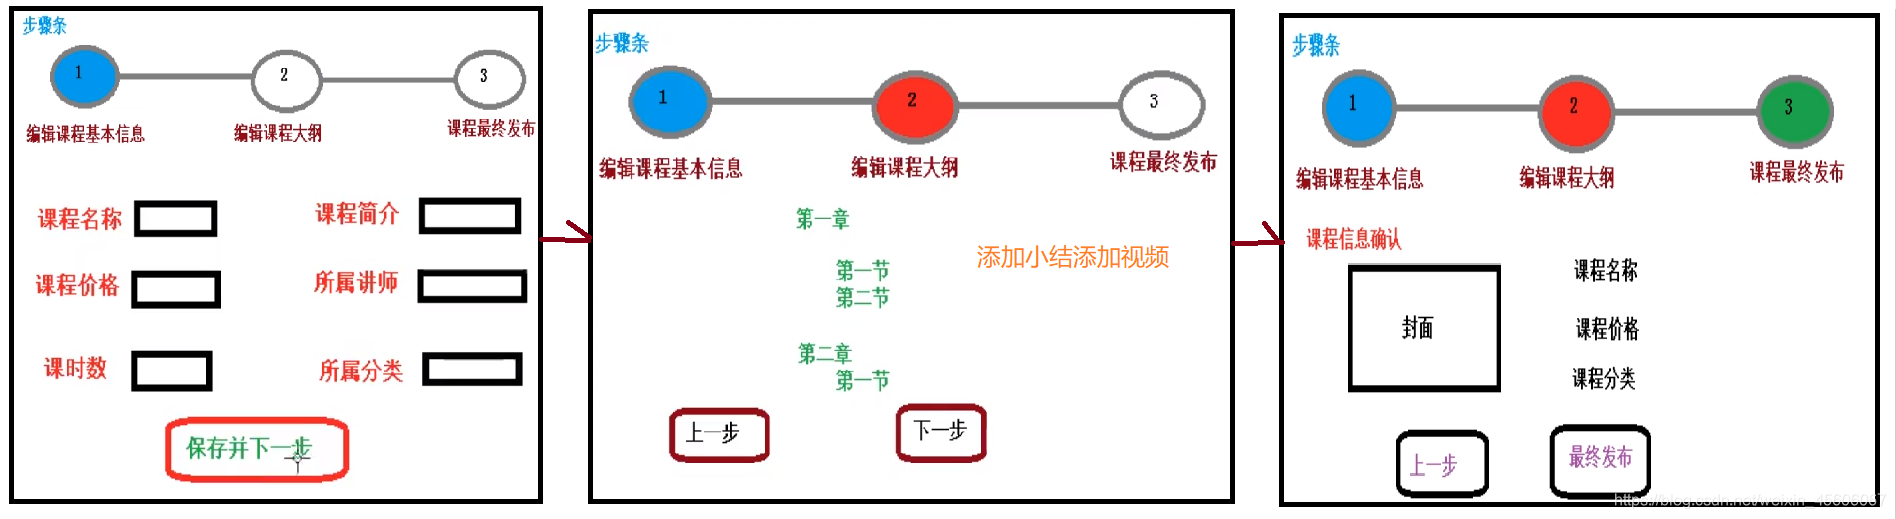
发布流程图
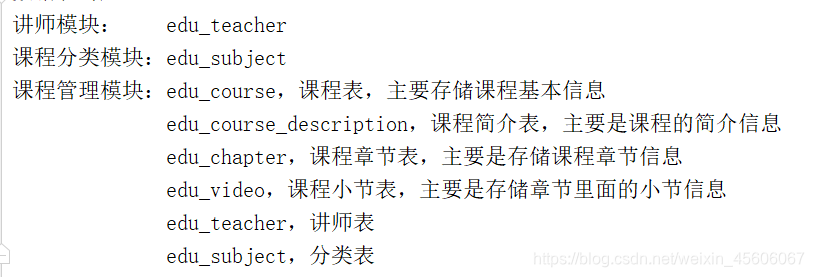
数据表对应
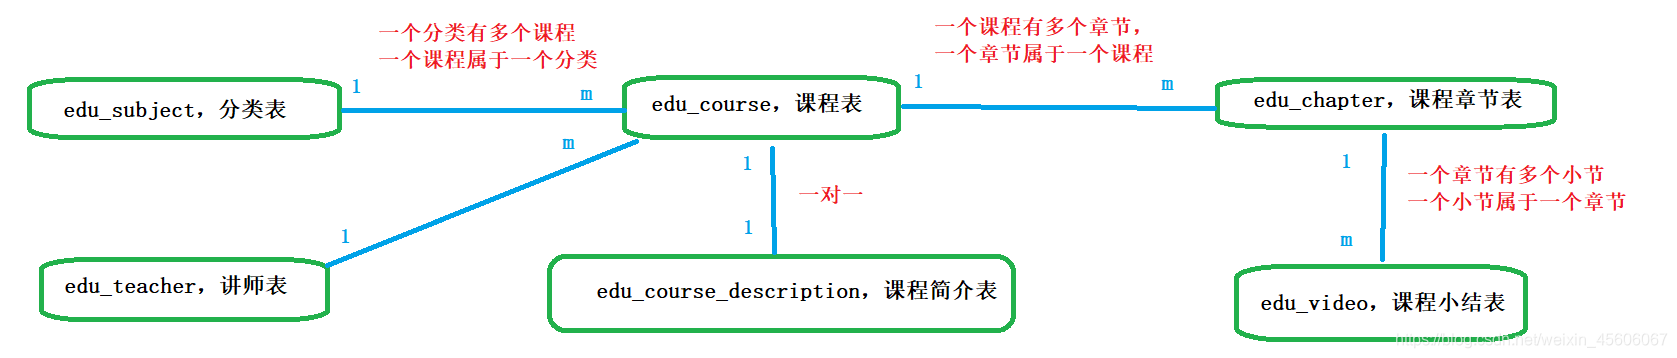
课程相关表的关系
二、课程管理–添加课程后端
1、使用代码生成器生成相关课程相关的代码
CodeGenerator类中生成
2、细节问题
(1)创建vo实体类用户表单数据封装
(2)把表单提交过来的数据添加到数据库
向两张表添加数据:课程表 和 课程表述表
(3)把讲师和分类使用下拉列表显示
课程分类 做成二级联动
3、创建vo实体类
@ApiModel(value = "Course查询对象", description = "课程管理查询对象封装")
@Data
public class CourseInfoVo {
    @ApiModelProperty(value = "课程ID")
    private String id;

    @ApiModelProperty(value = "课程讲师ID")
    private String teacherId;

    @ApiModelProperty(value = "二级分类ID")
    private String subjectId;

    @ApiModelProperty(value = "一级分类ID")
    private String subjectParentId;

    @ApiModelProperty(value = "课程标题")
    private String title;

    @ApiModelProperty(value = "课程销售价格,设置为0则可免费观看")
    private BigDecimal price;

    @ApiModelProperty(value = "总课时")
    private Integer lessonNum;

    @ApiModelProperty(value = "课程封面图片路径")
    private String cover;

    @ApiModelProperty(value = "课程简介")
    private String description;
}
4、编写Controller类
@Api(description = "课程管理")
@RestController
@RequestMapping("/eduservice/course")
@CrossOrigin
public class EduCourseController {
@Autowired
private EduCourseService courseService;
@ApiOperation(value = "添加课程基本信息")
@PostMapping("addCourseInfo")
public R addCourseInfo(@RequestBody CourseInfoVo courseInfoVo){
String id = courseService.saveCourseInfo(courseInfoVo);
return R.ok().data("courseId",id);
}
}
5、编写Service类
@Service
public class EduCourseServiceImpl extends ServiceImpl<EduCourseMapper, EduCourse> implements EduCourseService {
@Autowired
private EduCourseDescriptionService courseDescriptionService;
@Override
public String saveCourseInfo(CourseInfoVo courseInfoVo) {
EduCourse eduCourse =new EduCourse();
BeanUtils.copyProperties(courseInfoVo,eduCourse);
int insert = baseMapper.insert(eduCourse);
if (insert == 0) {
throw new GuliException(20001,"添加课程信息失败");
}
String cid = eduCourse.getId();
EduCourseDescription courseDescription =new EduCourseDescription();
courseDescription.setDescription(courseInfoVo.getDescription());
courseDescription.setId(cid);
courseDescriptionService.save(courseDescription);
return cid;
}
}
注意问题:
(1)课程和描述是一对一关系,添加之后,id应该是相同的。
EduCourseDescription类中id 属性@TableId(value = "id", type = IdType.INPUT)
(2)EduCourse类和EduCourseDescription类中的时间需要自动填充。@TableField(fill = FieldFill.INSERT)
6、启动Swagger测试
三、课程管理–添加课程前端–填写课程基本信息
效果图:

1、添加课程管理路由
在api/router/index.js 中
{
path: '/course',
  component: Layout,
  redirect: '/course/list',
  name: '课程管理',
  meta: { title: '课程管理', icon: 'example' },
  children: [
    {
      path: 'list',
      name: '课程列表',
      component: () => import('@/views/edu/course/list'),
      meta: { title: '课程列表', icon: 'table' }
    },
    {
      path: 'info',
      name: '添加课程',
      component: () => import('@/views/edu/course/info'),
      meta: { title: '添加课程', icon: 'tree' }
    },
    {
      path: 'info/:id',
      name: 'EduCourseInfoEdit',
      component: () => import('@/views/edu/course/info'),
      meta: { title: '编辑课程基本信息', noCache: true },
      hidden: true
    },
    {
      path: 'chapter/:id',
      name: 'EduCourseChapterEdit',
      component: () => import('@/views/edu/course/chapter'),
      meta: { title: '编辑课程大纲', noCache: true },
      hidden: true
    },
    {
      path: 'publish/:id',
      name: 'EduCoursePublishEdit',
      component: () => import('@/views/edu/course/publish'),
      meta: { title: '发布课程', noCache: true },
      hidden: true
    }
  ]
},
注意:这里有三个模块添加隐藏域。
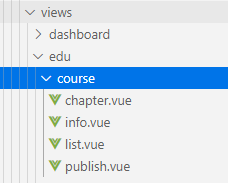
2、添加Vue组件
3、整合步骤条组件实现页面跳转
参考:http://element-cn.eleme.io/#/zh-CN/component/steps
(1)课程页面信息
info.vue
<template>
<div class="app-container">
<h2 style="text-align: center;">发布新课程</h2>
<el-steps :active="1" process-status="wait" align-center style="margin-bottom: 40px;">
<el-step title="填写课程基本信息"/>
<el-step title="创建课程大纲"/>
<el-step title="最终发布"/>
</el-steps>
<el-form label-width="120px">
<el-form-item>
<el-button :disabled="saveBtnDisabled" type="primary" @click="saveOrUpdate">保存并下一步</el-button>
</el-form-item>
</el-form>
</div>
</template>
<script>
export default {
data() {
return {
saveBtnDisabled:false
}
},
created() {
},
methods:{
saveOrUpdate() {
this.$router.push({path:'/course/chapter/1'})
}
}
}
</script>
(2)课程大纲页面
chapter.vue
<template>
<div class="app-container">
<h2 style="text-align: center;">发布新课程</h2>
<el-steps :active="2" process-status="wait" align-center style="margin-bottom: 40px;">
<el-step title="填写课程基本信息"/>
<el-step title="创建课程大纲"/>
<el-step title="提交审核"/>
</el-steps>
<el-form label-width="120px">
<el-form-item>
<el-button @click="previous">上一步</el-button>
<el-button :disabled="saveBtnDisabled" type="primary" @click="next">下一步</el-button>
</el-form-item>
</el-form>
</div>
</template>
<script>
export default {
data() {
return {
saveBtnDisabled: false
}
},
created() {
},
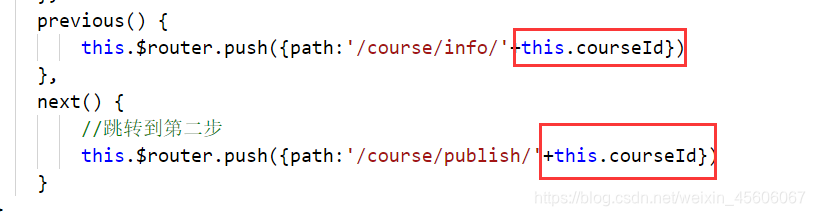
methods: {
previous() {
this.$router.push({ path: '/edu/course/info/1' })
},
next() {
this.$router.push({ path: '/edu/course/publish/1' })
}
}
}
</script>
(3)课程发布页面
publish.vue
<template>
<div class="app-container">
<h2 style="text-align: center;">发布新课程</h2>
<el-steps :active="3" process-status="wait" align-center style="margin-bottom: 40px;">
<el-step title="填写课程基本信息"/>
<el-step title="创建课程大纲"/>
<el-step title="最终发布"/>
</el-steps>
<el-form label-width="120px">
<el-form-item>
<el-button @click="previous">返回修改</el-button>
<el-button :disabled="saveBtnDisabled" type="primary" @click="publish">发布课程</el-button>
</el-form-item>
</el-form>
</div>
</template>
<script>
export default {
data() {
return {
saveBtnDisabled: false
}
},
created() {
console.log('publish created')
},
methods: {
previous() {
console.log('previous')
this.$router.push({ path: '/course/chapter/1' })
},
publish() {
console.log('publish')
this.$router.push({ path: '/course/list' })
}
}
}
</script>
4、定义api
在api/edu/course.js 中
import request from '@/utils/request'
export default{
addCourseInfo(courseInfo){
return request({
url: `/eduservice/course/addCourseInfo`,
method: 'post',
data:courseInfo
})
}
}
5、组件模板
在 src/views/edu/info.vue 中
<el-form label-width="120px">
<el-form-item label="课程标题">
<el-input v-model="courseInfo.title" placeholder=" 示例:机器学习项目课:从基础到搭建项目视频课程。专业名称注意大小写"/>
</el-form-item>
<el-form-item label="总课时">
<el-input-number :min="0" v-model="courseInfo.lessonNum" controls-position="right" placeholder="请填写课程的总课时数"/>
</el-form-item>
<el-form-item label="课程简介">
<el-input v-model="courseInfo.description" placeholder=" "/>
</el-form-item>
<el-form-item label="课程价格">
<el-input-number :min="0" v-model="courseInfo.price" controls-position="right" placeholder="免费课程请设置为0元"/> 元
</el-form-item>
<el-form-item>
<el-button :disabled="saveBtnDisabled" type="primary" @click="saveOrUpdate">保存并下一步</el-button>
</el-form-item>
</el-form>
6、组件js
<script>
import course from '@/api/edu/course'
export default {
data() {
return {
saveBtnDisabled:false,
courseInfo:{
title: '',
subjectId: '',
subjectParentId:'',
teacherId: '',
lessonNum: 0,
description: '',
cover: '',
price: 0
},
}
},
created() {
},
methods:{
saveOrUpdate() {
course.addCourseInfo(this.courseInfo)
.then(response => {
this.$message({
type: 'success',
message: '添加课程信息成功!'
});
this.$router.push({path:'/course/chapter/'+response.data.courseId})
})
}
}
}
</script>
7、讲师下拉列表
(1)组件模板
<el-form-item label="课程讲师">
<el-select
v-model="courseInfo.teacherId"
placeholder="请选择">
<el-option
v-for="teacher in teacherList"
:key="teacher.id"
:label="teacher.name"
:value="teacher.id"/>
</el-select>
</el-form-item>
(2)定义api
api/edu/teacher.js
getListTeacher() {
return request({
url: `/eduservice/teacher/findAll`,
method: 'get'
})
}
组件中引入teacher api
import teacher from '@/api/edu/teacher'
(3)组件脚本
定义data
teacherList: []
表单初始化时获取讲师列表
created() {
this.getListTeacher()
},
methods:{
getListTeacher() {
course.getListTeacher()
.then(response => {
this.teacherList = response.data.items
})
},
}
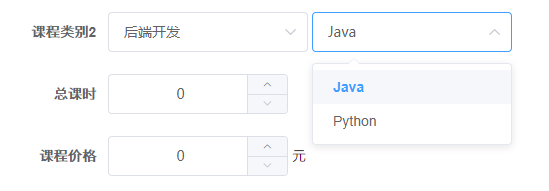
8、课程分类多级联动
1、效果图
2、获取一级分类
(1)组件数据定义
定义data中
subjectOneList:[],
subjectTwoList:[]
(2)组件模板
<el-form-item label="课程分类">
    <el-select
        v-model="courseInfo.subjectParentId"
        placeholder="一级分类">

        <el-option
            v-for="subject in subjectOneList"
            :key="subject.id"
            :label="subject.title"
            :value="subject.id"/>
    </el-select>

</el-form-item>
(3)组件脚本
表单初始化时获取一级分类嵌套列表,引入subject api
import subject from '@/api/edu/subject'
定义方法
created() {
this.getOneSubject()
},
method:{
getOneSubject() {
subject.getSubjectList()
.then(response => {
this.subjectOneList = response.data.list
})
},
}
3、显示二级分类
1、组件模板
<el-select v-model="courseInfo.subjectId" placeholder="二级分类">
<el-option
v-for="subject in subjectTwoList"
:key="subject.id"
:label="subject.title"
:value="subject.id"/>
</el-select>
2、注册change事件
在一级分类的<el-select>组件中注册change事件
<el-select @change="subjectLevelOneChanged" ....>
3、定义change事件方法
subjectLevelOneChanged(value) {
for(var i=0;i<this.subjectOneList.length;i++) {
var oneSubject = this.subjectOneList[i]
if(value === oneSubject.id) {
this.subjectTwoList = oneSubject.children
this.courseInfo.subjectId = ''
}
}
},
9、课程封面
参考 http://element-cn.eleme.io/#/zh-CN/component/upload 用户头像上传
1、上传默认封面
创建文件夹cover,上传默认的课程封面
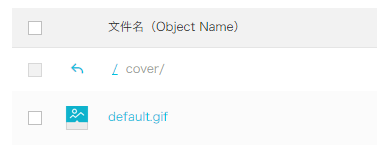
2、定义默认封面
courseInfo:{
cover: '/static/01.jpg',
},
3、定义data数据
BASE_API: process.env.BASE_API
4、组件模板
在info.vue中添加上传组件模板
<el-form-item label="课程封面">
<el-upload
:show-file-list="false"
:on-success="handleAvatarSuccess"
:before-upload="beforeAvatarUpload"
:action="BASE_API+'/eduoss/fileoss'"
class="avatar-uploader">
<img :src="courseInfo.cover">
</el-upload>
</el-form-item>
5、结果回调
handleAvatarSuccess(res, file) {
this.courseInfo.cover = res.data.url
},
beforeAvatarUpload(file) {
const isJPG = file.type === 'image/jpeg'
const isLt2M = file.size / 1024 / 1024 < 2
if (!isJPG) {
this.$message.error('上传头像图片只能是 JPG 格式!')
}
if (!isLt2M) {
this.$message.error('上传头像图片大小不能超过 2MB!')
}
return isJPG && isLt2M
},
10、富文本编辑器
1、Tinymce可视化编辑器
参考:
https://panjiachen.gitee.io/vue-element-admin/#/components/tinymce
https://panjiachen.gitee.io/vue-element-admin/#/example/create
2、组件初始化
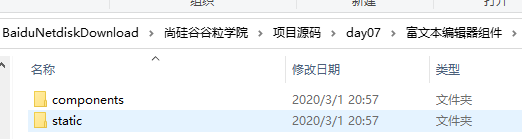
(1)复制脚本库
将脚本库复制到项目的static目录下(在vue-element-admin-master的static路径下)
(2)配置html变量
在 guli-admin/build/webpack.dev.conf.js 中添加配置
使在html页面中可是使用这里定义的BASE_URL变量
new HtmlWebpackPlugin({
templateParameters: {
BASE_URL: config.dev.assetsPublicPath + config.dev.assetsSubDirectory
}
})
(3)引入js脚本
在guli-admin/index.html 中引入js脚本
<script src=<%= BASE_URL %>/tinymce4.7.5/tinymce.min.js></script>
<script src=<%= BASE_URL %>/tinymce4.7.5/langs/zh_CN.js></script>
3、组件引入
(1)引入组件
课程信息组件中引入 Tinymce
import Tinymce from '@/components/Tinymce'

export default {
  components: { Tinymce },
  ......
}
4、组件模板
<!-- 课程简介-->
<el-form-item label="课程简介">
   <tinymce :height="300" v-model="courseInfo.description"/>
</el-form-item>
5、组件样式
在info.vue文件的最后添加如下代码,调整上传图片按钮的高度
<style scoped>
.tinymce-container {
  line-height: 29px;
}
</style>
四、课程大纲列表 – 后端开发
效果图:
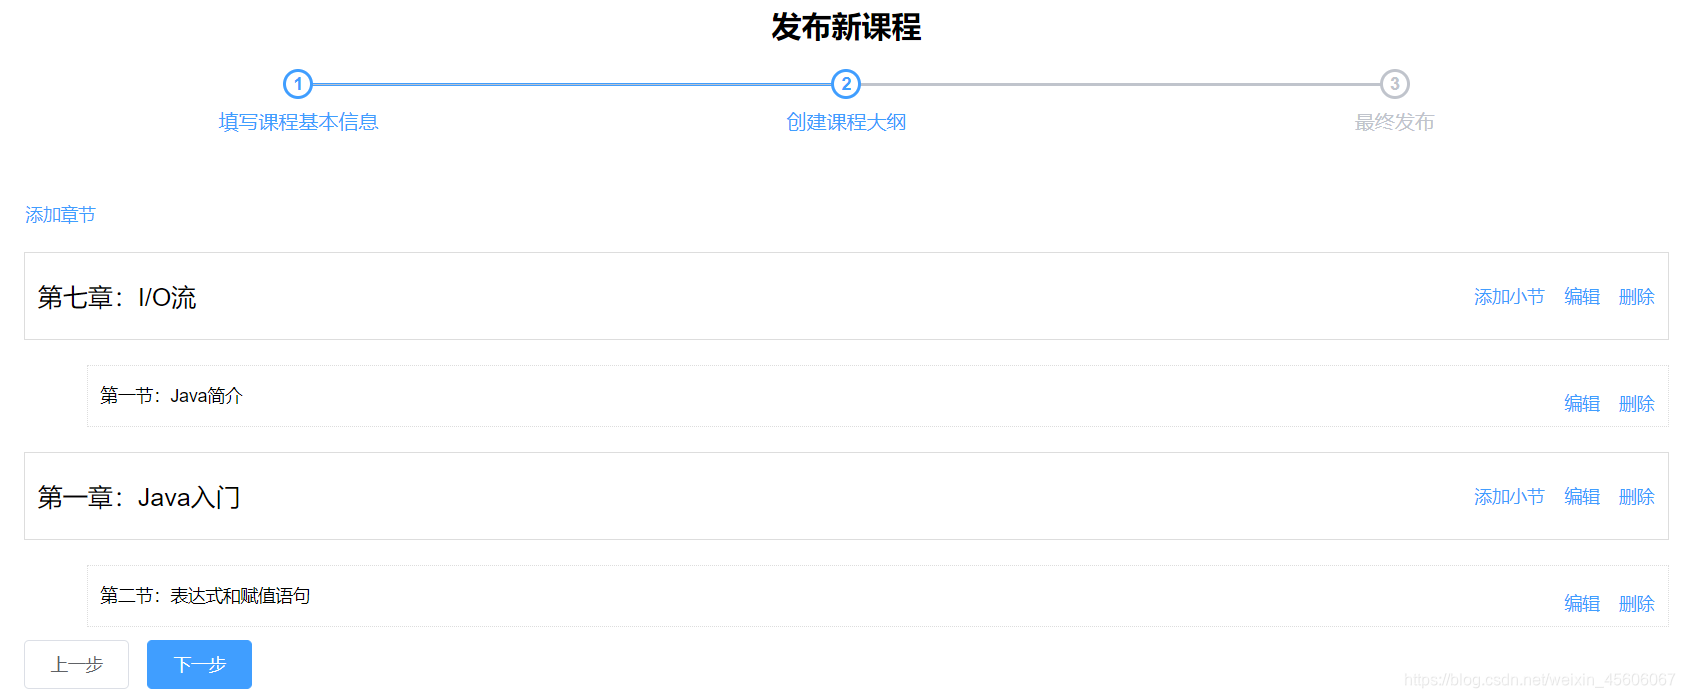
1、创建两个实体类,章节和小节
ChapterVo 类
@ApiModel(value = "章节封装类",description = "章节封装类")
@Data
public class ChapterVo {
private String id;
private String title;
private List<VideoVo> children = new ArrayList<>();
}
VideoVo 类
@ApiModel(value = "小节封装类",description = "小节封装类")
@Data
public class VideoVo {

    private String id;

    private String title;

}
2、编写Controller
@Api(description = "章节")
@RestController
@RequestMapping("/eduservice/chapter")
@CrossOrigin
public class EduChapterController {
@Autowired
private EduChapterService chapterService;
@ApiOperation(value = "课程大纲列表")
@GetMapping("/getChapterVideo/{courseId}")
public R getChapterVideo(@PathVariable String courseId){
List<ChapterVo> list = chapterService.getChapterVideoByCourseId(courseId);
return R.ok().data("allChapterVideo",list);
}
}
3、编写Service
@Service
public class EduChapterServiceImpl extends ServiceImpl<EduChapterMapper, EduChapter> implements EduChapterService {
@Autowired
private EduVideoService videoService;
@Override
public List<ChapterVo> getChapterVideoByCourseId(String courseId) {
QueryWrapper<EduChapter> wrapperChapter = new QueryWrapper<>();
wrapperChapter.eq("course_id",courseId);
List<EduChapter> eduChapterList = baseMapper.selectList(wrapperChapter);
QueryWrapper<EduVideo> wrapperVideo = new QueryWrapper<>();
wrapperVideo.eq("course_id",courseId);
List<EduVideo> eduVideoList = videoService.list(wrapperVideo);
List<ChapterVo> finallList = new ArrayList<>();
for (int i = 0; i < eduChapterList.size(); i++) {
EduChapter eduChapter = eduChapterList.get(i);
ChapterVo chapterVo = new ChapterVo();
BeanUtils.copyProperties(eduChapter,chapterVo);
finallList.add(chapterVo);
List<VideoVo> videoList = new ArrayList<>();
for (int m = 0; m < eduVideoList.size(); m++) {
EduVideo eduVideo = eduVideoList.get(m);
if (eduVideo.getChapterId().equals(eduChapter.getId())) {
VideoVo videoVo = new VideoVo();
BeanUtils.copyProperties(eduVideo,videoVo);
videoList.add(videoVo);
}
}
chapterVo.setChildren(videoList);
}
return finallList;
}
}
4、使用Swagger进行测试
五、课程大纲列表 – 前端开发
1、定义api
import request from '@/utils/request'
export default{
getChapterVideo(courseId) {
return request({
url: `/eduservice/chapter/getChapterVideo/${courseId}`,
method: 'get'
})
}
}
2、组件脚本
import chapter from '@/api/edu/chapter'
3、页面调用
在views/edu/course/chapter.vue 中
created() {
if(this.$route.params && this.$route.params.id) {
this.courseId = this.$route.params.id
this.getChapterVideo()
}
},
methods:{
getChapterVideo() {
chapter.getChapterVideo(this.courseId)
.then(response =>{
this.chapterVideoList = response.data.allChapterVideo
})
},
}
4、添加页面
<ul class="chanpterList">
<li
v-for="chapter in chapterVideoList"
:key="chapter.id">
<p>
{{ chapter.title }}
<span class="acts">
<el-button style="" type="text" @click="openVideo(chapter.id)">添加小节</el-button>
<el-button style="" type="text" @click="openEditChatper(chapter.id)">编辑</el-button>
<el-button type="text" @click="removeChapter(chapter.id)">删除</el-button>
</span>
</p>
<ul class="chanpterList videoList">
<li
v-for="video in chapter.children"
:key="video.id">
<p>{{ video.title }}
<span class="acts">
<el-button style="" type="text" @click="openEditVideo(video.id)">编辑</el-button>
<el-button type="text" @click="removeVideo(video.id)">删除</el-button>
</span>
</p>
</li>
</ul>
</li>
</ul>
<div>
<el-button @click="previous">上一步</el-button>
<el-button :disabled="saveBtnDisabled" type="primary" @click="next">下一步</el-button>
</div>
5、页面样式
<style scoped>
.chanpterList{
    position: relative;
    list-style: none;
    margin: 0;
    padding: 0;
}
.chanpterList li{
  position: relative;
}
.chanpterList p{
  float: left;
  font-size: 20px;
  margin: 10px 0;
  padding: 10px;
  height: 70px;
  line-height: 50px;
  width: 100%;
  border: 1px solid #DDD;
}
.chanpterList .acts {
    float: right;
    font-size: 14px;
}

.videoList{
  padding-left: 50px;
}
.videoList p{
  float: left;
  font-size: 14px;
  margin: 10px 0;
  padding: 10px;
  height: 50px;
  line-height: 30px;
  width: 100%;
  border: 1px dotted #DDD;
}
</style>
六、修改课程基本信息
流程是:点击上一步的时候,回到第一步页面,把课程基本信息数据回显。修改数据点击保存实现更新数据效果。
1、后端Controller类
@ApiOperation(value = "根据课程查询课程基本信息")
@GetMapping("getCourseInfo/{courseId}")
public R getCourseInfo(@PathVariable String courseId) {
   CourseInfoVo courseInfoVo = courseService.getCourseInfo(courseId);
   return R.ok().data("courseInfoVo",courseInfoVo);
}

@ApiOperation(value = "根据id修改课程信息")
@PostMapping("updateCourseInfo")
public R updateCourseInfo(@RequestBody CourseInfoVo courseInfoVo) {
   courseService.updateCourseInfo(courseInfoVo);
   return R.ok();
}
2、后端Service类
@Override
public CourseInfoVo getCourseInfo(String courseId) {
EduCourse eduCourse = baseMapper.selectById(courseId);
CourseInfoVo courseInfoVo =new CourseInfoVo();
BeanUtils.copyProperties(eduCourse,courseInfoVo);
EduCourseDescription courseDescription = courseDescriptionService.getById(courseId);
courseInfoVo.setDescription(courseDescription.getDescription());
return courseInfoVo;
}
@Override
public void updateCourseInfo(CourseInfoVo courseInfoVo) {
EduCourse eduCourse = new EduCourse();
BeanUtils.copyProperties(courseInfoVo,eduCourse);
int update = baseMapper.updateById(eduCourse);
if(update ==0) {
throw new GuliException(20001,"修改课程信息失败");
}
EduCourseDescription description = new EduCourseDescription();
description.setId(courseInfoVo.getId());
description.setDescription(courseInfoVo.getDescription());
courseDescriptionService.updateById(description);
}
3、定义前端两个接口
在api/edu/course.js中
getCourseInfoId(id) {
return request({
url: `/eduservice/course/getCourseInfo/${id}`,
method: 'get'
})
},
updateCourseInfo(courseInfo) {
return request({
url: `/eduservice/course/updateCourseInfo`,
method: 'post',
data: courseInfo
})
}
4、修改/edu/course/chapter.vue中路径
5、在info.vue页面实现数据回显
获取路由中课程id,调用根据id查询的接口,数据显示。
created() {
if(this.$route.params && this.$route.params.id) {
this.courseId = this.$route.params.id
this.getInfo()
}else{
this.getListTeacher()
this.getOneSubject()
}
},
methods:{
getInfo(){
course.getCourseInfoId(this.courseId)
.then(response => {
this.courseInfo = response.data.courseInfoVo
})
}
}
注意:这里我们在运行的时候发现二级分类下拉框没有数据,因为subjectTwoList数组为空,所以只显示查询出来的id。
解决办法就是:因为在courseInfo课程基本信息,包含一级分类id和二级分类id,所以先查询所有一级分类,然后遍历所有一级分类,比较当前courseInfo里面一级分类id 和 所有的一级分类id,如果相同则遍历一级分类下面的二级分类。
subject.getSubjectList()
.then(response => {
this.subjectOneList = response.data.list
for(var i=0;i<this.subjectOneList.length;i++){
var oneSubject = this.subjectOneList[i]
if(this.courseInfo.subjectParentId == oneSubject.id){
this.subjectTwoList = oneSubject.children
}
}
})
this.getListTeacher()
此时启动服务测试,页面数据即可回显。
6、更新数据 js
这里我们对之前写的加以修改,把添加和修改方法单独提出来写。
methods:{
saveCourse() {
course.addCourseInfo(this.courseInfo)
.then(response => {
this.$message({
type: 'success',
message: '添加课程信息成功!'
});
this.$router.push({path:'/course/chapter/'+response.data.courseId})
})
},
updateCourse() {
course.updateCourseInfo(this.courseInfo)
.then(response => {
this.$message({
type: 'success',
message: '修改课程信息成功!'
});
this.$router.push({path:'/course/chapter/'+this.courseId})
})
},
saveOrUpdate() {
if(!this.courseInfo.id) {
this.saveCourse()
}else{
this.updateCourse()
}
}
}
7、启动服务测试即可
七、课程章节添加、修改、删除 --后端开发
1、编写Controller类
@ApiOperation(value = "添加章节")
@PostMapping("addChapter")
public R addChapter(@RequestBody EduChapter eduChapter){
    chapterService.save(eduChapter);
    return R.ok();
}

@ApiOperation(value = "根据章节id查询")
@GetMapping("getChapterInfo/{chapterId}")
public R getChapterInfo(@PathVariable String chapterId) {
    EduChapter eduChapter = chapterService.getById(chapterId);
    return R.ok().data("chapter",eduChapter);
}

@ApiOperation(value = "修改章节")
@PostMapping("updateChapter")
public R updateChapter(@RequestBody EduChapter eduChapter){
    chapterService.updateById(eduChapter);
    return R.ok();
}

@ApiOperation(value = "删除章节")
@DeleteMapping("deleteChapter/{chapterId}")
public R deleteChapter(@PathVariable String chapterId){
    boolean flag = chapterService.deleteChapter(chapterId);
    if (flag){
        return R.ok();
    }else {
        return R.error();
    }
}
注意:在实体类中的时间加上@TableField(fill = FieldFill.INSERT)注解
2、编写Service类
@Override
public boolean deleteChapter(String chapterId) {
QueryWrapper<EduVideo> wrapper = new QueryWrapper<>();
wrapper.eq("chapter_id",chapterId);
int count = videoService.count(wrapper);
if (count > 0) {
throw new GuliException(20001,"不能删除");
}else{
int result = baseMapper.deleteById(chapterId);
return result>0;
}
}
注意:这里我们要对删除进行判断:
如果章节里面没有小节,直接删除。
如果章节里面有小节,如何删除?
第一种:删除章节的时候,把章节里面所有小节都删除。
第二种:如果删除章节下面有小节,不让进行删除。
八、课程章节添加、修改、删除 --前端开发
1、定义api接口
addChapter(chapter) {
return request({
url: `/eduservice/chapter/addChapter`,
method: 'post',
data:chapter
})
},
updateChapter(chapter) {
return request({
url: `/eduservice/chapter/updateChapter`,
method: 'post',
data:chapter
})
},
deleteChapter(chapterId) {
return request({
url: `/eduservice/chapter/deleteChapter/${chapterId}`,
method: 'delete'
})
},
getChapterInfo(chapterId) {
return request({
url: `/eduservice/chapter/getChapterInfo/${chapterId}`,
method: 'get'
})
}
2、添加章节按钮
<el-button type="text" @click="openChapterDialog()">添加章节</el-button>
3、添加弹出框表单
<el-dialog :visible.sync="dialogChapterFormVisible" title="添加章节">
<el-form :model="chapter" label-width="120px">
<el-form-item label="章节标题">
<el-input v-model="chapter.title"/>
</el-form-item>
<el-form-item label="章节排序">
<el-input-number v-model="chapter.sort" :min="0" controls-position="right"/>
</el-form-item>
</el-form>
<div slot="footer" class="dialog-footer">
<el-button @click="dialogChapterFormVisible = false">取 消</el-button>
<el-button type="primary" @click="saveOrUpdate">确 定</el-button>
</div>
</el-dialog>
4、编写添加的js
data() {
return {
courseId:'',
chapterVideoList:[],
chapter:{
title: '',
sort: 0
},
dialogChapterFormVisible:false
}
},
methods:{
openChapterDialog() {
this.dialogChapterFormVisible = true
this.chapter.title = ''
this.chapter.sort = ''
},
addChapter() {
this.chapter.courseId = this.courseId
chapter.addChapter(this.chapter)
.then(response => {
this.dialogChapterFormVisible = false
this.$message({
type: 'success',
message: '添加章节成功!'
});
this.getChapterVideo()
})
},
saveOrUpdate() {
this.addChapter()
},
}
5、编写修改的js
updateChapter() {
chapter.updateChapter(this.chapter)
.then(response => {
this.dialogChapterFormVisible = false
this.$message({
type: 'success',
message: '修改章节成功!'
});
this.getChapterVideo()
})
},
saveOrUpdate() {
if(!this.chapter.id){
this.addChapter()
}else{
this.updateChapter()
}
},
6、编写删除的js
removeChapter(chapterId) {
this.$confirm('此操作将永久删除章节, 是否继续?', '提示', {
confirmButtonText: '确定',
cancelButtonText: '取消',
type: 'warning'
}).then(() => {
chapter.deleteChapter(chapterId)
.then(response => {
this.$message({
type: 'success',
message: '删除成功!'
});
this.getChapterVideo()
})
})
},
注意:启动服务运行出现403错误。
出现问题原因:第一种是Controller类中跨域注解没有写@CrossOrigin。第二种是访问路径写的不对。
九、课程小节添加、修改、删除 --前端开发
1、编写Controller类
@Api(description = "小节")
@RestController
@RequestMapping("/eduservice/video")
@CrossOrigin
public class EduVideoController {
@Autowired
private EduVideoService videoService;
@ApiOperation(value = "添加小节")
@PostMapping("addVideo")
public R addVideo(@RequestBody EduVideo eduVideo){
videoService.save(eduVideo);
return R.ok();
}
@ApiOperation(value = "根据小节id查询")
@GetMapping("getVideoInfo/{id}")
public R getVideoInfo(@PathVariable String id){
EduVideo eduVideo = videoService.getById(id);
return R.ok().data("eduVideo",eduVideo);
}
@ApiOperation(value = "修改小节")
@PostMapping("updateVideo")
public R updateVideo(@RequestBody EduVideo eduVideo){
videoService.updateById(eduVideo);
return R.ok();
}
@ApiOperation(value = "删除小节")
@DeleteMapping("deleteVideo/{id}")
public R deleteVideo(@PathVariable String id){
videoService.removeById(id);
return R.ok();
}
}
注意:在实体类中的时间加上@TableField(fill = FieldFill.INSERT)注解
十、课程小节添加、修改、删除 --前端开发
1、定义api接口
import request from '@/utils/request'
export default{
addVideo(video) {
return request({
url: `/eduservice/video/addVideo`,
method: 'post',
data:video
})
},
getVideoInfo(id) {
return request({
url: `/eduservice/video/getVideoInfo/${id}`,
method: 'get'
})
},
updateVideo(video) {
return request({
url: `/eduservice/video/updateVideo`,
method: 'post',
data:video
})
},
deleteVideo(id) {
return request({
url: `/eduservice/video/deleteVideo/${id}`,
method: 'delete'
})
}
}
2、添加修改页面
<el-dialog :visible.sync="dialogVideoFormVisible" title="添加课时">
<el-form :model="video" label-width="120px">
<el-form-item label="课时标题">
<el-input v-model="video.title"/>
</el-form-item>
<el-form-item label="课时排序">
<el-input-number v-model="video.sort" :min="0" controls-position="right"/>
</el-form-item>
<el-form-item label="是否免费">
<el-radio-group v-model="video.free">
<el-radio :label="true">免费</el-radio>
<el-radio :label="false">默认</el-radio>
</el-radio-group>
</el-form-item>
<el-form-item label="上传视频">
</el-form-item>
</el-form>
<div slot="footer" class="dialog-footer">
<el-button @click="dialogVideoFormVisible = false">取 消</el-button>
<el-button :disabled="saveVideoBtnDisabled" type="primary" @click="saveOrUpdateVideo">确 定</el-button>
</div>
</el-dialog>
3、引入包
import video from '@/api/edu/video'
4、初始数据定义
data() {
return {
video: {
title: '',
sort: 0,
free: 0,
videoSourceId: ''
},
dialogVideoFormVisible:false
}
},
5、编写增删改查的js
removeVideo(id) {
this.$confirm('此操作将永久删除小节, 是否继续?', '提示', {
confirmButtonText: '确定',
cancelButtonText: '取消',
type: 'warning'
}).then(() => {
video.deleteVideo(id)
.then(response => {
this.$message({
type: 'success',
message: '删除小节成功!'
});
this.getChapterVideo()
})
})
},
openVideo(chapterId) {
this.dialogVideoFormVisible = true
this.video.chapterId = chapterId
this.video.title = ''
this.video.sort = ''
this.video.free = ''
this.video.videoSourceId = ''
},
addVideo() {
this.video.courseId = this.courseId
video.addVideo(this.video)
.then(response => {
this.dialogVideoFormVisible = false
this.$message({
type: 'success',
message: '添加小节成功!'
});
this.getChapterVideo()
})
},
openEditVideo(id) {
this.dialogVideoFormVisible = true
video.getVideoInfo(id)
.then(response => {
this.video = response.data.eduVideo
})
},
updateVideo() {
video.updateVideo(this.video)
.then(response => {
this.dialogVideoFormVisible = false
this.$message({
type: 'success',
message: '修改小节成功!'
});
this.getChapterVideo()
})
},
saveOrUpdateVideo() {
if(!this.video.id) {
this.addVideo()
}else{
this.updateVideo()
}
},
6、启动服务测试即可。
如果有收获!!! 希望老铁们来个三连,点赞、收藏、转发。
创作不易,别忘点个赞,可以让更多的人看到这篇文章,顺便鼓励我写出更好的博客
本文内容由网友自发贡献,版权归原作者所有,本站不承担相应法律责任。如您发现有涉嫌抄袭侵权的内容,请联系:hwhale#tublm.com(使用前将#替换为@)