文章目录
- 1、入门案例演示
- 1. 创建一个Springboot项目
- 2. 引入相关依赖
- 3. 编写Controller进行测试
- 4. 运行项目
- 2、权限管理中的相关概念
-
- 3、SpringSecurity 基本原理
- 4、UserDetailsService 接口
- 5、PasswordEncoder 接口
- 6、SpringBoot 对 Security 的自动配置
1、入门案例演示
1. 创建一个Springboot项目
2. 引入相关依赖
<dependency>
    <groupId>org.springframework.boot</groupId>
    <artifactId>spring-boot-starter-web</artifactId>
</dependency>

<dependency>
    <groupId>org.springframework.boot</groupId>
    <artifactId>spring-boot-starter-security</artifactId>
</dependency>
3. 编写Controller进行测试
@RestController
@RequestMapping("/test")
public class TestController {

    @GetMapping("hello")
    public String hello(){

        return "hello security";
    }
}
4. 运行项目
访问:localhost:8080/test/hello

默认的用户名:user
密码在项目启动的时候在控制台会打印,注意每次启动的时候密码都不一样。

输入用户名、密码,这样就可以访问了。

2、权限管理中的相关概念
1. 主体
英文单词:principal
使用系统的用户或设备或从其他系统远程登录的用户等等。简单说就是谁使用系统谁就是主体。
2. 认证
英文单词:authentication
权限管理系统确认一个主体的身份,允许主体进入系统。简单说就是“主体”证明自己是谁。
笼统的认为就是以前所做的登录操作。
3. 授权
英文单词:authorization
将操作系统的“权力”“授予”“主体”,这样主体就具备了操作系统中特定功能的能力。
所以简单来说,授权就是给用户分配权限。
3、SpringSecurity 基本原理
SpringSecurity 本质是一个过滤器链
从启动是可以获取到过滤器链:
org.springframework.security.web.context.request.async.WebAsyncManagerIntegrationFilter
org.springframework.security.web.context.SecurityContextPersistenceFilter
org.springframework.security.web.header.HeaderWriterFilter
org.springframework.security.web.csrf.CsrfFilter
org.springframework.security.web.authentication.logout.LogoutFilter
org.springframework.security.web.authentication.UsernamePasswordAuthenticationFilter
org.springframework.security.web.authentication.ui.DefaultLoginPageGeneratingFilter
org.springframework.security.web.authentication.ui.DefaultLogoutPageGeneratingFilter
org.springframework.security.web.savedrequest.RequestCacheAwareFilter
org.springframework.security.web.servletapi.SecurityContextHolderAwareRequestFilter
org.springframework.security.web.authentication.AnonymousAuthenticationFilter
org.springframework.security.web.session.SessionManagementFilter
org.springframework.security.web.access.ExceptionTranslationFilter
org.springframework.security.web.access.intercept.FilterSecurityInterceptor
代码底层流程:重点看三个过滤器:
-
FilterSecurityInterceptor:是一个方法级的权限过滤器, 基本位于过滤链的最底部
super.beforeInvocation(fi):表示查看之前的 filter 是否通过。
fi.getChain().doFilter(fi.getRequest(), fi.getResponse()); :表示真正的调用后台的服务。
-
ExceptionTranslationFilter:是个异常过滤器,用来处理在认证授权过程中抛出的异常

-
UsernamePasswordAuthenticationFilter :对/login 的 POST 请求做拦截,校验表单中用户名,密码。

过滤器如何进行加载的?

4、UserDetailsService 接口
当什么也没有配置的时候,账号和密码是由 Spring Security 定义生成的。而在实际项目中账号和密码都是从数据库中查询出来的。 所以我们要通过自定义逻辑控制认证逻辑。
如果需要自定义逻辑时,只需要实现 UserDetailsService 接口即可。接口定义如下:

这个类是系统默认的用户“主体”
public interface UserDetails extends Serializable {
Collection<? extends GrantedAuthority> getAuthorities();
String getPassword();
String getUsername();
boolean isAccountNonExpired();
boolean isAccountNonLocked();
boolean isCredentialsNonExpired();
boolean isEnabled();
}
以下是 UserDetails 实现类
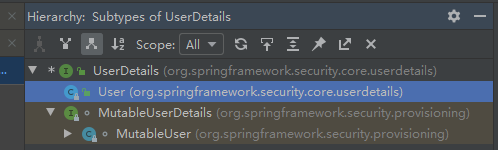
以后我们只需要使用 User 这个实体类即可!

5、PasswordEncoder 接口
public interface PasswordEncoder {
String encode(CharSequence rawPassword);
配,则返回 true;如果不匹配,则返回 false。第一个参数表示需要被解析的密码。第二个
参数表示存储的密码。
boolean matches(CharSequence rawPassword, String encodedPassword);
false。默认返回 false。
default boolean upgradeEncoding(String encodedPassword) {return false; }
}
接口实现类

BCryptPasswordEncoder 是 Spring Security 官方推荐的密码解析器,平时多使用这个解析器。
BCryptPasswordEncoder 是对 bcrypt 强散列方法的具体实现。是基于 Hash 算法实现的单向加密。可以通过 strength 控制加密强度,默认 10.
查用方法演示
@Test
public void test01(){
BCryptPasswordEncoder bCryptPasswordEncoder = new BCryptPasswordEncoder();
String num = bCryptPasswordEncoder.encode("123456");
System.out.println("加密之后数据:\t"+ num);
boolean result = bCryptPasswordEncoder.matches("num", num);
System.out.println("比较结果:\t"+result);
}
6、SpringBoot 对 Security 的自动配置
https://docs.spring.io/spring-security/site/docs/5.3.4.RELEASE/reference/html5/#servlet-hello
如果有收获!!! 希望老铁们来个三连,点赞、收藏、转发。
创作不易,别忘点个赞,可以让更多的人看到这篇文章,顺便鼓励我写出更好的博客
本文内容由网友自发贡献,版权归原作者所有,本站不承担相应法律责任。如您发现有涉嫌抄袭侵权的内容,请联系:hwhale#tublm.com(使用前将#替换为@)