前面介绍的线程是利用了POSIX线程库,这是传统C/C++程序员使用线程的方式,而C++11提供了语言层面使用线程的方式。
C++11新标准中引入了5个头文件来支持多线程编程,分别是atomic、thread、mutex、condition_variable和future。
· atomic:该头文件主要声明了两个类,std::atomic和std::atomic_flag,另外还声明了一套C风格的原子类型和与C兼容的原子操作的函数。
· thread:该头文件主要声明了类std::thread,另外std::this_thread命名空间也在该头文件中。
· mutex:该头文件主要声明了与互斥锁(mutex)相关的类,包括std::mutex系列类、std::lock_guard、std::unique_lock,以及其他的类型和函数。
· condition_variable:该头文件主要声明了与条件变量相关的类,包括std::condition_variable和std::condition_variable_any。
· future:该头文件主要声明了std::promise和std::package_task两个Provider类,以及std::future和std::shared_future两个Future类,另外还有一些与之相关的类型和函数,std::async函数就声明在该头文件中。
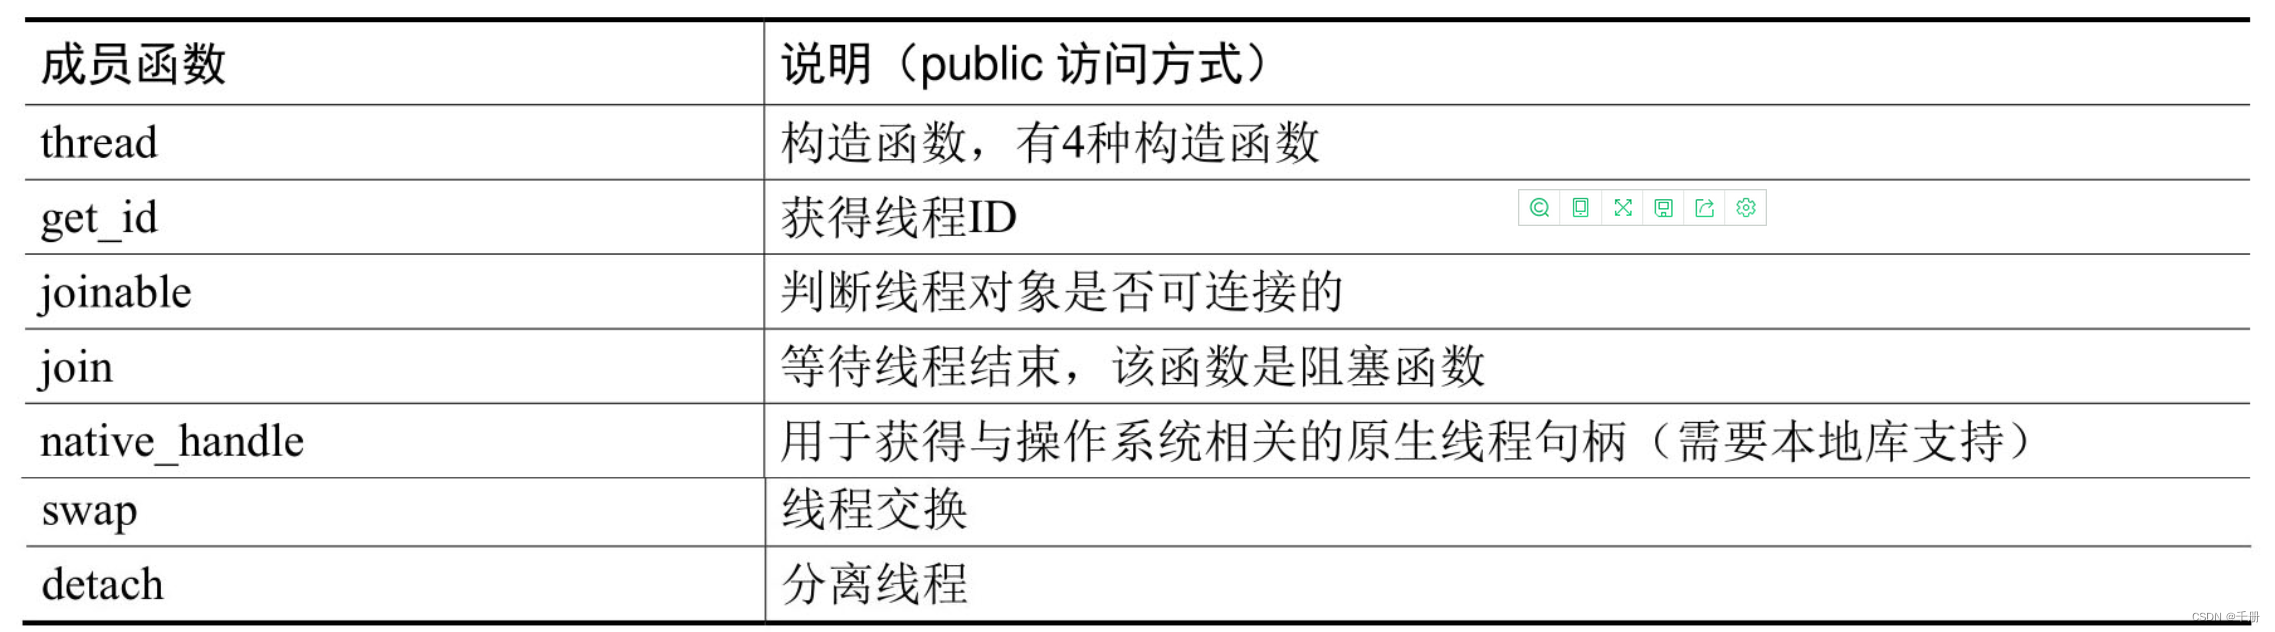
显然,类std::thread是非常重要的类,下面我们来概览下这个类的成员,类std::thread的常用成员函数如表3-2所示。
类std::thread的常用成员函数
线程的创建
在C++11中,创建线程的方式是用类std::thread的构造函数,std::thread在#include<thread>头文件中声明,因此使用std::thread时需要包含头文件thread,即#include <thread>。std::thread的构造函数有三种形式:不带参数的默认构造函数、初始化构造函数、移动构造函数。虽然类thread的初始化可以提供丰富且方便的形式,但其实现的底层依然是创建一个pthread线程并运行之,有些实现甚至是直接调用pthread_create来创建的。
1.默认构造函数
默认构造函数是不带有参数的,声明如下:
thread();
刚定义默认构造函数的thread对象,其线程是不会马上运行的。
【例3.20】 批量创建线程。
#ifndef _GNU_SOURCE
#define _GNU_SOURCE
#endif
#include <stdio.h>
#include <iostream>
#include <thread>
using namespace std;
#define DEBUG_INFO(format, ...) printf("%s:%d -- " format "\n", __func__, __LINE__,##__VA_ARGS__)

void func(int n){
    DEBUG_INFO("n = %d\n", n);
}

int test_01(){
    std::thread threads[5];
    DEBUG_INFO("CREATE THREAD");
    for(int i=0; i < 5;i++){
        threads[i] = std::thread(func,i + 1);
    }
    for(auto &t:threads){
        t.join();
    }
    DEBUG_INFO("all threads joined\n");
}

int main(int argc, char **argv)
{
    return test_01();
}
编译:
g++ -o test test.cpp -lpthread -std=c++11
执行结果:
test_01:16 -- CREATE THREAD
func:11 -- n = 1

func:11 -- n = 3

func:11 -- n = 2

func:11 -- n = 5

func:11 -- n = 4

test_01:23 -- all threads joined
此例定义了5个线程对象,刚定义的时候并不会执行线程,而是用另外初始化构造函数的返回值赋给它们。创建的线程都是可连接线程,所以要用函数join来等待它们结束。多次执行这个程序,可以发现它们打印的次序并不每次都一样,这个与CPU的调度有关。
2.初始化构造函数
这里所说的初始化构造函数,是指把线程函数的指针和线程函数的参数(如果有的话)都传入到线程类的构造函数中。这种形式最常用,由于传入了线程函数,因此在定义线程对象的时候,就会开始执行线程函数,如果线程函数需要参数,可以在构造函数中传入。初始化构造函数的形式如下:
     template <class Fn, class... Args>
     explicit thread (Fn&& fn, Args&&... args);
其中fn是线程函数指针,args是可选的,是要传入线程函数的参数。线程对象定义后,主线程会继续执行后面的代码,这就可能会出现创建的子线程还没执行完,主线程就结束了的情况,比如控制台程序,主线程结束就意味着进程就结束了。在这种情况下,我们就需要让主线程等待,待子线程全部运行结束后再继续执行主线程。还有一种情况,主线程为了统计各个子线程的工作的结果而需要等待子线程结束完毕后再继续执行,此时主线程就要等待了。类thread提供了成员函数join来等待子线程结束,即子线程的线程函数执行完毕后,join才返回,因此join是个阻塞函数。函数join会让主线程挂起,直到子线程都退出,同时join能让子线程所占资源得到释放。子线程退出后,主线程会接收到系统的信号,从休眠中恢复。这一过程和POSIX类似,只是函数形式不同而已。成员函数join声明如下:
void join();
值得注意的是,这样创建的线程是可连接线程,因此thread对象必须在销毁时调用join函数,或者将其设置为可分离的。下面我们来看通过初始化构造函数来创建线程的例子。
【例3.21】 创建一个线程,不传参数。
#ifndef _GNU_SOURCE
#define _GNU_SOURCE
#endif
#include <stdio.h>
#include <iostream>
#include <thread>
#include <unistd.h>

using namespace std;
#define DEBUG_INFO(format, ...) printf("%s:%d -- " format "\n", __func__, __LINE__,##__VA_ARGS__)

void func(){
    DEBUG_INFO("hello world\n");
}

int test_01(){
    std::thread threads(func);
    sleep(3);
    DEBUG_INFO("byebye\n");
    return 0;
}

int main(int argc, char **argv)
{
    return test_01();
}
执行结果:
func:13 -- hello world

test_01:19 -- byebye

terminate called without an active exception
./test.sh: 行 9: 123807 已放弃               (核心已转储) ./_build_test_cpp_test/test
注意,最后退出的时候,出现的异常
值得注意的是,编译C++11代码的时候,要加上编译命令函数-std=c++11。在这个例子中,首先定义一个线程对象,定义对象后马上会执行传入构造函数的线程函数,线程函数在打印一行字符串后结束,而主线程在创建子线程后会等待一秒后再结束,这样不至于因为主线程的过早结束而导致进程结束,进程结束子线程就没有机会执行了。如果没有等待函数sleep,则可能子线程的线程函数还没来得及执行,主线程就结束了,这样导致子线程的线程都没有机会执行,因为主线程已经结束,整个应用程序已经退出了。
【例3.22】 创建一个线程,并传入整型参数。
#ifndef _GNU_SOURCE
#define _GNU_SOURCE
#endif
#include <stdio.h>
#include <iostream>
#include <thread>
#include <unistd.h>

using namespace std;
#define DEBUG_INFO(format, ...) printf("%s:%d -- " format "\n", __func__, __LINE__,##__VA_ARGS__)

void func(int n){
    DEBUG_INFO("hello world n = %d\n", n);
}

int test_01(){
    std::thread t(func,10086);
    t.join();
    DEBUG_INFO("byebye\n");
    return 0;
}

int main(int argc, char **argv)
{
    return test_01();
}
执行结果:
func:13 -- hello world n = 10086

test_01:19 -- byebye
这个例子和例3.21有两点不同,一是创建线程时,把一个整数作为参数传给构造函数;另外一点是等待子线程结束没有用函数sleep,而是用函数join。函数sleep只是等待一个固定的时间,有可能在这个固定的时间内子线程早已经结束,或者子线程运行的时间大于这个固定时间,因此用它来等待子线程结束并不准确,而用函数join则会一直等到子线程结束后才会执行该函数后面的代码。
【例3.23】 创建一个线程,并传递字符串作为参数。
#ifndef _GNU_SOURCE
#define _GNU_SOURCE
#endif
#include <stdio.h>
#include <iostream>
#include <thread>
#include <unistd.h>

using namespace std;
#define DEBUG_INFO(format, ...) printf("%s:%d -- " format "\n", __func__, __LINE__,##__VA_ARGS__)

void func(const char *str){
    DEBUG_INFO("hello world n = %s\n", str);
}

int test_01(){
    std::thread t(func,"lkmao");
    t.join();
    DEBUG_INFO("byebye\n");
    return 0;
}

int main(int argc, char **argv)
{
    return test_01();
}
执行结果:
func:13 -- hello world n = lkmao

test_01:19 -- byebye
【例3.24】 创建一个线程,并传递结构体作为参数。
#ifndef _GNU_SOURCE
#define _GNU_SOURCE
#endif
#include <stdio.h>
#include <iostream>
#include <thread>
#include <unistd.h>

using namespace std;
#define DEBUG_INFO(format, ...) printf("%s:%d -- " format "\n", __func__, __LINE__,##__VA_ARGS__)

struct mystruct{
    int a;
    float f;
    char c;
};

void func(struct mystruct *s){
    DEBUG_INFO("a = %d,f = %0.2f,c = %c\n", s->a,s->f,s->c);
}

int test_01(){
    struct mystruct my={50,3.14,'X'};
    std::thread t(func,&my);
    t.join();
    DEBUG_INFO("byebye\n");
    return 0;
}

int main(int argc, char **argv)
{
    return test_01();
}
执行结果:
func:19 -- a = 50,f = 3.14,c = X

test_01:26 -- byebye
通过结构体我们把多个值传给了线程函数。现在不用结构体作为载体,直接把多个值通过构造函数来传给线程函数,其中有一个参数是指针,可以在线程中修改其值。
【例3.25】 创建一个线程,传多个参数给线程函数。
#ifndef _GNU_SOURCE
#define _GNU_SOURCE
#endif
#include <stdio.h>
#include <iostream>
#include <thread>
#include <unistd.h>

using namespace std;
#define DEBUG_INFO(format, ...) printf("%s:%d -- " format "\n", __func__, __LINE__,##__VA_ARGS__)

struct mystruct{
    int a;
    float f;
    char c;
};

void func(struct mystruct *s,int *m,const char *name){
    DEBUG_INFO("a = %d,f = %0.2f,c = %c\n", s->a,s->f,s->c);
    DEBUG_INFO("name = %s\n", name);
    DEBUG_INFO("m = %d\n", *m);
    *m = 10085;
}
void func2(int &&k){
    DEBUG_INFO("k = %d\n", k);
    k = 10;
}

int test_01(){
    struct mystruct my={50,3.14,'X'};
    int m = 10;
    int n = 5;
    int k = 5;
    std::thread t(func,&my,(int*)&m,"gulu gulu");
    std::thread t2(func2,std::move(k));
    t.join();
    t2.join();
    DEBUG_INFO("byebye\n");
    DEBUG_INFO("m = %d,n = %d,k = %d",m,n,k);
    return 0;
}

int main(int argc, char **argv)
{
    return test_01();
}
执行结果:
func:19 -- a = 50,f = 3.14,c = X

func:20 -- name = gulu gulu

func:21 -- m = 10

func2:25 -- k = 5

test_01:38 -- byebye

test_01:39 -- m = 10085,n = 5,k = 5
这个例子中,我们传入了多个参数给构造函数,这样线程函数也要准备好同样多的形参,并且其中一个是整型地址(&k),我们在线程中修改了它所指变量的内容,等子线程结束后,再在主线程中打印k,发现它的值变了。前面提到,默认创建的线程都是可连接线程,可连接线程需要调用函数join来等待其结束并释放资源。除了join方式来等待结束外,还可以把可连接线程进行分离,即调用成员函数detach,变成可分离线程后,线程结束后就可以被系统自动回收资源了。而且主线程并不需要等待子线程结束,主线程可以自己先结束。将线程进行分离的成员函数是detach,声明如下:
void detach();
【例3.26】 把可连接线程转为分离线程(C++11和POSIX结合使用)。
#ifndef _GNU_SOURCE
#define _GNU_SOURCE
#endif
#include <stdio.h>
#include <iostream>
#include <thread>
#include <unistd.h>

using namespace std;
#define DEBUG_INFO(format, ...) printf("%s:%d -- " format "\n", __func__, __LINE__,##__VA_ARGS__)

void func2(int &&k){
    DEBUG_INFO("start thread func: k = %d\n", k);
    k = 10;
    sleep(1);
    DEBUG_INFO("end thread func:k = %d\n", k);
}

int test_01(){
    std::thread t2;
    t2 = std::thread(func2,15);
    t2.detach();
    DEBUG_INFO("byebye\n");
    pthread_exit(NULL);
    DEBUG_INFO("oh no\n");
    return 0;
}

int main(int argc, char **argv)
{
    return test_01();
}
执行结果:
test_01:23 -- byebye

func2:13 -- start thread func: k = 15

func2:16 -- end thread func:k = 10
在这个例子中,我们调用detach来分离线程,这样主线程可以不用等子线程结束而可以自己先结束了。为了展示效果,我们在主线程中调用了pthread_exit(NULL)来结束主线程,前面提到过,在主线程中调用pthread_exit(NULL);的时候,将结束主线程,但进程并不会立即退出,而要等所有的线程全部结束后进程才会结束,所以我们能看到子线程函数打印的内容。主线程中会先打印k,这是因为打印k的时候线程还没有切换。从这个例子可以看出,C++11可以和POSIX结合使用。
3.移动(move)构造函数
通过移动构造函数的方式来创建线程是C++11创建线程的另一种常用方式。它通过向构造函数thread中传入一个C++对象来创建线程。这种形式的构造函数定义如下:
thread (thread&& x);
调用成功之后,x不代表任何thread对象。
【例3.27】 通过移动构造函数来启动线程。
#ifndef _GNU_SOURCE
#define _GNU_SOURCE
#endif
#include <stdio.h>
#include <iostream>
#include <thread>
#include <unistd.h>

using namespace std;
#define DEBUG_INFO(format, ...) printf("%s:%d -- " format "\n", __func__, __LINE__,##__VA_ARGS__)

void func(int &k){
    DEBUG_INFO("start thread func: k = %d\n", k);
    k = k + 10086;
    std::this_thread::sleep_for(chrono::milliseconds(1000));
    DEBUG_INFO("end thread func:k = %d\n", k);
}

int test_01(){
    std::thread t;
    int k = 20;
    //std::ref() 用于表示传递引用
    t = std::thread(func,std::ref(k));
    std::thread t2(std::move(t));
    t2.join();
    DEBUG_INFO("byebye\n");
    return 0;
}

int main(int argc, char **argv)
{
    return test_01();
}
执行结果:
func:13 -- start thread func: k = 20

func:16 -- end thread func:k = 10106

test_01:26 -- byebye
从这个例子可以看出,t1并不会执行,执行的是t2,因为t1的线程函数移动给t2了。
线程的标识符
线程的标识符(ID)可以用来唯一标识某个thread对象所对应的线程,这样可以用来区别不同的线程。两个标识符相同的thread对象,它们代表的线程是同一个线程,或者代表这两个对象还都还没有线程。两个标识符不同的thread对象,表示它们代表着不同的线程,或者一个thread对象已经有线程了,另外一个还没有。
类thread提供了成员函数get_id()来获取线程ID,该函数声明如下:
thread::id get_id()
其中ID是线程标识符的类型,它是类thread的成员,用来唯一表示某个线程。有时候,为了查看两个thread对象的ID是否相同,可以在调试的时候把ID打印出来,它们数值虽然没有含义,但却可以比较是否相同。
【例3.28】 线程比较。
#ifndef _GNU_SOURCE
#define _GNU_SOURCE
#endif
#include <stdio.h>
#include <iostream>
#include <thread>
#include <unistd.h>

using namespace std;
#define DEBUG_INFO(format, ...) printf("%s:%d -- " format "\n", __func__, __LINE__,##__VA_ARGS__)

std::thread::id main_therad_id = std::this_thread::get_id();

void func(){
    std::thread::id myid = std::this_thread::get_id();
    cout << myid << endl;
    if(main_therad_id == myid){
        DEBUG_INFO("wo shi main thread");
    }else{
        DEBUG_INFO("wo shi child thread");
    }
}

int test_01(){
    std::thread t;
    func();
    t = std::thread(func);
    t.join();
    DEBUG_INFO("byebye\n");
    return 0;
}

int main(int argc, char **argv)
{
    return test_01();
}
执行结果:
140366864676672
func:18 -- wo shi main thread
140366847350528
func:20 -- wo shi child thread
test_01:29 -- byebye
此例中,is_main_thread第一次使用时是作为主线程中的普通函数,得到的ID肯定和main_thread_id相同。第二次是作为一个子线程的线程函数,此时得到的ID是子线程的ID,和main_thread_id就不同了。this_thread是一个命名空间,用来表示当前线程,主要作用是集合了一些函数来访问当前线程。
当前线程this_thread
在实际线程开发中,经常需要访问当前线程。C++11提供了一个命名空间this_thread来引用当前线程,该命名空间集合了4个有用的函数,get_id、yield、sleep_until、sleep_for。函数get_id和类thread的成员函数get_id作用相同,都可用来获取线程ID。
1.让出CPU时间
调用函数yield的线程将让出自己的CPU时间片,以便其他线程有机会运行,声明如下:
void yield();
调用该函数的线程放弃执行,回到就绪态。我们通过一个例子来说明该函数的作用。这个例子要实现这样一个功能:创建10个线程,每个线程中让一个变量从1累加到一百万,谁先完成就打印谁的编号,以此排名。为了公平起见,创建线程时,先不让它们占用CPU时间,直到主线程改变全局变量值,各个子线程才一起开始累加。
【例3.29】 线程赛跑排名次。
#ifndef _GNU_SOURCE
#define _GNU_SOURCE
#endif
#include <stdio.h>
#include <iostream>
#include <thread>
#include <unistd.h>
#include <atomic>
#include <mutex>

// #include <loc
using namespace std;
#define DEBUG_INFO(format, ...) printf("%s:%d -- " format "\n", __func__, __LINE__,##__VA_ARGS__)

std::atomic<bool> ready(false);
std::mutex _mutex;
void func(int id){
    while(!ready){
        //std::lock_guard<std::mutex> lock(_mutex);
        //cout << "en" << std::endl;
        std::this_thread::yield();
    }
    for(volatile int i = 0;i < 1000000;i++){}
    std::lock_guard<std::mutex> lock(_mutex);
    cout << id << " ";
}

int test_01(){
    std::thread threads[10];
    for(int i = 0;i < 10;i++){
        threads[i] = std::thread(func, i);
    }
    ready = true;
    for(auto &t:threads){
        t.join();
    }
    sleep(1);
    cout << endl;
    DEBUG_INFO("byebye\n");
    return 0;
}

int main(int argc, char **argv)
{
    return test_01();
}
执行结果:
1 0 3 8 4 9 2 5 7 6
test_01:37 -- byebye
多次运行此例,可发现每次结果是不同的。线程刚启动时,一直while循环让出自己的CPU时间,这就是函数yield的作用,this_thread在子线程中使用,就代表这个子线程一旦跳出while,就开始累加,直到一百万,最后输出序号,全部序号输出后,得到先跑完一百万的排名。atomic用来定义在全局变量ready上的操作都是原子操作,原子操作(后面章节会讲到)表示在多个线程访问同一个全局资源的时候,能够确保所有其他的线程都不在同一时间内访问相同的资源。也就是它确保了在同一时刻只有唯一的线程对这个资源进行访问。这有点类似互斥对象对共享资源的访问的保护,但是原子操作更加接近底层,因而效率更高。
2.线程暂停一段时间
命名空间this_thread还有2个函数sleep_until、sleep_for,它们用来阻塞线程,暂停执行一段时间。函数sleep_until声明如下:
     template <class Clock, class Duration>
     void sleep_until (const chrono::time_point<Clock,Duration>& abs_time);
其中参数abs_time表示函数阻塞线程到abs_time这个时间点,到了这个时间点后再继续执行。函数sleep_for的功能与函数sleep_until类似,只是它是挂起线程一段时间,时间长度由参数决定,声明如下:
     template <class Rep, class Period>
     void sleep_for (const chrono::duration<Rep,Period>& rel_time);
其中参数rel_time表示线程挂起的时间段,在这段时间内线程暂停执行。下面我们来看两个小例子来加深对这两个函数的理解。
【例3.30】 暂停线程到下一分钟。
#ifndef _GNU_SOURCE
#define _GNU_SOURCE
#endif
#include <stdio.h>
#include <iostream>
#include <thread>
#include <unistd.h>
#include <atomic>
#include <mutex>
#include <time.h>
#include <stddef.h>
#include <chrono>

// #include <loc
using namespace std;
#define DEBUG_INFO(format, ...) printf("%s:%d -- " format "\n", __func__, __LINE__,##__VA_ARGS__)

void getnowtime(){
    timespec time;
    struct tm now;
    clock_gettime(CLOCK_REALTIME, &time);
    localtime_r(&time.tv_sec,&now);

    DEBUG_INFO("%04d-%02d-%02d %02d:%02d:%02d",
    now.tm_year+1900,now.tm_mon,now.tm_mday,
    now.tm_hour,now.tm_min,now.tm_sec);

}
void func(){
    getnowtime();
    using std::chrono::system_clock;
    std::time_t tt = system_clock::to_time_t(system_clock::now());
    struct std::tm *ptm = std::localtime(&tt);
    ptm->tm_min = ptm->tm_min + 1;
    std::this_thread::sleep_until(system_clock::from_time_t(mktime(ptm)));
    getnowtime();
}

int test_01(){
    std::thread t;
    t = std::thread(func);
    t.join();
    cout << endl;
    DEBUG_INFO("byebye\n");
    return 0;
}

int main(int argc, char **argv)
{
    return test_01();
}
执行结果:
getnowtime:26 -- 2023-03-28 15:05:24
getnowtime:26 -- 2023-03-28 15:06:24

test_01:44 -- byebye
在此例中,子线程从sleep_until处开始挂起,然后到了下一个整分时间(分钟加1,秒钟为0)的时候再继续执行。
【例3.31】 暂停线程5秒。
#ifndef _GNU_SOURCE
#define _GNU_SOURCE
#endif
#include <stdio.h>
#include <iostream>
#include <thread>
#include <unistd.h>
#include <atomic>
#include <mutex>
#include <time.h>
#include <stddef.h>
#include <chrono>

// #include <loc
using namespace std;
#define DEBUG_INFO(format, ...) printf("%s:%d -- " format "\n", __func__, __LINE__,##__VA_ARGS__)

void getnowtime(){
    timespec time;
    struct tm now;
    clock_gettime(CLOCK_REALTIME, &time);
    localtime_r(&time.tv_sec,&now);

    DEBUG_INFO("%04d-%02d-%02d %02d:%02d:%02d",
    now.tm_year+1900,now.tm_mon,now.tm_mday,
    now.tm_hour,now.tm_min,now.tm_sec);

}
void func(){
    getnowtime();
    std::this_thread::sleep_for(std::chrono::milliseconds(3000));
    getnowtime();
}

int test_01(){
    std::thread t;
    t = std::thread(func);
    t.join();
    cout << endl;
    DEBUG_INFO("byebye\n");
    return 0;
}

int main(int argc, char **argv)
{
    return test_01();
}
执行结果:
getnowtime:26 -- 2023-03-28 15:51:58
getnowtime:26 -- 2023-03-28 15:52:01

test_01:40 -- byebye
在多线程编程中,线程间是相互独立而又相互依赖的,所有的线程都是并发、并行且是异步执行的。多线程编程提供了一种新型的模块化编程思想和方法。这种方法能清晰地表达各种独立事件的相互关系,但是多线程编程也带来了一定的复杂度:并发和异步机制带来了线程间资源竞争的无序性。因此我们需要引入同步机制来消除这种复杂度和实现线程间数据共享,以一致的顺序执行一组操作。而如何使用同步机制来消除因线程并发、并行和异步执行而带来的复杂度是多线程编程中最核心的问题。
小结
本文内容由网友自发贡献,版权归原作者所有,本站不承担相应法律责任。如您发现有涉嫌抄袭侵权的内容,请联系:hwhale#tublm.com(使用前将#替换为@)