QEMU来创建一个,[教程在这]。

2023-05-16

RASPBERRY PI ON QEMU

Let’s start setting up a Lab VM. We will use Ubuntu and emulate our desired ARM versions inside of it.

First, get the latest Ubuntu version and run it in a VM:

  • https://www.ubuntu.com/download/desktop

For the QEMU emulation you will need the following:

  1. A Raspbian Image: http://downloads.raspberrypi.org/raspbian/images/raspbian-2017-04-10/ (other versions might work, but Jessie is recommended)
  2. Latest qemu kernel: https://github.com/dhruvvyas90/qemu-rpi-kernel

Inside your Ubuntu VM, create a new folder:


$ mkdir ~/qemu_vms/  

Download and place the Raspbian Jessie image to ~/qemu_vms/.

Download and place the qemu-kernel to ~/qemu_vms/.


$ sudo apt-get install qemu-system
$ unzip <image-file>.zip
$ fdisk -l <image-file>  

You should see something like this:


Disk 2017-03-02-raspbian-jessie.img: 4.1 GiB, 4393533440 bytes, 8581120 sectors
Units: sectors of 1 * 512 = 512 bytes
Sector size (logical/physical): 512 bytes / 512 bytes
I/O size (minimum/optimal): 512 bytes / 512 bytes
Disklabel type: dos
Disk identifier: 0x432b3940

Device                          Boot  Start     End Sectors Size Id Type
2017-03-02-raspbian-jessie.img1        8192  137215  129024  63M  c W95 FAT32 (LBA)
2017-03-02-raspbian-jessie.img2      137216 8581119 8443904   4G 83 Linux  

You see that the filesystem (.img2) starts at sector 137216. Now take that value and multiply it by 512, in this case it’s 512 * 137216 = 70254592 bytes. Use this value as an offset in the following command:


$ sudo mkdir /mnt/raspbian
$ sudo mount -v -o offset=70254592 -t ext4 ~/qemu_vms/<your-img-file.img> /mnt/raspbian
$ sudo nano /mnt/raspbian/etc/ld.so.preload  

Comment out every entry in that file with ‘#’, save and exit with Ctrl-x » Y.


$ sudo nano /mnt/raspbian/etc/fstab  

IF you see anything with mmcblk0 in fstab, then:

  1. Replace the first entry containing /dev/mmcblk0p1 with /dev/sda1
  2. Replace the second entry containing /dev/mmcblk0p2 with /dev/sda2, save and exit.

$ cd ~
$ sudo umount /mnt/raspbian  

Now you can emulate it on Qemu by using the following command:


$ qemu-system-arm -kernel ~/qemu_vms/<your-kernel-qemu> -cpu arm1176 -m 256 -M versatilepb -serial stdio -append "root=/dev/sda2 rootfstype=ext4 rw" -hda ~/qemu_vms/<your-jessie-image.img> -redir tcp:5022::22 -no-reboot  

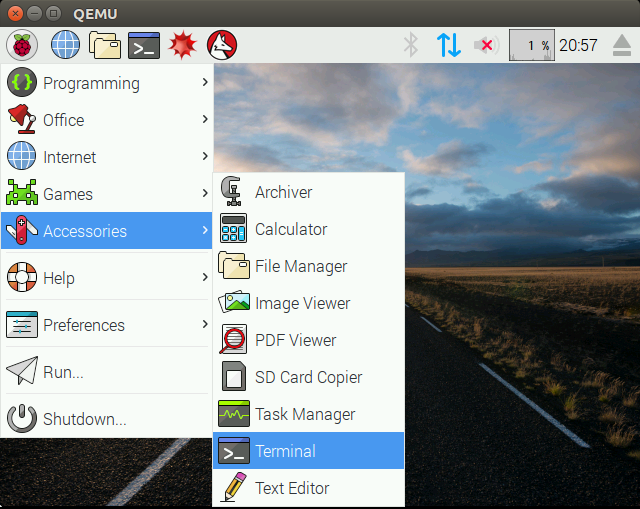
If you see GUI of the Raspbian OS, you need to get into the terminal. Use Win key to get the menu, then navigate with arrow keys until you find Terminal application as shown below.
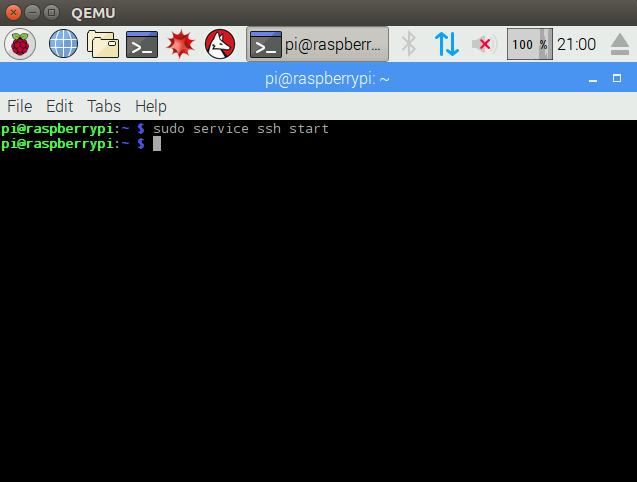
From the terminal, you need to start the SSH service so that you can access it from your host system (the one from which you launched the qemu).
Now you can SSH into it from your host system with (default password – raspberry):


$ ssh pi@127.0.0.1 -p 5022  

For a more advanced network setup see the “Advanced Networking” paragraph below.

Troubleshooting

If SSH doesn’t start in your emulator at startup by default, you can change that inside your Pi terminal with:


$ sudo update-rc.d ssh enable  

If your emulated Pi starts the GUI and you want to make it start in console mode at startup, use the following command inside your Pi terminal:


$ sudo raspi-config
>Select 3 – Boot Options
>Select B1 – Desktop / CLI
>Select B2 – Console Autologin  

If your mouse doesn’t move in the emulated Pi, click <Windows>, arrow down to Accessories, arrow right, arrow down to Terminal, enter.

Resizing the Raspbian image

Once you are done with the setup, you are left with a total of 3,9GB on your image, which is full. To enlarge your Raspbian image, follow these steps on your Ubuntu machine:

Create a copy of your existing image:


$ cp <your-raspbian-jessie>.img rasbian.img  

Run this command to resize your copy:


$ qemu-img resize raspbian.img +6G  

Now start the original raspbian with enlarged image as second hard drive:


$ sudo qemu-system-arm -kernel ~/qemu_vms/<kernel-qemu> -cpu arm1176 -m 256 -M versatilepb -serial stdio -append "root=/dev/sda2 rootfstype=ext4 rw" -hda ~/qemu_vms/<your-original-raspbian-jessie>.img -redir tcp:5022::22 -no-reboot -hdb raspbian.img  

Login and run:


$ sudo cfdisk /dev/sdb  

Delete the second partition (sdb2) and create a New partition with all available space. Once new partition is creates, use Write to commit the changes. Then Quit the cfdisk.

Resize and check the old partition and shutdown.


$ sudo resize2fs /dev/sdb2
$ sudo fsck -f /dev/sdb2
$ sudo halt  

Now you can start QEMU with your enlarged image:


$ sudo qemu-system-arm -kernel ~/qemu_vms/<kernel-qemu> -cpu arm1176 -m 256 -M versatilepb -serial stdio -append "root=/dev/sda2 rootfstype=ext4 rw" -hda ~/qemu_vms/raspbian.img -redir tcp:5022::22  

Advanced Networking

In some cases you might want to access all the ports of the VM you are running in QEMU. For example, you run some binary which opens some network port(s) that you want to access/fuzz from your host (Ubuntu) system. For this purpose, we can create a shared network interface (tap0) which allows us to access all open ports (if those ports are not bound to 127.0.0.1). Thanks to @0xMitsurugi for suggesting this to include in this tutorial.

This can be done with the following commands on your HOST (Ubuntu) system:


azeria@labs:~ $ sudo apt-get install uml-utilities
azeria@labs:~ $ sudo tunctl -t tap0 -u azeria
azeria@labs:~ $ sudo ifconfig tap0 172.16.0.1/24  

After these commands you should see the tap0 interface in the ifconfig output.


azeria@labs:~ $ ifconfig tap0
tap0: flags=4099<UP,BROADCAST,MULTICAST> mtu 1500
inet 172.16.0.1 netmask 255.255.255.0 broadcast 172.16.0.255
ether 22:a8:a9:d3:95:f1 txqueuelen 1000 (Ethernet)
RX packets 0 bytes 0 (0.0 B)
RX errors 0 dropped 0 overruns 0 frame 0
TX packets 0 bytes 0 (0.0 B)
TX errors 0 dropped 0 overruns 0 carrier 0 collisions 0  

You can now start your QEMU VM with this command:


azeria@labs:~ $ sudo qemu-system-arm -kernel ~/qemu_vms/<kernel-qemu> -cpu arm1176 -m 256 -M versatilepb -serial stdio -append "root=/dev/sda2 rootfstype=ext4 rw" -hda ~/qemu_vms/rasbian.img -net nic -net tap,ifname=tap0,script=no,downscript=no -no-reboot  

When the QEMU VM starts, you need to assign an IP to it’s eth0 interface with the following command:


pi@labs:~ $ sudo ifconfig eth0 172.16.0.2/24  

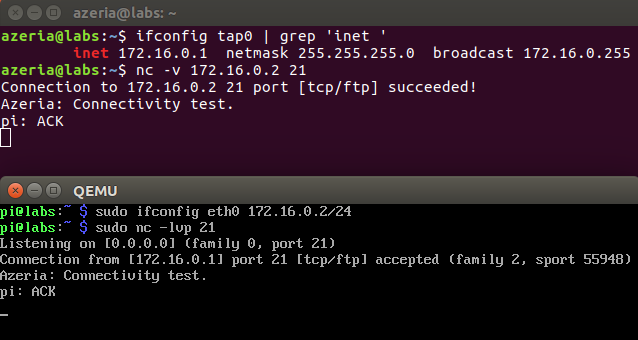
If everything went well, you should be able to reach open ports on the GUEST (Raspbian) from your HOST (Ubuntu) system. You can test this with a netcat (nc) tool (see an example below).


转自:https://www.anquanke.com/post/id/86383

本文内容由网友自发贡献,版权归原作者所有,本站不承担相应法律责任。如您发现有涉嫌抄袭侵权的内容,请联系:hwhale#tublm.com(使用前将#替换为@)

QEMU来创建一个,[教程在这]。 的相关文章

  • qemu侧 网络包发送调试记录(二)

    qemu侧 网络包发送调试记录 二 断点记录 网络后端初始化 net param nic 函数 net client init1 net init tap net init tap one 网络前端初始化 pci nic init nofa
  • qemu: could not load PC BIOS 'bios-256k.bin'

    qemu kvm 创建虚拟机时报错了 qemu could not load PC BIOS bios 256k bin 我在指定了BIOS后仍然不对 使用 find bios 256k bin 我发现 bios 256k bin是一个软连
  • 【转】KVM I/O虚拟化分析

    最近在看多队列的东西 看到下面两篇文章 记录下 以后自己也深入写个这方向的知识 0 背景 当今的I O虚拟化主要有几种模式 1 通过设备的模拟 设备的模拟主要分为两种 一种是直接在VMM中完成模拟 如xen vmware 一种是在另一个应用
  • Real-time Linux

    所谓实时操作系统 Real time Opearting System 是指当外接世界或数据产生时 能够接受并以足够快的速度予以处理 其处理的结果又能在规定的时间之内来控制生产过程或对处理系统做出快速响应 调度一切可利用的资源完成实时任务
  • 为什么macos(x86)可以运行docker arm容器arm64v8/alpine?

    我碰巧发现我的macos x86 可以为arm镜像arm64v8 alpine运行docker容器 但有以下警告 docker run it arm64v8 alpine uname a WARNING The requested imag
  • 如何在 QEMU x86 上模拟 i2c 设备?

    我正在研究 QEMU 1 5 1 6 但还没有看到任何在 i2c 总线上添加设备的文档 有人可以帮忙吗 Thanks 好吧 没人对这个问题感兴趣 我发布我自己的解决方案 由于 QEMU 不支持 I2C 总线级数据传输 因此在将多点触摸数据从
  • 如何使用 -ngraphic 和 -monitor 运行 qemu,但仍然能够向来宾发送 Ctrl+C 并使用 Ctrl+A X 退出?

    我刚刚发现如果你运行 QEMU monitor telnet 45454 server nowait nographic 然后 Ctrl C 终止 QEMU VM 而不是在来宾上生成 SIGINT 使用 ngraphic 运行 qemu 时
  • 如何在 QEMU 内使用 GDB 对 x86 代码进行源代码级调试?

    我为MBR部分编写了一个x86汇编程序 我编译如下 nasm hellombr asm f bin o hellombr img 然后我在 qemu 中运行它 qemu fda hellombr img boot a 问题是如何在源代码级别
  • 如何在Windows中通过Qemu透传USB设备?

    试图弄清楚如何通过 USB 记忆棒进入 Qemu 环境 有谁知道吗 Thanks None
  • Raspberry Pi Arch Linux 上的 qemu 最新 sd 映像

    我正在尝试设置一个 Arch 图像并使用 qemu 以便在将图像加载到 Pi 之前交叉编译一些东西 我认为最简单的方法是 qemu 最新的启动映像 准备我需要的任何东西 然后在完成后将其添加到 Pi 上 我从以下位置下载了 Arch 图像h
  • 如何使用 QEMU 模拟 vmx 功能?

    我读自here https www kernel org doc Documentation virtual kvm nested vmx txt必须通过向命令提供 vmx 选项来显式启用 QEMU 上的 vmx 功能支持 但问题是它似乎不
  • 将动态链接器与 qemu-arm 一起使用

    我有一个非常简单的arm可执行文件 用arm linux gnueabi工具链 我可以执行它qemu arm没有任何问题 qemu arm L usr arm linux gnueabi a out Hello world 不带任何参数运行
  • 如何使用 qemu 编译和构建 aarch64 的 python 包?

    我正在尝试为一个包构建 python 轮子 lap https github com gatagat lap 为了aarch64建筑学 我的主机环境是 WSL2 和 Ubuntu 20 04docker 目标是BuildrootGNU Li
  • 如何使用QEMU学习ARM Linux内核开发?

    我想学习它 比如开发一些设备驱动程序等 并为此使用 QEMU 因为我没有像 beagle 板这样的 ARM 硬件板 你们有什么建议 我可以使用 Qemu 模拟器来学习 ARM 目标上的 Linux 内核吗 或者我应该尝试的任何其他选择 这取
  • 如何在 QEMU 中模拟 TrustZone?

    我正在尝试在 Qemu 中模拟 TrustZone 功能 我发现两个链接似乎解释了这个过程 第一个参考 http www linaro org blog core dump arm trustzone qemu 未附加支持 TrustZon
  • Qemu-KVM:将访客物理地址转换为主机虚拟/主机物理地址

    我正在做一个需要翻译的项目qemu guest物理地址到主机虚拟 物理地址 我正在使用 VMI 虚拟机自省 来自省 qemu 进程 KVM VM 并读取存储在 virtio 环缓冲区描述符中的来宾物理地址 因此 我正在寻找一种简单的方法来将
  • 将 IVSHMEM 与 libvirt virt-manager 结合使用

    Using ivshmem in qemu需要执行以下步骤 在主机中启动 ivshmem 服务器 ivshmem server这将创建一个unix域套接字 tmp ivshmem socket 使用以下命令行选项启动 qemu charde
  • 如何统计QEMU从运行开始到结束执行的客户指令数量?

    我想对 QEMU 每秒的客户指令进行基准测试 以将其与其他模拟器进行比较 如何获取访客指令数 我对用户模式和完整系统模式都感兴趣 我现在唯一的解决方案是使用简单的跟踪记录所有指令exec tb or d in asm 如何使用 QEMU 的
  • 如何创建具有自定义外设和内存映射的 QEMU ARM 机器?

    我正在为 Cortex M3 cpu 编写代码 并且正在使用以下命令执行单元测试qemu arm二进制 现在一切都很好 但我想知道我是否能够使用测试整个系统qemu system arm 我的意思是 我想为 qemu 编写自定义 机器 我将
  • assembly x86 qemu:致命:尝试在 RAM 或 ROM 之外执行代码

    我正在开发一个非常基本的 shell 其中当前唯一的命令是 help 如果您输入错误 系统会通知您该命令无法识别 在段和堆栈设置的某个地方 我有一个错误 导致 shell 在我输入任何内容后吐出一些废话 然后完全冻结 我在终端中遇到错误 q

随机推荐

  • FreeRTOS代码阅读笔记:heap_4.c

    FreeRTOS中对于内存的管理当前一共有5种实现方式 xff08 作者当前的版本是10 1 1 xff09 xff0c 均在 Source portable MemMang 下面 xff0c 这里笔记下 heap 4 c和第二种方式比较相
  • (1)touchgfx 添加时钟控件

    第一步 xff1a 新建空白模版 添加图片 xff1a 放入 链接 xff1a https pan baidu com s 1NI6LUYrTUs64Z2jZE6AAQQ 提取码 xff1a 2odw 添加控件 xff1a 位置部件属性1T
  • 【基于51】红外寻迹智能小车 - 代码篇

    文章目录 前言一 准备工作二 使用步骤1 模块化编程2 电机模块3 小车动作模块4 PWM 和定时器 中断系统5 寻迹逻辑 总结 前言 关于硬件部分可以看我上次写的帖子https blog csdn net ZER00000001 arti
  • C++关键字override

    一 什么是override override的翻译是覆盖 实际上它在C 43 43 中可以检测哪些虚函数没有被重写并报错 注 xff1a 在派生类的成员函数中使用override时 xff0c 如果基类中无此函数 xff0c 或基类中的函数
  • 邻接矩阵和邻接表

    图的概述和存储结构 xff08 一 xff09 文章目录 前言一 图的概述1 xff09 图的分类2 xff09 图的要素 二 图的存储结构三 邻接矩阵四 邻接表 前言 有一种说法是程序是由数据结构和算法组成的 xff0c 这很能体现出数据
  • 图解迪杰斯特拉(Dijkstra)最短路径算法

    往期文章目录 干货满满 xff01 最小生成树 Prim算法 最小生成树 Kruskal算法 目录 前言 一 最短路径的概念及应用 二 Dijkstra迪杰斯特拉 1 什么是Dijkstra 2 逻辑实现 总结 前言 无论是什么程序都要和数
  • Vscode配置Git+快速入门,一篇学会80%的Git操作

    前言 团队开发中经常会用到Git xff0c 能极大简化开发的流程 xff0c 而个人开发也可以利用Git管理自己的代码 同样作为一个初学者 xff0c 我在学完Git之后写下这篇文章总结个人走过的坑 xff0c 大家一起进步 Git下载和
  • 【C++11】三大神器之——智能指针

    文章目录 前言 一 智能指针的原理1 RAII机制2 简单的实现 二 智能指针的用法1 智能指针的分类2 unique ptr基本语法 3 shared ptr基本语法 4 删除器5 weak ptr 前言 一 智能指针的原理 1 RAII
  • 【C++11】三大神器之——右值、移动语义、完美转发

    前言 如果你还不知道C 43 43 11引入的右值 移动语义 完美转发是什么 xff0c 可以阅读这篇文章 xff1b 如果你已经对这些知识了如指掌 xff0c 也可以看看有什么可以补充 x1f60f 一 右值 值类别vs变量类型 在正式认
  • 【C++11】三大神器之——包装器和绑定器

    前言 如果你还不知道 C 43 43 11 引入的包装器和绑定器是什么 xff0c 可以读读这篇文章 xff0c 看看有什么 启发 xff1b 如果你已经对包装器和绑定器了如指掌 xff0c 也可以读读这篇文章 xff0c 看看有什么 补充
  • 【神经网络和深度学习-开发案例】第四章 神经网络如何对数字进行分类

    神经网络和深度学习 第四章 神经网络如何对数字进行分类 案例 xff1a 使用神经网络识别手写数字 好了 xff0c 让我们来写一个程序 xff0c 学习如何识别手写的数字 xff0c 使用随机梯度下降和MNIST的训练数据 我们将用一个简
  • Win7下安装Ubuntu(双硬盘)的简要步骤

    0 硬件准备 一个至少4G大小的U盘 xff0c 用于刻录Ubuntu系统并安装 1 下载Ubuntu镜像及刻录 Ubuntu镜像 Ubuntu镜像可从官网下载 xff08 外网 xff0c 速度太慢 xff09 xff0c 或使用国内镜像
  • C++ Primer Plus拾遗

    本博文整理了C 43 43 Primer Plus前六章中的部分知识点 xff0c 一般为不常用的小技巧或基础概念性的内容 C与C 43 43 的语言特性 C语言特性 结构化编程 xff08 Structured Programming x
  • 时隔一年,对全国大学生智能车竞赛做段总结(五)

    早期粗糙的赛道元素处理 说这个没有别的意思 xff0c 就是觉得 xff0c 遇到实际应用上的问题 xff0c 虽然脑海里的知识技巧并不能让我们有多高明的手法去解决这个问题 xff0c 但也要努力去尝试 元素判断 这里的元素判断也是粗糙的
  • Windows7 VMware USB Arbitration Service启动失败解决

    转自 http huxiaodan666 blog 163 com blog static 162090542201091014749373 前几日安装了Windows7 xff0c 不过vmware虚拟机安装之后却无法使用usb 软件是官
  • Windows下以太坊公钥加密功能python实现

    文章目录 一 什么是公钥 私钥 地址二 实现过程1 从keystore文件中解出私钥以及私钥 gt 公钥 gt 地址2 利用公钥进行消息加密 解密 一 什么是公钥 私钥 地址 私钥 xff1a 32字节 xff08 256位 xff09 x
  • fatal error: mav_msgs/Actuators.h: 没有那个文件或目录

    编译ros gz包的时候 xff0c ros ign bridge一直报错 xff0c 最开始都已经放弃了 xff0c 但是今天发现不得不跑 xff0c 唉 xff0c 一直报 xff1a fatal error mav msgs Actu
  • stalled和Initial connection偶尔请求时间长

    Queueing 请求排队的时间 关于这个 xff0c 需要知道一个背景 xff0c 就是浏览器与同一个域名建立的TCP连接数是有限制的 xff0c chrome设置的6个 xff0c 如果说同一时间 xff0c 发起的同一域名的请求超过了
  • 自制stm32F103c6t6出现No target connected或者Internal command error的原因猜测和解决方法

    刚刚焊好的最小系统板 xff0c 在使用ST LINK下载程序的时候 xff0c 发现没有啥问题 xff0c 之后再下载的时候便出现了这样的问题 xff0c 怀疑是单片机供电出现了问题 xff0c 但是每个脚都供好了电 xff0c 网上说可
  • QEMU来创建一个,[教程在这]。

    RASPBERRY PI ON QEMU Let s start setting up a Lab VM We will use Ubuntu and emulate our desired ARM versions inside of i