相关部署方式也挺多,自己采用双master节点+单node节点方式,并且采用keepalived部署1.18.20版本,中间也出现过相关小问题,但都一一处理,记录以给需要的同仁们参考,希望大家都可以一起学习交流!!!
【部署环境】----参考之前已使用的环境
master01:192.168.66.200
master02:192.168.66.201
node01:192.168.66.250
vip:192.168.66.199
【操作步骤】
步骤1、虚机的初始化配置(相关配置已略去)
请参考K8s 1.15.0 版本部署安装_好好学习之乘风破浪的博客-CSDN博客
步骤2、双master节点配置keepalived
# yum install keepalived -y
# cd /etc/keepalived
修改keepalived.conf配置文件
[root@k8s-master01 ~]# cat /etc/keepalived/keepalived.conf
! Configuration File for keepalived

global_defs {
   router_id LVS_DEVEL
}

vrrp_script check_nginx {
    script "/etc/keepalived/check_nginx.sh"
    interval 2
    weight -2
}

vrrp_instance VI_1 {
    state MASTER         ####master01上配置Master,master02上配置BACKUP
    interface ens33      #####需要根据虚机的网卡进行填写
    virtual_router_id 51
    priority 100           ####master01上配置100,master02上配置90
    advert_int 1
    authentication {
        auth_type PASS
        auth_pass 1111
    }

    track_script {
     check_nginx
    }

    virtual_ipaddress {
        192.168.66.199       #####配置VIP
    }
}
[root@k8s-master02 keepalived]# cat keepalived.conf
! Configuration File for keepalived

global_defs {
   router_id LVS_DEVEL
}

vrrp_script check_nginx {
    script "/etc/keepalived/check_nginx.sh"
    interval 2
    weight -2
}

vrrp_instance VI_1 {
    state BACKUP
    interface ens33
    virtual_router_id 51
    priority 90
    advert_int 1
    authentication {
        auth_type PASS
        auth_pass 1111
    }

    track_script {
     check_nginx
    }

    virtual_ipaddress {
        192.168.66.199
    }
}
分别在两台节点上配置检查keepalived脚本 check_nginx.sh
[root@k8s-master01 keepalived]# cat check_nginx.sh
#!/bin/bash
count=`ps aux |grep nginx|grep -v grep|wc -l`
if [ $count -eq 0 ];then
    nginx
else
    sleep 3
    systemctl stop keepalived.service
fi

[root@k8s-master02 keepalived]# cat check_nginx.sh
#!/bin/bash
count=`ps aux |grep nginx|grep -v grep|wc -l`
if [ $count -eq 0 ];then
    nginx
else
    sleep 3
    systemctl stop keepalived.service
fi
配置完成后重启keepalive服务
# systemctl enable keepalived && systemctl start keepalived && systemctl status keepalived

若出现重启keepalived服务报错Configuration file ‘/etc/keepalived/keepalived.conf‘ is not a regular non-executable file,具体处理方式如下:
K8s 配置高可用提示Configuration file ‘/etc/keepalived/keepalived.conf‘ is not a regular non-executable file_好好学习之乘风破浪的博客-CSDN博客
步骤三、安装docker
可以参考k8s 1.18.20版本部署_好好学习之乘风破浪的博客-CSDN博客
步骤四、安装软件包
可以参考k8s 1.18.20版本部署_好好学习之乘风破浪的博客-CSDN博客
五、部署集群
以下操作在k8s-master01节点上操作
5.1 、生成初始化配置
kubeadm config print init-defaults > kubeadm.yaml
[root@k8s-master01 ~]# cat  kubeadm.yaml
apiVersion: kubeadm.k8s.io/v1beta2
bootstrapTokens:
- groups:
  - system:bootstrappers:kubeadm:default-node-token
  token: abcdef.0123456789abcdef
  ttl: 24h0m0s
  usages:
  - signing
  - authentication
kind: InitConfiguration
localAPIEndpoint:
  advertiseAddress: 192.168.66.199    ####需要修改为VIP的地址
  bindPort: 6443
nodeRegistration:
  criSocket: /var/run/dockershim.sock
  taints:
  - effect: NoSchedule
    key: node-role.kubernetes.io/master
---
apiServer:
  timeoutForControlPlane: 4m0s
apiVersion: kubeadm.k8s.io/v1beta2
certificatesDir: /etc/kubernetes/pki
clusterName: kubernetes
controllerManager: {}
dns:
  type: CoreDNS
etcd:
  local:
    dataDir: /var/lib/etcd
imageRepository: k8s.gcr.io
kind: ClusterConfiguration
kubernetesVersion: v1.18.20   ####需要修改为v1.18.20
controlPlaneEndpoint: 192.168.66.199:6443   ####需要修改为VIP的地址和端口
apiServer:                              ####新增
  certSANs:                              ####新增
  - 192.168.66.200                        ####新增
  - 192.168.66.201                          ####新增
  - 192.168.66.199                           ####新增
networking:
  dnsDomain: cluster.local
  serviceSubnet: 10.96.0.0/12  ####保持默认
  podSubnet: 10.2.0.0/16     ####新增
scheduler: {}

---                                             ####新增
apiVersion: kubeproxy.config.k8s.io/v1alpha1    ####新增
kind: KubeProxyConfiguration                    ####新增
mode: ipvs                                      ####新增
5.2 、执行初始化配置
kubeadm init --config kubeadm.yaml
成功会显示如下信息
[root@k8s-master01 ~]# kubeadm init --config kubeadm.yaml
W0401 23:48:19.240599   47054 strict.go:54] error unmarshaling configuration schema.GroupVersionKind{Group:"kubeadm.k8s.io", Version:"v1beta2", Kind:"ClusterConfiguration"}: error converting YAML to JSON: yaml: unmarshal errors:
  line 17: key "apiServer" already set in map
W0401 23:48:19.241866   47054 configset.go:202] WARNING: kubeadm cannot validate component configs for API groups [kubelet.config.k8s.io kubeproxy.config.k8s.io]
[init] Using Kubernetes version: v1.18.20
[preflight] Running pre-flight checks
[preflight] Pulling images required for setting up a Kubernetes cluster
[preflight] This might take a minute or two, depending on the speed of your internet connection
[preflight] You can also perform this action in beforehand using 'kubeadm config images pull'
[kubelet-start] Writing kubelet environment file with flags to file "/var/lib/kubelet/kubeadm-flags.env"
[kubelet-start] Writing kubelet configuration to file "/var/lib/kubelet/config.yaml"
[kubelet-start] Starting the kubelet
[certs] Using certificateDir folder "/etc/kubernetes/pki"
[certs] Generating "ca" certificate and key
[certs] Generating "apiserver" certificate and key
[certs] apiserver serving cert is signed for DNS names [k8s-master01 kubernetes kubernetes.default kubernetes.default.svc kubernetes.default.svc.cluster.local] and IPs [10.96.0.1 192.168.66.199 192.168.66.199 192.168.66.200 192.168.66.201 192.168.66.199]
[certs] Generating "apiserver-kubelet-client" certificate and key
[certs] Generating "front-proxy-ca" certificate and key
[certs] Generating "front-proxy-client" certificate and key
[certs] Generating "etcd/ca" certificate and key
[certs] Generating "etcd/server" certificate and key
[certs] etcd/server serving cert is signed for DNS names [k8s-master01 localhost] and IPs [192.168.66.199 127.0.0.1 ::1]
[certs] Generating "etcd/peer" certificate and key
[certs] etcd/peer serving cert is signed for DNS names [k8s-master01 localhost] and IPs [192.168.66.199 127.0.0.1 ::1]
[certs] Generating "etcd/healthcheck-client" certificate and key
[certs] Generating "apiserver-etcd-client" certificate and key
[certs] Generating "sa" key and public key
[kubeconfig] Using kubeconfig folder "/etc/kubernetes"
[kubeconfig] Writing "admin.conf" kubeconfig file
[kubeconfig] Writing "kubelet.conf" kubeconfig file
[kubeconfig] Writing "controller-manager.conf" kubeconfig file
[kubeconfig] Writing "scheduler.conf" kubeconfig file
[control-plane] Using manifest folder "/etc/kubernetes/manifests"
[control-plane] Creating static Pod manifest for "kube-apiserver"
[control-plane] Creating static Pod manifest for "kube-controller-manager"
W0401 23:48:24.472613   47054 manifests.go:225] the default kube-apiserver authorization-mode is "Node,RBAC"; using "Node,RBAC"
[control-plane] Creating static Pod manifest for "kube-scheduler"
W0401 23:48:24.474030   47054 manifests.go:225] the default kube-apiserver authorization-mode is "Node,RBAC"; using "Node,RBAC"
[etcd] Creating static Pod manifest for local etcd in "/etc/kubernetes/manifests"
[wait-control-plane] Waiting for the kubelet to boot up the control plane as static Pods from directory "/etc/kubernetes/manifests". This can take up to 4m0s
[apiclient] All control plane components are healthy after 16.004197 seconds
[upload-config] Storing the configuration used in ConfigMap "kubeadm-config" in the "kube-system" Namespace
[kubelet] Creating a ConfigMap "kubelet-config-1.18" in namespace kube-system with the configuration for the kubelets in the cluster
[upload-certs] Skipping phase. Please see --upload-certs
[mark-control-plane] Marking the node k8s-master01 as control-plane by adding the label "node-role.kubernetes.io/master=''"
[mark-control-plane] Marking the node k8s-master01 as control-plane by adding the taints [node-role.kubernetes.io/master:NoSchedule]
[bootstrap-token] Using token: abcdef.0123456789abcdef
[bootstrap-token] Configuring bootstrap tokens, cluster-info ConfigMap, RBAC Roles
[bootstrap-token] configured RBAC rules to allow Node Bootstrap tokens to get nodes
[bootstrap-token] configured RBAC rules to allow Node Bootstrap tokens to post CSRs in order for nodes to get long term certificate credentials
[bootstrap-token] configured RBAC rules to allow the csrapprover controller automatically approve CSRs from a Node Bootstrap Token
[bootstrap-token] configured RBAC rules to allow certificate rotation for all node client certificates in the cluster
[bootstrap-token] Creating the "cluster-info" ConfigMap in the "kube-public" namespace
[kubelet-finalize] Updating "/etc/kubernetes/kubelet.conf" to point to a rotatable kubelet client certificate and key
[addons] Applied essential addon: CoreDNS
[addons] Applied essential addon: kube-proxy

Your Kubernetes control-plane has initialized successfully!

To start using your cluster, you need to run the following as a regular user:

  mkdir -p $HOME/.kube
  sudo cp -i /etc/kubernetes/admin.conf $HOME/.kube/config
  sudo chown $(id -u):$(id -g) $HOME/.kube/config

You should now deploy a pod network to the cluster.
Run "kubectl apply -f [podnetwork].yaml" with one of the options listed at:
  https://kubernetes.io/docs/concepts/cluster-administration/addons/

You can now join any number of control-plane nodes by copying certificate authorities
and service account keys on each node and then running the following as root:

  kubeadm join 192.168.66.199:6443 --token abcdef.0123456789abcdef \
    --discovery-token-ca-cert-hash sha256:bd8a870bc548c50dd036fcf84da9a7ff506903e785d767de5a022482011f8c58 \
    --control-plane

Then you can join any number of worker nodes by running the following on each as root:

kubeadm join 192.168.66.199:6443 --token abcdef.0123456789abcdef \
    --discovery-token-ca-cert-hash sha256:bd8a870bc548c50dd036fcf84da9a7ff506903e785d767de5a022482011f8c58
Your Kubernetes control-plane has initialized successfully!
To start using your cluster, you need to run the following as a regular user:
mkdir -p $HOME/.kube
sudo cp -i /etc/kubernetes/admin.conf $HOME/.kube/config
sudo chown $(id -u):$(id -g) $HOME/.kube/config
You should now deploy a pod network to the cluster.
Run "kubectl apply -f [podnetwork].yaml" with one of the options listed at:
https://kubernetes.io/docs/concepts/cluster-administration/addons/
You can now join any number of control-plane nodes by copying certificate authorities
and service account keys on each node and then running the following as root:
kubeadm join 192.168.66.199:6443 --token abcdef.0123456789abcdef \
--discovery-token-ca-cert-hash sha256:bd8a870bc548c50dd036fcf84da9a7ff506903e785d767de5a022482011f8c58 \
--control-plane
Then you can join any number of worker nodes by running the following on each as root:
kubeadm join 192.168.66.199:6443 --token abcdef.0123456789abcdef \
--discovery-token-ca-cert-hash sha256:bd8a870bc548c50dd036fcf84da9a7ff506903e785d767de5a022482011f8c58
5.3 按照要求执行生成文件
mkdir -p $HOME/.kube
sudo cp -i /etc/kubernetes/admin.conf $HOME/.kube/config
sudo chown $(id -u):$(id -g) $HOME/.kube/config
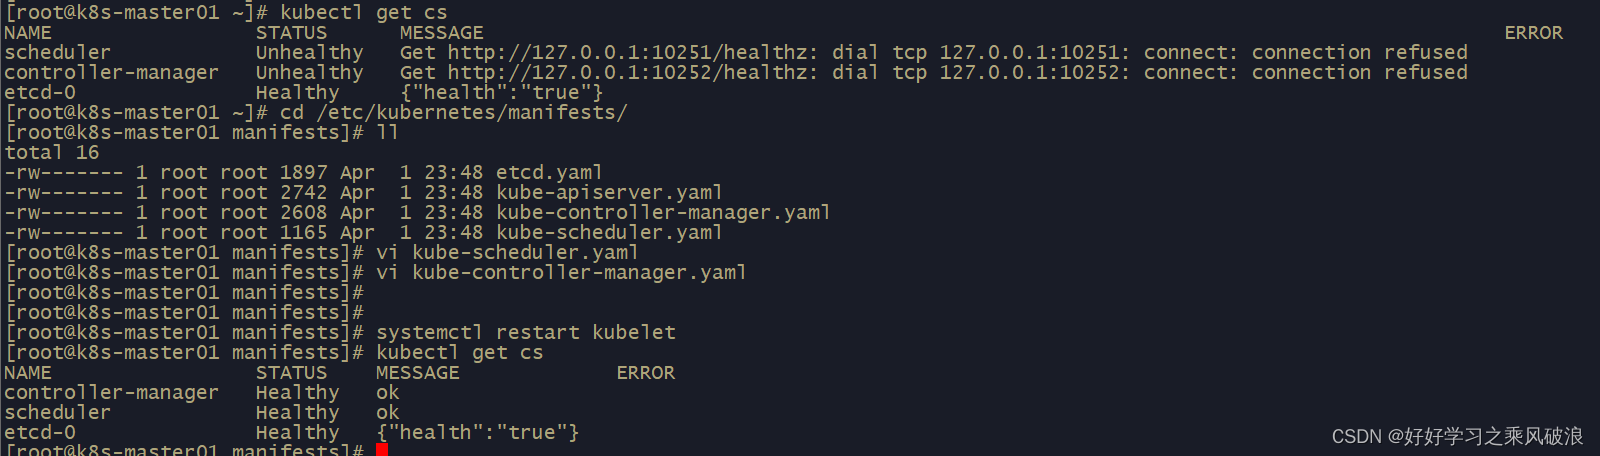
5.4 查询集群状态
# kubectl get cs

怎样处理127.0.0.1:10251端口可以参考
k8s 1.18.20版本部署_好好学习之乘风破浪的博客-CSDN博客
5.5 部署calico组件
calico.yaml文件
链接:https://pan.baidu.com/s/1-zvq1Ug4Gvny4ek5u0HWqw
提取码:2sbq
执行calico文件

查询集群pod运行情况

步骤6、添加节点
(1)将master02节点添加到集群中,直接使用
kubeadm join 192.168.66.199:6443 --token abcdef.0123456789abcdef \
> --discovery-token-ca-cert-hash sha256:bd8a870bc548c50dd036fcf84da9a7ff506903e785d767de5a022482011f8c58 \
> --control-plane
[preflight] Running pre-flight checks
提示缺少证书文件

从master01上上传证书文件到master02上
# cd /etc/kubernetes/pki
# scp ca.* 192.168.66.201:/etc/kubernetes/pki/
# scp sa.* 192.168.66.201:/etc/kubernetes/pki/
# scp front* 192.168.66.201:/etc/kubernetes/pki/
还有etcd证书文件
# cd /etc/kubernetes/pki/etcd
# scp ca.* 192.168.66.201:/etc/kubernetes/pki/etcd/
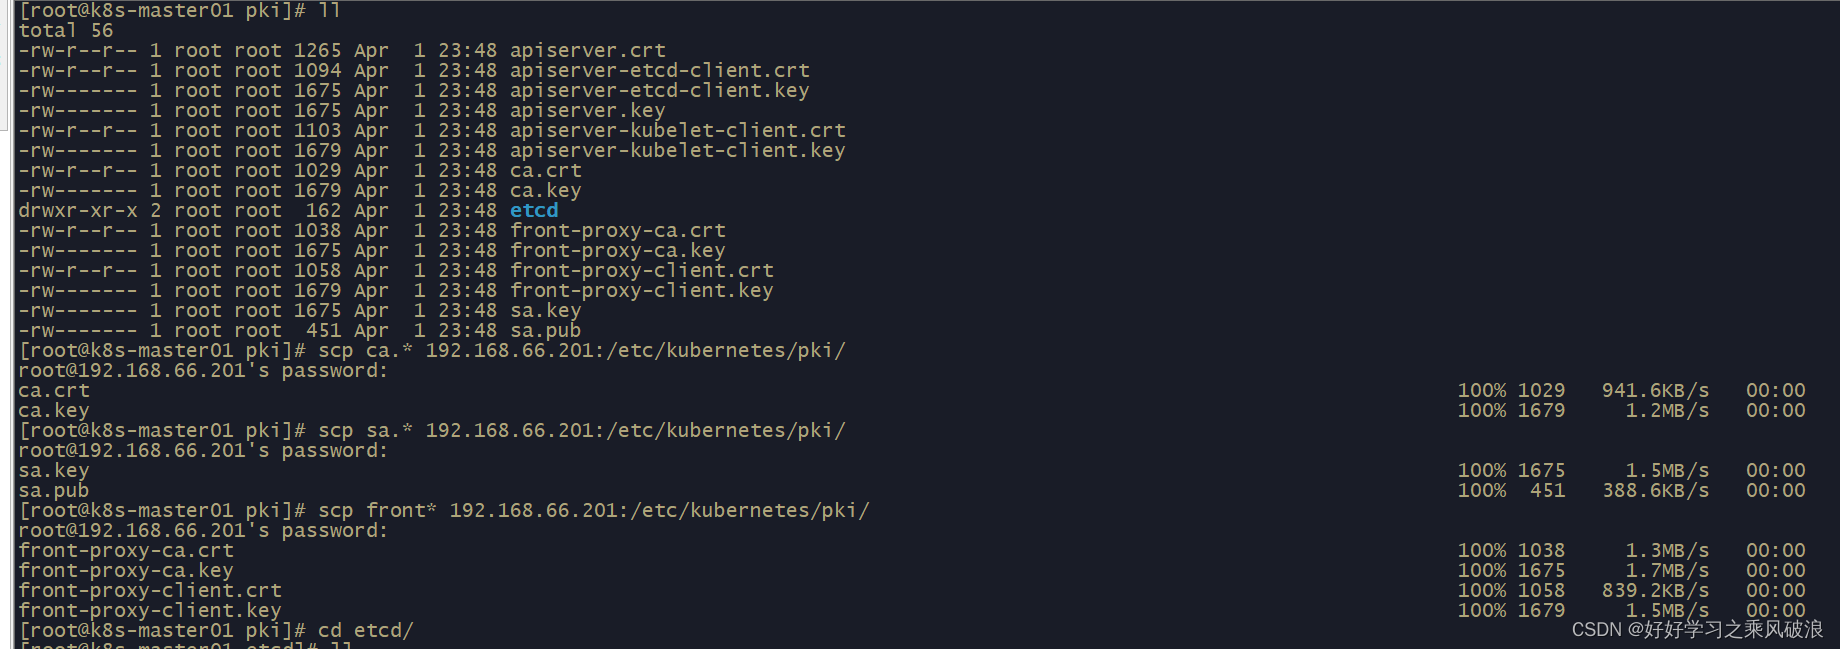

上传完成后再次执行添加集群操作
kubeadm join 192.168.66.199:6443 --token abcdef.0123456789abcdef --discovery-token-ca-cert-hash sha256:bd8a870bc548c50dd036fcf84da9a7ff506903e785d767de5a022482011f8c58 --control-plane
[root@k8s-master02 kubernetes]#   kubeadm join 192.168.66.199:6443 --token abcdef.0123456789abcdef     --discovery-token-ca-cert-hash sha256:bd8a870bc548c50dd036fcf84da9a7ff506903e785d767de5a022482011f8c58     --control-plane
[preflight] Running pre-flight checks
[preflight] Reading configuration from the cluster...
[preflight] FYI: You can look at this config file with 'kubectl -n kube-system get cm kubeadm-config -oyaml'
[preflight] Running pre-flight checks before initializing the new control plane instance
[preflight] Pulling images required for setting up a Kubernetes cluster
[preflight] This might take a minute or two, depending on the speed of your internet connection
[preflight] You can also perform this action in beforehand using 'kubeadm config images pull'
[certs] Using certificateDir folder "/etc/kubernetes/pki"
[certs] Using the existing "front-proxy-client" certificate and key
[certs] Generating "etcd/healthcheck-client" certificate and key
[certs] Generating "etcd/server" certificate and key
[certs] etcd/server serving cert is signed for DNS names [k8s-master02 localhost] and IPs [192.168.66.201 127.0.0.1 ::1]
[certs] Generating "etcd/peer" certificate and key
[certs] etcd/peer serving cert is signed for DNS names [k8s-master02 localhost] and IPs [192.168.66.201 127.0.0.1 ::1]
[certs] Generating "apiserver-etcd-client" certificate and key
[certs] Generating "apiserver" certificate and key
[certs] apiserver serving cert is signed for DNS names [k8s-master02 kubernetes kubernetes.default kubernetes.default.svc kubernetes.default.svc.cluster.local] and IPs [10.96.0.1 192.168.66.201 192.168.66.199 192.168.66.200 192.168.66.201 192.168.66.199]
[certs] Generating "apiserver-kubelet-client" certificate and key
[certs] Valid certificates and keys now exist in "/etc/kubernetes/pki"
[certs] Using the existing "sa" key
[kubeconfig] Generating kubeconfig files
[kubeconfig] Using kubeconfig folder "/etc/kubernetes"
[kubeconfig] Writing "admin.conf" kubeconfig file
[kubeconfig] Writing "controller-manager.conf" kubeconfig file
[kubeconfig] Writing "scheduler.conf" kubeconfig file
[control-plane] Using manifest folder "/etc/kubernetes/manifests"
[control-plane] Creating static Pod manifest for "kube-apiserver"
W0402 00:27:01.015532    5719 manifests.go:225] the default kube-apiserver authorization-mode is "Node,RBAC"; using "Node,RBAC"
[control-plane] Creating static Pod manifest for "kube-controller-manager"
W0402 00:27:01.032698    5719 manifests.go:225] the default kube-apiserver authorization-mode is "Node,RBAC"; using "Node,RBAC"
[control-plane] Creating static Pod manifest for "kube-scheduler"
W0402 00:27:01.034211    5719 manifests.go:225] the default kube-apiserver authorization-mode is "Node,RBAC"; using "Node,RBAC"
[check-etcd] Checking that the etcd cluster is healthy
[kubelet-start] Downloading configuration for the kubelet from the "kubelet-config-1.18" ConfigMap in the kube-system namespace
[kubelet-start] Writing kubelet configuration to file "/var/lib/kubelet/config.yaml"
[kubelet-start] Writing kubelet environment file with flags to file "/var/lib/kubelet/kubeadm-flags.env"
[kubelet-start] Starting the kubelet
[kubelet-start] Waiting for the kubelet to perform the TLS Bootstrap...
[etcd] Announced new etcd member joining to the existing etcd cluster
[etcd] Creating static Pod manifest for "etcd"
[etcd] Waiting for the new etcd member to join the cluster. This can take up to 40s
{"level":"warn","ts":"2023-04-02T00:27:17.644+0800","caller":"clientv3/retry_interceptor.go:61","msg":"retrying of unary invoker failed","target":"passthrough:///https://192.168.66.201:2379","attempt":0,"error":"rpc error: code = DeadlineExceeded desc = context deadline exceeded"}
[upload-config] Storing the configuration used in ConfigMap "kubeadm-config" in the "kube-system" Namespace
[mark-control-plane] Marking the node k8s-master02 as control-plane by adding the label "node-role.kubernetes.io/master=''"
[mark-control-plane] Marking the node k8s-master02 as control-plane by adding the taints [node-role.kubernetes.io/master:NoSchedule]

This node has joined the cluster and a new control plane instance was created:

* Certificate signing request was sent to apiserver and approval was received.
* The Kubelet was informed of the new secure connection details.
* Control plane (master) label and taint were applied to the new node.
* The Kubernetes control plane instances scaled up.
* A new etcd member was added to the local/stacked etcd cluster.

To start administering your cluster from this node, you need to run the following as a regular user:

        mkdir -p $HOME/.kube
        sudo cp -i /etc/kubernetes/admin.conf $HOME/.kube/config
        sudo chown $(id -u):$(id -g) $HOME/.kube/config

Run 'kubectl get nodes' to see this node join the cluster.

[root@k8s-master02 kubernetes]#
按照要求进行操作
To start administering your cluster from this node, you need to run the following as a regular user:
mkdir -p $HOME/.kube
sudo cp -i /etc/kubernetes/admin.conf $HOME/.kube/config
sudo chown $(id -u):$(id -g) $HOME/.kube/config
Run 'kubectl get nodes' to see this node join the cluster.

查询master02节点添加情况,显示master02节点已经添加到集群中正常

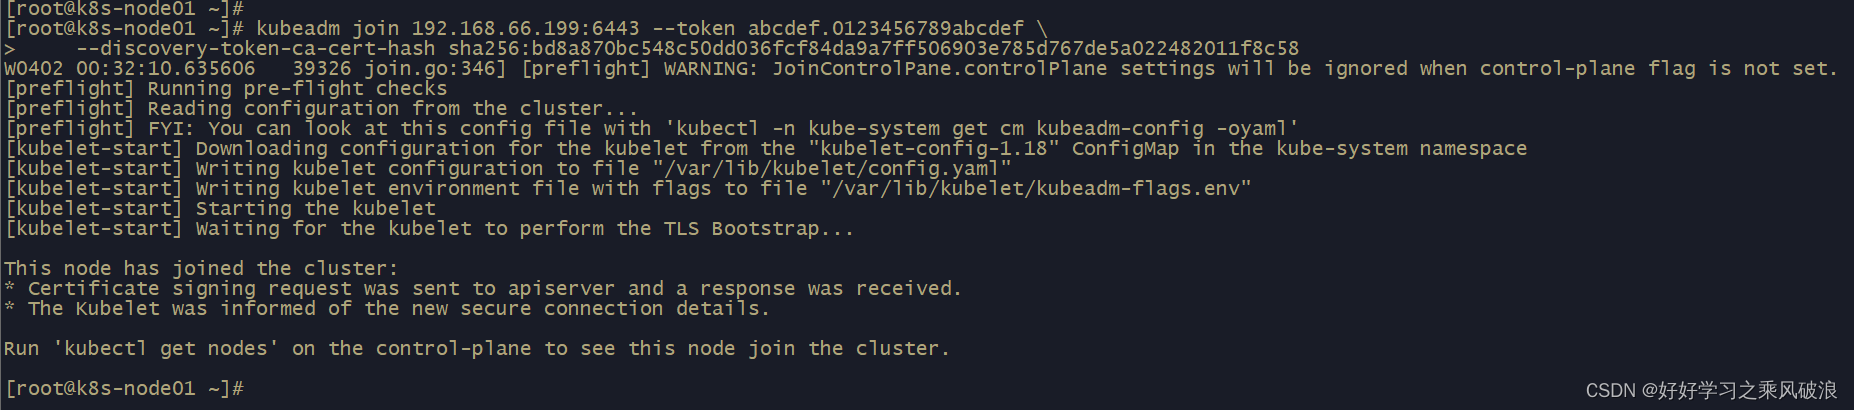
(2)将node01节点添加到集群中,直接使用
[root@k8s-node01 ~]# kubeadm join 192.168.66.199:6443 --token abcdef.0123456789abcdef \
> --discovery-token-ca-cert-hash sha256:bd8a870bc548c50dd036fcf84da9a7ff506903e785d767de5a022482011f8c58
查询集群节点node01情况和pod运行情况
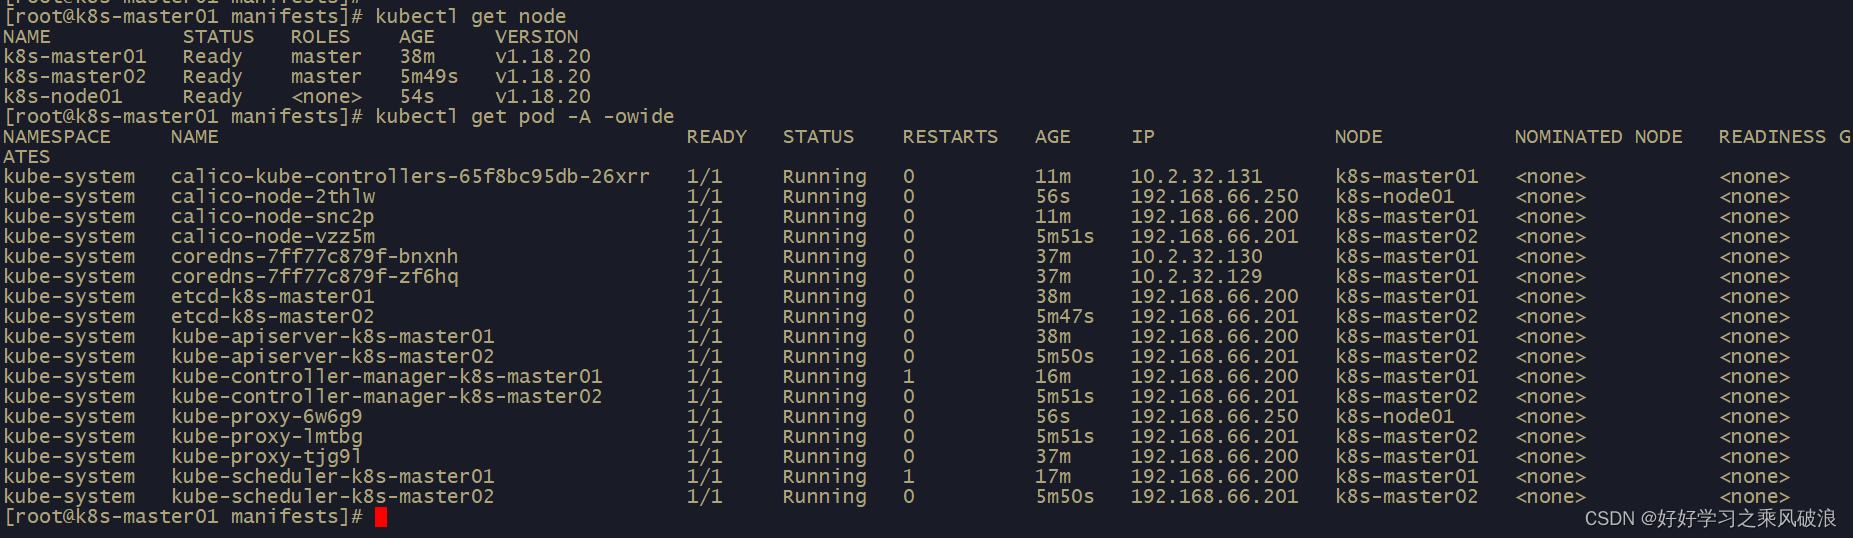
这样master、node节点都正常添加到集群中!
后续还会添加增加prometheus监控,期待中~~~~
本文内容由网友自发贡献,版权归原作者所有,本站不承担相应法律责任。如您发现有涉嫌抄袭侵权的内容,请联系:hwhale#tublm.com(使用前将#替换为@)