之前搭建了一个Springboot+Netty服务端的应用,既然有服务端,自然也有客户端的应用,现在搭建一个Springboot+Netty客户端的应用Demo程序,多客户端方式,使用服务端和客户端进行联调测试,也可以用tcp的小工具来测试(中文可能乱码)
SpringBoot+Netty实现TCP服务端客户端的源码Demo
新建Springboot的maven项目,pom.xml文件导入依赖包
<?xml version="1.0"?>
<project
	xsi:schemaLocation="http://maven.apache.org/POM/4.0.0 http://maven.apache.org/xsd/maven-4.0.0.xsd"
	xmlns="http://maven.apache.org/POM/4.0.0"
	xmlns:xsi="http://www.w3.org/2001/XMLSchema-instance">
	<modelVersion>4.0.0</modelVersion>

	<parent>
		<groupId>org.springframework.boot</groupId>
		<artifactId>spring-boot-starter-parent</artifactId>
		<version>2.0.5.RELEASE</version>
		<relativePath />
	</parent>

	<groupId>boot.base.tcp.client</groupId>
	<artifactId>boot-example-base-tcp-client-2.0.5</artifactId>
	<version>0.0.1-SNAPSHOT</version>
	<name>boot-example-base-tcp-client-2.0.5</name>
	<url>http://maven.apache.org</url>
	<properties>
		<project.build.sourceEncoding>UTF-8</project.build.sourceEncoding>
		<project.reporting.outputEncoding>UTF-8</project.reporting.outputEncoding>
		<java.version>1.8</java.version>
	</properties>

	<dependencies>
		<dependency>
			<groupId>org.springframework.boot</groupId>
			<artifactId>spring-boot-starter-web</artifactId>
		</dependency>
		<dependency>
			<groupId>io.netty</groupId>
			<artifactId>netty-all</artifactId>
		</dependency>
		<dependency>
			<groupId>io.springfox</groupId>
			<artifactId>springfox-swagger2</artifactId>
			<version>2.9.2</version>
		</dependency>
		<dependency>
			<groupId>com.github.xiaoymin</groupId>
			<artifactId>swagger-bootstrap-ui</artifactId>
			<version>1.9.2</version>
		</dependency>
	</dependencies>
	<build>
		<plugins>
			<!-- 打包成一个可执行jar -->
			<plugin>
				<groupId>org.springframework.boot</groupId>
				<artifactId>spring-boot-maven-plugin</artifactId>
				<executions>
					<execution>
						<goals>
							<goal>repackage</goal>
						</goals>
					</execution>
				</executions>
			</plugin>
		</plugins>
	</build>
</project>
Springboot启动类,启动一个Netty的客户端
package boot.example.tcp.client;

import boot.example.tcp.client.netty.BootNettyClientThread;
import org.springframework.boot.CommandLineRunner;
import org.springframework.boot.SpringApplication;
import org.springframework.boot.autoconfigure.SpringBootApplication;
import org.springframework.scheduling.annotation.Async;
import org.springframework.scheduling.annotation.EnableAsync;
import org.springframework.scheduling.annotation.EnableScheduling;

/**
 * 蚂蚁舞
 */
@SpringBootApplication
@EnableAsync
@EnableScheduling
public class BootNettyClientApplication implements CommandLineRunner{
    public static void main( String[] args ) {
		SpringApplication app = new SpringApplication(BootNettyClientApplication.class);
		app.run(args);

        System.out.println( "Hello World!" );
    }

    @Async
	@Override
	public void run(String... args) throws Exception {
		/**
		 * 使用异步注解方式启动netty客户端服务
		 */
		int port = 6655;
		String address = "127.0.0.1";
		int count = 10; // 模拟多个客户端
		for(int i = 0; i < count; i++) {
			BootNettyClientThread thread = new BootNettyClientThread(port, address);
			thread.start();
		}

	}
}
Netty的client类
package boot.example.tcp.client.netty;


import io.netty.bootstrap.Bootstrap;
import io.netty.channel.Channel;
import io.netty.channel.ChannelFuture;
import io.netty.channel.ChannelOption;
import io.netty.channel.EventLoopGroup;
import io.netty.channel.nio.NioEventLoopGroup;
import io.netty.channel.socket.SocketChannel;
import io.netty.channel.socket.nio.NioSocketChannel;

/**
 *
 * netty 客户端
 * 蚂蚁舞
 */
public class BootNettyClient {

	public void connect(int port, String host) throws Exception{

		/**
		 * 客户端的NIO线程组
		 *
		 */
        EventLoopGroup group = new NioEventLoopGroup();

        try {
        	/**
        	 * Bootstrap 是一个启动NIO服务的辅助启动类 客户端的
        	 */
        	Bootstrap bootstrap = new Bootstrap();
        	bootstrap = bootstrap.group(group);
        	bootstrap = bootstrap.channel(NioSocketChannel.class).option(ChannelOption.TCP_NODELAY, true);
        	/**
        	 * 设置 I/O处理类,主要用于网络I/O事件,记录日志,编码、解码消息
        	 */
        	bootstrap = bootstrap.handler(new BootNettyChannelInitializer<SocketChannel>());
        	/**
        	 * 连接服务端
        	 */
			ChannelFuture future = bootstrap.connect(host, port).sync();
			if(future.isSuccess()) {
				Channel channel = future.channel();
				String id = future.channel().id().toString();
				BootNettyClientChannel bootNettyClientChannel = new BootNettyClientChannel();
				bootNettyClientChannel.setChannel(channel);
				bootNettyClientChannel.setCode("clientId:"+id);
				BootNettyClientChannelCache.save("clientId:"+id, bootNettyClientChannel);
				System.out.println("netty client start success="+id);
				/**
				 * 等待连接端口关闭
				 */
				future.channel().closeFuture().sync();
			}
		} finally {
			/**
			 * 退出,释放资源
			 */
			group.shutdownGracefully().sync();
		}

	}


}
通道初始化
package boot.example.tcp.client.netty;


import io.netty.channel.Channel;
import io.netty.channel.ChannelHandler;
import io.netty.channel.ChannelInitializer;
import io.netty.handler.codec.string.StringDecoder;
import io.netty.handler.codec.string.StringEncoder;
import io.netty.util.CharsetUtil;

/**
 * 通道初始化
 * 蚂蚁舞
 */
@ChannelHandler.Sharable
public class BootNettyChannelInitializer<SocketChannel> extends ChannelInitializer<Channel> {

	@Override
	protected void initChannel(Channel ch) throws Exception {

        ch.pipeline().addLast("encoder", new StringEncoder(CharsetUtil.UTF_8));
        ch.pipeline().addLast("decoder", new StringDecoder(CharsetUtil.UTF_8));
        /**
         * 自定义ChannelInboundHandlerAdapter
         */
        ch.pipeline().addLast(new BootNettyChannelInboundHandlerAdapter());

	}

}
客户端I/O数据读写处理类
package boot.example.tcp.client.netty;

import java.io.IOException;
import java.net.InetSocketAddress;

import io.netty.channel.ChannelHandler;
import io.netty.channel.ChannelHandlerContext;
import io.netty.channel.ChannelInboundHandlerAdapter;

/**
 *
 * I/O数据读写处理类
 * 蚂蚁舞
 */
@ChannelHandler.Sharable
public class BootNettyChannelInboundHandlerAdapter extends ChannelInboundHandlerAdapter{

    /**
     * 从服务端收到新的数据时,这个方法会在收到消息时被调用
     */
    @Override
    public void channelRead(ChannelHandlerContext ctx, Object msg) throws Exception, IOException {
        if(msg == null){
            return;
        }
    	System.out.println("channelRead:read msg:"+msg.toString());
        BootNettyClientChannel bootNettyClientChannel = BootNettyClientChannelCache.get("clientId:"+ctx.channel().id().toString());
        if(bootNettyClientChannel != null){
            System.out.println("to do");
            bootNettyClientChannel.setLast_data(msg.toString());
        }

        //回应服务端
        //ctx.write("I got server message thanks server!");
    }

    /**
     * 从服务端收到新的数据、读取完成时调用
     */
    @Override
    public void channelReadComplete(ChannelHandlerContext ctx) throws IOException {
    	System.out.println("channelReadComplete");
    	ctx.flush();
    }

    /**
     * 当出现 Throwable 对象才会被调用,即当 Netty 由于 IO 错误或者处理器在处理事件时抛出的异常时
     */
    @Override
    public void exceptionCaught(ChannelHandlerContext ctx, Throwable cause) throws IOException {
    	System.out.println("exceptionCaught");
        cause.printStackTrace();
        ctx.close();//抛出异常,断开与客户端的连接
    }

    /**
     * 客户端与服务端第一次建立连接时 执行
     */
    @Override
    public void channelActive(ChannelHandlerContext ctx) throws Exception, IOException {
        super.channelActive(ctx);
        InetSocketAddress inSocket = (InetSocketAddress) ctx.channel().remoteAddress();
        String clientIp = inSocket.getAddress().getHostAddress();
        System.out.println(clientIp);
    }

    /**
     * 客户端与服务端 断连时 执行
     */
    @Override
    public void channelInactive(ChannelHandlerContext ctx) throws Exception, IOException {
        super.channelInactive(ctx);
        InetSocketAddress inSocket = (InetSocketAddress) ctx.channel().remoteAddress();
        String clientIp = inSocket.getAddress().getHostAddress();
        ctx.close(); //断开连接时,必须关闭,否则造成资源浪费
        System.out.println("channelInactive:"+clientIp);
    }


}
建立channel保存多客户端BootNettyClientChannel
package boot.example.tcp.client.netty;

import io.netty.channel.Channel;

/**
 * 	蚂蚁舞
 */
public class BootNettyClientChannel {

	//	连接客户端唯一的code
	private String code;

	//	客户端最新发送的消息内容
	private String last_data;

	private transient volatile Channel channel;

	public String getCode() {
		return code;
	}

	public void setCode(String code) {
		this.code = code;
	}

	public Channel getChannel() {
		return channel;
	}

	public void setChannel(Channel channel) {
		this.channel = channel;
	}

	public String getLast_data() {
		return last_data;
	}

	public void setLast_data(String last_data) {
		this.last_data = last_data;
	}
}
BootNettyClientChannelCache
package boot.example.tcp.client.netty;

import java.util.Map;
import java.util.concurrent.ConcurrentHashMap;

/**
 *  蚂蚁舞
 */
public class BootNettyClientChannelCache {

    public static volatile Map<String, BootNettyClientChannel> channelMapCache = new ConcurrentHashMap<String, BootNettyClientChannel>();

    public static void add(String code, BootNettyClientChannel channel){
    	channelMapCache.put(code,channel);
    }

    public static BootNettyClientChannel get(String code){
        return channelMapCache.get(code);
    }

    public static void remove(String code){
    	channelMapCache.remove(code);
    }

    public static void save(String code, BootNettyClientChannel channel) {
        if(channelMapCache.get(code) == null) {
            add(code,channel);
        }
    }


}
netty的启动BootNettyClientThread
package boot.example.tcp.client.netty;


/**
 *
 * netty 客户端
 * 蚂蚁舞
 */
public class BootNettyClientThread extends Thread {

	private final int port;

	private final String address;
	public BootNettyClientThread(int port, String address){
		this.port = port;
		this.address = address;
	}

	public void run() {
		try {
			new BootNettyClient().connect(port, address);
		} catch (Exception e) {
			throw new RuntimeException(e);
		}
	}
}
心跳使用定时器BootNettyHeartTimer
package boot.example.tcp.client.netty;


import io.netty.buffer.Unpooled;
import org.springframework.scheduling.annotation.Scheduled;
import org.springframework.stereotype.Service;

import java.util.Map;

/**
 *  蚂蚁舞
 */
@Service
public class BootNettyHeartTimer {

    //  使用定时器发送心跳
    @Scheduled(cron = "0/30 * * * * ?")
    public void heart_timer() {
        String back = "heart";
        if(BootNettyClientChannelCache.channelMapCache.size() > 0){
            for (Map.Entry<String, BootNettyClientChannel> entry : BootNettyClientChannelCache.channelMapCache.entrySet()) {
                BootNettyClientChannel bootNettyChannel = entry.getValue();
                if(bootNettyChannel != null && bootNettyChannel.getChannel().isOpen()){
                    bootNettyChannel.getChannel().writeAndFlush(Unpooled.buffer().writeBytes(back.getBytes()));
                }
            }
        }

    }

}
测试接口BootNettyClientController
package boot.example.tcp.client.controller;

import boot.example.tcp.client.netty.BootNettyClientChannel;
import boot.example.tcp.client.netty.BootNettyClientChannelCache;
import io.netty.buffer.Unpooled;
import org.springframework.web.bind.annotation.GetMapping;
import org.springframework.web.bind.annotation.PostMapping;
import org.springframework.web.bind.annotation.RequestParam;
import org.springframework.web.bind.annotation.RestController;

import java.util.ArrayList;
import java.util.HashMap;
import java.util.List;
import java.util.Map;

/**
 * 	蚂蚁舞
 */
@RestController
public class BootNettyClientController {

	@GetMapping("/list")
	public List<Map<String,String>> list() {
		List<Map<String,String>> list = new ArrayList<>();
		for (Map.Entry<String, BootNettyClientChannel> entry : BootNettyClientChannelCache.channelMapCache.entrySet()) {
			Map<String, String> map = new HashMap<String, String>();
			map.put("code", entry.getKey());
			//map.put("code", entry.getValue().getCode());
			map.put("last_data", entry.getValue().getLast_data());
			list.add(map);
		}
		return list;
	}

	@PostMapping("/reportAllClientDataToServer")
	public String reportAllClientDataToServer(@RequestParam(name="content", required = true) String content) {
		for (Map.Entry<String, BootNettyClientChannel> entry : BootNettyClientChannelCache.channelMapCache.entrySet()) {
			BootNettyClientChannel bootNettyChannel = entry.getValue();
			if(bootNettyChannel != null && bootNettyChannel.getChannel().isOpen()){
				bootNettyChannel.getChannel().writeAndFlush(Unpooled.buffer().writeBytes(content.getBytes()));
			}
		}
		return "ok";
	}

	@PostMapping("/reportClientDataToServer")
	public String downDataToClient(@RequestParam(name="code", required = true) String code, @RequestParam(name="content", required = true) String content) {
		BootNettyClientChannel bootNettyChannel = BootNettyClientChannelCache.get(code);
		if(bootNettyChannel != null && bootNettyChannel.getChannel().isOpen()){
			bootNettyChannel.getChannel().writeAndFlush(Unpooled.buffer().writeBytes(content.getBytes()));
			return "success";
		}
		return "fail";
	}


}
SwaggerConfig测试方便
package boot.example.tcp.client;

import com.google.common.base.Predicates;
import org.springframework.context.annotation.Bean;
import org.springframework.context.annotation.Configuration;
import springfox.documentation.builders.ApiInfoBuilder;
import springfox.documentation.builders.PathSelectors;
import springfox.documentation.builders.RequestHandlerSelectors;
import springfox.documentation.service.ApiInfo;
import springfox.documentation.spi.DocumentationType;
import springfox.documentation.spring.web.plugins.Docket;
import springfox.documentation.swagger2.annotations.EnableSwagger2;

/**
 *  蚂蚁舞
 */
@Configuration
@EnableSwagger2
public class SwaggerConfig {

    @Bean
    public Docket createRestApi(){
        return new Docket(DocumentationType.SWAGGER_2).apiInfo(apiInfo()).select()
                .apis(RequestHandlerSelectors.any()).paths(PathSelectors.any())
                .paths(Predicates.not(PathSelectors.regex("/error.*")))
                .paths(PathSelectors.regex("/.*"))
                .build().apiInfo(apiInfo());
    }

    private ApiInfo apiInfo(){
        return new ApiInfoBuilder()
                .title("netty tcp 客户端demo")
                .description("netty tcp 客户端接口测试demo")
                .version("0.01")
                .build();
    }

    /**
     * http://localhost:8094/doc.html  地址和端口根据实际项目查看
     */


}
客户端demo代码的目录结构
├─boot-example-base-tcp-client-2.0.5
│  │  pom.xml
│  │
│  ├─src
│  │  ├─main
│  │  │  ├─java
│  │  │  │  └─boot
│  │  │  │      └─example
│  │  │  │          └─tcp
│  │  │  │              └─client
│  │  │  │                  │  BootNettyClientApplication.java
│  │  │  │                  │  SwaggerConfig.java
│  │  │  │                  │
│  │  │  │                  ├─controller
│  │  │  │                  │      BootNettyClientController.java
│  │  │  │                  │
│  │  │  │                  └─netty
│  │  │  │                          BootNettyChannelInboundHandlerAdapter.java
│  │  │  │                          BootNettyChannelInitializer.java
│  │  │  │                          BootNettyClient.java
│  │  │  │                          BootNettyClientChannel.java
│  │  │  │                          BootNettyClientChannelCache.java
│  │  │  │                          BootNettyClientThread.java
│  │  │  │                          BootNettyHeartTimer.java
│  │  │  │
│  │  │  └─resources
│  │  │          application.properties
│  │  │
│  │  └─test
│  │      └─java
│  │          └─boot
│  │              └─example
│  │                  └─tcp
│  │                      └─client
│  │                              BootNettyClientApplicationTest.java
│  │
基本demo客户端代码就完成了,要进行测试了。
我这里不使用tcp服务端工具测试,之前使用之前使用netty搭建的服务端进行交互测试
地址Springboot+Netty搭建TCP服务端_蚂蚁舞的博客-CSDN博客
测试步骤
先启动springBoot+Netty的服务端代码
2023-01-20 10:25:55.677  INFO 2664 --- [           main] s.d.s.w.s.ApiListingReferenceScanner     : Scanning for api listing references
2023-01-20 10:25:55.904  INFO 2664 --- [           main] o.s.b.w.embedded.tomcat.TomcatWebServer  : Tomcat started on port(s): 6654 (http) with context path ''
2023-01-20 10:25:55.909  INFO 2664 --- [           main] b.e.t.server.BootNettyServerApplication  : Started BootNettyServerApplication in 6.752 seconds (JVM running for 7.598)
2023-01-20 10:25:55.915  INFO 2664 --- [           main] .s.a.AnnotationAsyncExecutionInterceptor : No task executor bean found for async processing: no bean of type TaskExecutor and no bean named 'taskExecutor' either
Hello World!
netty server start success!
可以浏览器web访问
http://localhost:6654/doc.html
再启动springBoot+Netty的客户端代码(多客户端啊,这里启动10个)
    	int port = 6655;
		String address = "127.0.0.1";
		int count = 10; // 模拟多个客户端
		for(int i = 0; i < count; i++) {
			BootNettyClientThread thread = new BootNettyClientThread(port, address);
			thread.start();
		}
2023-01-20 10:29:01.955  INFO 13120 --- [           main] o.s.j.e.a.AnnotationMBeanExporter        : Registering beans for JMX exposure on startup
2023-01-20 10:29:01.966  INFO 13120 --- [           main] o.s.c.support.DefaultLifecycleProcessor  : Starting beans in phase 2147483647
2023-01-20 10:29:01.967  INFO 13120 --- [           main] d.s.w.p.DocumentationPluginsBootstrapper : Context refreshed
2023-01-20 10:29:02.007  INFO 13120 --- [           main] d.s.w.p.DocumentationPluginsBootstrapper : Found 1 custom documentation plugin(s)
2023-01-20 10:29:02.053  INFO 13120 --- [           main] s.d.s.w.s.ApiListingReferenceScanner     : Scanning for api listing references
2023-01-20 10:29:02.205  INFO 13120 --- [           main] s.a.ScheduledAnnotationBeanPostProcessor : No TaskScheduler/ScheduledExecutorService bean found for scheduled processing
2023-01-20 10:29:02.257  INFO 13120 --- [           main] o.s.b.w.embedded.tomcat.TomcatWebServer  : Tomcat started on port(s): 8094 (http) with context path ''
2023-01-20 10:29:02.264  INFO 13120 --- [           main] b.e.t.client.BootNettyClientApplication  : Started BootNettyClientApplication in 6.258 seconds (JVM running for 7.18)
2023-01-20 10:29:02.270  INFO 13120 --- [           main] .s.a.AnnotationAsyncExecutionInterceptor : No task executor bean found for async processing: no bean of type TaskExecutor and no bean named 'taskExecutor' either
Hello World!
127.0.0.1
127.0.0.1
127.0.0.1
127.0.0.1
127.0.0.1
127.0.0.1
127.0.0.1
127.0.0.1
127.0.0.1
127.0.0.1
netty client start success=8f7ca2ce
netty client start success=987e23c5
netty client start success=dc272839
netty client start success=c74a53a9
netty client start success=cbf85db3
netty client start success=e6ff0519
netty client start success=bc0fc00f
netty client start success=29db84c8
netty client start success=6e20d3e6
netty client start success=30378f02
可以浏览客户端的web访问

可以看到客户端启动了是个客户端,服务端也给客户端返回了服务端创建成功的code(实际是netty的通道id,唯一的拿来使用的)

可以看到服务端收到了来自客户端的心跳
我选取一个客户端来测试客户端给服务端发送消息(含中文)
  {
    "code": "clientId:bc0fc00f",
    "last_data": "server:bd255b2d"
  }

可以看到给服务端发送的数据是
蚂蚁舞mywhtw147258#$%^
服务端接收到的最新数据
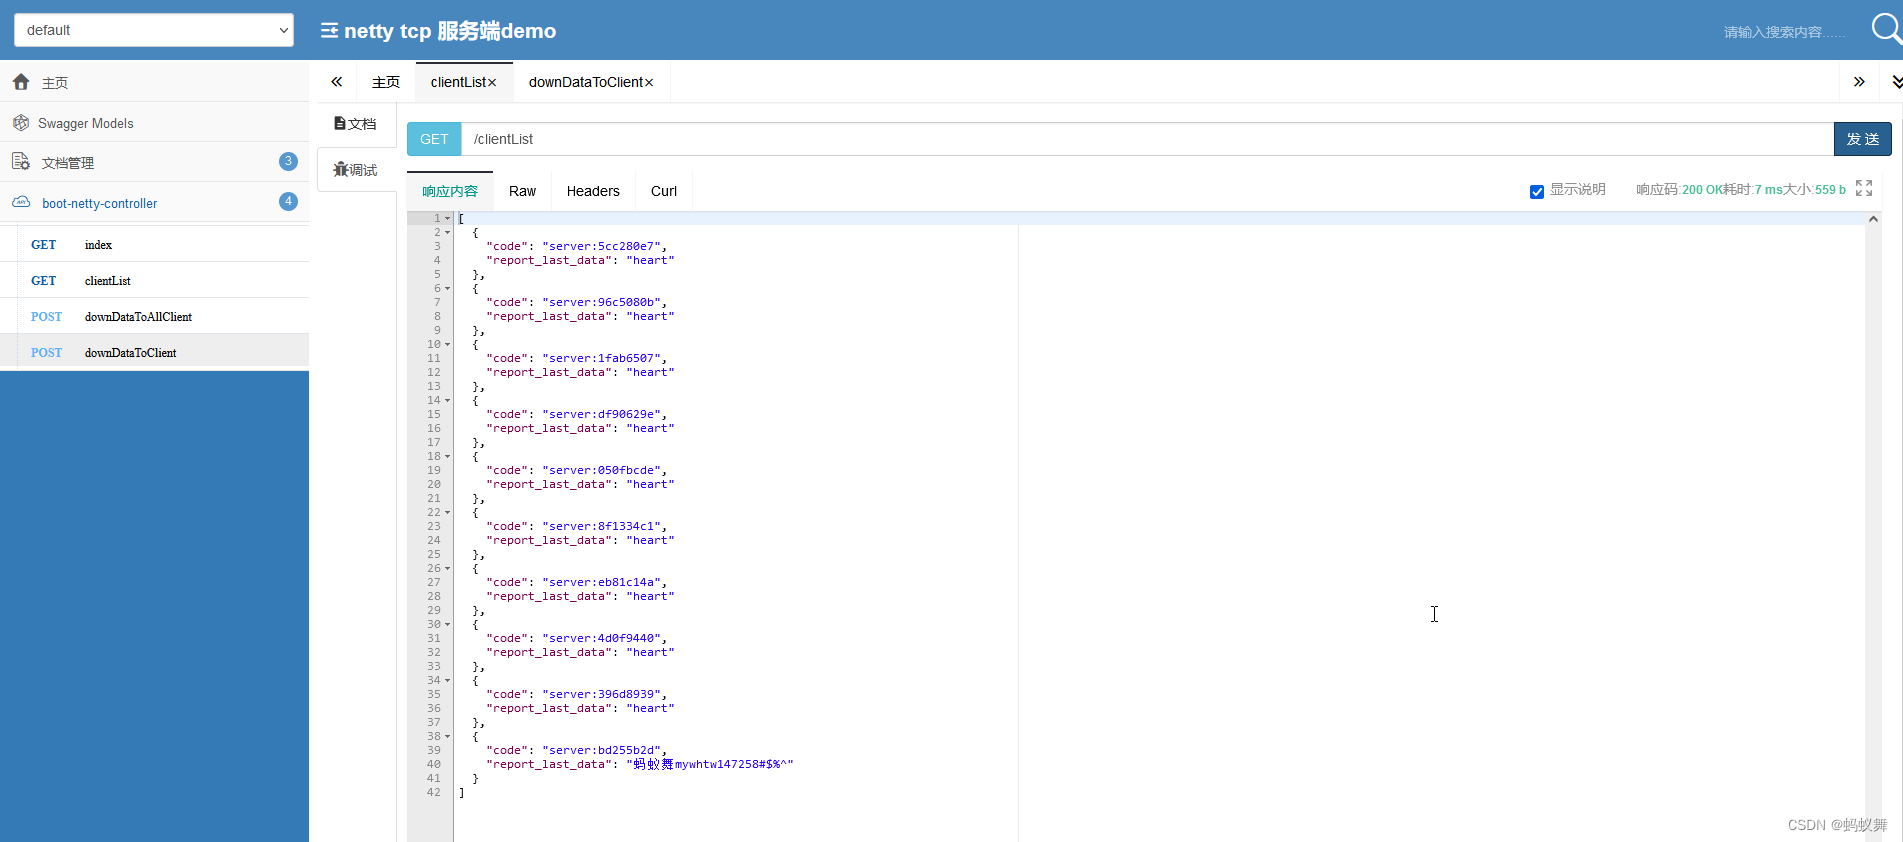
  {
    "code": "server:bd255b2d",
    "report_last_data": "蚂蚁舞mywhtw147258#$%^"
  }
服务端控制台的打印日志
channelId=bd255b2ddata=蚂蚁舞mywhtw147258#$%^
channelReadComplete
channelId=bd255b2ddata=蚂蚁舞mywhtw147258#$%^
channelReadComplete
服务端给客户端发送消息的方式是一样的,以及服务端批量给客户端发送消息,还有多个客户端给服务端发送同样的消息,都是可以达到的。
基于springboot+netty的客户端和服务端就调通了,支持中文不乱码。
本文内容由网友自发贡献,版权归原作者所有,本站不承担相应法律责任。如您发现有涉嫌抄袭侵权的内容,请联系:hwhale#tublm.com(使用前将#替换为@)