刚开始学习目标检测,都是在学习一些经典的目标检测框架,个人认为在大量阅读和理解别人现成的代码时,也要懂得去动手模仿,尝试着去修改别人的代码,即使是自己抄一遍别人的代码,也难免会发生错误,但在找bug的过程中,会不断加深自己对算法的理解,这确实也是一种学习方式吧。
IOU(区域交并比)
就是两个box区域的交集比上并集,体现两个框重合程度,iou值越大,重合度越大。

思路
- 首先计算两个box左上角点坐标的最大值和右下角坐标的最小值
- 然后计算交集面积
- 最后把交集面积除以对应的并集面积
下面会给出两种实现方法,一种来自于博文iou代码实现,另一种来自于pytorch官方目标检测框架中的实现。
博文中实现:
def cal_batch_iou(boxes1, boxes2):
"""
- 首先计算两个box左上角坐标最大值和右下角坐标的最小值 --> 获得角矩形的lt和br
- 计算交际面积
- 交集面积除以对应的并集面积
:param boxes1: (Tensor[N, 4]) Both set of boxes are expected to be in (x1, y1, x2, y2) format.
:param boxes2: (Tensor[N, 4])
:return: iou (Tensor[N, M])
"""
N = boxes1.size(0)
M = boxes2.size(0)
lt = torch.max(boxes1[:, :2].unsqueeze(1).expand(N, M, 2),
boxes2[:, :2].unsqueeze(0).expand(N, M, 2))
rb = torch.min(boxes1[:, 2:].unsqueeze(1).expand(N, M, 2),
boxes2[:, 2:].unsqueeze(0).expand(N, M, 2))
wh = (rb - lt).clamp(min = 0)
inter = wh[:, :, 0] * wh[:, :, 1]
area1 = (boxes1[:, 2] - boxes1[:, 0]) * (boxes1[:, 3] - boxes1[:, 1])
area2 = (boxes2[:, 2] - boxes2[:, 0]) * (boxes2[:, 3] - boxes2[:, 1])
area1 = area1.unsqueeze(1).expand(N, M)
area2 = area2.unsqueeze(0).expand(N, M)
iou = inter / (area2 + area1 - inter)
return iou
pytorch官方实现:
def box_area(boxes):
"""
Computes the area of a set of bounding boxes, which are specified by its
(x1, y1, x2, y2) coordinates.
Arguments:
boxes (Tensor[N, 4]): boxes for which the area will be computed. They
are expected to be in (x1, y1, x2, y2) format
Returns:
area (Tensor[N]): area for each box
"""
return (boxes[:, 2] - boxes[:, 0]) * (boxes[:, 3] - boxes[:, 1])
def calc_iou_tensor(boxes1, boxes2):
"""
Return intersection-over-union (Jaccard index) of boxes.
Both sets of boxes are expected to be in (x1, y1, x2, y2) format.
Arguments:
boxes1 (Tensor[N, 4])
boxes2 (Tensor[M, 4])
Returns:
iou (Tensor[N, M]): the NxM matrix containing the pairwise
IoU values for every element in boxes1 and boxes2
"""
area1 = box_area(boxes1)
area2 = box_area(boxes2)
lt = torch.max(boxes1[:, None, :2], boxes2[:, :2])
rb = torch.min(boxes1[:, None, 2:], boxes2[:, 2:])
wh = (rb - lt).clamp(min=0)
inter = wh[:, :, 0] * wh[:, :, 1]
iou = inter / (area1[:, None] + area2 - inter)
return iou
验证
为了验证两者是否计算一致,“人工造框”,产生一些数据来进行对比。3个红色的为gt框,黑色的为anchor。
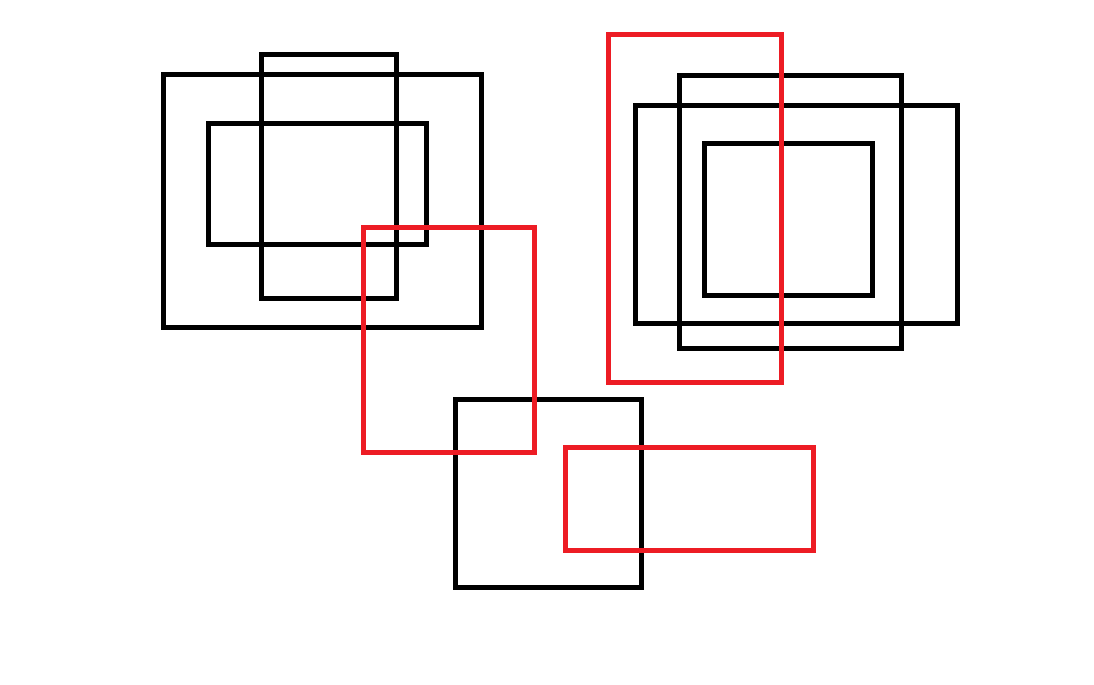
数据坐标:
365,228,534,450 564,449,812,548 609,34,782,382
165,77,482,326 211,124,427,241 262,54,398,297 635,105,957,322 681,74,901,347 705,145,870,292 458,400,642,585
验证代码:
if __name__ == '__main__':
test_boxes_file = 'boxes.txt'
with open(test_boxes_file, encoding='utf-8') as f:
boxes_lines = f.readlines()
str_gt_boxes = boxes_lines[0].split()
str_anchors = boxes_lines[1].split()
gt_boxes = np.array([np.array(list(map(int, box.split(',')))) for box in str_gt_boxes])
anchors = np.array([np.array(list(map(int, box.split(',')))) for box in str_anchors])
gt_boxes = torch.from_numpy(gt_boxes).type(torch.FloatTensor)
anchors = torch.from_numpy(anchors).type(torch.FloatTensor)
matrix_iou = cal_batch_iou(gt_boxes, anchors)
matrix_iou1 = calc_iou_tensor(gt_boxes, anchors)
print(matrix_iou)
print(matrix_iou1)
测试下来两种实现结果完全一致。
目标检测中NMS
模型预测的结果在某一区域对某种类别的预测框一般不会只有一个,NMS的作用用Bubbliiiing的总结就是:筛选出一定区域内属于同一种类得分最大的框。
本文nms的实现主要参考博文:睿智的目标检测31——非极大抑制NMS与Soft-NMS
实现思路
- 选取这类box中score最大的哪一个,记为box_best,并保存
- 计算box_best与其余box的iou,如果没有其余box则退出
- 如果其iou >
iou_thresh,那么就剔除这个box - 从剩余的boxes中,再找出最大的score的哪一个,如此往复循环,直到没有剩余box
实现代码(针对YOLO的预测结果):
from iou import cal_batch_iou
import torch
from torchvision.ops import nms
import numpy as np
def batch_nms(prediction, num_classes, conf_thresh = 0.5, nms_thresh = 0.4):
"""
- prediction主要是针对YOLO的
算法实现的简要思路如下:
1.选取这类box中score最大的哪一个,记为box_best,并保留它
2.计算box_best与其余的box的iou
3.如果其iou>nms_thresh,那么就舍弃这个box
4.从最后剩余的boxes中,再找出最大score的哪一个,如此往复循环
:param prediction: Tensor[b, num_anchors, 85] box_format(x,y,w,h)
:param num_classes: 需要检测的类别数
:param conf_thresh: 存在目标的置信度阈值
:param nms_thresh: 同一目标进行nms处理时的 iou阈值
:return: list[ array[sub_num_anchors, 7] ]
"""
box_corner = prediction.new(prediction)
box_corner[:, :, 0] = prediction[:, :, 0] - prediction[:, :, 2] / 2
box_corner[:, :, 1] = prediction[:, :, 1] - prediction[:, :, 3] / 2
box_corner[:, :, 0] = prediction[:, :, 0] + prediction[:, :, 2] / 2
box_corner[:, :, 1] = prediction[:, :, 1] + prediction[:, :, 3] / 2
prediction[:, :, :4] = box_corner[:, :, :4]
output = [None for _ in range(len(prediction))]
for i, image_pred in enumerate(prediction):
class_conf, class_pred = torch.max(image_pred[:, 5:5 + num_classes], 1, keepdim=True)
conf_mask = (image_pred[:, 4] * class_conf[:, 0] >= conf_thresh).squeeze()
image_pred = image_pred[conf_mask]
class_pred = class_pred[conf_mask]
class_conf = class_conf[conf_mask]
if not image_pred.size(0):
continue
detections = torch.cat((image_pred[:, :5], class_conf.float(), class_pred.float()), 1)
unique_labels = detections[:, -1].cpu().unique()
if prediction.is_cuda:
unique_labels = unique_labels.cuda()
detections = detections.cuda()
for c in unique_labels:
detections_class = detections[detections[:, -1] == c]
_, conf_sort_index = torch.sort(detections_class[:, 4] * detections_class[:, 5], descending=True)
detections_class = detections_class[conf_sort_index]
max_detections = []
while detections_class.size(0):
max_detections.append(detections_class[0].unsqueeze(0))
if len(detections_class) == 1:
break
ious = cal_batch_iou(max_detections[-1][:, :4], detections_class[1:, :4]).squeeze()
ious_mask = ious < nms_thresh
detections_class = detections_class[1:][ious_mask].squeeze(0)
max_detections = torch.cat(max_detections).data
output[i] = max_detections if output[i] is None else torch.cat((output[i], max_detections), dim=0)
if output[i] is not None:
output[i] = output[i].cpu().numpy()
return output
验证
为了验证算法能否达到效果,还是“人工造框”,产生数据进行验证,模拟检测4个类别,对应4种颜色(默认有一种类别未检出),所对应的图片和数据如下:

175,88,283,188,0.98,0.7,0.1,0.1,0.1
180,102,303,203,0.90,0.6,0.2,0.1,0.1
156,74,264,174,0.8,0.6,0.1,0.2,0.1
143,92,254,196,0.70,0.7,0.1,0.1,0.1
389,97,511,207,0.9,0.2,0.6,0.1,0.1
478,7,614,151,0.8,0.2,0.6,0.1,0.1
377,332,493,442,0.9,0.05,0.1,0.8,0.05
验证代码:
if __name__ == '__main__':
test_nms_file = 'NMS_boxes.txt'
with open(test_nms_file, encoding='utf-8') as f:
nms_boxes_lines = f.readlines()
boxes_prediction = [list(map(float, box.split(','))) for box in nms_boxes_lines]
boxes_prediction = torch.Tensor(boxes_prediction).unsqueeze(0)
boxes_prediction = boxes_prediction.repeat(2, 1, 1)
output = batch_nms(boxes_prediction, 4, conf_thresh=0.4, nms_thresh=0.4)
print(output)
试验方法,与官方nms处理结果是一样的。
本文内容由网友自发贡献,版权归原作者所有,本站不承担相应法律责任。如您发现有涉嫌抄袭侵权的内容,请联系:hwhale#tublm.com(使用前将#替换为@)