Kubesphere流水线实现蓝绿发布
1. Gitlab仓库准备
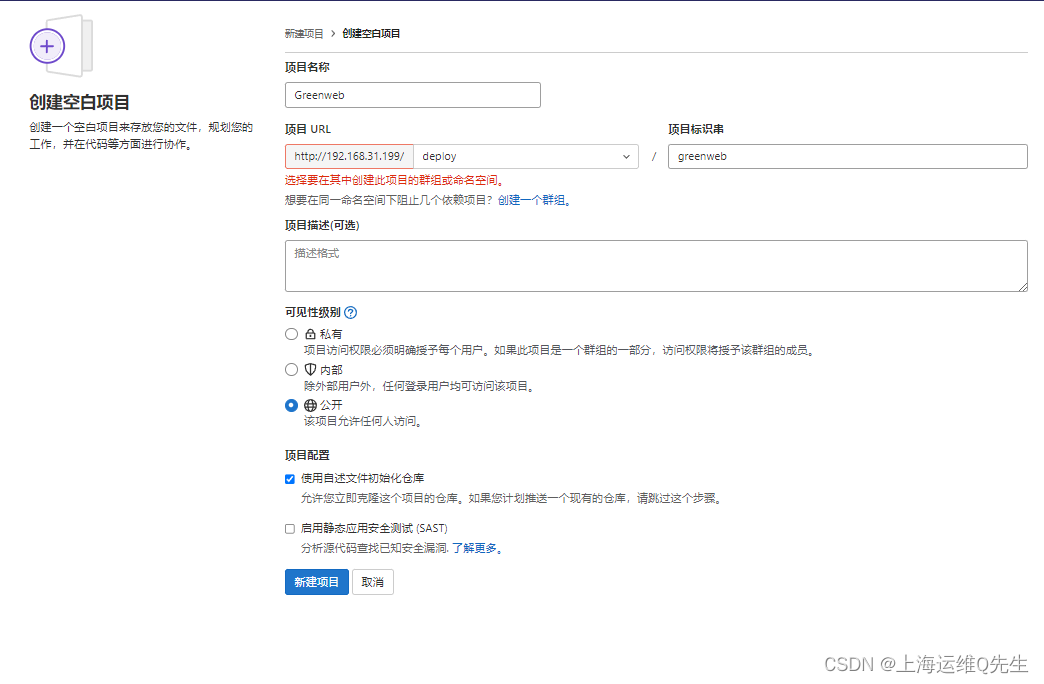
1.1 创建仓库
新建空白项目,名字随便取
greenweb
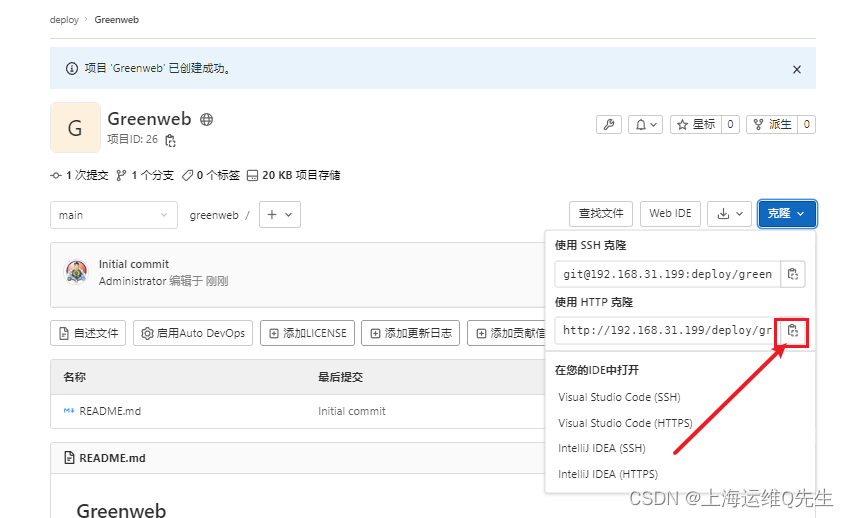
复制克隆地址
http://192.168.31.199/deploy/greenweb.git
1.2 初始化并上传代码
克隆并初始化代码仓库
mkdir git
cd git
git clone http://192.168.31.199/deploy/greenweb.git
cd greenweb/
git branch -M main
代码部分
- 2个主页,分别代表蓝色环境和绿色环境
root@ks-master:~/git/greenweb
web-app1-blue version 2.0.0
root@ks-master:~/git/greenweb
web-app1-green version 1.0.0
- 打包脚本maketar.sh,用来将项目打包成tar
#!/bin/bash
cd $1
tar czf html.tar.gz *
mv html.tar.gz ../
cd ../
- Dockerfile用来制作镜像
FROM nginx
ADD html.tar.gz  /usr/share/nginx/html/
EXPOSE 80
ENTRYPOINT nginx -g "daemon off;"
这个项目下面一共就这5个文件
root@ks-master:~/git/greenweb
total 16
-rw-r--r-- 1 root root 95 Apr 28 12:59 Dockerfile
-rw-r--r-- 1 root root 28 Apr 28 12:56 README.md
drwxr-xr-x 2 root root 24 Apr 28 12:56 blue
-rw-r--r-- 1 root root 866 Apr 28 12:56 deploy.yaml
drwxr-xr-x 2 root root 24 Apr 28 12:56 green
-rwxr-xr-x 1 root root 66 Apr 28 12:56 maketar.sh
- deploy.yaml 定义deployment和service资源
---
apiVersion: apps/v1
kind: Deployment
metadata:
  name: $PROJECT-$PROJECT_NAME-deployment
  namespace: sangomall
  labels:
    app: $PROJECT_NAME
    project: $PROJECT
spec:
  replicas: 1
  selector:
    matchLabels:
      app: $PROJECT_NAME
      project: $PROJECT
  template:
    metadata:
      labels:
        app: $PROJECT_NAME
        project: $PROJECT
    spec:
      containers:
      - name: $PROJECT_NAME
        image: $REGISTRY/$PROJECT/$PROJECT-$PROJECT_NAME:$PROJECT_VERSION
        ports:
        - containerPort: 80
---
kind: Service
apiVersion: v1
metadata:
  name: $PROJECT-$PROJECT_NAME-server
  namespace: sangomall
  labels:
    app: $PROJECT_NAME
    ver: $PROJECT_VERSION
spec:
  ports:
    - name: http
      protocol: TCP
      port: 80
      targetPort: 80
  selector:
    app: $PROJECT_NAME
    project: $PROJECT
- Jenkinsfile 用来定义pipeline
pipeline {
agent {
node {
label 'maven'
}
}
stages {
stage('Git pull code') {
agent none
steps {
git(url: 'http://192.168.31.199/deploy/bluegreen-web.git', branch: 'main', changelog: true, poll: false)
}
}
stage('Image build and push') {
agent none
steps {
container('maven') {
withCredentials([usernamePassword(credentialsId : 'harbor' ,passwordVariable : 'HARBOR_PASSWORD' ,usernameVariable : 'HARBOR_USERNAME' ,)]) {
sh 'bash maketar.sh $PROJECT_NAME'
sh 'echo $HARBOR_PASSWORD |docker login $REGISTRY -u "$HARBOR_USERNAME" --password-stdin'
sh 'docker build -t $REGISTRY/$PROJECT/$PROJECT-$PROJECT_NAME:$PROJECT_VERSION .'
sh 'docker push $REGISTRY/$PROJECT/$PROJECT-$PROJECT_NAME:$PROJECT_VERSION'
}
}
}
}
stage('Deploy Project') {
agent none
steps {
container('maven') {
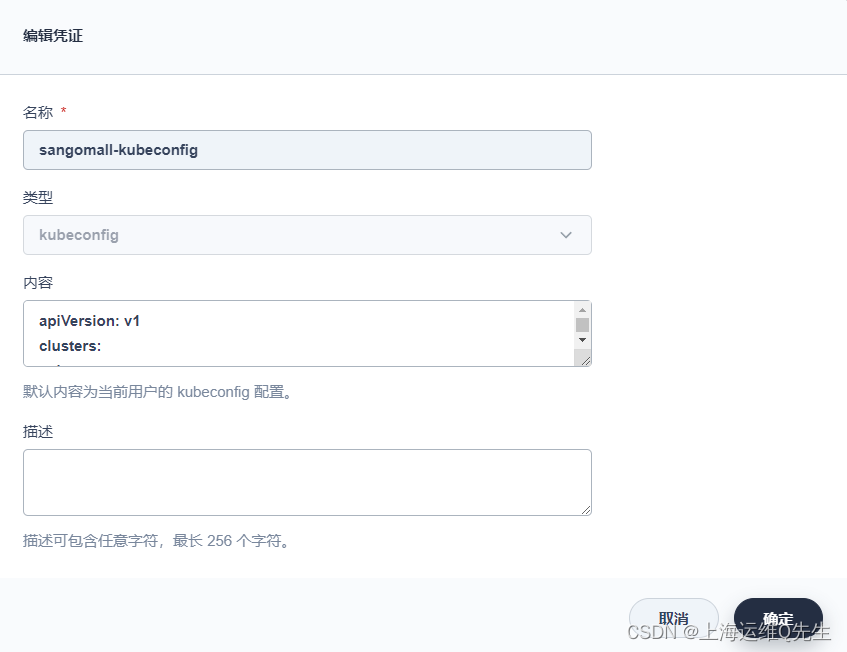
withCredentials([kubeconfigContent(credentialsId : 'sangomall-kubeconfig' ,variable : 'KUBECONFIG_CONTENT' ,)]) {
sh 'mkdir ~/.kube && echo "$KUBECONFIG_CONTENT" > ~/.kube/config && envsubst < deploy.yaml | kubectl apply -f -'
}
}
}
}
}
environment {
REGISTRY = 'harbor.intra.com'
PROJECT = 'greenweb'
}
parameters {
string(name: 'PROJECT_NAME', defaultValue: 'green', description: '')
string(name: 'PROJECT_VERSION', defaultValue: 'V1.0', description: '')
}
}
1.3 代码上传至Git仓库
执行以下命令将代码传至仓库
git add .
git commit -m "v1.0"
git push http://root:root12345@192.168.31.199/deploy/greenweb.git
命令执行过程如下:
root@ks-master:~/git/greenweb
root@ks-master:~/git/greenweb
[main ad10264] v1.0
Committer: root <root@ks-master.cluster.local>
Your name and email address were configured automatically based
on your username and hostname. Please check that they are accurate.
You can suppress this message by setting them explicitly. Run the
following command and follow the instructions in your editor to edit
your configuration file:
git config --global --edit
After doing this, you may fix the identity used for this commit with:
git commit --amend --reset-author
6 files changed, 58 insertions(+), 92 deletions(-)
create mode 100644 Dockerfile
rewrite README.md (99%)
create mode 100644 blue/index.html
create mode 100644 deploy.yaml
create mode 100644 green/index.html
create mode 100755 maketar.sh
root@ks-master:~/git/greenweb
Enumerating objects: 12, done.
Counting objects: 100% (12/12), done.
Delta compression using up to 4 threads
Compressing objects: 100% (5/5), done.
Writing objects: 100% (10/10), 1.07 KiB | 546.00 KiB/s, done.
Total 10 (delta 0), reused 0 (delta 0)
To http://192.168.31.199/deploy/greenweb.git
0dadc53..ad10264 main -> main
2. 流水线发布
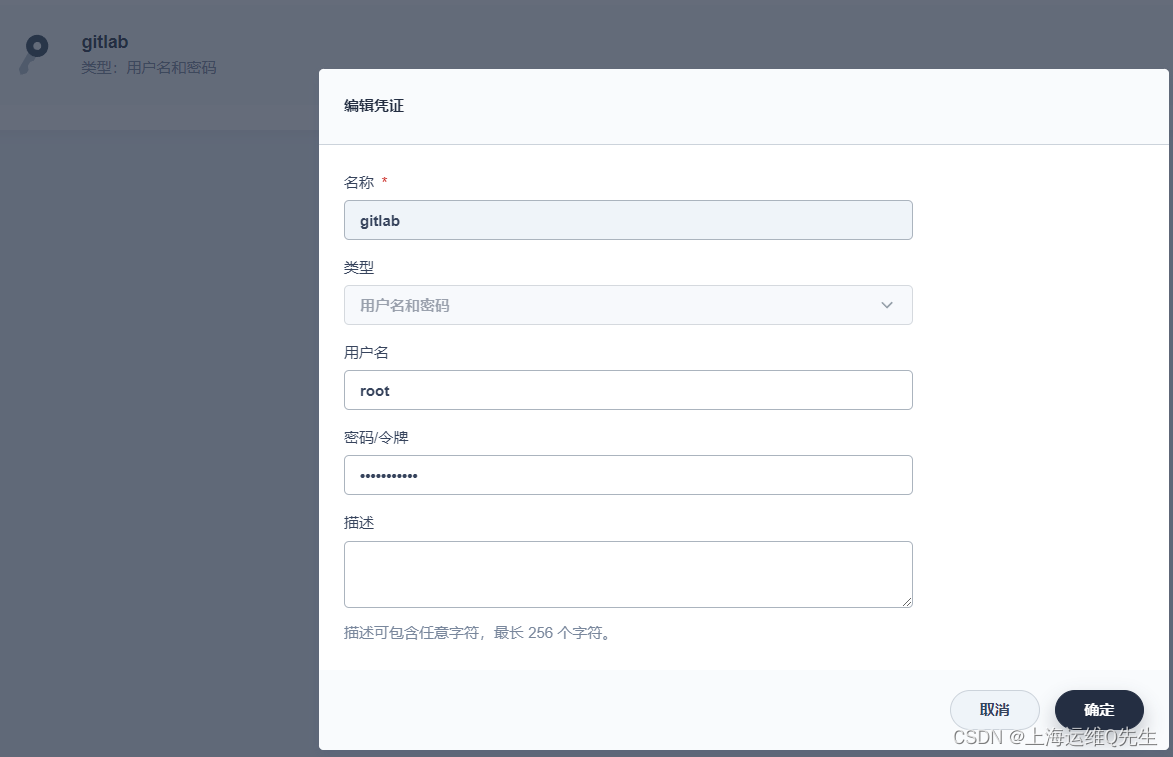
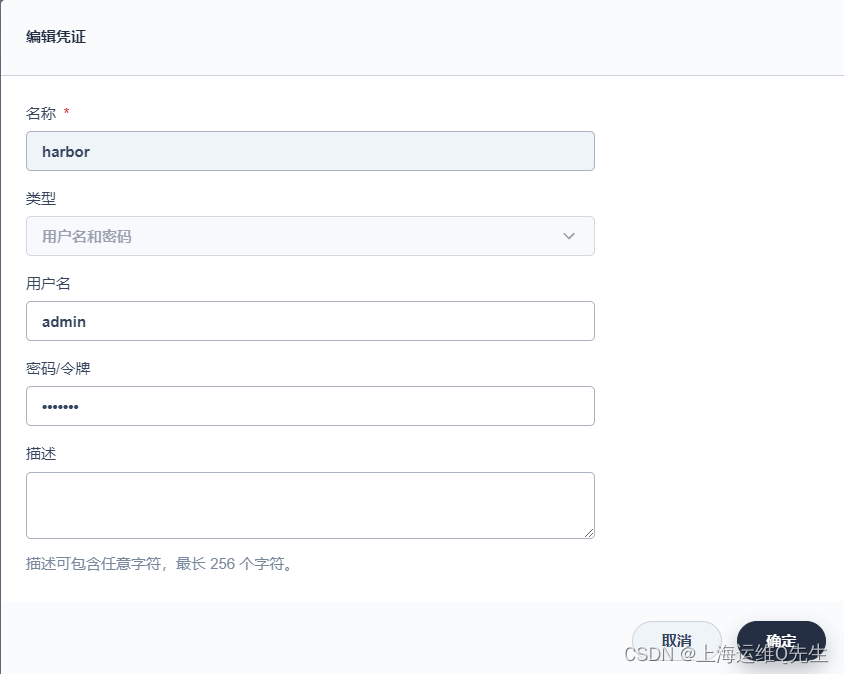
2.1 创建凭证
这里需要创建3个凭证,分别是:
- gitlab 用来连接gitlab代码仓库
- harbor 用来连接harbor镜像仓库
- kubeconfig 用来连接k8s-apiserver
Gitlab
Harbor
Kubeconfig
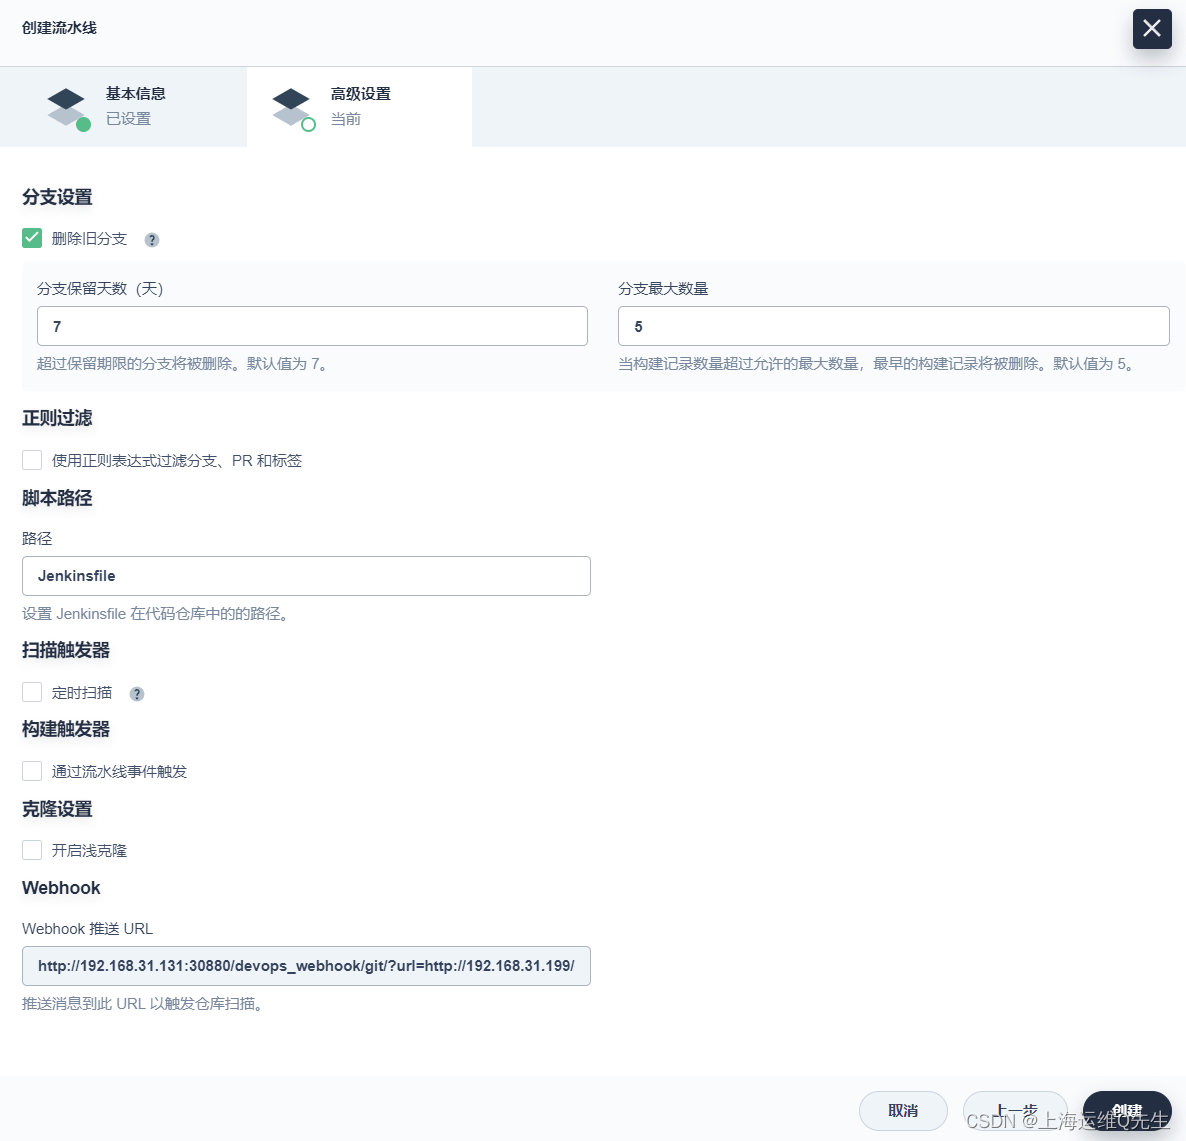
2.2 创建流水线
[流水线] [创建]
greenweb
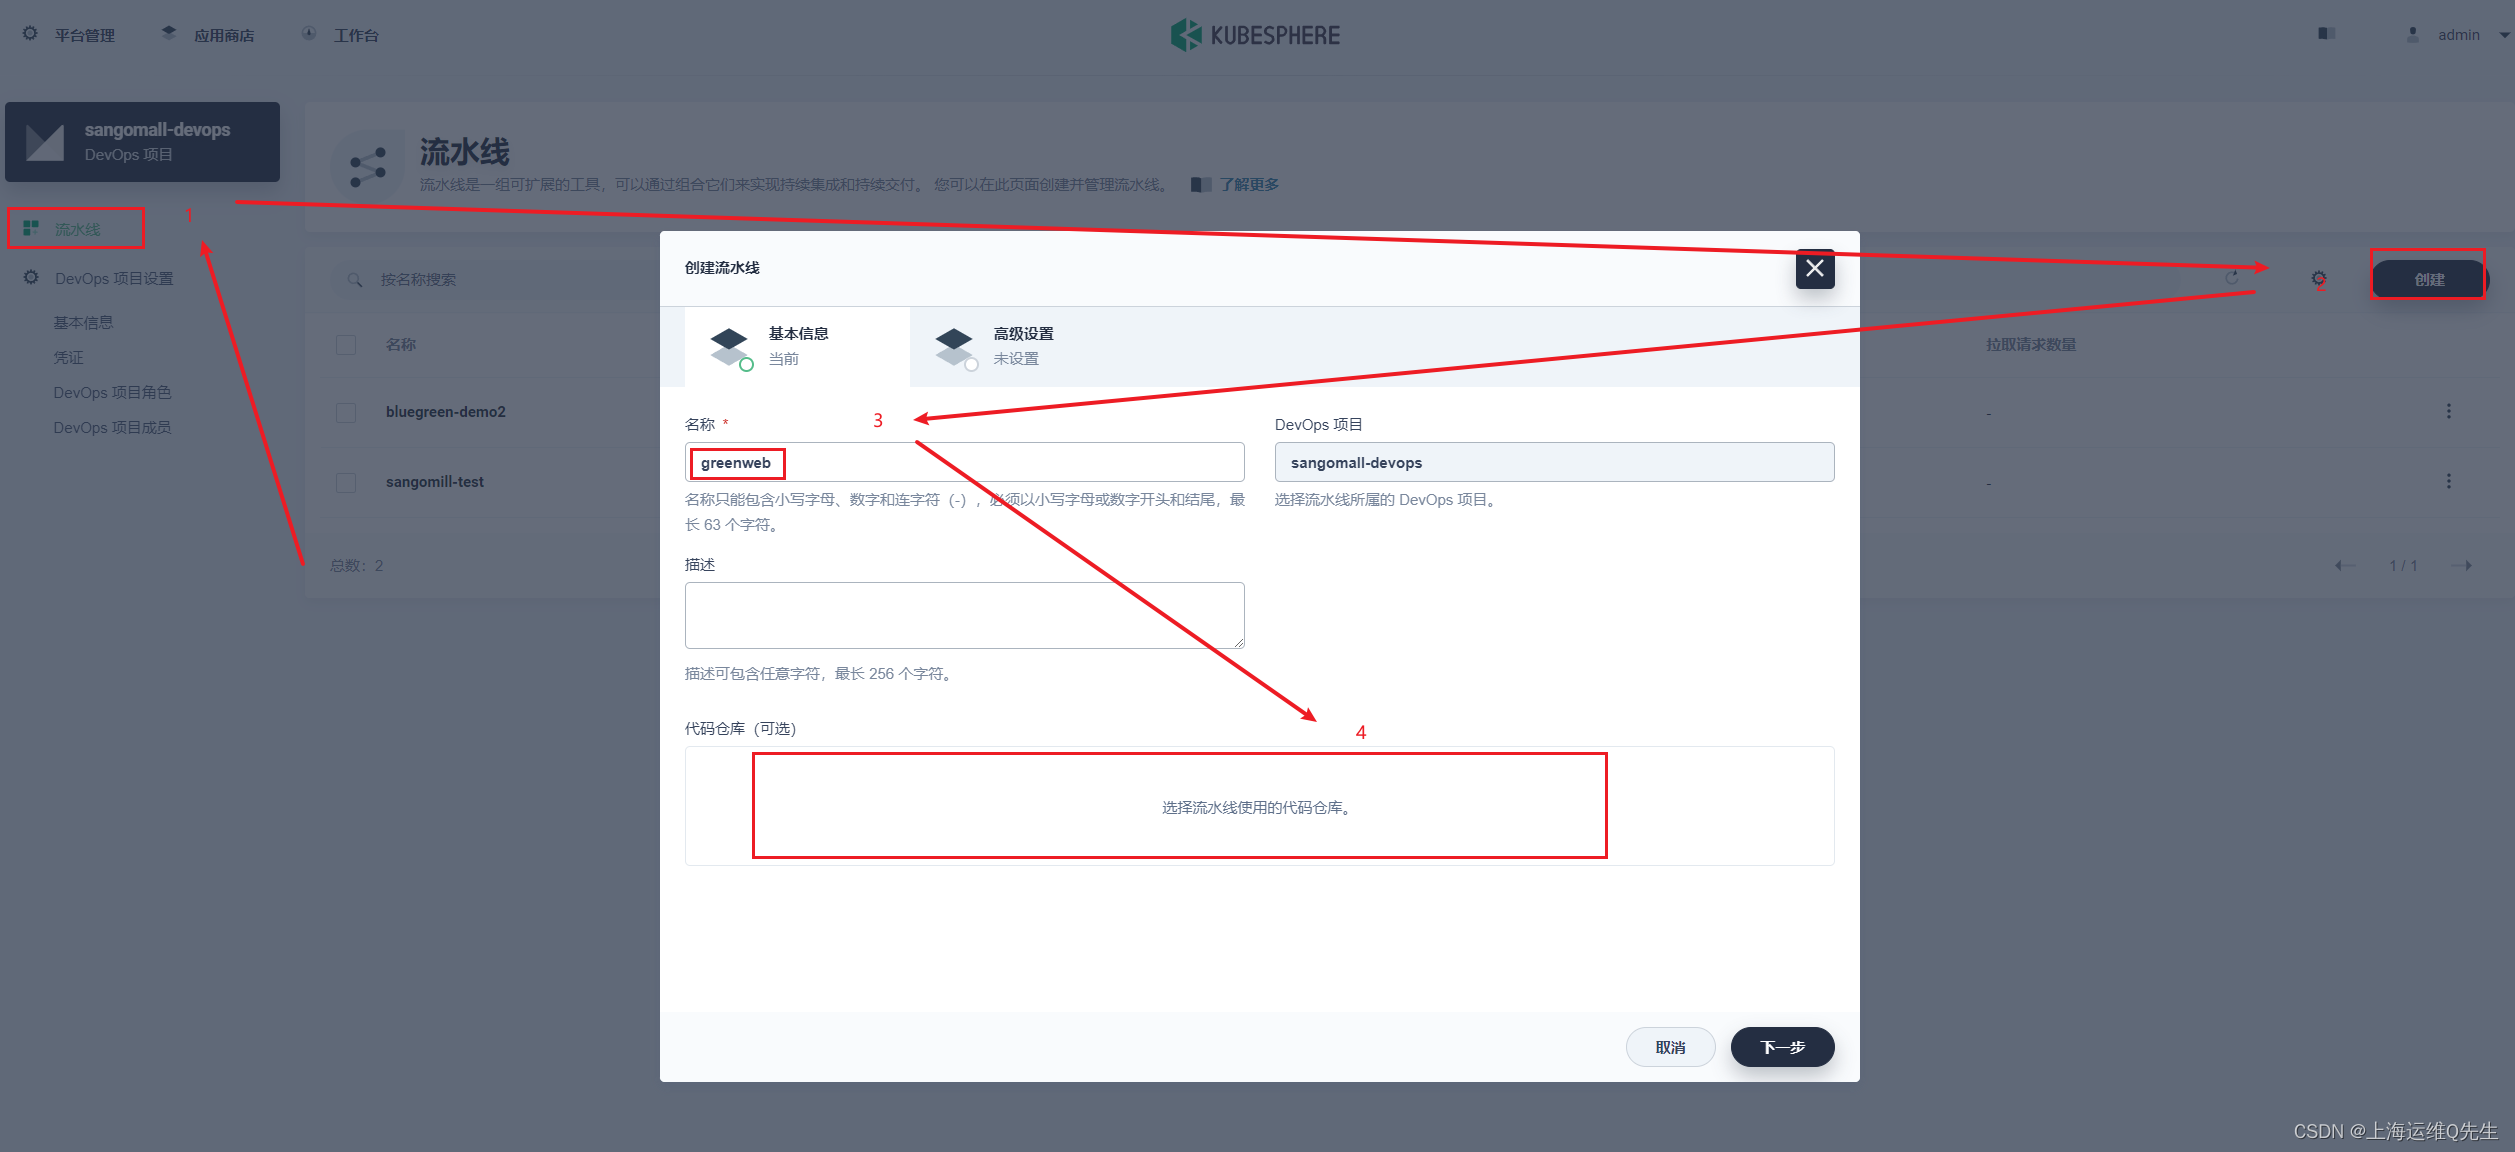
依次点击后选择,[Git] 输入以下地址(即1.1生成),凭证选择gitlab
http://192.168.31.199/deploy/greenweb.git
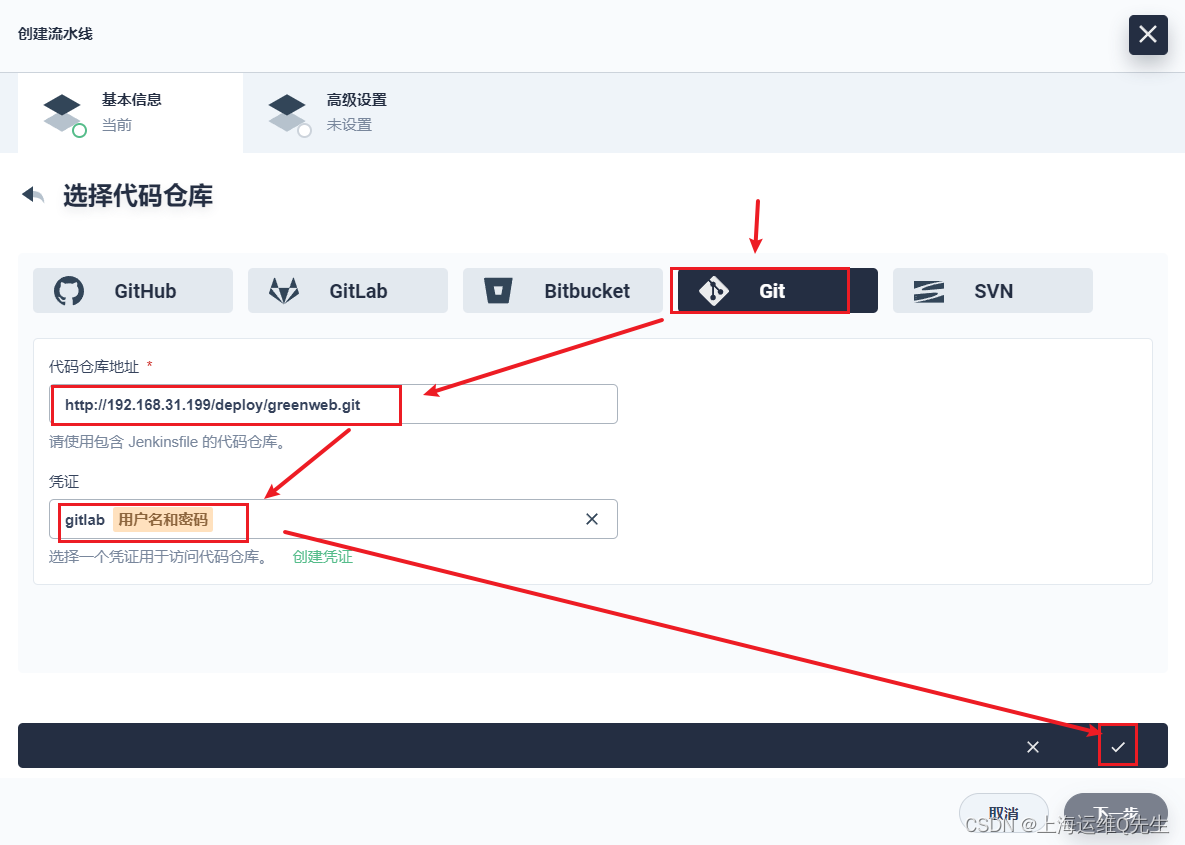
[下一步]
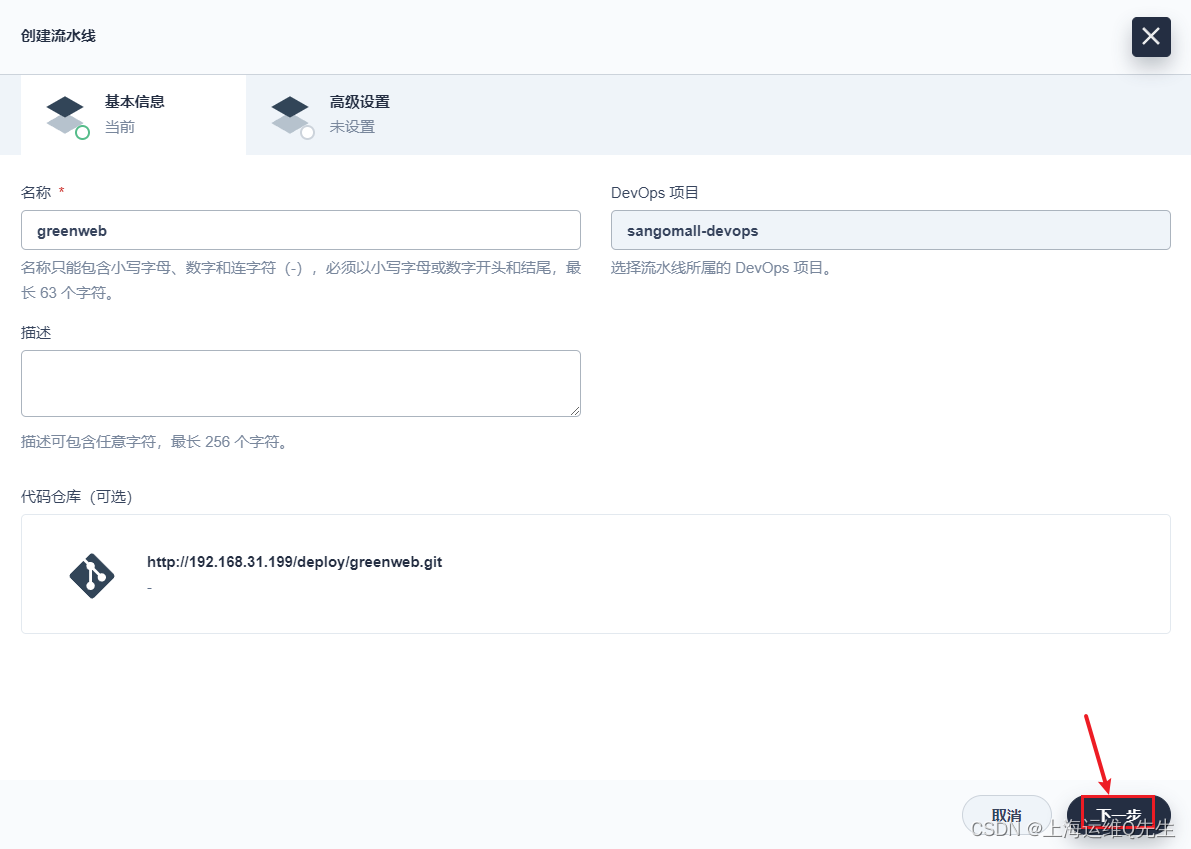
[创建]
2.3 发布绿版
创建后等待流水线由灰色变黑,点击进入流水线
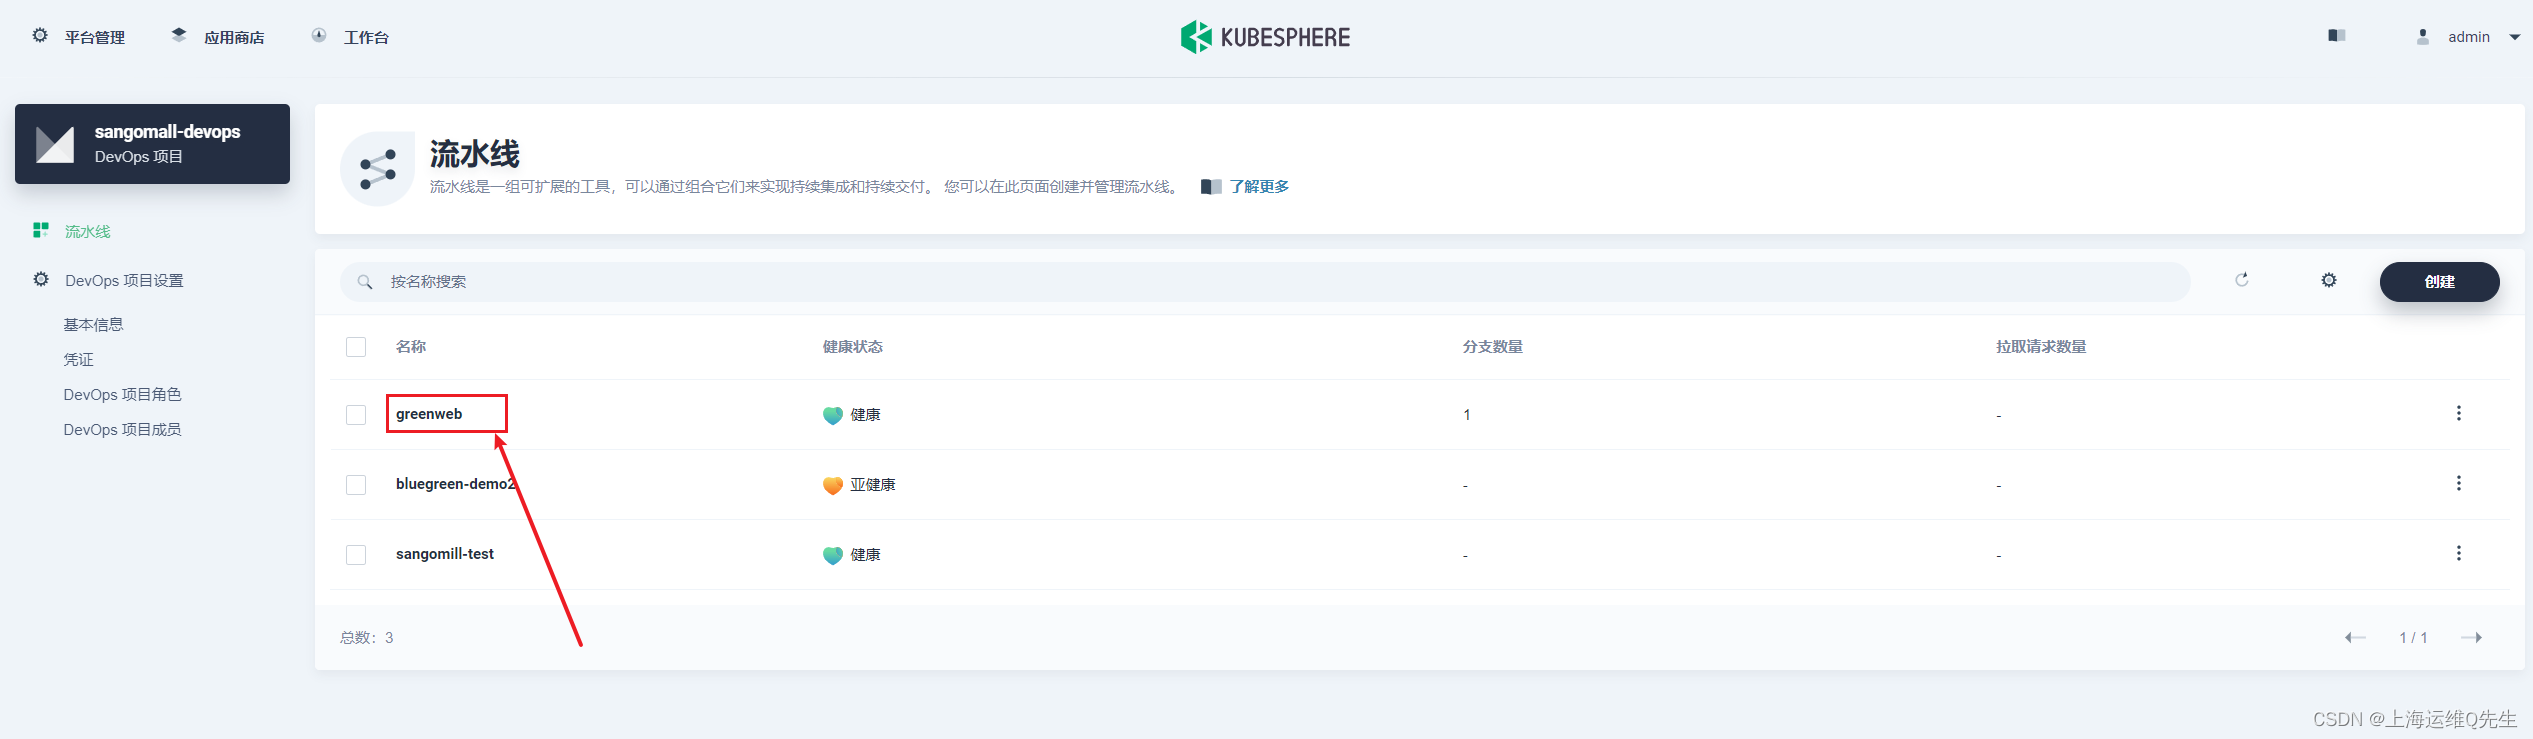
如果没有初始化流水线,就点击[初始化],由于截图时间比较长,它自动初始化完毕了.
[运行]
Jenkinsfile里默认写了green,就先发一版绿色的.
直接点击[确定],如果后续发版修改版本号和蓝色或绿色环境

此时可以看到sangomall空间下创建了deployment和svc
root@ks-master:~/git/greenweb
greenweb-green-server 10.233.106.146:80 52s
root@ks-master:~/git/greenweb
greenweb-green-deployment-6964b576dc-6lk42 1/1 Running 0 60s
root@ks-master:~/git/greenweb
greenweb-green-server ClusterIP 10.233.48.252 <none> 80/TCP 63s
可以看到绿版已经发布成功,通过绿版的service可以访问到页面
web-app1-green version 1.0.0
2.4 发布蓝版
这里将PROJECT_NAME 改为blue即可
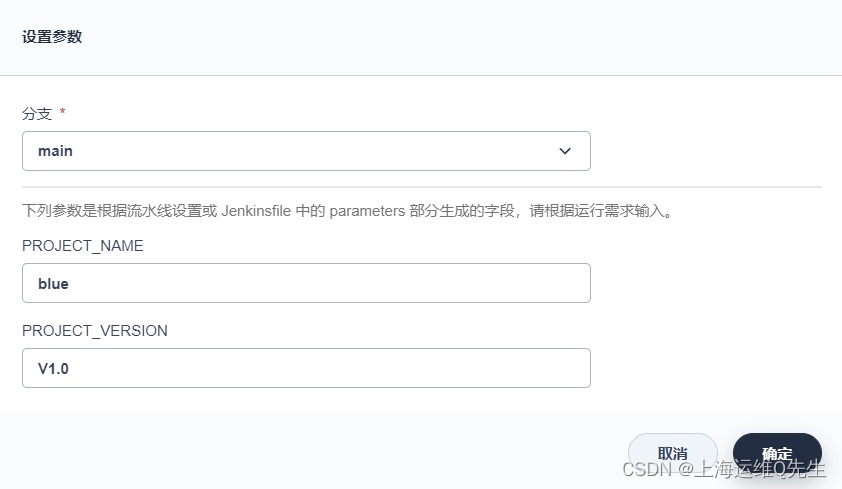
点击[确定]
稍等片刻,篮版也发布成功
root@ks-master:~/git/greenweb
greenweb-blue-server 10.233.106.148:80 8s
greenweb-green-server 10.233.106.146:80 4m24s
root@ks-master:~/git/greenweb
greenweb-blue-deployment-6cf7cd896-6rf9h 1/1 Running 0 11s
greenweb-green-deployment-6964b576dc-6lk42 1/1 Running 0 4m27s
root@ks-master:~/git/greenweb
greenweb-blue-server ClusterIP 10.233.63.13 <none> 80/TCP 13s
greenweb-green-server ClusterIP 10.233.48.252 <none> 80/TCP 4m29s
访问蓝版的service,也能返回蓝版的内容
web-app1-blue version 2.0.0
2.5 容器内测试
创建一个busybox的容器,通过它去访问下看看
kubectl run busybox --image=harbor.intra.com/baseimages/centos-base:7.9.2009 --command -- sleep 3600
进入容器
kubectl exec -it busybox bash
尝试访问蓝色和绿色两个版本的service
[root@busybox /]
web-app1-blue version 2.0.0
[root@busybox /]
web-app1-green version 1.0.0
现在的状态是蓝色和绿色两个版本同时存在,各自有各自的svc提供访问
3. 蓝绿选择
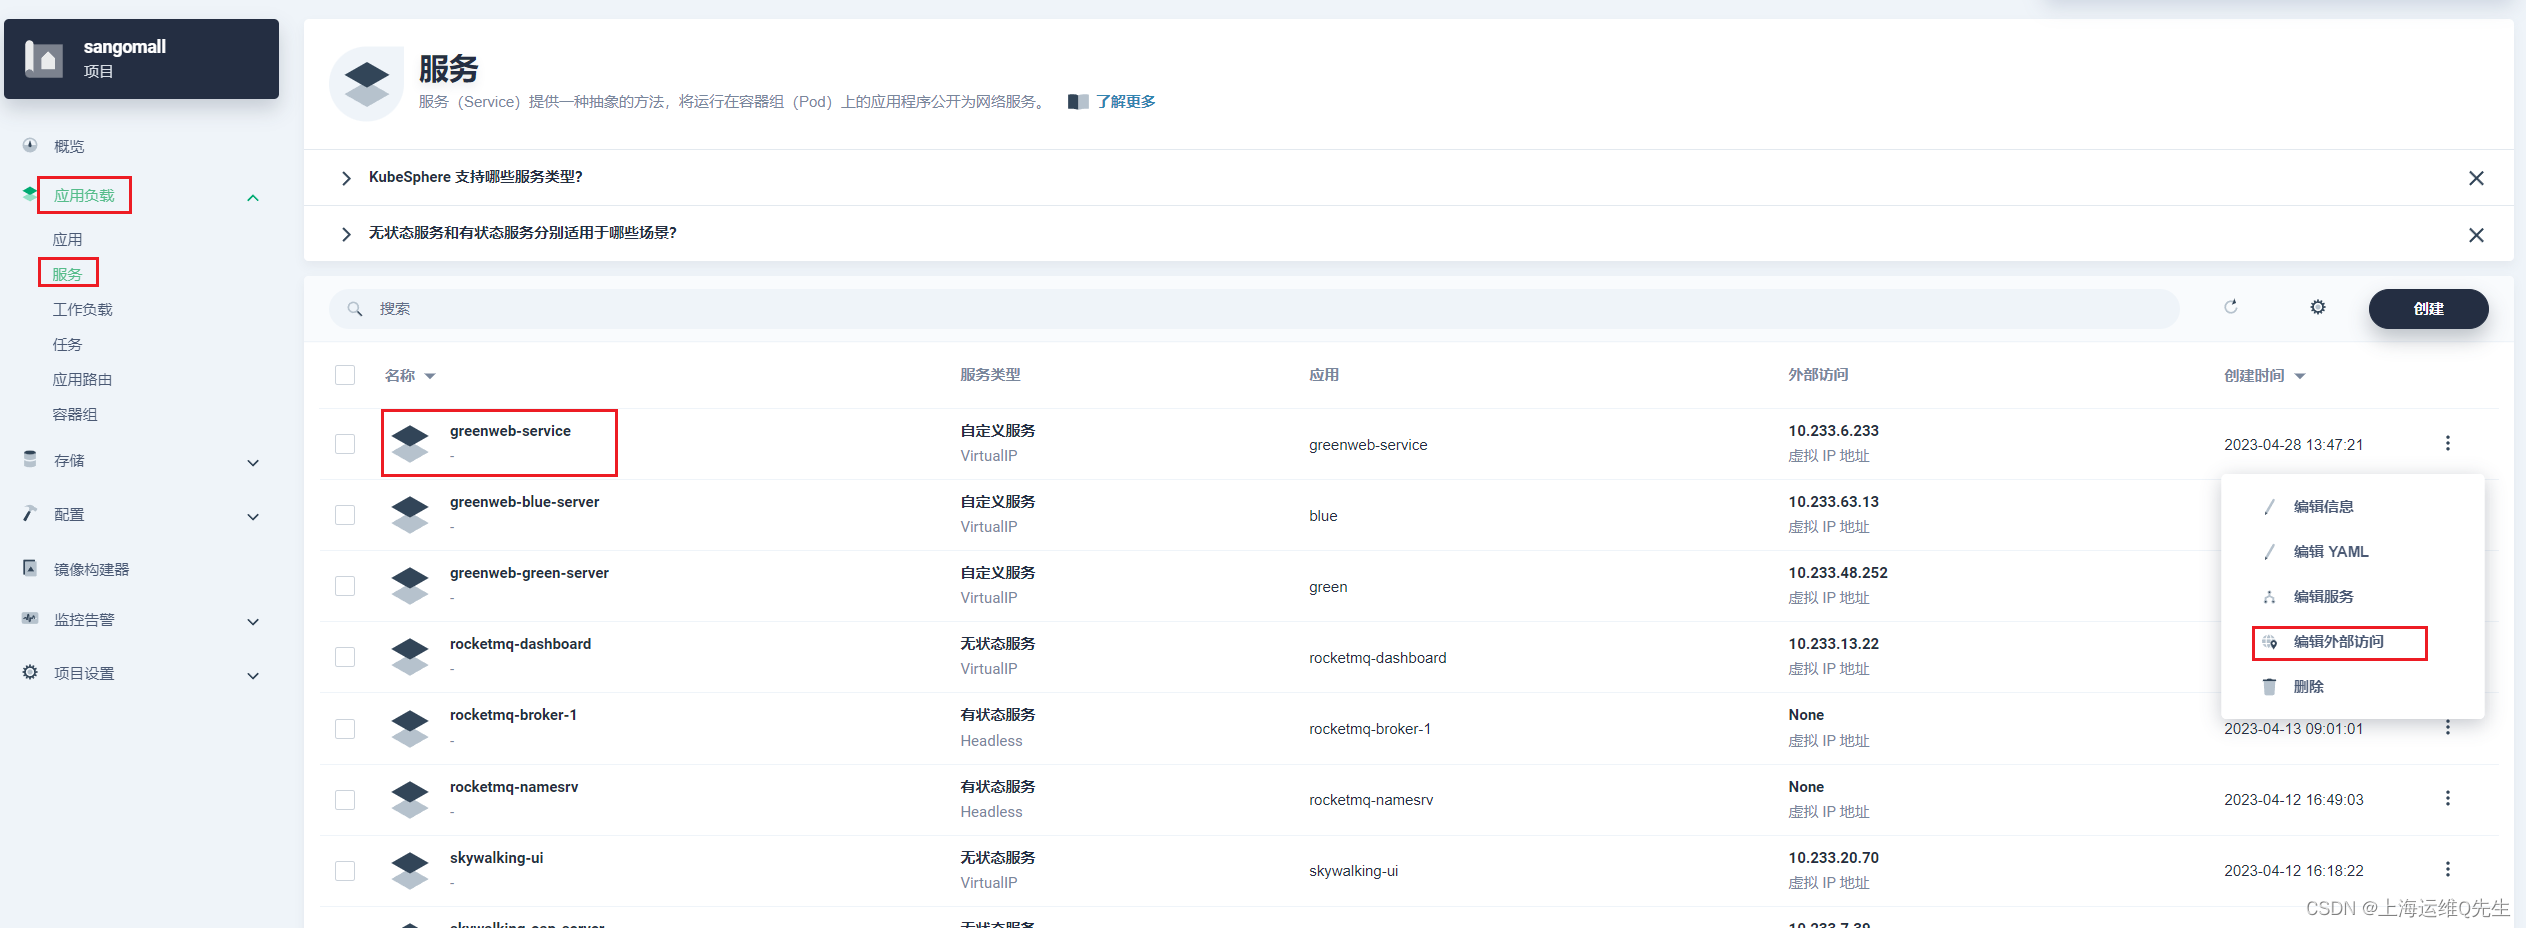
3.1 创建Svc
创建一个服务,用来选择蓝绿版本
[应用负载] [服务] [创建] [指定工作负载]
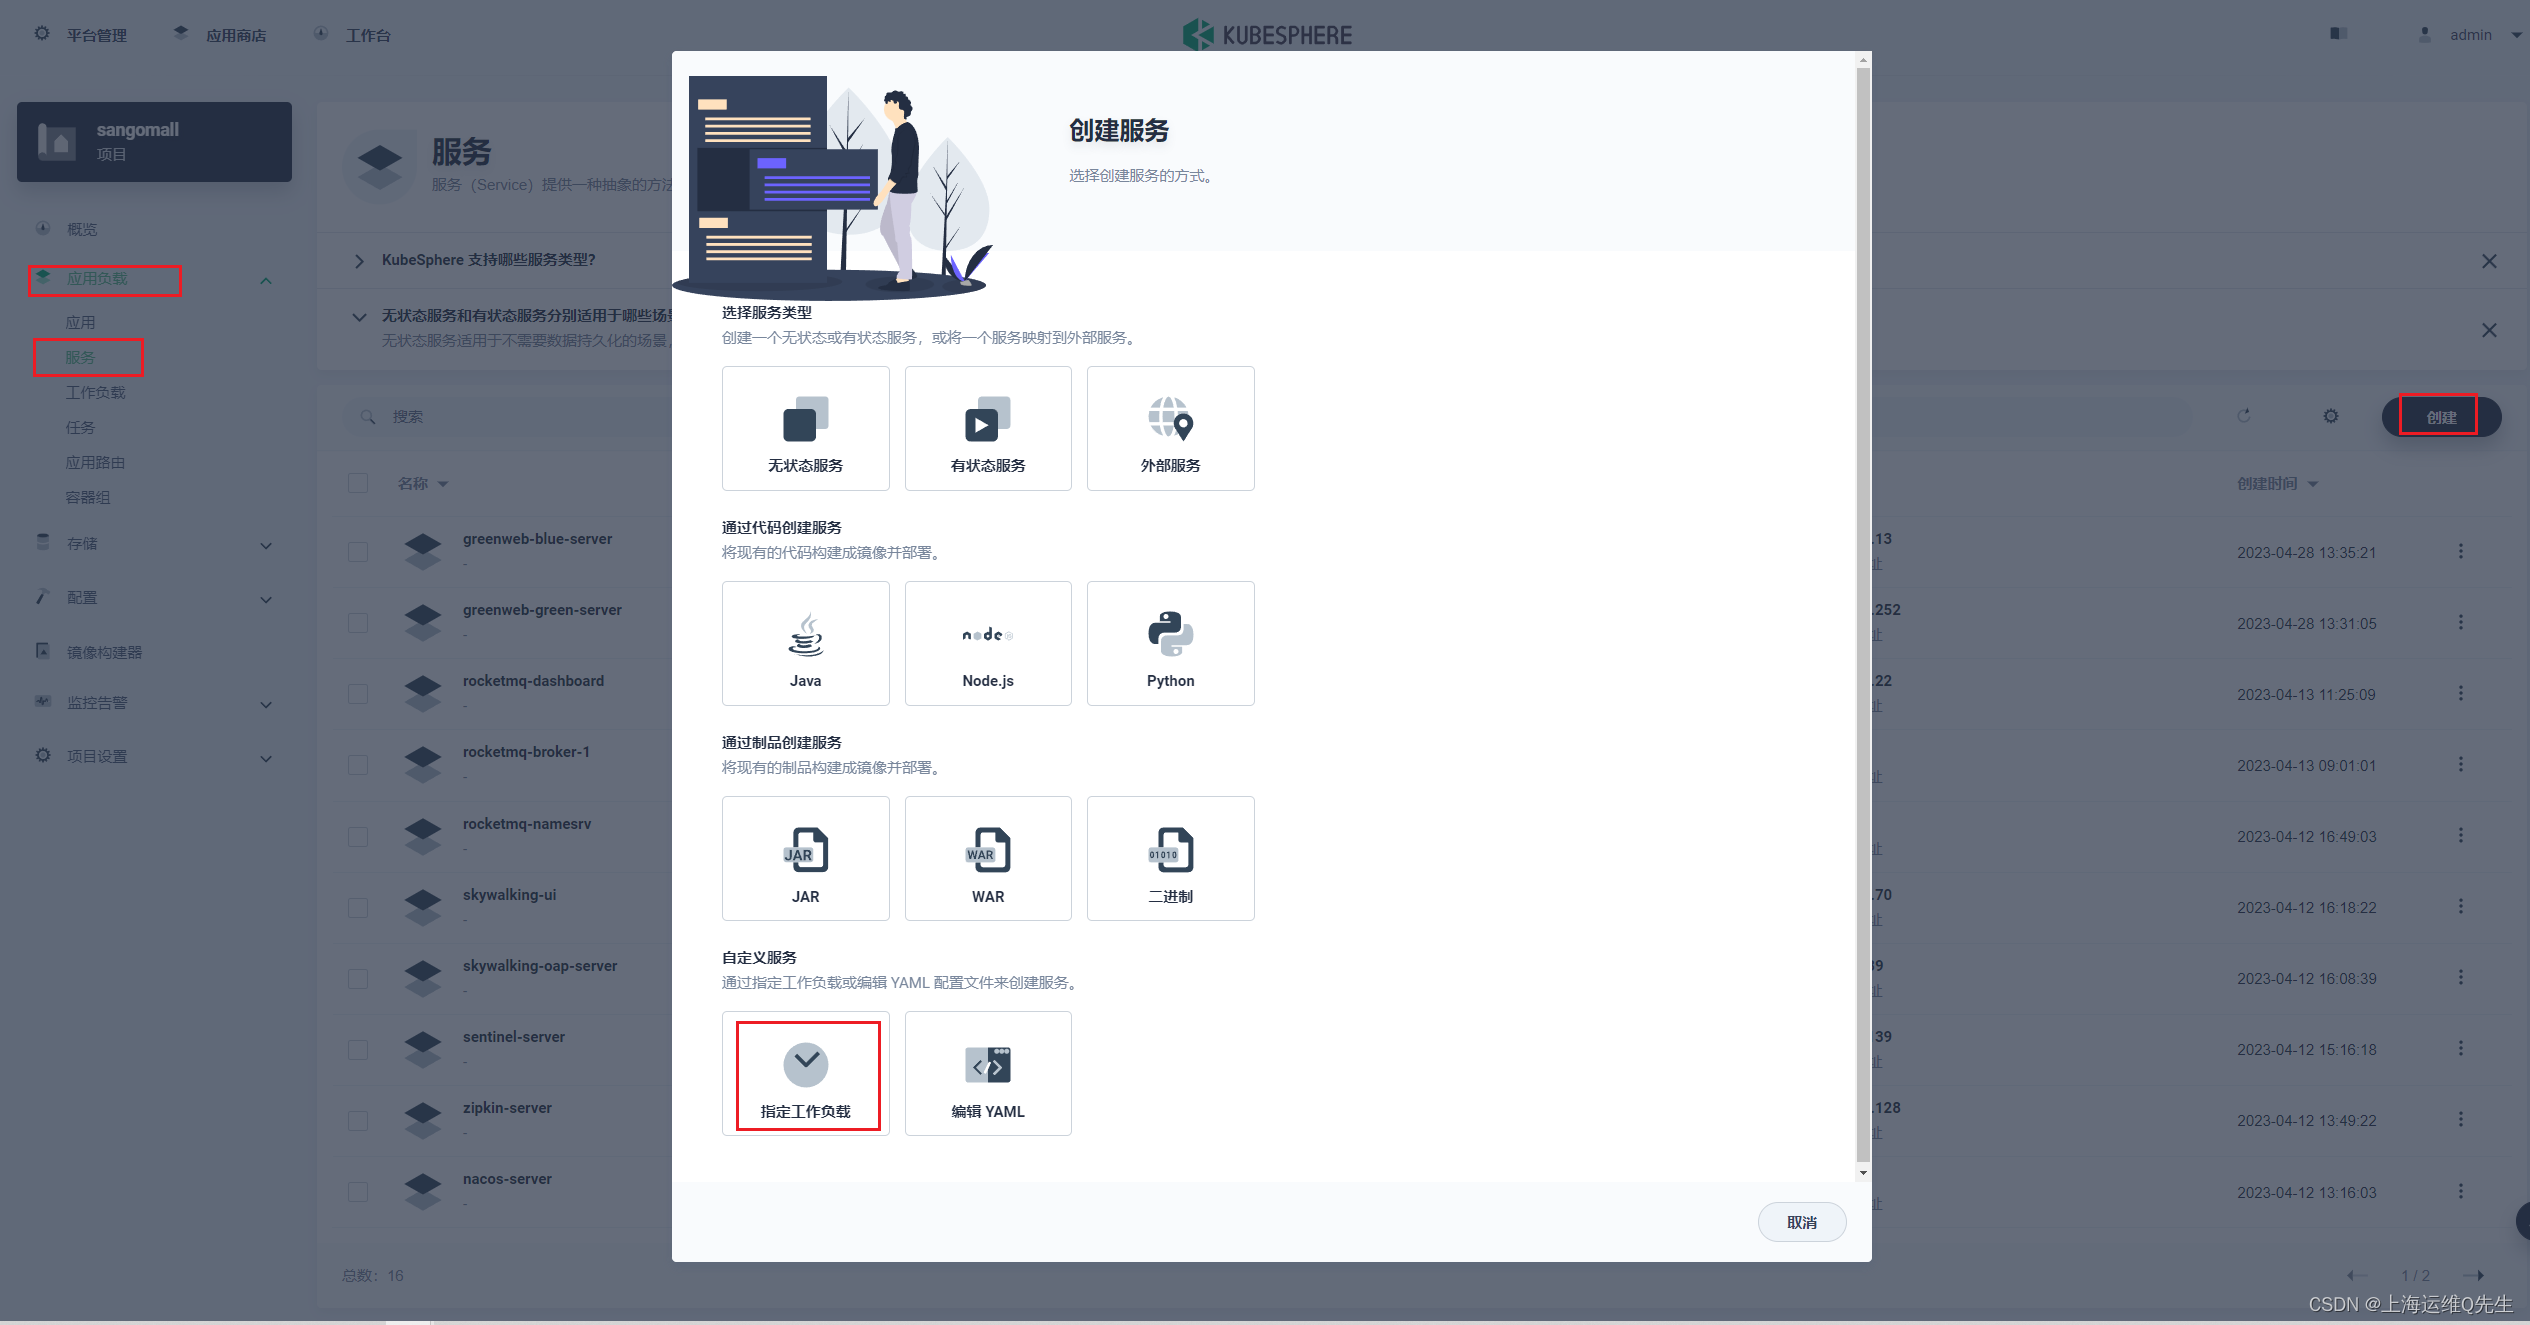
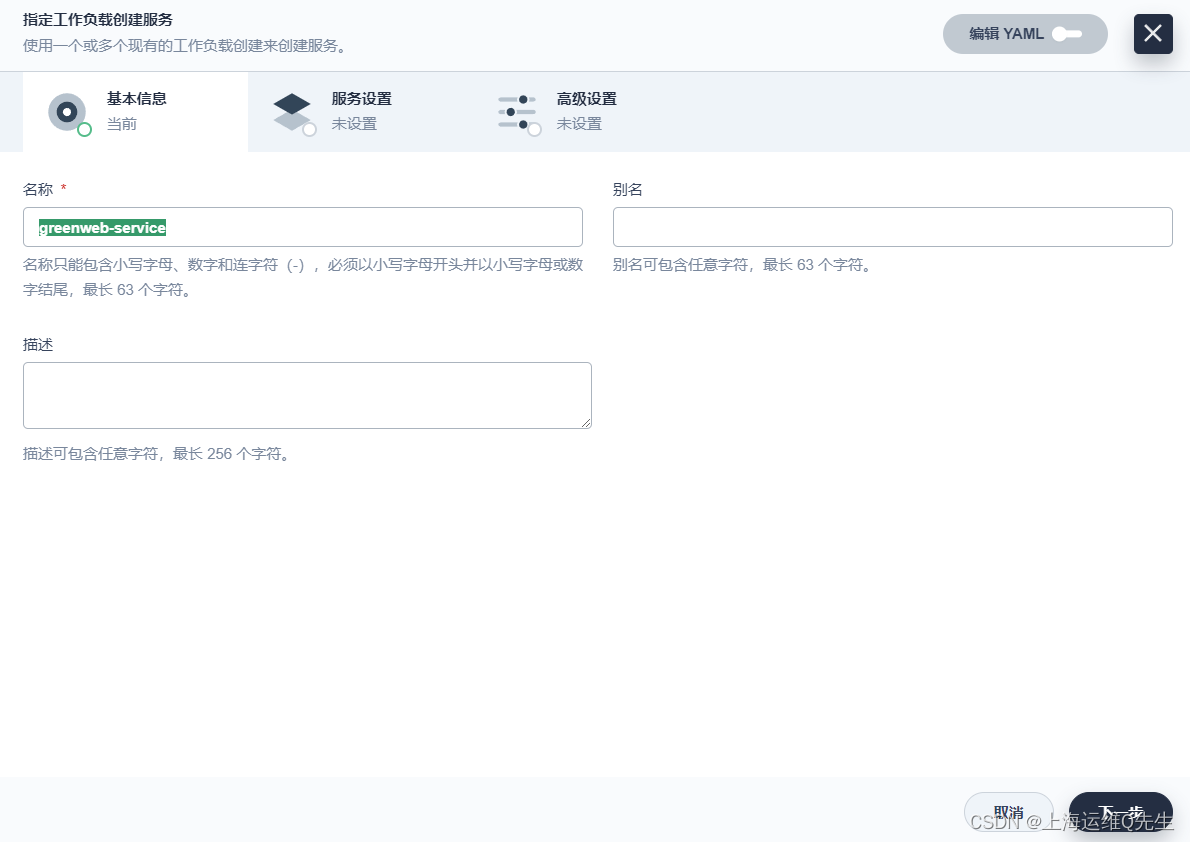
greenweb-service
[下一步]
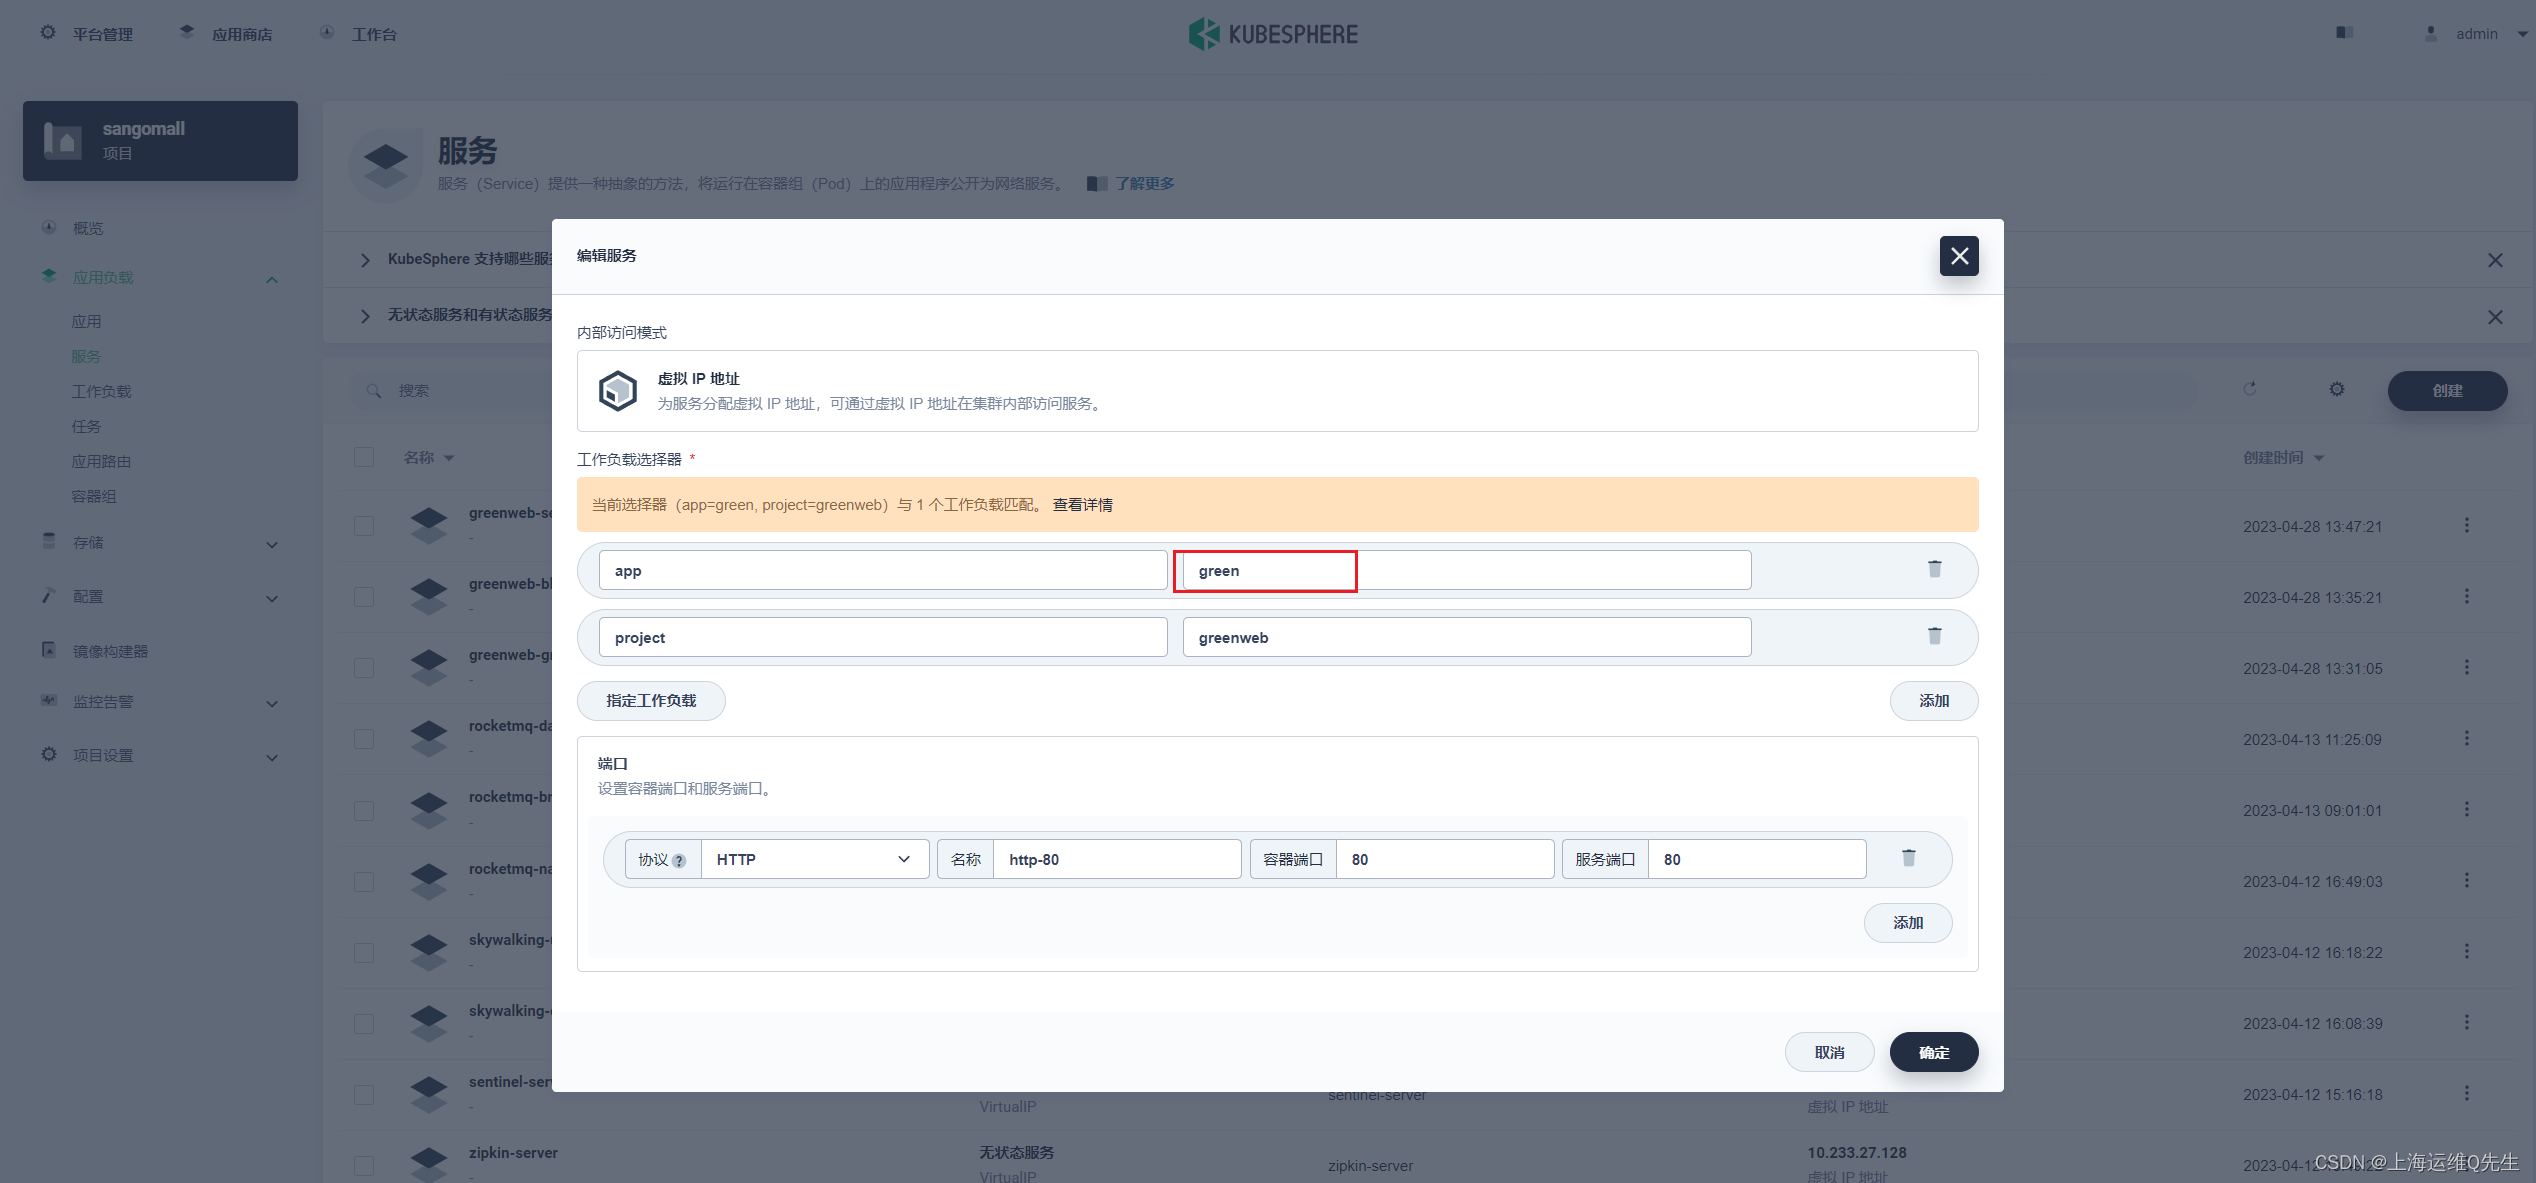
这里的键就是deployment和pods里面定义的2个Label.
project是一样的都是greenweb
app:蓝色就是blue,绿色版本就是green
app=blue
project=greenweb
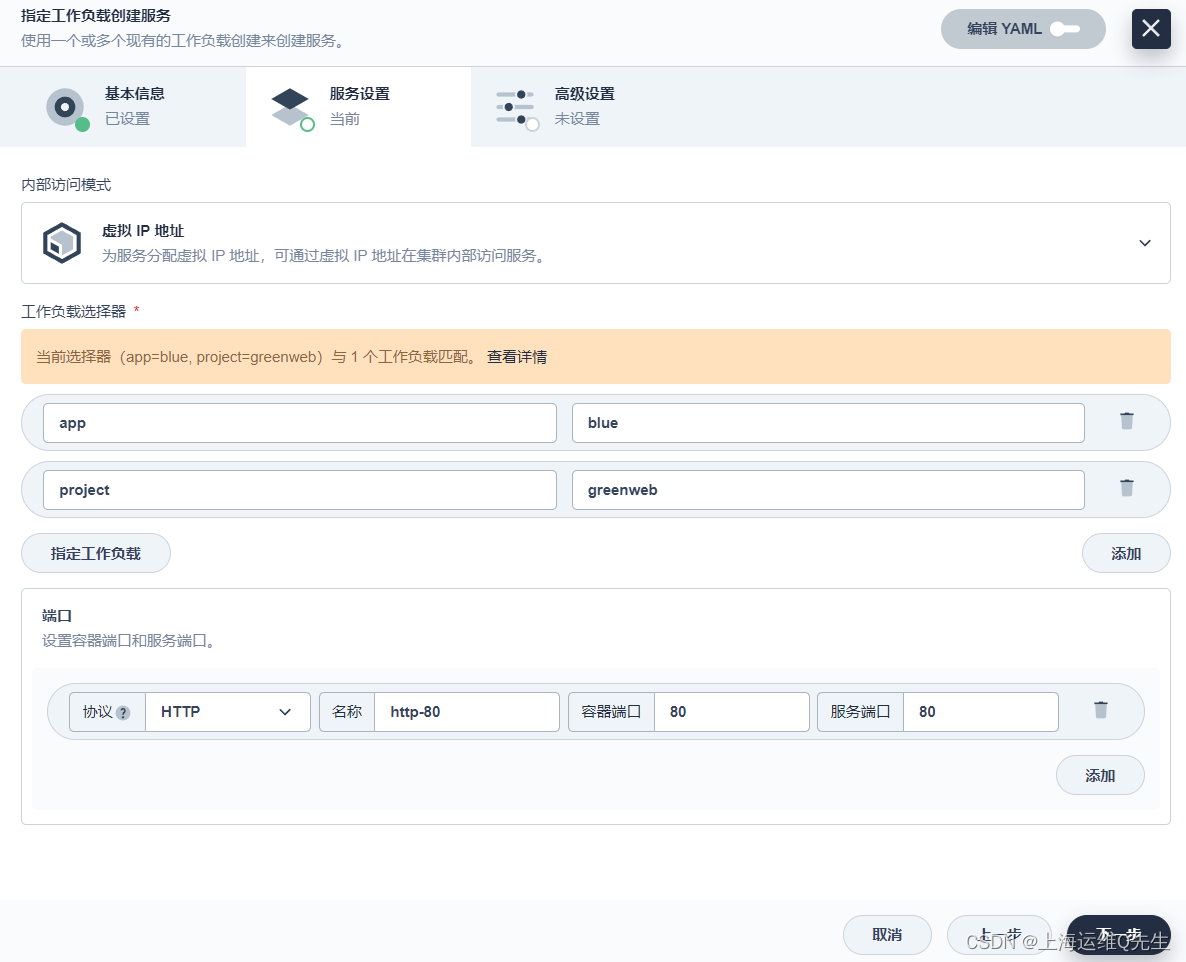
[下一步] [创建]
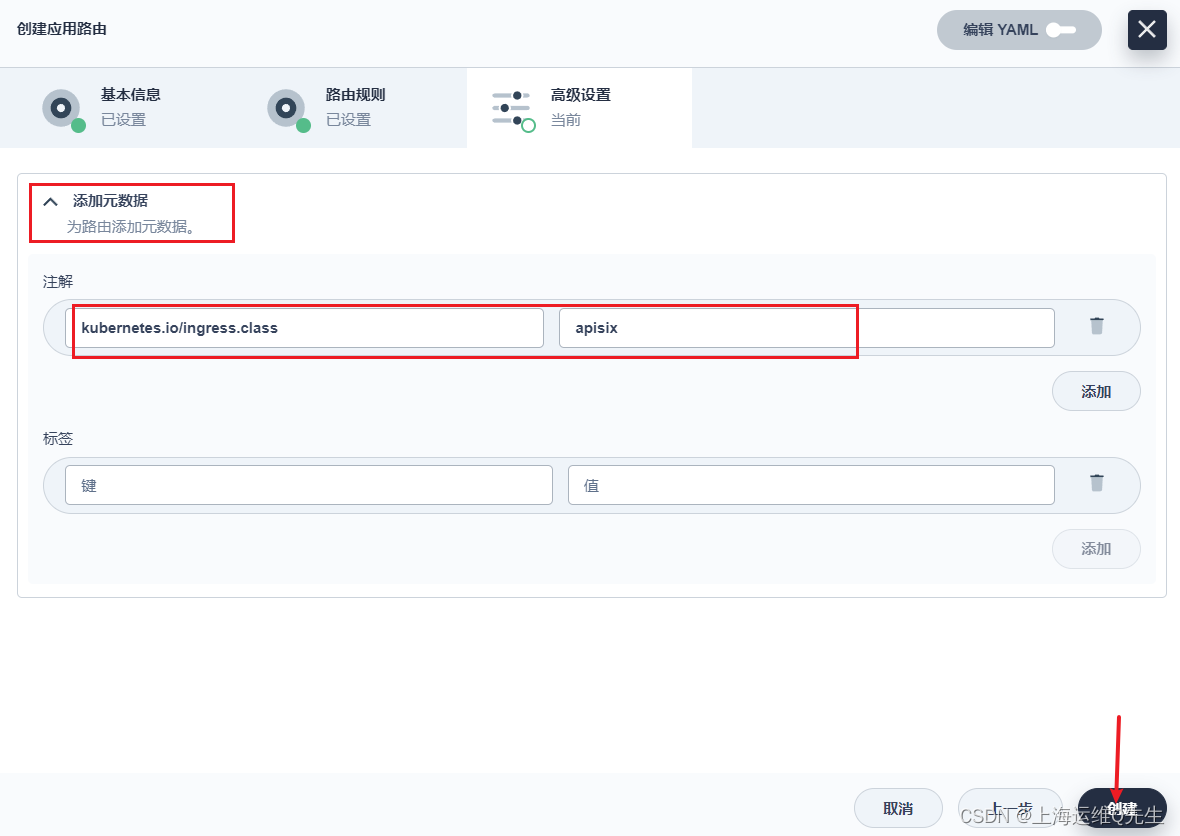
3.2 创建应用路由
使用apisix将应用暴露给k8s以外的环境访问,当然k8s也可以使用这个或者使用之前创建的svc进行访问
greenweb-route
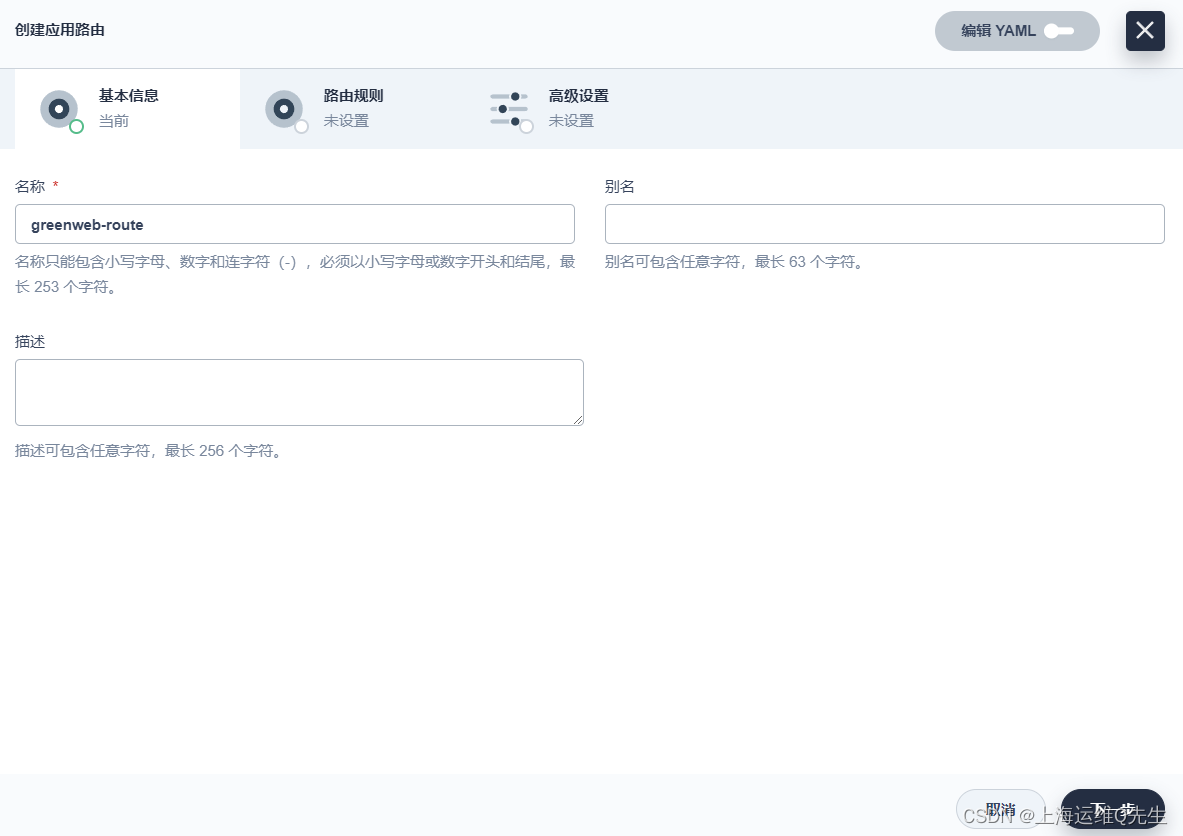
[下一步] [添加路由规则]
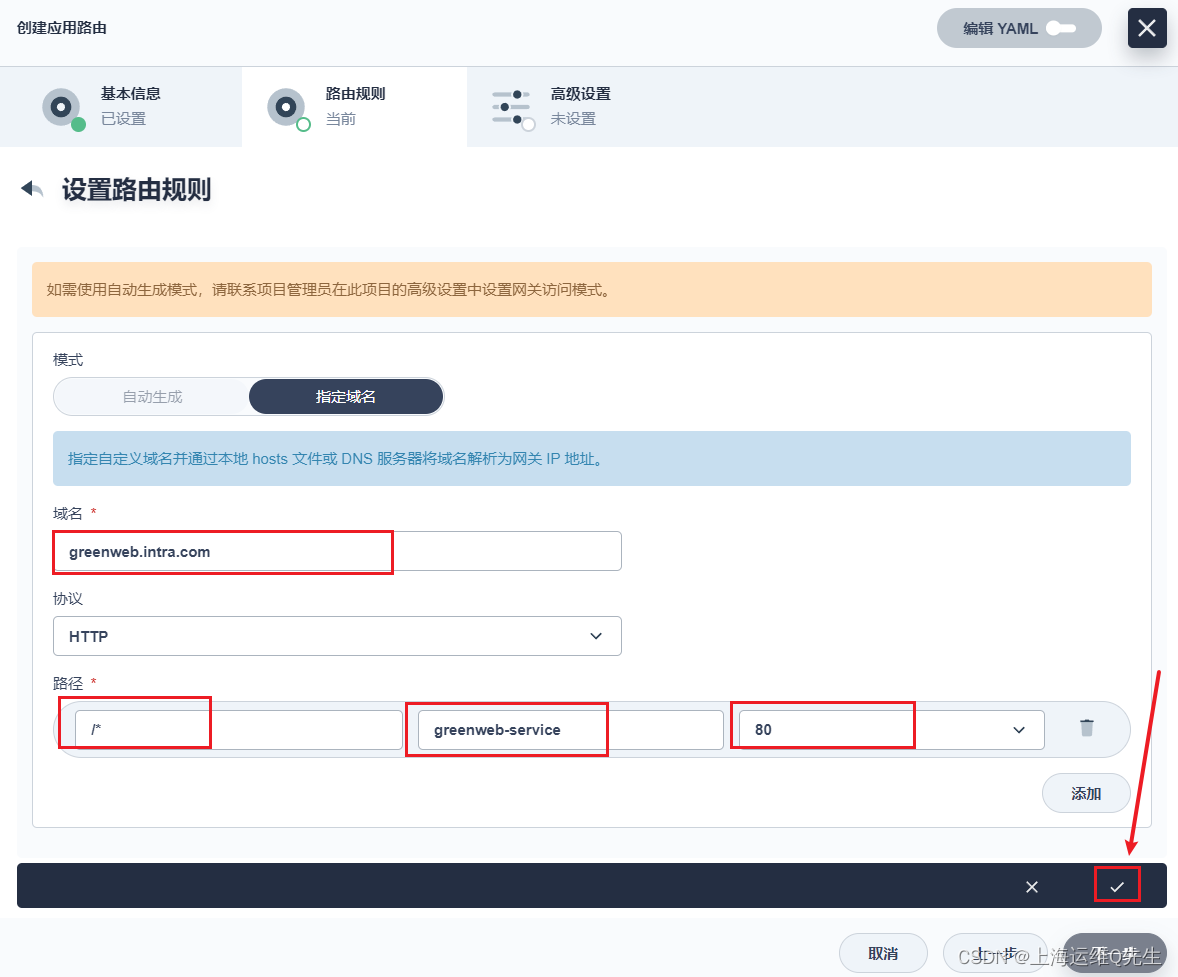

kubernetes.io/ingress.class apisix
3.3 配置域名解析
追加 greenweb A 192.168.31.211到dns解析中
[root@centos7-1 ~]
$TTL 1d
@ IN SOA intra.com. admin.intra.com. (
0;
1H;
5M;
1W;
1D);
@ NS ns.intra.com.
ns A 192.168.31.17
harbor A 192.168.31.104
gitlab A 192.168.31.199
kibana A 192.168.31.212
rabbitmq A 192.168.31.211
web1 A 192.168.31.211
nacos-server A 192.168.31.211
zipkin-server A 192.168.31.211
sentinel A 192.168.31.211
skywalking-ui A 192.168.31.211
rocketmq-dashboard A 192.168.31.211
mall-gateway A 192.168.31.213
mall A 192.168.31.211
item A 192.168.31.211
seckill A 192.168.31.211
search A 192.168.31.211
auth A 192.168.31.211
cart A 192.168.31.211
order A 192.168.31.211
admin A 192.168.31.214
nginx A 192.168.31.211
greenweb A 192.168.31.211
重启named
systemctl restart named
确保greenweb.intra.com能解析
ping greenweb.intra.com -c 1
测试访问
web-app1-blue version 2.0.0
切换到绿色版本
将这里的blue换成green
此时再次访问,已经将流量切换到了绿色版本
web-app1-green version 1.0.0
当把版本再切回蓝色时,流量又回去了

容器内部访问时也是没问题的

至此蓝绿发布完成
本文内容由网友自发贡献,版权归原作者所有,本站不承担相应法律责任。如您发现有涉嫌抄袭侵权的内容,请联系:hwhale#tublm.com(使用前将#替换为@)