安装yargarto 版本eabi编译链 http://www.yagarto.de/
安装JAVA虚拟机 JRE 就足够了。
下载 eclipse 的 C/C++ 版本
下载 zylin 插件,在 eclipse 的 Help --> Install New Software 中
添加地址 http://opensource.zylin.com/zylincdt/ 就可以了。
按照提示安装之后
debug --> debug configuration 中可以看到 zylin 了
![]()

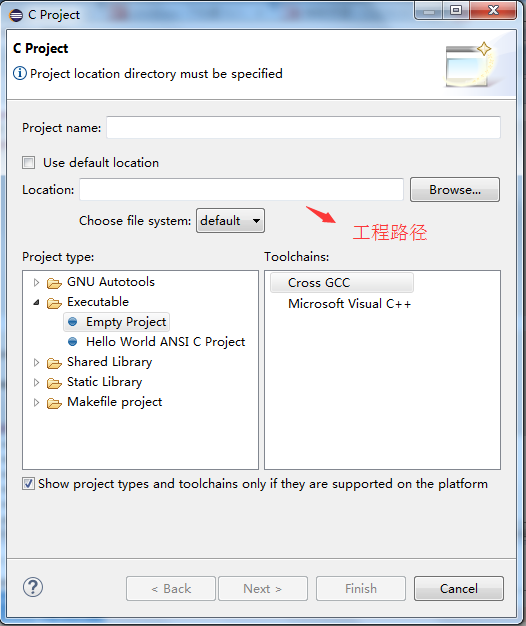
打开文件:file---->new--->c project
看到这样的界面
![]()
写入project name 以及问价路径location 点next
![]()
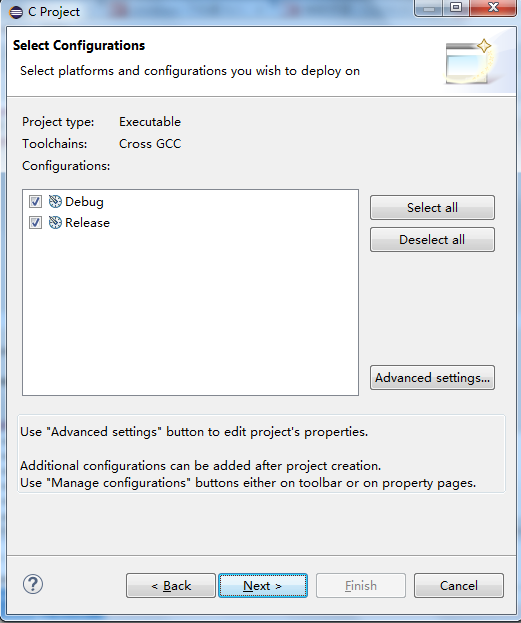
debug和release建议都选上,点next
![]()
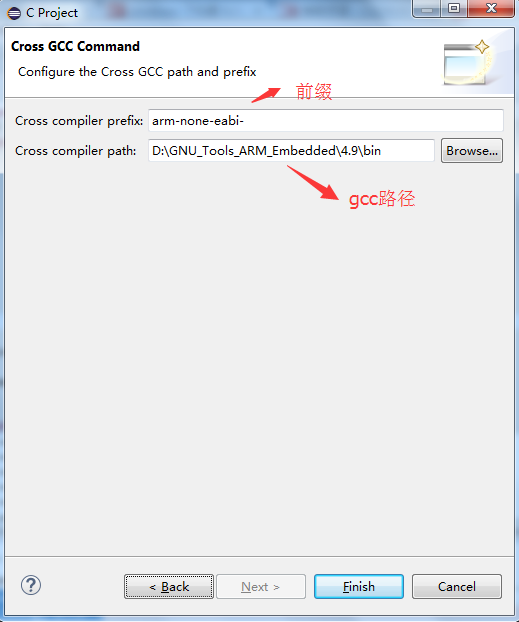
给出gcc的路径和前缀点finish
我的工程在虚拟机下面已经make了所以不需要make,如果你没有make,应该project--->build all 既可以make,建议吧自动编译去掉;我在build all 时会报错
d:/gnu_tools_arm_embedded/4.9/bin/../lib/gcc/arm-none-eabi/4.9.3/../../../../arm-none-eabi/lib\libc.a(lib_a-exit.o): In function `exit':
exit.c:(.text.exit+0x2c): undefined reference to `_exit'
collect2.exe: error: ld returned 1 exit status
make: *** [debug] Error 1
暂时还没找到原因;谁知道原因请告诉我;反正我是已经编译过的就没有找原因了;
再是debug
run------>debug configurations
![]()

点 Zylin Embedded debug(native) ,因为使用的是 yagarto工具链
新建一个 New Launch configuration 改名为项目的名字。、
C/C++ Application 选择生产的elf文件。
![]()
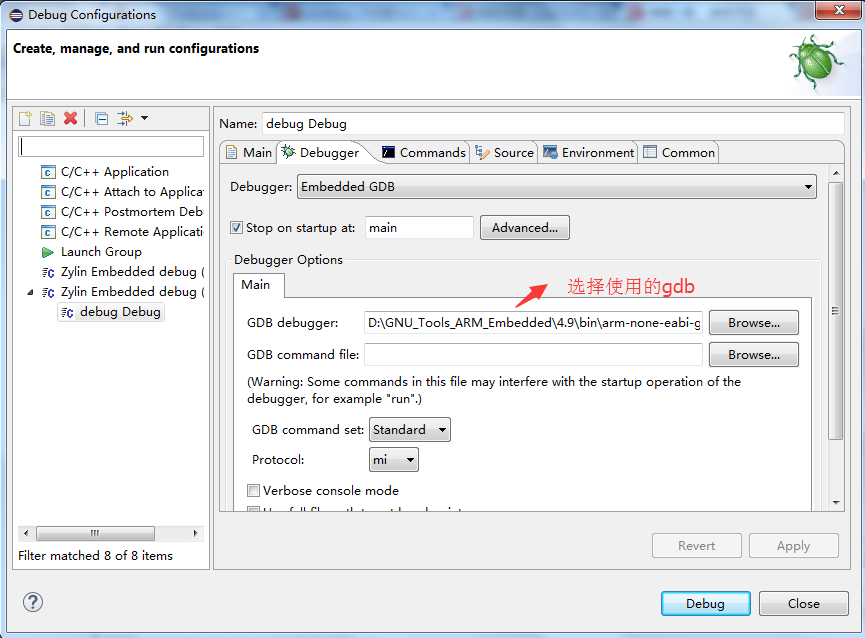
Debugger 页选择gdb具体的路径,例如
D:\yagarto\bin\arm-none-eabi-gdb.exe
GDB command file 选择需要的 gdb启动脚本,可以参考jlink的帮助文档,用现成的修改一下就行了。
其他不需要设置了。
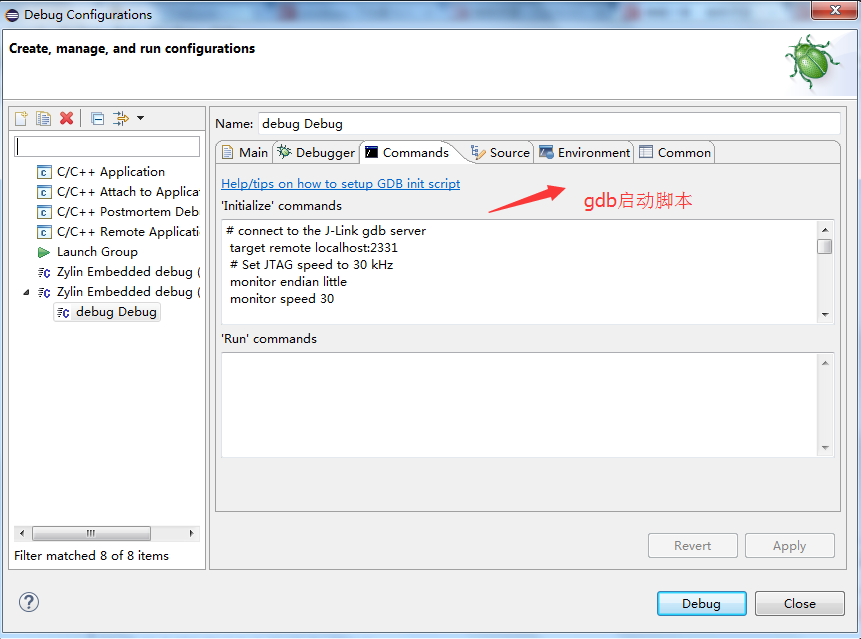
如果不在GDB command file也可以在commands页中的'initializd' commands 中直接写入gdb启动脚本!
![]()
三星2440可以使用内部的4K SRAM练习,如果初始化脚本加入初始化SDRAM控制器的话,
就可以直接下载到SDRAM上面调试了,非常方便。
先运行JLINK的 J_Link GDB Server,然后就可以通过eclipse 调试了。
我的gdbinit脚本
# connect to the J-Link gdb server
target remote localhost:2331
# Set JTAG speed to 30 kHz
monitor endian little
monitor speed 30
# Reset the target
monitor reset
monitor sleep 10
#
# CPU core initialization (to be done by user)
#
# Set the processor mode
monitor reg cpsr = 0xd3
#config MMU 配置MMU
#flush v3/v4 cache
monitor cp15 7, 7, 0, 0 = 0x0
#/* flush v4 TLB 协处理器*/
monitor cp15 8, 7, 0, 0 = 0x0
#disable MMU stuff and caches
monitor cp15 1, 0, 0, 0 =0x1002
#Peri port setup
monitor cp15 15, 2, 0, 4 = 0x70000013
#disable watchdog kangear 关闭看门狗
monitor MemU32 0x53000000 = 0x00000000
monitor sleep 10
#disable interrupt kangear 关闭中断
monitor MemU32 0x4A000008 = 0xffffffff
monitor MemU32 0x4A00001C = 0x7fff
#set clock
#initialize system clocks --- locktime register
monitor MemU32 0x4C000000 = 0xFF000000
#initialize system clocks --- clock-divn register
monitor MemU32 0x4C000014 = 0x5 #CLKDVIN_400_148
#initialize system clocks --- mpll register
monitor MemU32 0x4C000004 = 0x7f021 #default clock
#config sdram
monitor MemU32 0x53000000 0x00000000
monitor MemU32 0x4A000008 0xFFFFFFFF
monitor MemU32 0x4A00001C 0x000007FF
monitor MemU32 0x53000000 0x00000000
monitor MemU32 0x56000050 0x000055AA
monitor MemU32 0x4C000014 0x00000007
monitor MemU32 0x4C000000 0x00FFFFFF
monitor MemU32 0x4C000004 0x00061012
monitor MemU32 0x4C000008 0x00040042
monitor MemU32 0x48000000 0x22111120
monitor MemU32 0x48000004 0x00002F50
monitor MemU32 0x48000008 0x00000700
monitor MemU32 0x4800000C 0x00000700
monitor MemU32 0x48000010 0x00000700
monitor MemU32 0x48000014 0x00000700
monitor MemU32 0x48000018 0x0007FFFC
monitor MemU32 0x4800001C 0x00018005
monitor MemU32 0x48000020 0x00018005
monitor MemU32 0x48000024 0x008E0459
monitor MemU32 0x48000028 0x00000032
monitor MemU32 0x4800002C 0x00000030
monitor MemU32 0x48000030 0x00000030
# Setup GDB for faster downloads
#set remote memory-write-packet-size 1024
monitor speed auto
break _start
load
本文内容由网友自发贡献,版权归原作者所有,本站不承担相应法律责任。如您发现有涉嫌抄袭侵权的内容,请联系:hwhale#tublm.com(使用前将#替换为@)