ps1: 本文不讲AC算法的原理及数学证明, 具体请参考这篇文章:efficient_string_matching_an_aid_to_bibliographic_search.pdf
ps2: 源码主页:multifast
下面先从例子代码分析,如下例子代码:
- #include <stdio.h>
- #include <string.h>
-
- #include "ahocorasick.h"
-
- AC_ALPHABET_t * sample_patterns[] = {
- "he", "she", "his", "hers"
- };
- #define PATTERN_COUNT (sizeof(sample_patterns)/sizeof(AC_ALPHABET_t *))
-
- AC_ALPHABET_t * input_text1 = {"ushers"};
- AC_ALPHABET_t * input_text2 = {"whatever you are be a good one"};
- AC_ALPHABET_t * input_text3 = {"out of clutter, find simplicity"};
-
- #define BUFFER_ROW 20000
- #define BUFFER_COL 512
-
- int main (int argc, char ** argv)
- {
- unsigned int i = 0;
-
- // 1. Define AC variables:
-
- AC_AUTOMATA_t *atm;
- AC_PATTERN_t tmp_pattern;
- AC_TEXT_t tmp_text;
-
- // 2. Get a new automata
-
- atm = ac_automata_init ();
-
- // 3. Add patterns to automata
-
- for (i=0; i<PATTERN_COUNT; i++)
- {
- tmp_pattern.astring = sample_patterns[i];
- tmp_pattern.rep.number = i+1; // optional
- tmp_pattern.length = strlen(tmp_pattern.astring);
- ac_automata_add (atm, &tmp_pattern);
- }
-
- // 4. Finalize automata
-
- ac_automata_finalize (atm);
- // after you have finished with adding patterns you must finalize the automata
- // from now you can not add patterns anymore.
-
- // 4.1. Display automata (if you are interested)
-
- // ac_automata_display (atm, 'n');
- // the second argument determines the cast type of the pattern representative.
- // 'n': as number
- // 's': as string
- // because we use the integer part of union (tmp_patt.rep.number) so we used 'n'
-
- printf ("Searching: \"%s\"\n", input_text1);
-
- // 5. Set the input text
-
- tmp_text.astring = input_text1;
- tmp_text.length = strlen(tmp_text.astring);
- ac_automata_settext (atm, &tmp_text, 0);
-
- // 6. find
-
- AC_MATCH_t * matchp;
-
- while ((matchp = ac_automata_findnext(atm)))
- {
- unsigned int j;
-
- printf ("@%2ld: ", matchp->position);
-
- for (j=0; j < matchp->match_num; j++)
- printf("#%ld (%s), ", matchp->patterns[j].rep.number, matchp->patterns[j].astring);
- // CAUTION: be careful about using m->matched_patterns[j].astring
- // if 'astring' has permanent allocation inside your program's
- // memory area, you can use it. otherwise it will point to
- // an incorrect memory place.
-
- printf ("\n");
- }
-
- printf ("Searching: \"%s\"\n", input_text2);
- // you can do more search
- // just use function pair ac_automata_settext/ac_automata_findnext
-
- tmp_text.astring = input_text2;
- tmp_text.length = strlen(tmp_text.astring);
- ac_automata_settext (atm, &tmp_text, 0);
-
- while ((matchp = ac_automata_findnext(atm)))
- {
- unsigned int j;
-
- printf ("@%2ld: ", matchp->position);
-
- for (j=0; j < matchp->match_num; j++)
- printf("#%ld (%s), ", matchp->patterns[j].rep.number, matchp->patterns[j].astring);
-
- printf ("\n");
- }
-
- printf ("Searching: \"%s\" with \'keep\' enabled\n", input_text3);
- // and again
-
- tmp_text.astring = input_text3;
- tmp_text.length = strlen(tmp_text.astring);
- ac_automata_settext (atm, &tmp_text, 1);
- // when the keep option (3rd argument) in set, then the automata
- // considers that the given text is the next chunk of the previous text.
- // to understand the difference try it with 0 and 1 and compare the result
-
- while ((matchp = ac_automata_findnext(atm)))
- {
- unsigned int j;
-
- printf ("@ %2ld: ", matchp->position);
-
- for (j=0; j < matchp->match_num; j++)
- printf("#%ld (%s), ", matchp->patterns[j].rep.number, matchp->patterns[j].astring);
-
- printf ("\n");
- }
-
- // 7. Release the automata
-
- ac_automata_release (atm);
- // do not forget to release the automata after you have done with it
-
- return 0;
- }
哈哈, 是不是一开始被这么多代码吓住了, 没有分析的勇气了?淡定!耐心看一下, 源码的作者在例子代码中给予我们提供了AC源码的使用方式, 并列出了 1, 2, 3, 4, 5, 6, 7的步骤, 我们只需要顺藤摸瓜,即可破析源码!
第一步:
- // 1. Define AC variables:
-
- AC_AUTOMATA_t *atm;
- AC_PATTERN_t tmp_pattern;
- AC_TEXT_t tmp_text;
这些数据机构宏定义, 我们跟踪到定义的最开始地方:
atm的类型:
- typedef struct AC_AUTOMATA
- {
- /* The root of the Aho-Corasick trie */
- struct AC_NODE * root;
-
- /* maintain all nodes pointers. it will be used to access or release
- * all nodes. */
- struct AC_NODE ** all_nodes;
-
- unsigned int all_nodes_num; /* Number of all nodes in the automata */
- unsigned int all_nodes_max; /* Current max allocated memory for *all_nodes */
-
- /* this flag indicates that if automata is finalized by
- * ac_automata_finalize() or not. 1 means finalized and 0
- * means not finalized (is open). after finalizing automata you can not
- * add pattern to automata anymore. */
- unsigned short automata_open;
-
- /* It is possible to feed a large input to the automata chunk by chunk to
- * be searched using ac_automata_search(). in fact by default automata
- * thinks that all chunks are related unless you do ac_automata_reset().
- * followings are variables that keep track of searching state. */
- struct AC_NODE * current_node; /* Pointer to current node while searching */
- unsigned long base_position; /* Represents the position of current chunk
- * related to whole input text */
-
- /* The input text.
- * used only when it is working in settext/findnext mode */
- AC_TEXT_t * text;
-
- /* The lase searched position in the chunk.
- * used only when it is working in settext/findnext mode */
- unsigned long position;
-
- /* Statistic Variables */
-
- /* Total patterns in the automata */
- unsigned long total_patterns;
-
- } AC_AUTOMATA_t;
又是一堆代码!还是淡定!作者给出了详细的解释,只不过是英文而已,耐心读一读。
ac自动机的root字段:类型是AC_NODE, 这个AC_NODE又是什么东东?跟踪一下,如下:
- /* automata node */
- typedef struct AC_NODE
- {
- int id; /* Node ID : for debugging purpose */
- short int final; /* 0: no ; 1: yes, it is a final node */
- struct AC_NODE * failure_node; /* The failure node of this node */
- unsigned short depth; /* depth: distance between this node and the root */
-
- /* Matched patterns */
- AC_PATTERN_t * matched_patterns; /* Array of matched patterns */
- unsigned short matched_patterns_num; /* Number of matched patterns at this node */
- unsigned short matched_patterns_max; /* Max capacity of allocated memory for matched_patterns */
-
- /* Outgoing Edges */
- struct edge * outgoing; /* Array of outgoing edges */
- unsigned short outgoing_degree; /* Number of outgoing edges */
- unsigned short outgoing_max; /* Max capacity of allocated memory for outgoing */
- } AC_NODE_t;
原来代表一个节点,那么它各个字段都是什么意思呢?如下分析:
id字段:标示节点的, 比如这是第几个节点, 注释也说了, for debugging, 没什么实际作用。
final字段:代表该节点是不是模式串的最后一个节点, 也就说当我匹配到这里的时候,发现该节点的final为1, 那么就代表我们已经发现了一个匹配。
failure_node字段:该节点匹配失败的跳转节点, 如果你不懂什么叫跳转失败节点, 那么下面的分析你就不要看了, 先去看看那边论文吧。
depth字段:AC自动机说穿了就是一个trie树, 既然是树的话, 那么就有深度的概念, 不懂深度?去复习一下tree这种数据结构吧。
outgoing字段:边的数组。什么叫边的数组呢?就是从这个节点出发, 可以有多少种出路。好吧, 其实就是出度, 不懂出度?去复习一下数据结构吧。
outgoing_degree字段:边数组的大小, 也就是该节点的出度, 看变量名字就知道 outgoing degree, 多么直白啊。
outgoing_max字段:表示出度数组能容量的最大数目, 这里使用的是预分配的概念, 不懂吗?复习一下数据结构的动态数组吧。
其他字段不是核心字段, 在这里就不解释了。
附上edge的结构体:
- /* The Edge of the Node */
- struct edge
- {
- AC_ALPHABET_t alpha; /* Edge alpha */
- AC_NODE_t * next; /* Target of the edge */
- };
其中alpha代表边上的字母, 一个边对应一个字母;next代表通过该边能到达哪个节点。
继续分析我们的AC自动机字段:
all_nodes字段:保存所有节点的数组。
all_nodes_num字段:节点数组大小。
all_nodes_max字段:预分配的最大节点数组。
automata_open字段:标示自动还能不能再添加模式串。
current_node字段:自动机搜查的当前节点。
text字段:自动机要查询的目标文本。
其他字段不是核心字段, 在这里就不分析了。
第二步:初始化一个AC自动机,如下代码片段:
- // 2. Get a new automata
-
- atm = ac_automata_init ();
- /******************************************************************************
- * FUNCTION: ac_automata_init
- * Initialize automata; allocate memories and set initial values
- * PARAMS:
- ******************************************************************************/
- AC_AUTOMATA_t * ac_automata_init ()
- {
- AC_AUTOMATA_t * thiz = (AC_AUTOMATA_t *)malloc(sizeof(AC_AUTOMATA_t));
- memset (thiz, 0, sizeof(AC_AUTOMATA_t));
- thiz->root = node_create ();
- thiz->all_nodes_max = REALLOC_CHUNK_ALLNODES;
- thiz->all_nodes = (AC_NODE_t **) malloc (thiz->all_nodes_max*sizeof(AC_NODE_t *));
- ac_automata_register_nodeptr (thiz, thiz->root);
- ac_automata_reset (thiz);
- thiz->total_patterns = 0;
- thiz->automata_open = 1;
- return thiz;
- }
从代码里面我可以清楚的看到,自动机的初始化过程(具体代码过程请参考源码):
1. 分配自动机内存并初始化;
2. 创建自动机root节点;
3. 预分配自动机保存所有节点的数组;
4. 调用ac_automata_register_nodeptr方法把root节点加到all_nodes数组;
5. 标记自动机可以添加模式串(open = 1)
第三步:向自动机添加模式串,如下代码:
- // 3. Add patterns to automata
-
- for (i=0; i<PATTERN_COUNT; i++)
- {
- tmp_pattern.astring = sample_patterns[i];
- tmp_pattern.rep.number = i+1; // optional
- tmp_pattern.length = strlen(tmp_pattern.astring);
- ac_automata_add (atm, &tmp_pattern);
- }
- /******************************************************************************
- * FUNCTION: ac_automata_add
- * Adds pattern to the automata.
- * PARAMS:
- * AC_AUTOMATA_t * thiz: the pointer to the automata
- * AC_PATTERN_t * patt: the pointer to added pattern
- * RETUERN VALUE: AC_ERROR_t
- * the return value indicates the success or failure of adding action
- ******************************************************************************/
- AC_STATUS_t ac_automata_add (AC_AUTOMATA_t * thiz, AC_PATTERN_t * patt)
- {
- unsigned int i;
- AC_NODE_t * n = thiz->root;
- AC_NODE_t * next;
- AC_ALPHABET_t alpha;
-
- if(!thiz->automata_open)
- return ACERR_AUTOMATA_CLOSED;
-
- if (!patt->length)
- return ACERR_ZERO_PATTERN;
-
- if (patt->length > AC_PATTRN_MAX_LENGTH)
- return ACERR_LONG_PATTERN;
-
- for (i=0; i<patt->length; i++)
- {
- alpha = patt->astring[i];
- if ((next = node_find_next(n, alpha)))
- {
- n = next;
- continue;
- }
- else
- {
- next = node_create_next(n, alpha);
- next->depth = n->depth + 1;
- n = next;
- ac_automata_register_nodeptr(thiz, n);
- }
- }
-
- if(n->final)
- return ACERR_DUPLICATE_PATTERN;
-
- n->final = 1;
- node_register_matchstr(n, patt);
- thiz->total_patterns++;
-
- return ACERR_SUCCESS;
- }
向添加模式串的过程如下:
1. 首先检查各种条件,如自动机是不是打开添加标记的,添加的模式串是不是长度在允许的范围等等;
2. 先从根节点开始查找当前字符是否在自动机节点中,如果在, 以查找到的节点开始继续查找;如果不在调用node_find_next函数创建一个新节点,更新新节点深度, 最后把新节点添加到all_nodes中;
3. 将最有添加的一个节点的final设置为1,表示该节点是该模式串的最后一个节点;
说明:实际上这里创建的就是一个trie树, 如果不懂trie树, 百度一下吧。
第四步(核心):修正自动机的失败跳转节点,如下代码片段:
- // 4. Finalize automata
-
- ac_automata_finalize (atm);
- /******************************************************************************
- * FUNCTION: ac_automata_finalize
- * Locate the failure node for all nodes and collect all matched pattern for
- * every node. it also sorts outgoing edges of node, so binary search could be
- * performed on them. after calling this function the automate literally will
- * be finalized and you can not add new patterns to the automate.
- * PARAMS:
- * AC_AUTOMATA_t * thiz: the pointer to the automata
- ******************************************************************************/
- void ac_automata_finalize (AC_AUTOMATA_t * thiz)
- {
- unsigned int i;
- AC_ALPHABET_t alphas[AC_PATTRN_MAX_LENGTH];
- AC_NODE_t * node;
-
- ac_automata_traverse_setfailure (thiz, thiz->root, alphas);
-
- for (i=0; i < thiz->all_nodes_num; i++)
- {
- node = thiz->all_nodes[i];
- ac_automata_union_matchstrs (node);
- node_sort_edges (node);
- }
- thiz->automata_open = 0; /* do not accept patterns any more */
- }
上面函数主要处理的任务:
1. 设置失败节点跳转;
2. 对所有相同深度的节点排序;
3. 关闭自动机添加标示。
对于ac_automata_traverse_setfailure函数, 如下代码:
- /******************************************************************************
- * FUNCTION: ac_automata_traverse_setfailure
- * Traverse all automata nodes using DFS (Depth First Search), meanwhile it set
- * the failure node for every node it passes through. this function must be
- * called after adding last pattern to automata. i.e. after calling this you
- * can not add further pattern to automata.
- ******************************************************************************/
- static void ac_automata_traverse_setfailure
- (AC_AUTOMATA_t * thiz, AC_NODE_t * node, AC_ALPHABET_t * alphas)
- {
- unsigned int i;
- AC_NODE_t * next;
-
- for (i=0; i < node->outgoing_degree; i++)
- {
- alphas[node->depth] = node->outgoing[i].alpha;
- next = node->outgoing[i].next;
-
- /* At every node look for its failure node */
- ac_automata_set_failure (thiz, next, alphas);
-
- /* Recursively call itself to traverse all nodes */
- ac_automata_traverse_setfailure (thiz, next, alphas);
- }
- }
对给定参数节点node,在该处匹配失败,自动机该跳转到哪里?分析ac_automata_set_failure代码:
- /******************************************************************************
- * FUNCTION: ac_automata_set_failure
- * find failure node for the given node.
- ******************************************************************************/
- static void ac_automata_set_failure
- (AC_AUTOMATA_t * thiz, AC_NODE_t * node, AC_ALPHABET_t * alphas)
- {
- unsigned int i, j;
- AC_NODE_t * m;
-
- for (i=1; i < node->depth; i++)
- {
- m = thiz->root;
- for (j=i; j < node->depth && m; j++)
- m = node_find_next (m, alphas[j]);
- if (m)
- {
- node->failure_node = m;
- break;
- }
- }
- if (!node->failure_node)
- node->failure_node = thiz->root;
- }
这个代码是核心代码, 写的很简洁, 双重循环, 但是不好理解。首先我们考虑既然匹配到当前位置并且在当前位置失败,那么对于目标串当前位置前面的一部分肯定是匹配过的,
那么这匹配过的部分有可能是其他模式串的开始部分(前缀),如果是的话, 这些匹配过的部分就不需要再匹配了, 直接跳过其他模式串相同的前缀部分, 这样目标串就不用回溯,
这就是AC算法的核心。那么对于该函数,第二次for循环就是在找其他模式串的最大相同开始部分, 也就是最大前缀, 如果找到, 那么就跳出第一重for循环, 函数直接返回;没找到的话,
从新的已经匹配的部分下一个位置继续寻找, 即第一重for循环保证能找到所有其他模式串的分支,最后如果什么也没找到, 那么就代表没有相同的部分, 只能跳回到root节点,从新的
位置开始继续匹配。
找完之后对所有节点进行排序,如下代码片段:
- /******************************************************************************
- * FUNCTION: node_sort_edges
- * sorts edges alphabets.
- ******************************************************************************/
- void node_sort_edges (AC_NODE_t * thiz)
- {
- qsort ((void *)thiz->outgoing, thiz->outgoing_degree, sizeof(struct edge),
- node_edge_compare);
- }
- /******************************************************************************
- * FUNCTION: node_edge_compare
- * Comparison function for qsort. see man qsort.
- ******************************************************************************/
- int node_edge_compare (const void * l, const void * r)
- {
- /* According to man page:
- * The comparison function must return an integer less than, equal to, or
- * greater than zero if the first argument is considered to be
- * respectively less than, equal to, or greater than the second. if two
- * members compare as equal, their order in the sorted array is undefined.
- *
- * NOTE: Because edge alphabets are unique in every node we ignore
- * equivalence case.
- **/
- if ( ((struct edge *)l)->alpha >= ((struct edge *)r)->alpha )
- return 1;
- else
- return -1;
- }
至于为什么要排序, 分析到后面就明白了, 这里先不讲。
第五步:设置目标串(待匹配串)
- // 5. Set the input text
-
- tmp_text.astring = input_text1;
- tmp_text.length = strlen(tmp_text.astring);
- ac_automata_settext (atm, &tmp_text, 0);
- /******************************************************************************
- * FUNCTION: ac_automata_settext
- ******************************************************************************/
- void ac_automata_settext (AC_AUTOMATA_t * thiz, AC_TEXT_t * text, int keep)
- {
- thiz->text = text;
- if (!keep)
- ac_automata_reset(thiz);
- thiz->position = 0;
- }
第六步:开始匹配,如下代码,
- // 6. find
-
- AC_MATCH_t * matchp;
-
- while ((matchp = ac_automata_findnext(atm)))
- {
- unsigned int j;
-
- printf ("@%2ld: ", matchp->position);
-
- for (j=0; j < matchp->match_num; j++)
- printf("#%ld (%s), ", matchp->patterns[j].rep.number, matchp->patterns[j].astring);
- // CAUTION: be careful about using m->matched_patterns[j].astring
- // if 'astring' has permanent allocation inside your program's
- // memory area, you can use it. otherwise it will point to
- // an incorrect memory place.
-
- printf ("\n");
- }
- /******************************************************************************
- * FUNCTION: ac_automata_findnext
- ******************************************************************************/
- AC_MATCH_t * ac_automata_findnext (AC_AUTOMATA_t * thiz)
- {
- unsigned long position;
- AC_NODE_t * current;
- AC_NODE_t * next;
- static AC_MATCH_t match;
-
- if (thiz->automata_open)
- return 0;
-
- if (!thiz->text)
- return 0;
-
- position = thiz->position;
- current = thiz->current_node;
- match.match_num = 0;
-
- /* This is the main search loop.
- * it must be as lightweight as possible. */
- while (position < thiz->text->length)
- {
- if (!(next = node_findbs_next(current, thiz->text->astring[position])))
- {
- if (current->failure_node /* we are not in the root node */)
- current = current->failure_node;
- else
- position++;
- }
- else
- {
- current = next;
- position++;
- }
-
- if (current->final && next)
- /* We check 'next' to find out if we came here after a alphabet
- * transition or due to a fail. in second case we should not report
- * matching because it was reported in previous node */
- {
- match.position = position + thiz->base_position;
- match.match_num = current->matched_patterns_num;
- match.patterns = current->matched_patterns;
- break;
- }
- }
-
- /* save status variables */
- thiz->current_node = current;
- thiz->position = position;
-
- if (!match.match_num)
- /* if we came here due to reaching to the end of input text
- * not a loop break
- */
- thiz->base_position += position;
-
- return match.match_num?&match:0;
- }
分析ac_automata_findnext:
1. 调用node_findbs_next函数, 查找下一个匹配位置;
2. 如果没找到跳转到failure_node继续查找;
3. 检查是不是final节点, 如果是的话, 匹配成功。
分析node_findbs_next函数:
- /******************************************************************************
- * FUNCTION: node_findbs_next
- * Find out the next node for a given Alpha. this function is used after the
- * pre-processing stage in which we sort edges. so it uses Binary Search.
- ******************************************************************************/
- AC_NODE_t * node_findbs_next (AC_NODE_t * thiz, AC_ALPHABET_t alpha)
- {
- int min, max, mid;
- AC_ALPHABET_t amid;
-
- min = 0;
- max = thiz->outgoing_degree - 1;
-
- while (min <= max)
- {
- mid = (min+max) >> 1;
- amid = thiz->outgoing[mid].alpha;
- if (alpha > amid)
- min = mid + 1;
- else if (alpha < amid)
- max = mid - 1;
- else
- return (thiz->outgoing[mid].next);
- }
- return NULL;
- }
这里对每一层使用的是二分查找, 现在明白了上面为什么要排序了吧。都是为了加速后面的查找。
第七步:释放内存。
- // 7. Release the automata
-
- ac_automata_release (atm);
至此AC自动机源码分析完毕, 其中各个细节实现需要亲自越多源码, 细细揣摩, 方可领悟!
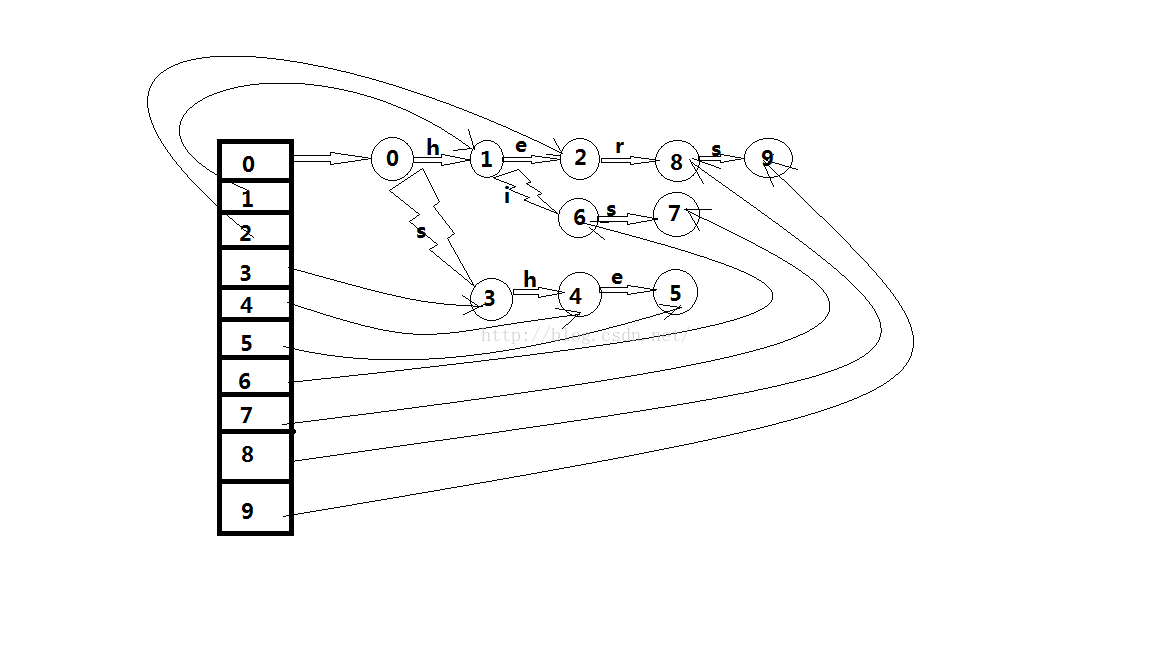
附上第一个例子的程序数据结构图, 如下:
本文内容由网友自发贡献,版权归原作者所有,本站不承担相应法律责任。如您发现有涉嫌抄袭侵权的内容,请联系:hwhale#tublm.com(使用前将#替换为@)