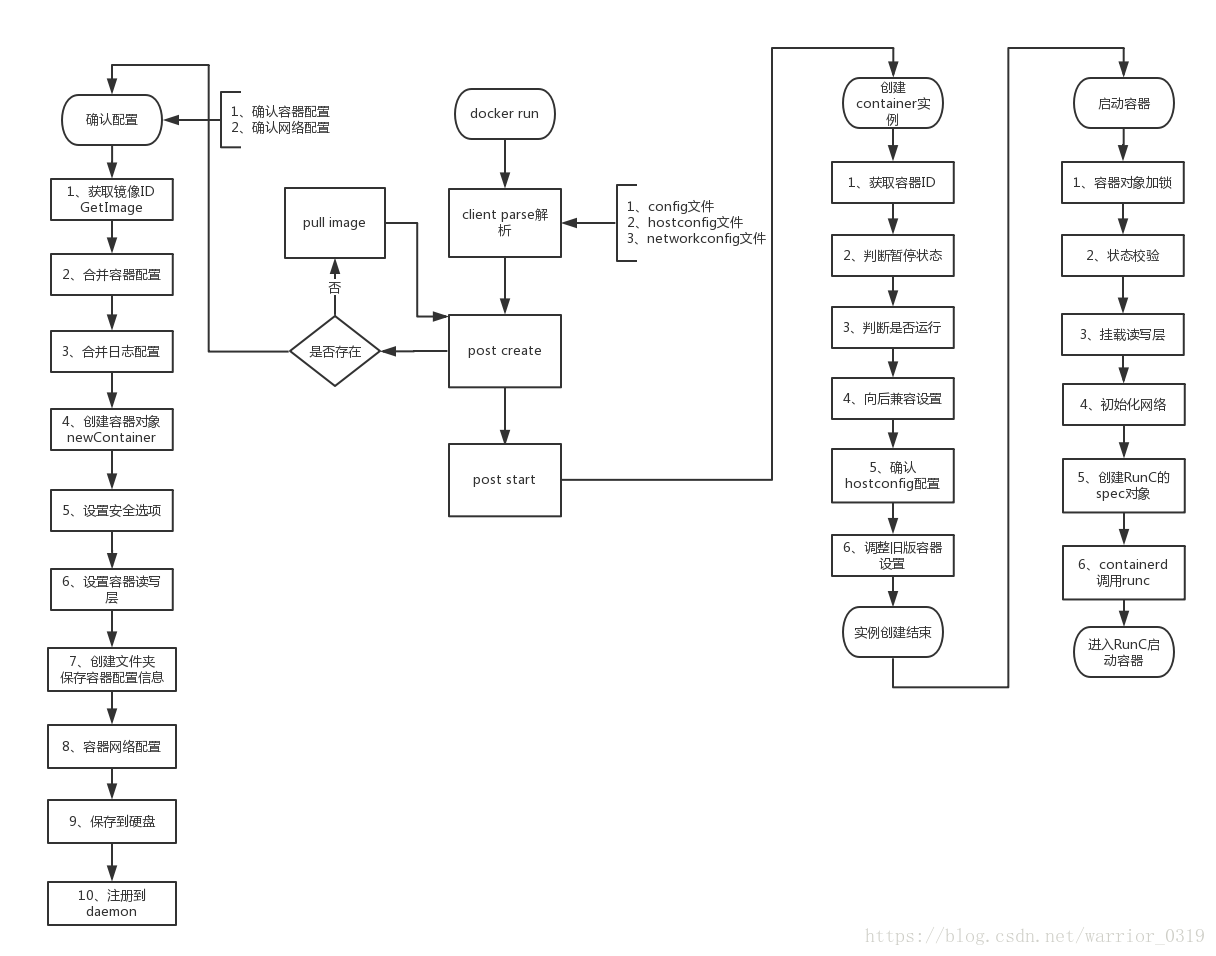
以运行 busybox容器为线索,跟踪docekr启动容器的过程,
vito@caas:~$ docker run -it busybox /bin/sh
1、docker 客户端解析
Docker client主要的工作是通过解析用户所提供的一系列参数后,docker的入口函数main,在入口函数中处理传入的参数,并把参数转化为cobra的command类型,最后通过cobra调用相应的方法。
/docker/api/client/container/run.go
// NewRunCommand create a new `docker run` command
func NewRunCommand(dockerCli *client.DockerCli) *cobra.Command {
var opts runOptions
var copts *runconfigopts.ContainerOptions
cmd := &cobra.Command{
Use: "run [OPTIONS] IMAGE [COMMAND] [ARG...]",
Short: "Run a command in a new container",
Args: cli.RequiresMinArgs(1),
RunE: func(cmd *cobra.Command, args []string) error {
copts.Image = args[0]
if len(args) > 1 {
copts.Args = args[1:]
}
return runRun(dockerCli, cmd.Flags(), &opts, copts)
},
}
客户端中预准备的步骤:
func runRun(dockerCli *client.DockerCli, flags *pflag.FlagSet, opts *runOptions, copts *runconfigopts.ContainerOptions) error {
stdout, stderr, stdin := dockerCli.Out(), dockerCli.Err(), dockerCli.In()
client := dockerCli.Client()
cmdPath := "run"
var (
flAttach *opttypes.ListOpts
ErrConflictAttachDetach = fmt.Errorf("Conflicting options: -a and -d")
ErrConflictRestartPolicyAndAutoRemove = fmt.Errorf("Conflicting options: --restart and --rm")
ErrConflictDetachAutoRemove = fmt.Errorf("Conflicting options: --rm and -d")
)
config, hostConfig, networkingConfig, err := runconfigopts.Parse(flags, copts)
fmt.Println('-----------print config:/n',config, hostConfig, networkingConfig)
分析:
config文件的结构定义在container包中,具体路径如下:
docker/vendor/github.com/docker/engine-api/types/container/config.go
docker/vendor/github.com/docker/engine-api/types/container/host_config.go
- container.Config :包含着容器的配置数据,主要是与主机无关的配置数据,比如hostname,user;默认omitempty设置,如果为空置则忽略字段。
type Config struct {
Hostname string
Domainname string
User string
AttachStdin bool
AttachStdout bool
AttachStderr bool
ExposedPorts map[nat.Port]struct{} `json:",omitempty"`
Tty bool
OpenStdin bool
StdinOnce bool
Env []string
Cmd strslice.StrSlice
Healthcheck *HealthConfig `json:",omitempty"`
ArgsEscaped bool `json:",omitempty"`
Image string
Volumes map[string]struct{}
WorkingDir string
Entrypoint strslice.StrSlice
NetworkDisabled bool `json:",omitempty"`
MacAddress string `json:",omitempty"`
OnBuild []string
Labels map[string]string
StopSignal string `json:",omitempty"`
StopTimeout *int `json:",omitempty"`
Shell strslice.StrSlice `json:",omitempty"`
}
- container.HostConfig: 与主机相关的配置信息。
type HostConfig struct {
    // Applicable to all platforms
    //从宿主机上绑定到容器的volume
    Binds []string // List of volume bindings for this container
    //用于写入容器ID的文件名
    ContainerIDFile string // File (path) where the containerId is written
    //配置容器的日志
    LogConfig LogConfig // Configuration of the logs for this container
    //容器的网络模式
    NetworkMode NetworkMode // Network mode to use for the container
    //容器绑定到宿主及的端口
    PortBindings nat.PortMap // Port mapping between the exposed port (container) and the host
    //容器退出是采取的重启策略
    RestartPolicy RestartPolicy // Restart policy to be used for the container
    //容器退出时是否自动移除容器
    AutoRemove   bool     // Automatically remove container when it exits
    VolumeDriver string   // Name of the volume driver used to mount volumes
    VolumesFrom  []string // List of volumes to take from other container

    // Applicable to UNIX platforms
    CapAdd          strslice.StrSlice // List of kernel capabilities to add to the container
    CapDrop         strslice.StrSlice // List of kernel capabilities to remove from the container
    DNS             []string          `json:"Dns"`        // List of DNS server to lookup
    DNSOptions      []string          `json:"DnsOptions"` // List of DNSOption to look for
    DNSSearch       []string          `json:"DnsSearch"`  // List of DNSSearch to look for
    ExtraHosts      []string          // List of extra hosts
    GroupAdd        []string          // List of additional groups that the container process will run as
    IpcMode         IpcMode           // IPC namespace to use for the container
    Cgroup          CgroupSpec        // Cgroup to use for the container
    Links           []string          // List of links (in the name:alias form)
    OomScoreAdj     int               // Container preference for OOM-killing
    PidMode         PidMode           // PID namespace to use for the container
    Privileged      bool              // Is the container in privileged mode
    PublishAllPorts bool              // Should docker publish all exposed port for the container
    ReadonlyRootfs  bool              // Is the container root filesystem in read-only
    SecurityOpt     []string          // List of string values to customize labels for MLS systems, such as SELinux.
    StorageOpt      map[string]string `json:",omitempty"` // Storage driver options per container.
    Tmpfs           map[string]string `json:",omitempty"` // List of tmpfs (mounts) used for the container
    UTSMode         UTSMode           // UTS namespace to use for the container
    UsernsMode      UsernsMode        // The user namespace to use for the container
    ShmSize         int64             // Total shm memory usage
    Sysctls         map[string]string `json:",omitempty"` // List of Namespaced sysctls used for the container
    Runtime         string            `json:",omitempty"` // Runtime to use with this container

    // Applicable to Windows
    ConsoleSize [2]int    // Initial console size
    Isolation   Isolation // Isolation technology of the container (eg default, hyperv)

    // Contains container's resources (cgroups, ulimits)
    Resources
}
- networktypes.NetworkingConfig:网络相关的配置。
- 其他的一些配置校验
其中最关键的两个步骤:create、start
创建容器的函数:
createResponse, err := createContainer(ctx, dockerCli, config, hostConfig, networkingConfig, hostConfig.ContainerIDFile, opts.name)
if err != nil {
reportError(stderr, cmdPath, err.Error(), true)
return runStartContainerErr(err)
}
运行容器的函数:
if err := client.ContainerStart(ctx, createResponse.ID, types.ContainerStartOptions{}); err != nil {
if attach {
cancelFun()
<-errCh
}
通过上面的分析我们可以看出,docker run 命令主要执行了两个操作,一个是docker create、另一个是docker start,
查看route,找到相应的方法对应的方法实现:
container 相关的 route地址:docker/api/server/router/container/container.go
func (r *containerRouter) initRoutes() {
    r.routes = []router.Route{
        // HEAD
        router.NewHeadRoute("/containers/{name:.*}/archive", r.headContainersArchive),
        // GET
        router.NewGetRoute("/containers/json", r.getContainersJSON),
        router.NewGetRoute("/containers/{name:.*}/export", r.getContainersExport),
        router.NewGetRoute("/containers/{name:.*}/changes", r.getContainersChanges),
        router.NewGetRoute("/containers/{name:.*}/json", r.getContainersByName),
        router.NewGetRoute("/containers/{name:.*}/top", r.getContainersTop),
        router.Cancellable(router.NewGetRoute("/containers/{name:.*}/logs", r.getContainersLogs)),
        router.Cancellable(router.NewGetRoute("/containers/{name:.*}/stats", r.getContainersStats)),
        router.NewGetRoute("/containers/{name:.*}/attach/ws", r.wsContainersAttach),
        router.NewGetRoute("/exec/{id:.*}/json", r.getExecByID),
        router.NewGetRoute("/containers/{name:.*}/archive", r.getContainersArchive),
        // POST
        router.NewPostRoute("/containers/create", r.postContainersCreate),
        router.NewPostRoute("/containers/{name:.*}/kill", r.postContainersKill),
        router.NewPostRoute("/containers/{name:.*}/pause", r.postContainersPause),
        router.NewPostRoute("/containers/{name:.*}/unpause", r.postContainersUnpause),
        router.NewPostRoute("/containers/{name:.*}/restart", r.postContainersRestart),
        router.NewPostRoute("/containers/{name:.*}/start", r.postContainersStart),
        router.NewPostRoute("/containers/{name:.*}/stop", r.postContainersStop),
        router.NewPostRoute("/containers/{name:.*}/wait", r.postContainersWait),
        router.NewPostRoute("/containers/{name:.*}/resize", r.postContainersResize),
        router.NewPostRoute("/containers/{name:.*}/attach", r.postContainersAttach),
        router.NewPostRoute("/containers/{name:.*}/copy", r.postContainersCopy), // Deprecated since 1.8, Errors out since 1.12
        router.NewPostRoute("/containers/{name:.*}/exec", r.postContainerExecCreate),
        router.NewPostRoute("/exec/{name:.*}/start", r.postContainerExecStart),
        router.NewPostRoute("/exec/{name:.*}/resize", r.postContainerExecResize),
        router.NewPostRoute("/containers/{name:.*}/rename", r.postContainerRename),
        router.NewPostRoute("/containers/{name:.*}/update", r.postContainerUpdate),
        // PUT
        router.NewPutRoute("/containers/{name:.*}/archive", r.putContainersArchive),
        // DELETE
        router.NewDeleteRoute("/containers/{name:.*}", r.deleteContainers),
    }
其中
create对应的handler:postContainersCreate
start对应的handler:postContainersStart
下面对两个过程逐个分析:
2、docker create 分析
这阶段Docker daemon的主要工作是对client提交的POST表单进行分析整理,获得config配置和hostconfig配置。然后daemon会调用daemon.newContainer函数来创建一个基本的container对象,并将config和hostconfig中保存的信息填写到container对象中。当然此时的container对象并不是一个具体的物理容器,它其中保存着所有用户指定的参数和Docker生成的一些默认的配置信息。最后,Docker会将container对象进行JSON编码,然后保存到其对应的状态文件中。
首先我们分析postContainersCreate方法,如下:
func (s *containerRouter) postContainersCreate(ctx context.Context, w http.ResponseWriter, r *http.Request, vars map[string]string) error {
if err := httputils.ParseForm(r); err != nil {
return err
}
if err := httputils.CheckForJSON(r); err != nil {
return err
}
name := r.Form.Get("name")
config, hostConfig, networkingConfig, err := s.decoder.DecodeConfig(r.Body)
fmt.Println("服务器端接收到的配置信息 config:\n", config, "\n---------------hostConfig\n", hostConfig, "\n------------networkingConfig:\n", networkingConfig)
if err != nil {
return err
}
version := httputils.VersionFromContext(ctx)
adjustCPUShares := versions.LessThan(version, "1.19")
validateHostname := versions.GreaterThanOrEqualTo(version, "1.24")
ccr, err := s.backend.ContainerCreate(types.ContainerCreateConfig{
Name: name,
Config: config,
HostConfig: hostConfig,
NetworkingConfig: networkingConfig,
AdjustCPUShares: adjustCPUShares,
}, validateHostname)
if err != nil {
return err
}
return httputils.WriteJSON(w, http.StatusCreated, ccr)
}
分析代码可知,每一类操作都是定义了接口,方法调用的时候直接使用的接口调用,然后在daemon包中再具体实现接口,container的接口定义文件:/docker/api/server/router/container/backend.go
type stateBackend interface {
    ContainerCreate(config types.ContainerCreateConfig, validateHostname bool) (types.ContainerCreateResponse, error)
    ContainerKill(name string, sig uint64) error
    ContainerPause(name string) error
    ContainerRename(oldName, newName string) error
    ContainerResize(name string, height, width int) error
    ContainerRestart(name string, seconds int) error
    ContainerRm(name string, config *types.ContainerRmConfig) error
    ContainerStart(name string, hostConfig *container.HostConfig, validateHostname bool) error
    ContainerStop(name string, seconds int) error
    ContainerUnpause(name string) error
    ContainerUpdate(name string, hostConfig *container.HostConfig, validateHostname bool) ([]string, error)
    ContainerWait(name string, timeout time.Duration) (int, error)
}
在daemon包中找到ContainerCreate该接口的实现:
源代码路径:/docker/daemon/create.go
func (daemon *Daemon) ContainerCreate(params types.ContainerCreateConfig, validateHostname bool) (types.ContainerCreateResponse, error) {
    return daemon.containerCreate(params, false, validateHostname)
}
我们分析containerCreate方法,经过几个配置确认工作,开始创建容器,创建容器方法中经过一系列的操作完成了容器的创建过程,总结下来,主要做的事情有以下几步:
- 获取镜像ID GetImage
- 合并容器配置
- 合并日志配置
- 创建容器对象 newContainer
- 设置安全选项
- 设置容器读写层
- 创建文件夹保存容器配置信息
- 容器网络配置
- 保存到硬盘
- 注册到daemon
首先是在创建容器以前的确认工作分别,对配置文件中定义的容器工作目录、容器端口、容器hostname、容器网络等信息进行了确认,如该没问题开始下面的创建工作:
下面逐个分析每一步做了那些工作:
1、 获取镜像ID GetImage
通过镜像的名字,获取完整的镜像ID,然后使用该镜像ID获得完整的镜像结构体,用于以后创建容器
if params.Config.Image != "" {
img, err = daemon.GetImage(params.Config.Image)
if err != nil {
return nil, err
}
imgID = img.ID()
}
2. 将用户指定的config参数与镜像中json文件中的config参数合并并验证
方法如下:
    if err := daemon.mergeAndVerifyConfig(params.Config, img); err != nil {
        return nil, err
    }
主要做的工作是,初始化容器的一些配置,比如环境变量,主机名称等,如果在启动的时候传入的参数包含这些配置,例如在启动的时候设置了环境变量,在这个方法中会合并启动命令中的参数和镜像里面的参数,把镜像中的默认配置写入到配置文件中,对比写入前后的数据,以下是用命令docker run -e aaa=bb -h hosttest busybox 命令的前后对比结果:
-----------------合并配置前params:
 &{hosttest   false false false map[] false false false [aaa=bbb] [] <nil> false busybox map[]  [] false  [] map[]  <nil> []}
 &{[]  { map[]} default map[] {no 0} false  [] [] [] [] [] [] [] []   [] 0  false false false [] map[] map[]   67108864 map[] runc [0 0]  {0 0  0 [] [] [] [] [] 0 0   [] 0 0 0 0 0xc421096e60 0xc421096e6a 0 [] 0 0 0 0}}
 &{map[]}
-----------------合并配置后params:
 &{hosttest   false false false map[] false false false [aaa=bbb PATH=/usr/local/sbin:/usr/local/bin:/usr/sbin:/usr/bin:/sbin:/bin] [sh] <nil> true busybox map[]  [] false  [] map[]  <nil> []}
 &{[]  {json-file map[]} default map[] {no 0} false  [] [] [] [] [] [] [] []   [] 0  false false false [] map[] map[]   67108864 map[] runc [0 0]  {0 0  0 [] [] [] [] [] 0 0   [] 0 0 0 0 0xc421096e60 0xc421096e6a 0 [] 0 0 0 0}}
 &{map[]}
3. 将用户指定的log config参数与镜像中json文件中的config参数合并并验证 ??
如该容器的日志选项没有配置,该方法将会把daemon 中的默认日志配置合并到容器中,具体细节有待进一步深入分析
4. 创建新的container对象
初始化一个容器的结构体newContainer,包含基本的信息,比如容器名称、配置文件结构体、对应的镜像ID等:
    if container, err = daemon.newContainer(params.Name, params.Config, imgID, managed); err != nil {
        return nil, err
    }
同时设置一些安全选项和存储选项的配置到container结构体,setSecurityOptions、StorageOpt
5. 设置安全选项??
6. 创建容器的读写层:
    if err := daemon.setRWLayer(container); err != nil {
        return nil, err
    }
7. 创建文件夹,用于保存容器的配置信息
在/var/lib/docker/containers/id下:
获取rootUID, rootGID,并创建容器文件夹保存容器的配置信息:
if err := idtools.MkdirAs(container.Root, 0700, rootUID, rootGID); err != nil {
return nil, err
}
if err := daemon.setHostConfig(container, params.HostConfig); err != nil {
return nil, err
}
8. 更新容器网络配置,并保存到硬盘
    if err := daemon.updateContainerNetworkSettings(container, endpointsConfigs); err != nil {
        return nil, err
    }
9. 最后注册该容器到docker daemon
把容器的id加入到docker daemon 中,容器创建完成。
待研究问题:docker Security :/media/vito/code/golang/src/docker/daemon/daemon_unix.go
3、docker start 分析
还是从docker daemon 收到请求的route路由开始梳理:
/docker/api/server/router/container/container.go文件下,找到start容器的API路由,
router.NewPostRoute(“/exec/{name:.*}/start”, r.postContainerExecStart)
我们从postContainerExecStart开始追踪,我们从postContainerExecStart中能够找到start容器对应的接口是ContainerExecStart,下一步是在daemon中找到该接口的实现。
    if err := s.backend.ContainerStart(vars["name"], hostConfig, validateHostname); err != nil {
        return err
    }
找到ContainerStart接口的daemon包实现:/docker/daemon/start.go
func (daemon *Daemon) ContainerStart(name string, hostConfig *containertypes.HostConfig, validateHostname bool) error {
    container, err := daemon.GetContainer(name)
    if err != nil {
        return err
    }
然后检查一些配置和状态,例如是否运行、是否暂停等,确认hostconfig与当前系统配置是否一致。最后执行函数containerStart,开始启动容器,具体函数如下:
func (daemon *Daemon) containerStart(container *container.Container) (err error)
下面我们仔细分析容器启动过程,主要由两步来完成,第一步是创建container 实例;第二部是启动容器,我们逐步分析:
第一步,创建container实例过程:
1. 实例化容器对象
因为前面已经创建完成了container,所有这里使用查找方法查找container,查找方式可以是完整的container ID,完整的container 名称或者ID的前缀。返回一个container 对象。
container, err := daemon.GetContainer(name)
if err != nil {
return err
}
2. 判断暂停状态
if container.IsPaused() {
return fmt.Errorf("Cannot start a paused container, try unpause instead.")
}
3. 判断是否运行
if container.IsRunning() {
err := fmt.Errorf("Container already started")
return errors.NewErrorWithStatusCode(err, http.StatusNotModified)
}
4. 向后兼容设置
主要针对非windows系统
5. 确认hostconfig配置
if _, err = daemon.verifyContainerSettings(container.HostConfig, nil, false, validateHostname); err != nil {
return err
}
- 调整旧版容器设置
if err := daemon.adaptContainerSettings(container.HostConfig, false); err != nil {
return err
}
linuxMinCPUShares = 2
linuxMaxCPUShares = 262144
platformSupported = true
主要是cpu、内存限制的校验和设置
7. 创建结束,返回container对象
8. 开始进入启动容器函数
- 容器对象加锁
container.Lock()
defer container.Unlock()
- 状态校验,如该已经运行,直接返回
if container.Running {
return nil
}
- 挂载读写层
返回挂载的路径,一般是:
设置container.BaseFS为该路径
    dir, err := container.RWLayer.Mount(container.GetMountLabel())
    if err != nil {
        return err
    }
初始化网络
首先验证网络模型是否是正确的值,然后设置网络模式,保存到container对象中,最后设置hostname
创建RunC的spec对象
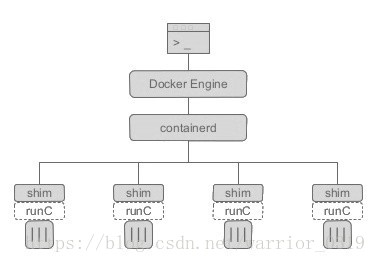
containerd 调用runc
- 进入RunC启动容器
4、runc过程解析
看runc的源代码:
//初始化了一个APP,设置了APP都有那些command, 然后执行app.Run 看一下app.Run()函数:
func main() {
    app := cli.NewApp()
    app.Name = "runc"
    app.Usage = usage
...
...
    app.Commands = []cli.Command{
        checkpointCommand,
        createCommand,
        deleteCommand,
        eventsCommand,
        execCommand,
        initCommand,
        killCommand,
        listCommand,
        pauseCommand,
        psCommand,
        restoreCommand,
        resumeCommand,
        runCommand,
        specCommand,
        startCommand,
        stateCommand,
        updateCommand,
    }
接下来看一下app.Run()函数:
/runc/vendor/github.com/urfave/cli/app.go
func (a *App) Run(arguments []string) (err error) {
    a.Setup()

    // parse flags
    set := flagSet(a.Name, a.Flags)
    set.SetOutput(ioutil.Discard)
    err = set.Parse(arguments[1:])
    nerr := normalizeFlags(a.Flags, set)
    context := NewContext(a, set, nil)
    ...
    ...
    args := context.Args()
    if args.Present() {
        name := args.First()
        c := a.Command(name)
        if c != nil {
            return c.Run(context)
        }
    }
下面 name=args.First()获取到的就是create、restore、run等。接下来调用HandleAction(a.Action, context) 会调用到 create对应的cli.command的Action函数,我们先看一下cli.command 的createCommand函数的定义
/runc/utils_linux.go
func startContainer(context *cli.Context, spec *specs.Spec, action CtAct, criuOpts *libcontainer.CriuOpts) (int, error) {
id := context.Args().First()
if id == "" {
return -1, errEmptyID
}
notifySocket := newNotifySocket(context, os.Getenv("NOTIFY_SOCKET"), id)
if notifySocket != nil {
notifySocket.setupSpec(context, spec)
}
container, err := createContainer(context, id, spec)
if err != nil {
return -1, err
}
最终在以下函数中运行容器
func (r *runner) run(config *specs.Process) (int, error) {
    if err := r.checkTerminal(config); err != nil {
        r.destroy()
        return -1, err
    }
    process, err := newProcess(*config)
    if err != nil {
        r.destroy()
        return -1, err
    }
本文内容由网友自发贡献,版权归原作者所有,本站不承担相应法律责任。如您发现有涉嫌抄袭侵权的内容,请联系:hwhale#tublm.com(使用前将#替换为@)