1.control_auto()
说完control_manual,接下来我们在看看control_auto。control_auto是用来处理自动控制的函数,即把航线任务转换为期望位置。函数位于Mc_pos_control-mian.cpp的1089行。
首先,如果函数的_mode_auto是第一次启动,那么就要进行初始化,重置xy位置期望值和高度期望值,如果无人机位于固定翼模式,也要重置xy位置期望值和高度期望值,毕竟该文件是用于处理多轴的位置控制。然后根据标志位重置位置,高度期望值。
	/* reset position setpoint on AUTO mode activation or if we are not in MC mode */
	if (!_mode_auto || !_vehicle_status.is_rotary_wing) {
		if (!_mode_auto) {
			_mode_auto = true;
		}

		_reset_pos_sp = true;
		_reset_alt_sp = true;
	}

	// Always check reset state of altitude and position control flags in auto
	reset_pos_sp();
	reset_alt_sp();
然后更新任务期望值,如果当前的任务期望值的lat,lon,alt不是合理数字,就认为认为是无效的(基本不会触发)。
	//Poll position setpoint
	bool updated;
	orb_check(_pos_sp_triplet_sub, &updated);

	if (updated) {
		orb_copy(ORB_ID(position_setpoint_triplet), _pos_sp_triplet_sub, &_pos_sp_triplet);

		//Make sure that the position setpoint is valid
		if (!PX4_ISFINITE(_pos_sp_triplet.current.lat) ||
		    !PX4_ISFINITE(_pos_sp_triplet.current.lon) ||
		    !PX4_ISFINITE(_pos_sp_triplet.current.alt)) {
			_pos_sp_triplet.current.valid = false;
		}
	}
然后当前任务的经纬度转化为x,y坐标,这个坐标有一个原点,原点就是_ref_pos这个变量代表的经纬度,它也是PX4的EKF的原点,一般都位于刚上电时无人机的位置所在的位置。z坐标直接由任务高度(相对于原点的高度)计算绝对高度,然后将x,y,z坐标赋值给变量curr_sp。同样的,计算无人机上一个任务所代表的x,y,z坐标,赋值给变量prev_sp。
	bool current_setpoint_valid = false;
	bool previous_setpoint_valid = false;

	math::Vector<3> prev_sp;
	math::Vector<3> curr_sp;

	if (_pos_sp_triplet.current.valid) {

		/* project setpoint to local frame */
		map_projection_project(&_ref_pos,
				       _pos_sp_triplet.current.lat, _pos_sp_triplet.current.lon,
				       &curr_sp.data[0], &curr_sp.data[1]);
		curr_sp(2) = -(_pos_sp_triplet.current.alt - _ref_alt);

		if (PX4_ISFINITE(curr_sp(0)) &&
		    PX4_ISFINITE(curr_sp(1)) &&
		    PX4_ISFINITE(curr_sp(2))) {
			current_setpoint_valid = true;
		}
	}

	if (_pos_sp_triplet.previous.valid) {
		map_projection_project(&_ref_pos,
				       _pos_sp_triplet.previous.lat, _pos_sp_triplet.previous.lon,
				       &prev_sp.data[0], &prev_sp.data[1]);
		prev_sp(2) = -(_pos_sp_triplet.previous.alt - _ref_alt);

		if (PX4_ISFINITE(prev_sp(0)) &&
		    PX4_ISFINITE(prev_sp(1)) &&
		    PX4_ISFINITE(prev_sp(2))) {
			previous_setpoint_valid = true;
		}
	}
如果当前位置期望点有效且当前任务不是IDLE任务(空闲任务),首先获取巡航速度,也可以称为最大速度,默认是5m/s。如果飞行任务设置了巡航速度,那么就采用任务中的巡航速度。然后将使用位置控制的比例系数P除以巡航速度得到scale,然后再用当前期望位置乘上系数scale得到当前期望位置的缩放curr_sp_s。意思是,当飞机对应的距离误差是多少,飞机会以巡航速度飞行时,当巡航速度为5m/s,位置控制P为1时,对应的距离是5/1=5m,然后代码就是把当前期望位置缩放,再把上一期望点的位置也缩放,当飞机与当前期望位置的距离为1时(经过缩放了,实际是5m),对应的期望速度就达到了5m/s,距离再大就没有意义了,因为速度受到了限制,此时就可以把期望位置点设在飞机位置与当前期望位置的连线中的某一点。
	if (current_setpoint_valid &&
	    (_pos_sp_triplet.current.type != position_setpoint_s::SETPOINT_TYPE_IDLE)) {

		/* scaled space: 1 == position error resulting max allowed speed */

		math::Vector<3> cruising_speed = _params.vel_cruise;

		if (PX4_ISFINITE(_pos_sp_triplet.current.cruising_speed) &&
		    _pos_sp_triplet.current.cruising_speed > 0.1f) {
			cruising_speed(0) = _pos_sp_triplet.current.cruising_speed;
			cruising_speed(1) = _pos_sp_triplet.current.cruising_speed;
		}

		math::Vector<3> scale = _params.pos_p.edivide(cruising_speed);

		/* convert current setpoint to scaled space */
		math::Vector<3> curr_sp_s = curr_sp.emult(scale);

		/* by default use current setpoint as is */
		math::Vector<3> pos_sp_s = curr_sp_s;
然后如果任务是位置任务和跟随任务,把就要根据过去任务期望位置值与现在任务期望位置值直接的连线计算当前的期望位置值。比如,我要从1点飞到2点,两个位置相差10公里,我们不可能把2点与1点的位置直接作差求期望速度,我们最希望的方法是无人机稳稳的压着1点和2点的连线飞(有风干扰,实际是锯齿线一样的飞行),所以每次都要根据无人机的实际位置来计算它的期望位置,让无人机能回到1点和2点的连线上,最后能沿着这条连线飞到2点上。
然后当上一期望点与当前期望点的距离大于0.01m时,计算当前位置的缩放pos_s,过去任务位置的缩放prev_sp_s,当前任务位置与过去任务位置的连线的向量的缩放prev_curr_s,当前位置与当前任务的连线的向量的缩放curr_pos_s。
		if ((_pos_sp_triplet.current.type == position_setpoint_s::SETPOINT_TYPE_POSITION  ||
		     _pos_sp_triplet.current.type == position_setpoint_s::SETPOINT_TYPE_FOLLOW_TARGET) &&
		    previous_setpoint_valid) {

			/* follow "previous - current" line */

			if ((curr_sp - prev_sp).length() > MIN_DIST) {

				/* find X - cross point of unit sphere and trajectory */
				math::Vector<3> pos_s = _pos.emult(scale);
				math::Vector<3> prev_sp_s = prev_sp.emult(scale);
				math::Vector<3> prev_curr_s = curr_sp_s - prev_sp_s;
				math::Vector<3> curr_pos_s = pos_s - curr_sp_s;
				float curr_pos_s_len = curr_pos_s.length();
然后,如果无人机距离当前任务的期望小于1时(经过缩放后),就加入前馈让无人机更快过当前任务的期望点,更快的切换到下一个任务点,从下列代码可以看出,期望位置加前馈得到的点位于过去任务期望点到当前任务期望点的连线延长线上。
				if (curr_pos_s_len < 1.0f) {
					/* copter is closer to waypoint than unit radius */
					/* check next waypoint and use it to avoid slowing down when passing via waypoint */
					if (_pos_sp_triplet.next.valid) {
						math::Vector<3> next_sp;
						map_projection_project(&_ref_pos,
								       _pos_sp_triplet.next.lat, _pos_sp_triplet.next.lon,
								       &next_sp.data[0], &next_sp.data[1]);
						next_sp(2) = -(_pos_sp_triplet.next.alt - _ref_alt);

						if ((next_sp - curr_sp).length() > MIN_DIST) {
							math::Vector<3> next_sp_s = next_sp.emult(scale);

							/* calculate angle prev - curr - next */
							math::Vector<3> curr_next_s = next_sp_s - curr_sp_s;
							math::Vector<3> prev_curr_s_norm = prev_curr_s.normalized();

							/* cos(a) * curr_next, a = angle between current and next trajectory segments */
							float cos_a_curr_next = prev_curr_s_norm * curr_next_s;

							/* cos(b), b = angle pos - curr_sp - prev_sp */
							float cos_b = -curr_pos_s * prev_curr_s_norm / curr_pos_s_len;

							if (cos_a_curr_next > 0.0f && cos_b > 0.0f) {
								float curr_next_s_len = curr_next_s.length();

								/* if curr - next distance is larger than unit radius, limit it */
								if (curr_next_s_len > 1.0f) {
									cos_a_curr_next /= curr_next_s_len;
								}

								/* feed forward position setpoint offset */
								math::Vector<3> pos_ff = prev_curr_s_norm *
											 cos_a_curr_next * cos_b * cos_b * (1.0f - curr_pos_s_len) *
											 (1.0f - expf(-curr_pos_s_len * curr_pos_s_len * 20.0f));
								pos_sp_s += pos_ff;
							}
						}
					}
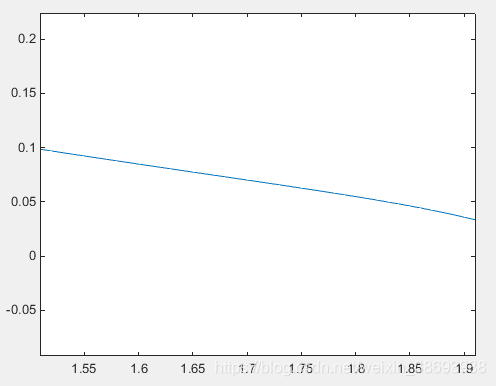
用MATLAB仿真得到的轨迹图如下(过去任务[1,0,0],当前任务[2,0,0],下一任务[3,3,0],当前无人机位置[1.5,0.1,0])
上面是无人机已经比较靠近当前任务的期望点的时候的计算,当无人机还在上一任务期望点的时候,此时飞控刚切换完任务,执行代码如下
else {
					bool near = cross_sphere_line(pos_s, 1.0f, prev_sp_s, curr_sp_s, pos_sp_s);
程序调用了cross_sphere_line函数,那么我们看下这个函数又在背后干了什么。
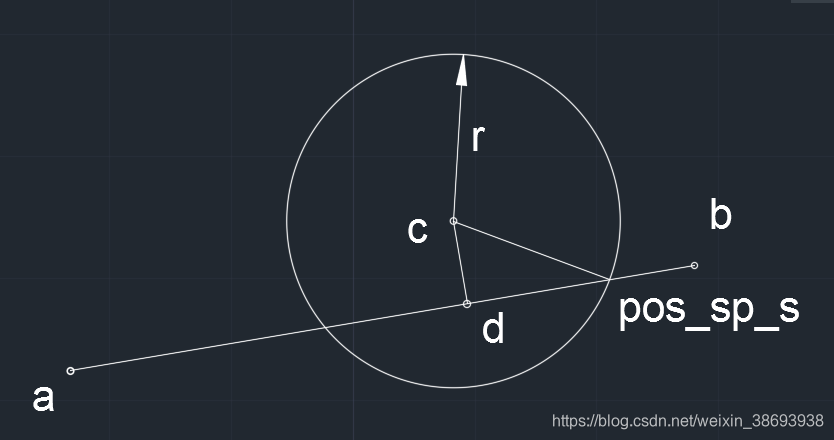
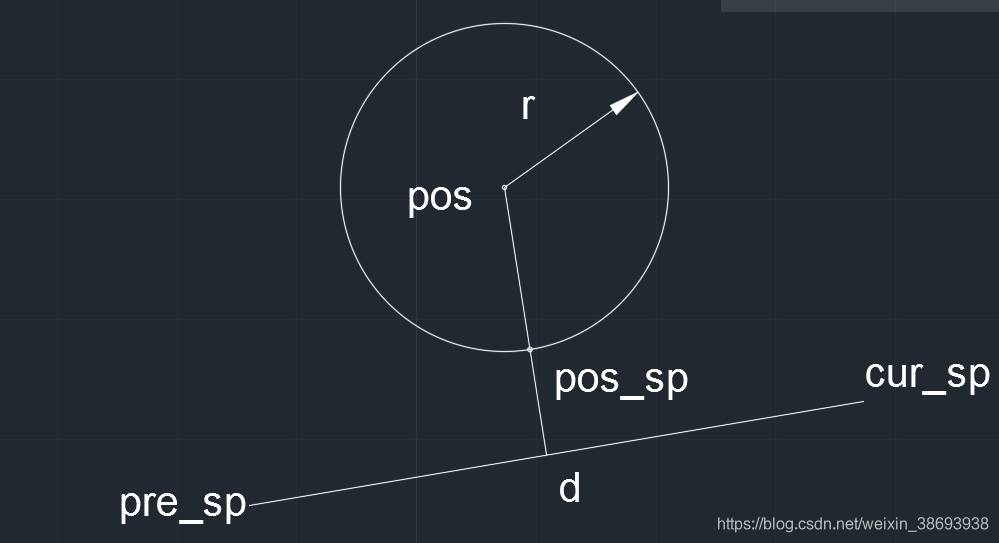
首先,计算点a(过去任务的期望点),点b(当前任务的期望点)的距离ab_norm,然后把该向量归一化,求向量d,d是向量ab连线上离点c(无人机实际位置)最近的点,即dc⊥ab,且d是ab上的点。cd_len是cd的长度,sphere_r是圆心为c的圆的半径,可以从上面的代码看到,它是1。
如果这个半径大于cd_len,即向量ab与以c(实际无人机的位置)为圆心,sphere_r为半径的圆有交点。然后计算dx_len,即点d到ab向量与圆的交点x的距离。然后又可以分为两种情况。
1.bc点乘ab_norm大于0,此时,b点位于无人机的后面,所以直接采用b点作为期望位置。
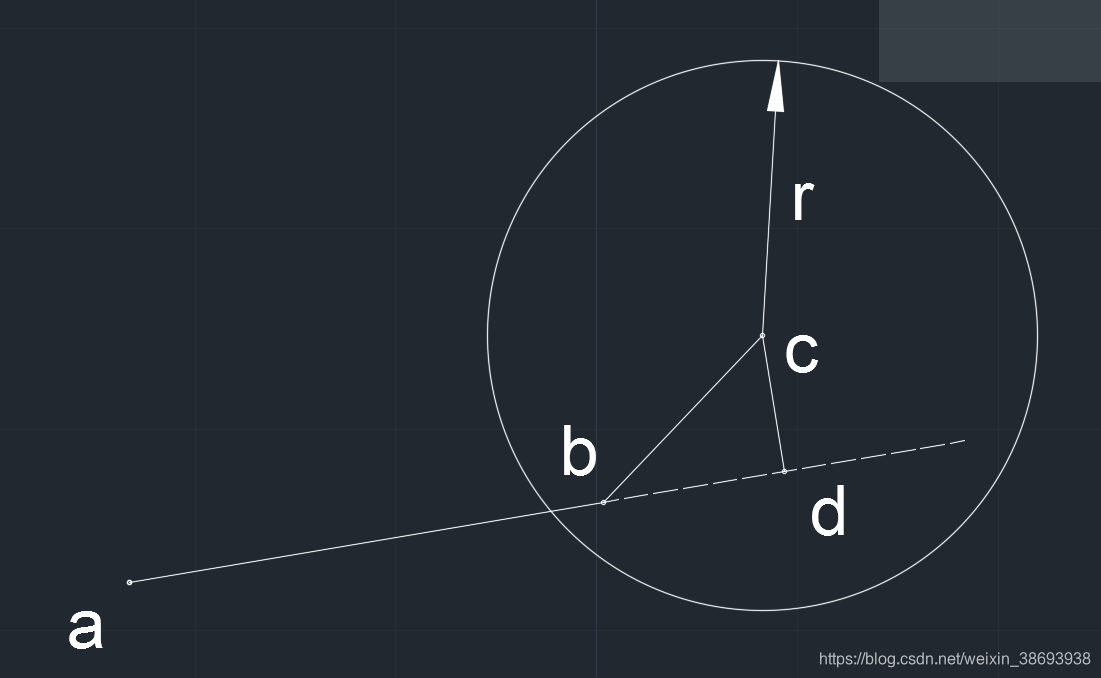
2.除1以外的所有情况,这个时候,期望位置点就是圆与ab的交点靠近b的那个点。
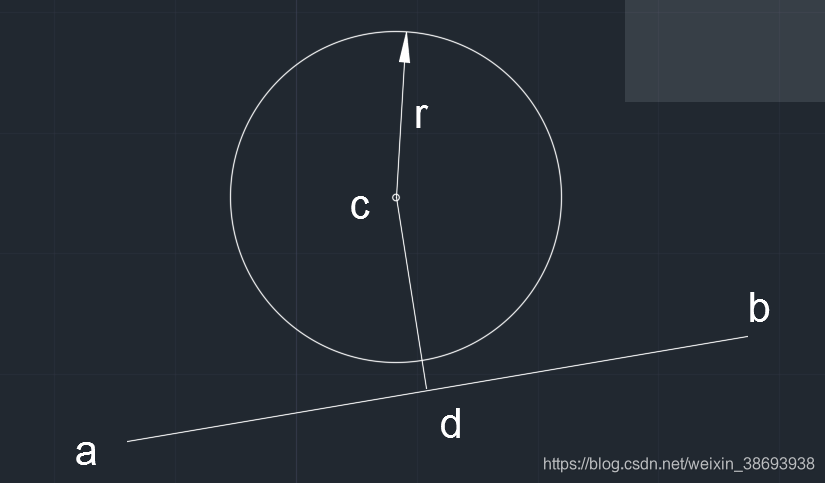
如果cd_len比这个半径要大
1.正常情况,那么直接采用点d。
2.在a之前,采用点a。
3.在b之后,采用点b。
最后都要返回false。
bool
MulticopterPositionControl::cross_sphere_line(const math::Vector<3> &sphere_c, float sphere_r,
		const math::Vector<3> line_a, const math::Vector<3> line_b, math::Vector<3> &res)
{
	/* project center of sphere on line */
	/* normalized AB */
	math::Vector<3> ab_norm = line_b - line_a;
	ab_norm.normalize();
	math::Vector<3> d = line_a + ab_norm * ((sphere_c - line_a) * ab_norm);
	float cd_len = (sphere_c - d).length();

	if (sphere_r > cd_len) {
		/* we have triangle CDX with known CD and CX = R, find DX */
		float dx_len = sqrtf(sphere_r * sphere_r - cd_len * cd_len);

		if ((sphere_c - line_b) * ab_norm > 0.0f) {
			/* target waypoint is already behind us */
			res = line_b;

		} else {
			/* target is in front of us */
			res = d + ab_norm * dx_len; // vector A->B on line
		}

		return true;

	} else {
		/* have no roots, return D */
		res = d; /* go directly to line */

		/* previous waypoint is still in front of us */
		if ((sphere_c - line_a) * ab_norm < 0.0f) {
			res = line_a;
		}

		/* target waypoint is already behind us */
		if ((sphere_c - line_b) * ab_norm > 0.0f) {
			res = line_b;
		}

		return false;
	}
}
如果返回的是false,那么在control_auto里面,会对其进计算,取期望位置与实际位置之间连线上的点,该点到实际位置的距离为1(都是缩放过的)。
					if (!near) {
						/* we're far away from trajectory, pos_sp_s is set to the nearest point on the trajectory */
						pos_sp_s = pos_s + (pos_sp_s - pos_s).normalized();
					}
然后求上一个使用的位置期望值的缩放,上一个位置期望与当前位置期望的距离不能超过1,如果超过了,就对其进行缩小。
	/* move setpoint not faster than max allowed speed */
		math::Vector<3> pos_sp_old_s = _pos_sp.emult(scale);

		/* difference between current and desired position setpoints, 1 = max speed */
		math::Vector<3> d_pos_m = (pos_sp_s - pos_sp_old_s).edivide(_params.pos_p);
		float d_pos_m_len = d_pos_m.length();

		if (d_pos_m_len > dt) {
			pos_sp_s = pos_sp_old_s + (d_pos_m / d_pos_m_len * dt).emult(_params.pos_p);
		}

		/* scale result back to normal space */
		_pos_sp = pos_sp_s.edivide(scale);
如果需要更新航向值,那么就更新航向值。如果是起飞任务或者是留待任务,当无人机与任务期望位置点较近的时候,不允许进行位置,高度期望点的重置,因为起飞任务需要切换到位置控制。
		/* update yaw setpoint if needed */

		if (_pos_sp_triplet.current.yawspeed_valid
		    && _pos_sp_triplet.current.type == position_setpoint_s::SETPOINT_TYPE_FOLLOW_TARGET) {
			_att_sp.yaw_body = _att_sp.yaw_body + _pos_sp_triplet.current.yawspeed * dt;

		} else if (PX4_ISFINITE(_pos_sp_triplet.current.yaw)) {
			_att_sp.yaw_body = _pos_sp_triplet.current.yaw;
		}

		/*
		 * if we're already near the current takeoff setpoint don't reset in case we switch back to posctl.
		 * this makes the takeoff finish smoothly.
		 */
		if ((_pos_sp_triplet.current.type == position_setpoint_s::SETPOINT_TYPE_TAKEOFF
		     || _pos_sp_triplet.current.type == position_setpoint_s::SETPOINT_TYPE_LOITER)
		    && _pos_sp_triplet.current.acceptance_radius > 0.0f
		    /* need to detect we're close a bit before the navigator switches from takeoff to next waypoint */
		    && (_pos - _pos_sp).length() < _pos_sp_triplet.current.acceptance_radius * 1.2f) {
			_do_reset_alt_pos_flag = false;

			/* otherwise: in case of interrupted mission don't go to waypoint but stay at current position */

		} else {
			_do_reset_alt_pos_flag = true;
		}
最后,进行起落架的升起与降下,在起飞,降落时,起落架是放下的,在过航线点的时候,起落架是升起的。
		// During a mission or in loiter it's safe to retract the landing gear.
		if ((_pos_sp_triplet.current.type == position_setpoint_s::SETPOINT_TYPE_POSITION ||
		     _pos_sp_triplet.current.type == position_setpoint_s::SETPOINT_TYPE_LOITER) &&
		    !_vehicle_land_detected.landed) {
			_att_sp.landing_gear = 1.0f;

			// During takeoff and landing, we better put it down again.

		} else if (_pos_sp_triplet.current.type == position_setpoint_s::SETPOINT_TYPE_TAKEOFF ||
			   _pos_sp_triplet.current.type == position_setpoint_s::SETPOINT_TYPE_LAND) {
			_att_sp.landing_gear = -1.0f;

		} else {
			// For the rest of the setpoint types, just leave it as is.
		}

	} else {
		/* no waypoint, do nothing, setpoint was already reset */
	}
}
本文内容由网友自发贡献,版权归原作者所有,本站不承担相应法律责任。如您发现有涉嫌抄袭侵权的内容,请联系:hwhale#tublm.com(使用前将#替换为@)