参考:使用OpenCV检测图像中的矩形_知来者逆的博客-CSDN博客_opencv检测图像中的矩形
1.得到原始图像之后,代码处理的步骤是:
(1)滤波增强边缘。
(2)分离图像通道,并检测边缘。
(3) 提取轮廓。
(4)使用图像轮廓点进行多边形拟合。
(5)计算轮廓面积并得到矩形4个顶点。
(6)求轮廓边缘之间角度的最大余弦。
(7)画出矩形。
一、首先介绍几个本文用到的函数:
1、mixChannels()函数
用途:用于将输入数组的指定通道复制到输出数组的指定通道。
mixChannels()参数说明:
void mixChannels(
const Mat* src, //输入数组或向量矩阵,所有矩阵的大小和深度必须相同。
size_t nsrcs, //矩阵的数量
Mat* dst, //输出数组或矩阵向量,大小和深度必须与src[0]相同
size_t ndsts,//矩阵的数量
const int* fromTo,//指定被复制通道与要复制到的位置组成的索引对
size_t npairs //fromTo中索引对的数目
);
示例:HSV通道获取
在HSV颜色空间中:
色相 (Hue):代表色彩。取 0 到 360 度的数值来衡量(红-黄-绿-青-蓝-洋红)。
饱和度 (Saturation):又称色度,指色彩的深浅,饱和度代表灰色与色调的比例,并以 0% (灰色) 到 100% (完全饱和) 来衡量;S = 0时只有灰度。
色调 (Value):色彩的明亮程度。V=1。它包含RGB模型中的R=1,G=1,B=1 三个面,所代表的颜色较亮。
利用mixChannels()函数通过复制指定通道可以看到HSV颜色空间下的三个通道的具体情况。
#include<opencv2/opencv.hpp>
using namespace cv;
int main()
{
Mat src, hsv, dst;
src = imread("1.jpg");
if (src.empty())
{
printf("can not load image \n");
return -1;
}
namedWindow("input", WINDOW_AUTOSIZE);
imshow("input", src);
cvtColor(src, hsv, COLOR_BGR2HSV);
dst.create(hsv.size(), hsv.depth());
//分离Hue/色相通道
int ch[] = {0, 0};
mixChannels(&hsv, 1, &dst, 1, ch, 1);
imshow("H channel", dst);
//分离Saturation/饱和度通道
int ch1[] = {1, 0};
mixChannels(&hsv, 1, &dst, 1, ch1, 1);
imshow("S channel", dst);
//分离Value/色调通道
int ch2[] = {2, 0};
mixChannels(&hsv, 1, &dst, 1, ch2, 1);
imshow("V channel", dst);
waitKey(0);
return 0;
}
2、approxPolyDP 多边拟合函数
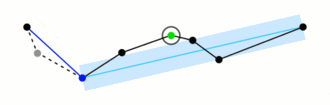
approxPolyDP 主要功能是把一个连续光滑曲线折线化,对图像轮廓点进行多边形拟合。
原理图:对比之前黑点连线,之后蓝色连线:
参数详解;
void approxPolyDP(
InputArray curve, //一般是由图像的轮廓点组成的点集
OutputArray approxCurve, //表示输出的多边形点集
double epsilon, //主要表示输出的精度,就是另个轮廓点之间最大距离数,5,6,7,,8,,,,,
bool closed //表示输出的多边形是否封闭
)
示例:
#include <opencv2/opencv.hpp>
#include <stdio.h>
#include <stdlib.h>
#include <iostream>


using namespace cv;
using namespace std;


	Mat img = imread("F:/project/jushi/ellipse_detector-sdk/images/04_00010.bmp", -1);

	//Mat img = imread("4.jpg", -1);
	pyrDown(img, img, Size(img.cols / 2, img.rows / 2), 4);
	imshow("img", img); imwrite("img.jpg", img);

	//通过canny算法找轮廓,这样 findcontours 的结果会好些
	Mat canny_out;
	Canny(img, canny_out, 45, 127, 3, false);
	imshow("canny_out", canny_out); imwrite("canny_out.jpg", canny_out);

	//寻找轮廓
	vector<vector<Point>> contours;
	vector<Vec4i> hierachy;
	findContours(canny_out, contours, hierachy, RETR_TREE, CV_CHAIN_APPROX_SIMPLE, Point(-1, -1));
	drawContours(img, contours, -1, Scalar(0, 0, 255), 1, 8, hierachy);

	//定义圆形、方形、旋转矩形、椭圆的存储容器
	vector<vector<Point>> contours_ploy(contours.size());
	vector<Rect> rects_ploy(contours.size());
	vector<Point2f> circle_centers(contours.size());
	vector<float> circle_radius(contours.size());
	vector<RotatedRect> RotatedRect_ploy;//注意:由于下面赋值的过程中有个点数大于5的条件,所以这里没有直接初始化,才有下面pushback的方法添加值。
	vector<RotatedRect> ellipse_ploy;//注意,这里是画椭圆,但是容器类型是 RotatedRect

	//将结果放到各自的容器中
	for (size_t i = 0; i < contours.size(); i++)
	{

		approxPolyDP(contours[i], contours_ploy[i], 5, true);
		rects_ploy[i] = boundingRect(contours_ploy[i]);
		minEnclosingCircle(contours_ploy[i], circle_centers[i], circle_radius[i]);

		if (contours_ploy[i].size() > 5)
		{

				RotatedRect temp1 = minAreaRect(contours_ploy[i]);
			RotatedRect_ploy.push_back(temp1);

			RotatedRect temp2 = fitEllipse(contours_ploy[i]);
			ellipse_ploy.push_back(temp2);
		}
	}

	//定义最终绘图的图片
	Mat draw_rect(img.size(), img.type(), Scalar::all(0)),
		draw_rotateRect(img.size(), img.type(), Scalar::all(0)),
		draw_circle(img.size(), img.type(), Scalar::all(0)),
		draw_ellipse(img.size(), img.type(), Scalar::all(0));

	//绘图圆形、矩形
	RNG rng(12345);
	for (size_t i = 0; i < contours.size(); i++)
	{

			Scalar color = Scalar(rng.uniform(0, 255), rng.uniform(0, 255), rng.uniform(0, 255));
		rectangle(draw_rect, rects_ploy[i], color, 1, 8);
		circle(draw_circle, circle_centers[i], circle_radius[i], color, 1, 8);
	}
	imshow("draw_rect", draw_rect); imwrite("draw_rect.jpg", draw_rect);
	imshow("draw_circle", draw_circle); imwrite("draw_circle.jpg", draw_circle);

	//绘图椭圆形、旋转矩形
	Point2f pot[4];
	for (size_t i = 0; i < ellipse_ploy.size(); i++)
	{

			Scalar color = Scalar(rng.uniform(0, 255), rng.uniform(0, 255), rng.uniform(0, 255));
		ellipse(draw_ellipse, ellipse_ploy[i], color, 1, 8);

		RotatedRect_ploy[i].points(pot);
		for (int j = 0; j < 4; j++)
		{
			 line(draw_rotateRect, pot[j], pot[(j + 1) % 4], color);
		}
	}
	imshow("draw_ellipse", draw_ellipse); imwrite("draw_ellipse.jpg", draw_ellipse);
	imshow("draw_rotateRect", draw_rotateRect); imwrite("draw_rotateRect.jpg", draw_rotateRect);


	waitKey();
3、 多边形绘制polylines()
参数详解:
void cv::polylines ( Mat & img, //作为画布的矩阵
const Point *const * pts, //折线顶点数组
const int * npts, //折线顶点个数
int ncontours, //待绘制折线数
bool isClosed, //是否是闭合折线(多边形)
const Scalar & color, //折线的颜色
int thickness = 1, //折线粗细
int lineType = LINE_8, //线段类型
int shift = 0 //缩放比例(0是不缩放,4是1/4)
)
二、矩形检测实现源码
本文矩形检测代码来自于(我爱计算机公众号):https://mp.weixin.qq.com/s/WV78mvRn-cYm11cL4l2ScA
分享的开源代码地址:https://github.com/alyssaq/opencv
其算法流程:
1.中值滤波去噪;
2.依次提取不同的颜色通道(BGR)检测矩形;
3.对每一通道使用canny检测边缘或者使用多个阈值二值化;
4.使用findContours函数查找轮廓;
5.使用approxPolyDP函数去除多边形轮廓一些小的波折;
6.找到同时满足面积较大和形状为凸的四边形;
7.判断轮廓中两两邻接直线夹角余弦是否小于0.3(意味着角度在90度附近),是则此四边形为找到的矩形。
该代码效果还是不错的!
依赖于OpenCV,代码和本文的原版代码基本一致,原版可能更通用:
// The "Square Detector" program.
// It loads several images sequentially and tries to find squares in
// each image
//“矩形检测”程序。
//它按顺序加载了几张图像,并试图找到正方形

#include "opencv2/core/core.hpp"
#include "opencv2/imgproc/imgproc.hpp"
#include "opencv2/highgui/highgui.hpp"

#include <iostream>
#include <math.h>
#include <string.h>

using namespace cv;
using namespace std;


int thresh = 50, N = 5;
const char* wndname = "Square Detection Demo";

// helper function:
// finds a cosine of angle between vectors
// from pt0->pt1 and from pt0->pt2
//辅助功能:
//求出向量夹角的余弦
//从pt0->pt1到pt0->pt2
static double angle(Point pt1, Point pt2, Point pt0)
{
    double dx1 = pt1.x - pt0.x;
    double dy1 = pt1.y - pt0.y;
    double dx2 = pt2.x - pt0.x;
    double dy2 = pt2.y - pt0.y;
    return (dx1*dx2 + dy1 * dy2) / sqrt((dx1*dx1 + dy1 * dy1)*(dx2*dx2 + dy2 * dy2) + 1e-10);
}

// returns sequence of squares detected on the image.
// the sequence is stored in the specified memory storage
//返回在图像上检测到的正方形序列。
//序列存储在指定的内存中
static void findSquares(const Mat& image, vector<vector<Point> >& squares)
{
    squares.clear();

    //Mat pyr, timg, gray0(image.size(), CV_8U), gray;
    //down-scale and upscale the image to filter out the noise
    //按比例放大图像,滤除噪声
    //pyrDown(image, pyr, Size(image.cols/2, image.rows/2));
    //pyrUp(pyr, timg, image.size());


    // blur will enhance edge detection
    //中值滤波将增强边缘检测
    Mat timg(image);
    medianBlur(image, timg, 9);
    Mat gray0(timg.size(), CV_8U), gray;

    vector<vector<Point> > contours;

    // find squares in every color plane of the image
    //在图像的每个颜色平面上找到正方形
    for (int c = 0; c < 3; c++)
    {
        int ch[] = { c, 0 };
        mixChannels(&timg, 1, &gray0, 1, ch, 1);//将输入数组的指定通道复制到输出数组的指定通道

        // try several threshold levels
        //尝试几个阈值级别
        for (int l = 0; l < N; l++)
        {
            // hack: use Canny instead of zero threshold level.
            // Canny helps to catch squares with gradient shading
            // Canny帮助捕捉带有渐变阴影的正方形
            if (l == 0)
            {
                // apply Canny. Take the upper threshold from slider
                // and set the lower to 0 (which forces edges merging)
                Canny(gray0, gray, 5, thresh, 5);
                // dilate canny output to remove potential
                // holes between edge segments
                dilate(gray, gray, Mat(), Point(-1, -1));
            }
            else
            {
                // apply threshold if l!=0:
                // tgray(x,y) = gray(x,y) < (l+1)*255/N ? 255 : 0
                gray = gray0 >= (l + 1) * 255 / N;
            }

            // find contours and store them all as a list
            findContours(gray, contours, RETR_LIST, CHAIN_APPROX_SIMPLE);

            vector<Point> approx;

            // test each contour
            for (size_t i = 0; i < contours.size(); i++)
            {
                // approximate contour with accuracy proportional
                // to the contour perimeter
                //近似轮廓与精度成正比
                //到轮廓周长
                approxPolyDP(Mat(contours[i]), approx, arcLength(Mat(contours[i]), true)*0.02, true);

                // square contours should have 4 vertices after approximation
                // relatively large area (to filter out noisy contours)
                // and be convex.
                // Note: absolute value of an area is used because
                // area may be positive or negative - in accordance with the
                // contour orientation
                if (approx.size() == 4 &&
                    fabs(contourArea(Mat(approx))) > 1000 &&
                    isContourConvex(Mat(approx)))  //凸性检测 检测一个曲线是不是凸的
                {
                    double maxCosine = 0;

                    for (int j = 2; j < 5; j++)
                    {
                        // find the maximum cosine of the angle between joint edges
                        double cosine = fabs(angle(approx[j % 4], approx[j - 2], approx[j - 1]));
                        maxCosine = MAX(maxCosine, cosine);
                    }

                    // if cosines of all angles are small
                    // (all angles are ~90 degree) then write quandrange
                    // vertices to resultant sequence
                    if (maxCosine < 0.3)
                        squares.push_back(approx);
                }
            }
        }
    }
}


// the function draws all the squares in the image
static void drawSquares(Mat& image, const vector<vector<Point> >& squares)
{
    for (size_t i = 0; i < squares.size(); i++)
    {
        const Point* p = &squares[i][0];

        int n = (int)squares[i].size();
        //dont detect the border
        if (p->x > 3 && p->y > 3)
            polylines(image, &p, &n, 1, true, Scalar(0, 0, 255), 3, LINE_AA);
    }
    imshow(wndname, image);
}


int main(int /*argc*/, char** /*argv*/)
{
    static const char* names[] = { "./image/2stickies.jpg", "./image/manyStickies.jpg",0 };
    help();
    namedWindow(wndname, 1);
    vector<vector<Point> > squares;

    for (int i = 0; names[i] != 0; i++)
    {
        Mat image = imread(names[i], 1);
        if (image.empty())
        {
            cout << "Couldn't load " << names[i] << endl;
            continue;
        }

        findSquares(image, squares);
        drawSquares(image, squares);
        imwrite( "out.jpg", image );
        int c = waitKey();
        if ((char)c == 27)
            break;
    }
    return 0;
}
原版矩形检测
1.OpenCV没有内置的矩形检测的函数,如果想检测矩形,要自己去实现。
2.我这里使用的OpenCV版本是3.30.
矩形检测
1.得到原始图像之后,代码处理的步骤是:
(1)滤波增强边缘。
(2)分离图像通道,并检测边缘。
(3) 提取轮廓。
(4)使用图像轮廓点进行多边形拟合。
(5)计算轮廓面积并得到矩形4个顶点。
(6)求轮廓边缘之间角度的最大余弦。
(7)画出矩形。
2.代码
//检测矩形
//第一个参数是传入的原始图像,第二是输出的图像。
static double angle(Point pt1, Point pt2, Point pt0)
{
	double dx1 = pt1.x - pt0.x;
	double dy1 = pt1.y - pt0.y;
	double dx2 = pt2.x - pt0.x;
	double dy2 = pt2.y - pt0.y;
	return (dx1*dx2 + dy1 * dy2) / sqrt((dx1*dx1 + dy1 * dy1)*(dx2*dx2 + dy2 * dy2) + 1e-10);
}
int main(int argc, char** argv)
{
	//检测矩形
	//第一个参数是传入的原始图像,第二是输出的图像。
	/*void findSquares(const Mat& image, Mat &out)
	{*/
	Mat image = imread("F:/project/jushi/ellipse_detector-sdk/images/04_00010.bmp", IMREAD_COLOR);

		int thresh = 50, N = 5;
		vector<vector<Point> > squares;
		squares.clear();

		Mat src, dst, gray_one, gray,out;

		src = image.clone();
		out = image.clone();
		gray_one = Mat(src.size(), CV_8U);
		//滤波增强边缘检测
		medianBlur(src, dst, 9);
		//bilateralFilter(src, dst, 25, 25 * 2, 35);

		vector<vector<Point> > contours;
		vector<Vec4i> hierarchy;

		//在图像的每个颜色通道中查找矩形
		for (int c = 0; c < image.channels(); c++)
		{
			int ch[] = { c, 0 };

			//通道分离
			mixChannels(&dst, 1, &gray_one, 1, ch, 1);

			// 尝试几个阈值
			for (int l = 0; l < N; l++)
			{
				// 用canny()提取边缘
				if (l == 0)
				{
					//检测边缘
					Canny(gray_one, gray, 5, thresh, 5);
					//膨脹
					dilate(gray, gray, Mat(), Point(-1, -1));
					imshow("dilate", gray);
				}
				else
				{
					gray = gray_one >= (l + 1) * 255 / N;
				}

				// 轮廓查找
				//findContours(gray, contours, RETR_CCOMP, CHAIN_APPROX_SIMPLE);
				findContours(gray, contours, hierarchy, RETR_CCOMP, CHAIN_APPROX_SIMPLE);

				vector<Point> approx;

				// 检测所找到的轮廓
				for (size_t i = 0; i < contours.size(); i++)
				{
					//使用图像轮廓点进行多边形拟合
					approxPolyDP(Mat(contours[i]), approx, arcLength(Mat(contours[i]), true)*0.02, true);

					//计算轮廓面积后,得到矩形4个顶点
					if (approx.size() == 4 && fabs(contourArea(Mat(approx))) > 1000 && isContourConvex(Mat(approx)))
					{
						double maxCosine = 0;

						for (int j = 2; j < 5; j++)
						{
							// 求轮廓边缘之间角度的最大余弦
							double cosine = fabs(angle(approx[j % 4], approx[j - 2], approx[j - 1]));
							maxCosine = MAX(maxCosine, cosine);
						}

						if (maxCosine < 0.3)
						{
							squares.push_back(approx);
						}
					}
				}
			}
		}


		for (size_t i = 0; i < squares.size(); i++)
		{
			const Point* p = &squares[i][0];

			int n = (int)squares[i].size();
			if (p->x > 3 && p->y > 3)
			{
				polylines(out, &p, &n, 1, true, Scalar(0, 255, 0), 3, LINE_AA);
			}
		}
		imshow("dst", out);
		waitKey(0);
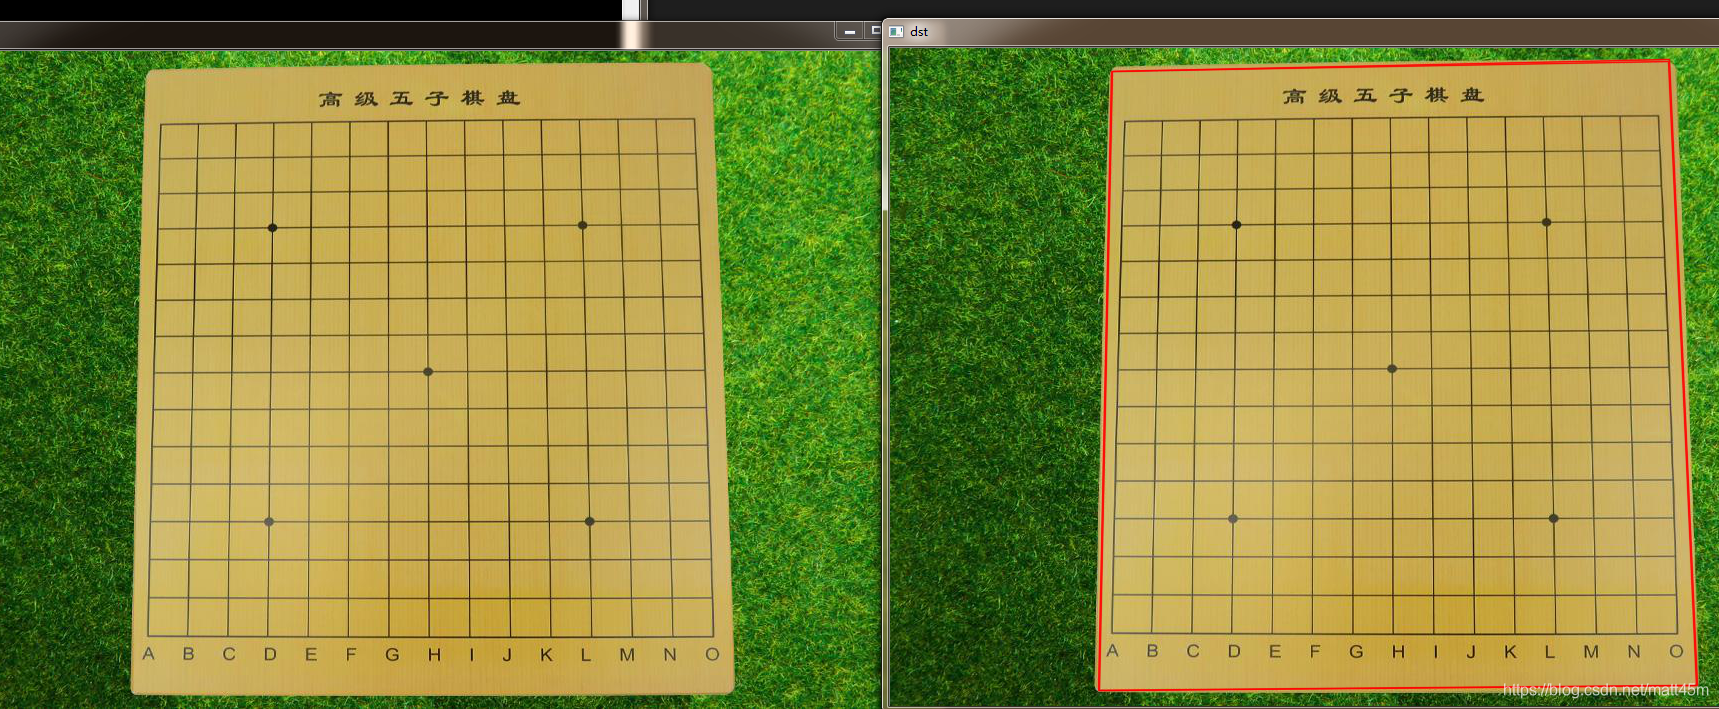
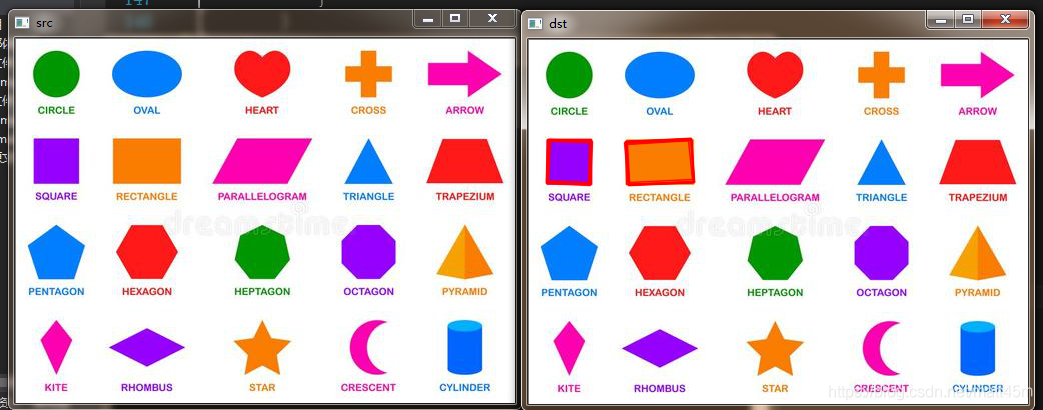
3.运行结果
————————————————
版权声明:本文为CSDN博主「知来者逆」的原创文章,遵循CC 4.0 BY-SA版权协议,转载请附上原文出处链接及本声明。
原文链接:https://blog.csdn.net/matt45m/article/details/95753563
本文内容由网友自发贡献,版权归原作者所有,本站不承担相应法律责任。如您发现有涉嫌抄袭侵权的内容,请联系:hwhale#tublm.com(使用前将#替换为@)