之前运行的样本是未进行过样本增强的
做出来多少样本就使用了多少样本来进行训练
这里复盘一下样本训练结果
首先是道路
使用512512分辨率的16461张标签和16461张原图进行训练
接下来是水体
使用512512分辨率的11503张标签和11503张原图进行训练
然后看看进行了样本增强后
iou有什么变化
样本旋转
首先是对道路样本进行样本旋转处理
这里的代码我参考了这位博主的文章
先尝试了旋转的问题
比如这一段代码
for img_name in os.listdir(file_dir):
img_path = file_dir + img_name
img = cv2.imread(img_path)
flipped_img = flip(img)
cv2.imwrite(savedir +img_name[0:-4] + '_flip'+img_name[-4:], flipped_img)
看起来貌似没什么问题
但运行的时候
他的图片路径是不对的
报错
[ WARN:0@5.871] global D:\a\opencv-python\opencv-python\opencv\modules\imgcodecs\src\loadsave.cpp (239) cv::findDecoder imread_(‘C:\Users\Administrator\Desktop\testad01_mask.png’): can’t open/read file: check file path/integrity
Traceback (most recent call last):
File “c:/Users/Administrator/Desktop/DeepGlobe-Road-Extraction-link34/addpic.py”, line 50, in
flipped_img = flip(img)
File “c:/Users/Administrator/Desktop/DeepGlobe-Road-Extraction-link34/addpic.py”, line 26, in flip
flipped_image = np.fliplr(image)
File “<array_function internals>”, line 6, in fliplr
可以很明显的看到
图片的路径是不对的
他这样写出来是这样的
‘C:\Users\Administrator\Desktop\testad01_mask.png’
但其实我的图片路径应该是这样的
‘C:\Users\Administrator\Desktop\test\ad01_mask.png’
于是需要对代码进行如下的修改
第一种读取图片的方式
for img_name in os.listdir(file_dir):
img_path = os.path.join(file_dir, img_name)
img = cv2.imread(img_path)
rotated_90 = rotate(img, 90)
cv2.imwrite(savedir +'\\'+ img_name[0:-4] + '_r90'+img_name[-4:], rotated_90)
rotated_180 = rotate(img, 180)
cv2.imwrite(savedir +'\\'+ img_name[0:-4] + '_r180'+img_name[-4:], rotated_180)
第二种直接粗暴
for img_name in os.listdir(file_dir):
img_path = file_dir +'\\' + img_name
img = cv2.imread(img_path)
flipped_img = flip(img)
cv2.imwrite(savedir +'\\'+img_name[0:-4] + '_flip'+img_name[-4:], flipped_img)
但是这样生成出来的命名并不是我想要的
后缀还是要样本_mask.
影像_sat.
所以对代码进行一些修改
最后旋转样本的代码如下
"""
Created on Wed July 31 23:44:15 2022
@author:Laney_Midory
csdn:Laney_Midory
"""
import cv2
import numpy as np
import os
import os.path
def rotate(image, angle, center=None, scale=1.0):
(h, w) = image.shape[:2]
if center is None:
center = (w / 2, h / 2)
m = cv2.getRotationMatrix2D(center, angle, scale)
rotated = cv2.warpAffine(image, m, (w, h))
return rotated
def flip(image):
flipped_image = np.fliplr(image)
return flipped_image
file_dir = r"C:\Users\Administrator\Desktop\train-road"
savedir=r"C:\Users\Administrator\Desktop\change"
for img_name in os.listdir(file_dir):
img_path = os.path.join(file_dir, img_name)
img = cv2.imread(img_path)
fname, ext = os.path.splitext(img_path)
base_name = os.path.basename(fname)
base_name = base_name.split('_')
rotated_90 = rotate(img, 90)
cv2.imwrite(savedir +'\\'+base_name[0] +'r90_'+base_name[1]+ext, rotated_90)
rotated_180 = rotate(img, 180)
cv2.imwrite(savedir +'\\'+base_name[0] +'r180_'+base_name[1]+ext, rotated_180)
print("finish ratate 90 and 180!")
for img_name in os.listdir(file_dir):
img_path = file_dir +'\\' + img_name
img = cv2.imread(img_path)
fname, ext = os.path.splitext(img_path)
base_name = os.path.basename(fname)
base_name = base_name.split('_')
flipped_img = flip(img)
cv2.imwrite(savedir +'\\'+base_name[0] +'flip_'+base_name[1]+ext, flipped_img)
print("finish flip!")
我使用上述的代码对我裁剪并且经过筛选之后的道路样本进行旋转
之前一共是有32922张
旋转之后数量直接翻倍
有98766张
跑旋转代码完成的速度还是挺快的
一会就把三万多张照片都旋转完成了
加起来就有十万多的样本了
131688
我天
这样一训练得训练多久。。。
但是我打算试试看训练一下
看结果有什么变化
于是在这里就等待一下更新吧
可能训练的会挺久的
多增加了20个G的数据
缓慢传输中
好吧
传了半天(1小时)卡死了。。。

转过去了
79079张。。。
导致电脑一直很卡
所以为了快速得出结果
我决定先增加10000张来试试效果
样本总数43240

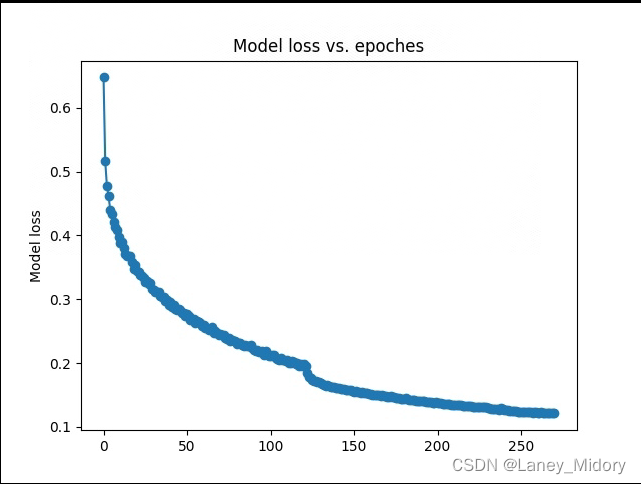
开始训练时间:
2022.8.1 16:46
于2022年8月3日14:40训练完成
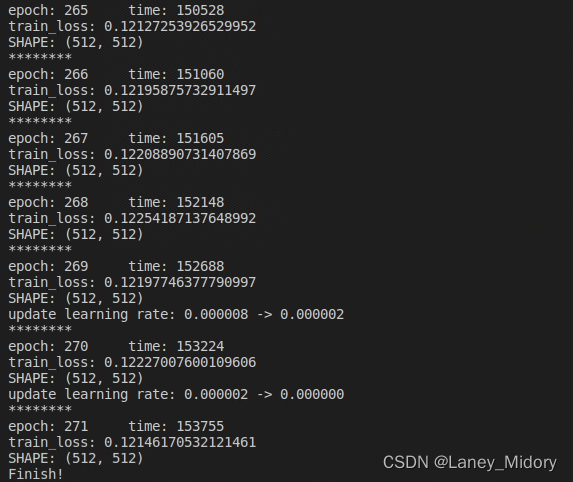
损失率为
接下来使用该训练结果进行相同的验证和测试
为了统计时间我增加了一个记录时间的函数
import datatime来进行时间的输出
输出时间
我试了几个输出时间的库
发现还是这个库最简单
首先引入库
import datetime
时间输出
time = datetime.datetime.now().strftime('%Y-%m-%d %H:%M:%S')
输出时间
print(time)
这样就可以成功输出时间啦
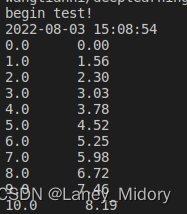
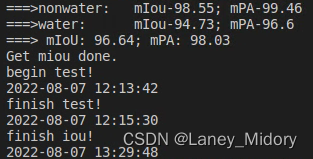
开始测试的时间为2022.8.3 15:08:54
开始测试!!看看结果
在之前的基础上增加了!!有效果!!!
换了一批测试影像
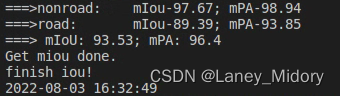
结果有所提高!!
道路貌似到这里效果就已经不错了
添加噪声和亮度貌似都可以先放放
于是我打算先去试试河流样本能否通过样本旋转达到接近90的iou
河流使用旋转代码后
我从中选择了30868张图片作为增强样本
加上本来有的23006张
因此这次选择的水体样本一共有53874张
开始训练
但是我在制作样本的时候出了点问题
水体我在跑完旋转代码后出现了标签与原图不对应的问题
搞得我焦头烂额
弄了一晚上和一早上 加上本来Ubuntu系统远程运行有些卡顿
效率贼低
最后还是没法用Ubuntu系统进行图片筛选
只能用windows系统运行好了再传输过去
我还增加了一个筛选标签与原图是否对应的代码
由于图片量巨大
使用该代码
可以保证图片是一一对应的
"""
Created on Fri Aug 4 21:54:50 2022
@author:Laney_Midory
csdn:Laney_Midory
"""
import os
import shutil
filePath = r"C:\Users\Administrator\Desktop\2"
new_path= r"C:\Users\Administrator\Desktop"
tif_names = filter(lambda x: x.find('tif')!=-1, os.listdir(filePath))
for file in tif_names:
img = os.path.join(filePath, file)
fname, ext = os.path.splitext(img)
base_name = os.path.basename(fname)
base_name = base_name.split('_')
if not os.path.isfile(filePath+'\\'+base_name[0]+'_mask.png'):
print('该标签无对应原始影像:"'+file+'"')
shutil.move(filePath+'\\'+file,new_path+'\\'+file)
print("检查完成")
对于水体
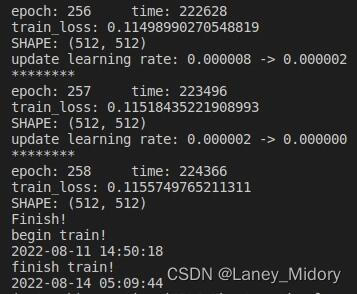
训练结束:
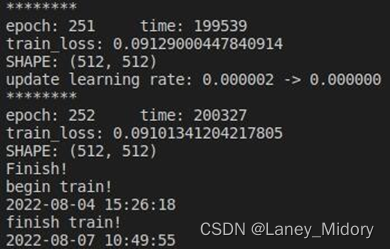
记录训练的时间
训练了三天得到了结果
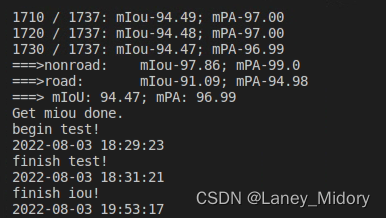
现在开始进行验证
验证结果也不错
成功使水体达到了90以上
为样本增加噪声
也是参考上面的代码进行添加噪声的操作
这里我的代码如下
也是进行了相同的修改
"""
Created on Wed July 31 23:44:15 2022
@author:Laney_Midory
csdn:Laney_Midory
"""
import cv2
import numpy as np
import os
import os.path
def SaltAndPepper(src,percetage):
SP_NoiseImg=src.copy()
SP_NoiseNum=int(percetage*src.shape[0]*src.shape[1])
for i in range(SP_NoiseNum):
randR=np.random.randint(0,src.shape[0]-1)
randG=np.random.randint(0,src.shape[1]-1)
randB=np.random.randint(0,3)
if np.random.randint(0,1)==0:
SP_NoiseImg[randR,randG,randB]=0
else:
SP_NoiseImg[randR,randG,randB]=255
return SP_NoiseImg
def addGaussianNoise(image,percetage):
G_Noiseimg = image.copy()
w = image.shape[1]
h = image.shape[0]
G_NoiseNum=int(percetage*image.shape[0]*image.shape[1])
for i in range(G_NoiseNum):
temp_x = np.random.randint(0,h)
temp_y = np.random.randint(0,w)
G_Noiseimg[temp_x][temp_y][np.random.randint(3)] = np.random.randn(1)[0]
return G_Noiseimg
file_dir = r"F:\deepl\clip-road"
savedir=r"F:\deepl\clip-road-noise"
for img_name in os.listdir(file_dir):
img_path = os.path.join(file_dir, img_name)
img = cv2.imread(img_path)
fname, ext = os.path.splitext(img_path)
base_name = os.path.basename(fname)
base_name = base_name.split('_')
img_salt = SaltAndPepper(img, 0.3)
cv2.imwrite(savedir +'\\'+base_name[0] + 'salt_'+base_name[1]+ext, img_salt)
img_gauss = addGaussianNoise(img, 0.3)
cv2.imwrite(savedir +'\\'+base_name[0] +'noise_'+base_name[1]+ext, img_gauss)
print("finish add noise!")
print("finish!")
这样可以直接成功运行
只是
跑的速度太慢了!!!
跑了一早上大概2小时吧
只跑了一万张!!!
确实增加噪声是修改图片的像素值
因此确实慢
只能慢慢等待了
这样修改样本使得样本数量急剧增加
因此并不能全部放进去训练
会导致过拟合的问题
因此我打算直接对旋转后的一万数量的样本进行噪声和后续的改变亮度步骤
等了差不都六个小时才把三万张影像加入了噪声
太慢了!!
改变样本亮度
代码如下
"""
Created on Wed July 31 23:44:15 2022
@author:Laney_Midory
csdn:Laney_Midory
"""
import cv2
import numpy as np
import os
import os.path
def darker(image,percetage=0.9):
image_copy = image.copy()
w = image.shape[1]
h = image.shape[0]
for xi in range(0,w):
for xj in range(0,h):
image_copy[xj,xi,0] = int(image[xj,xi,0]*percetage)
image_copy[xj,xi,1] = int(image[xj,xi,1]*percetage)
image_copy[xj,xi,2] = int(image[xj,xi,2]*percetage)
return image_copy
def brighter(image, percetage=1.5):
image_copy = image.copy()
w = image.shape[1]
h = image.shape[0]
for xi in range(0,w):
for xj in range(0,h):
image_copy[xj,xi,0] = np.clip(int(image[xj,xi,0]*percetage),a_max=255,a_min=0)
image_copy[xj,xi,1] = np.clip(int(image[xj,xi,1]*percetage),a_max=255,a_min=0)
image_copy[xj,xi,2] = np.clip(int(image[xj,xi,2]*percetage),a_max=255,a_min=0)
return image_copy
file_dir = r"F:\deepl\clip-road"
savedir=r"F:\deepl\clip-road-noise"
for img_name in os.listdir(file_dir):
img_path = os.path.join(file_dir, img_name)
img = cv2.imread(img_path)
fname, ext = os.path.splitext(img_path)
base_name = os.path.basename(fname)
base_name = base_name.split('_')
img_darker = darker(img)
cv2.imwrite(savedir +'\\'+base_name[0] + 'darker_'+base_name[1]+ext, img_darker)
img_brighter = brighter(img)
cv2.imwrite(savedir +'\\'+base_name[0] + 'brighter_'+base_name[1]+ext, img_brighter)
blur = cv2.GaussianBlur(img, (7, 7), 1.5)
cv2.imwrite(savedir +'\\'+base_name[0] + 'blur_'+base_name[1]+ext,blur)
print("finish change bright!")
print("finish!")
上面的实验是只修改了样本的方向
对样本进行了旋转
这里再继续增加样本关于噪声和亮度的改变
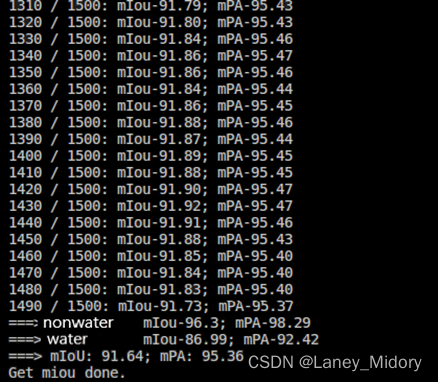
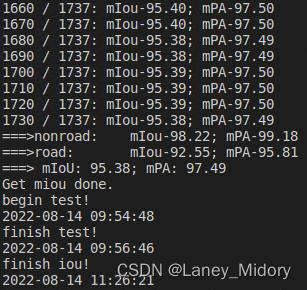
对于水体
增加了20116张改变了的样本
训练样本一共73990张
损失率

训练的时间还是比较长
整整训练了四天

测试结果比之前还高
达到了95%
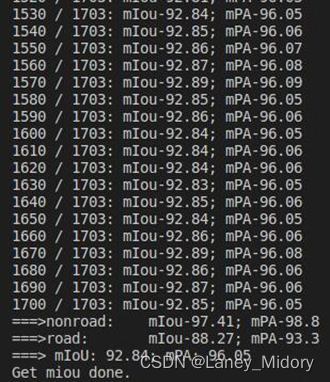
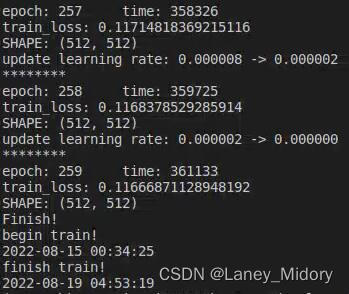
对于道路
增加了21042张改变噪声和亮度的样本
训练样本一共64282张
直接可以看到训练时间
训练结果如下
达到了92%
再次增加增强样本的数量,对47421张标签和47421张对应DOM影像进行训练,
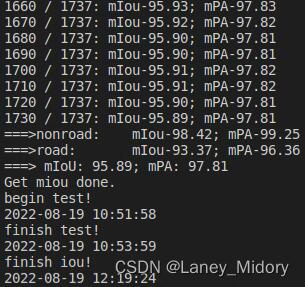
达到了93%
在这个基础上我再试着增加样本貌似iou没有很大的提升了
可以先试一个最好的样本数量
然后再进行下一步处理
本文内容由网友自发贡献,版权归原作者所有,本站不承担相应法律责任。如您发现有涉嫌抄袭侵权的内容,请联系:hwhale#tublm.com(使用前将#替换为@)