WebService是一种跨编程语言和跨操作系统平台的远程调用技术。
> 理解webservice
1.从表面上看,WebService就是一个应用程序向外界暴露出一个能通过Web进行调用的API,也就是说能用编程的方法通过Web来调用这个应用程序。我们把调用这个WebService的应用程序叫做客户端,而把提供这个WebService的应用程序叫做服务端。
2.从深层次看,WebService是建立可互操作的分布式应用程序的新平台,是一个平台,是一套标准。它定义了应用程序如何在Web上实现互操作性,你可以用任何你喜欢的语言,在任何你喜欢的平台上写Web service ,只要我们可以通过Web service标准对这些服务进行查询和访问。
3.Web Service是一个平台独立的,低耦合的,自包含的、基于可编程的web的应用程序,可使用开放的XML(标准通用标记语言下的一个子集)标准来描述、发布、发现、协调和配置这些应用程序,用于开发分布式的交互操作的应用程序。 [1]
4.Web Service技术, 能使得运行在不同机器上的不同应用无须借助附加的、专门的第三方软件或硬件, 就可相互交换数据或集成。依据Web Service规范实施的应用之间, 无论它们所使用的语言、 平台或内部协议是什么, 都可以相互交换数据。Web Service是自描述、 自包含的可用网络模块, 可以执行具体的业务功能。Web Service也很容易部署, 因为它们基于一些常规的产业标准以及已有的一些技术,诸如标准通用标记语言下的子集XML、HTTP。Web Service减少了应用接口的花费。Web Service为整个企业甚至多个组织之间的业务流程的集成提供了一个通用机制。
> Web服务的三个核心
> 看懂wsdl文件
只有看懂wsdl文件才能去调用soap类型的web服务,下面以YCS项目为例子的wsdl文件:
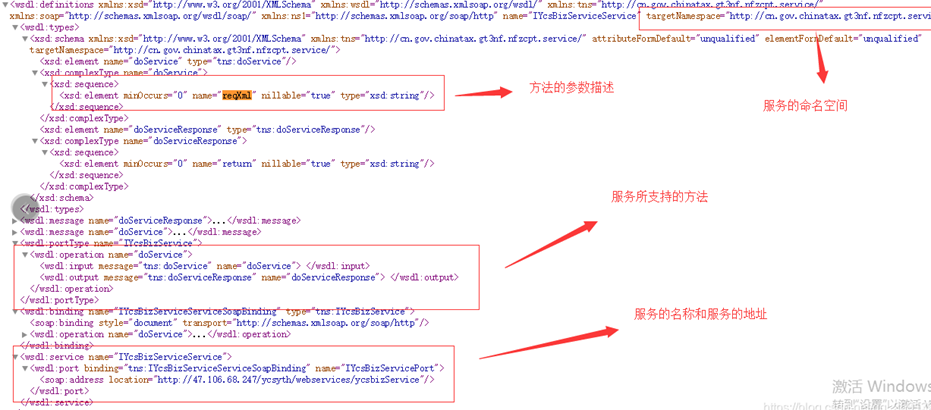
解释:首先我们可以看到服务的地址为:http://47.106.68.247/ycsyth/webservices/ycsbizService,对应wsdl文件的地址为http://47.106.68.247/ycsyth/webservices/ycsbizService?wsdl,地址的前缀为soap,说明这个服务是基于soap1.1版本的,然后我们可以看到服务的名称为IYcsBizServiceService,IYcsBizServiceService绑定的Port为IYcsBizServicePort,然后我们找到IYcsBizServicePort绑定的类型为IYcsBizService(portType name=“IYcsBizService”),从IYcsBizService中我们可以看到,支持一个方法叫做doService,关于doService的具体参数的信息看complexType name=“doService”。
> Python 库选择
服务端开发:
针对Python的WebService开发,开发者讨论最多的库是soaplib(官方地址:http://soaplib.github.io/soaplib/2_0/index.html),但从其官网可知,其最新版本“soaplib-2.0.0-beta2”从2011年3月发布后就不再进行更新了。通过阅读soaplib的官方文档,可知其不再维护后已经转向了一个新的项目:rpclib(官方地址:http://github.com/arskom/rpclib)进行后续开发,但在rpclib的readme中,介绍了rpclib已经更名为spyne,并将持续进行更新,so,那就选用spyne进行开发了。
spyne 官方文档:http://spyne.io/docs/2.10/index.html
spyne github:https://github.com/arskom/spyne
pip install spyne
pip install lxml
或者下载与python匹配的版本安装包 https://pypi.python.org/pypi/lxml/3.6.0 进行安装,如 lxml-3.6.0.win-amd64-py2.7.exe (md5)
客户端开发
客户端调用WebService一般应用suds库。
使用参考文档:https://fedorahosted.org/suds/wiki/Documentation
pip install suds
> 知识拓展
Spyne Introduction
How your code is wrapped?
> 代码实例–(结构1)
目录结构
webservice
	client.py
	serve.py
使用Python实现服务端
server.py 服务端启动文件
# -*- coding: utf-8 -*-

"""
preference:
    http://spyne.io/docs/2.10/index.html
    https://github.com/arskom/spyne/blob/master/examples/helloworld_soap.py

This is a simple HelloWorld example to show the basics of writing
a webservice using spyne, starting a server, and creating a service
client.
Here's how to call it using suds:

#>>> from suds.client import Client
#>>> hello_client = Client('http://localhost:8000/?wsdl')
#>>> hello_client.service.say_hello('punk', 5)
(stringArray){
   string[] =
      "Hello, punk",
      "Hello, punk",
      "Hello, punk",
      "Hello, punk",
      "Hello, punk",
 }
#>>>

"""
# Application is the glue between one or more service definitions, interface and protocol choices.
from spyne import Application
# @rpc decorator exposes methods as remote procedure calls
# and declares the data types it accepts and returns
from spyne import rpc
# spyne.service.ServiceBase is the base class for all service definitions.
from spyne import ServiceBase
# The names of the needed types for implementing this service should be self-explanatory.
from spyne import Iterable, Integer, Unicode

from spyne.protocol.soap import Soap11
# Our server is going to use HTTP as transport, It’s going to wrap the Application instance.
from spyne.server.wsgi import WsgiApplication


# step1: Defining a Spyne Service
class HelloWorldService(ServiceBase):
    @rpc(Unicode, Integer, _returns=Iterable(Unicode))
    def say_hello(self, name, times):
        """Docstrings for service methods appear as documentation in the wsdl.
        <b>What fun!</b>
        @param name: the name to say hello to
        @param times: the number of times to say hello
        @return  When returning an iterable, you can use any type of python iterable. Here, we chose to use generators.
        """

        for i in range(times):
            yield u'Hello, %s' % name


# step2: Glue the service definition, input and output protocols
soap_app = Application([HelloWorldService], 'spyne.examples.hello.soap',
                       in_protocol=Soap11(validator='lxml'),
                       out_protocol=Soap11())

# step3: Wrap the Spyne application with its wsgi wrapper
wsgi_app = WsgiApplication(soap_app)

if __name__ == '__main__':
    import logging

    from wsgiref.simple_server import make_server

    # configure the python logger to show debugging output
    # logging.basicConfig(level=logging.DEBUG)
    # logging.getLogger('spyne.protocol.xml').setLevel(logging.DEBUG)

    # logging.info("listening to http://127.0.0.1:8000")
    # logging.info("wsdl is at: http://localhost:8000/?wsdl")

    # step4:Deploying the service using Soap via Wsgi
    # register the WSGI application as the handler to the wsgi server, and run the http server
    print('WebService Started')
    server = make_server('127.0.0.1', 8000, wsgi_app)
    server.serve_forever()
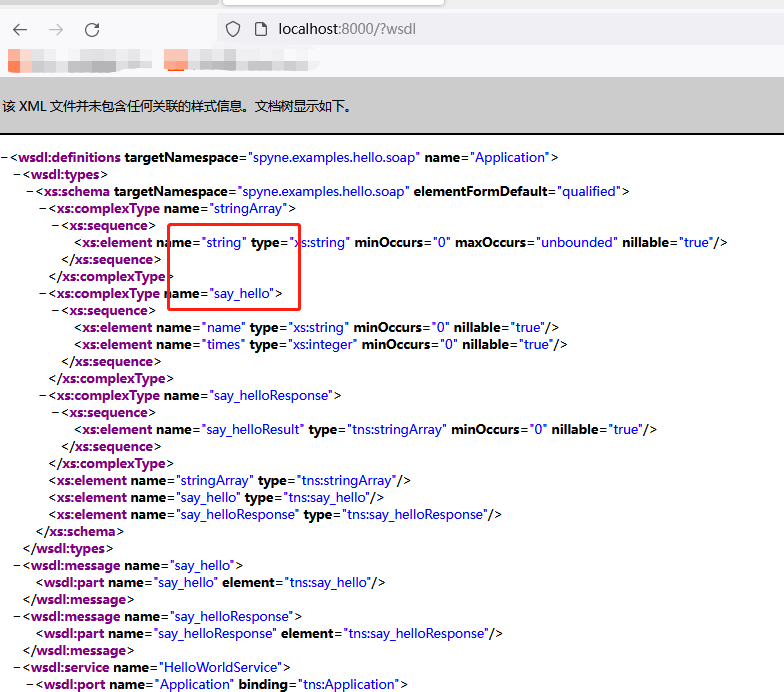
检查服务
服务端运行后,
访问浏览器检查服务 http://localhost:8000/?wsdl
浏览器中输出wsdl文件:
使用Python实现客户端
client.py 客户端接口
# -*- coding: utf-8 -*-

from suds.client import Client  # 导入suds.client 模块下的Client类

wsdl_url = "http://localhost:8000/?wsdl"


def say_hello_test(url, name, times):
    client = Client(url)                    # 创建一个webservice接口对象
    resp = client.service.say_hello(name, times)
    print(resp)
    # client.service.say_hello(name, times)   # 调用这个接口下的getMobileCodeInfo方法,并传入参数
    # req = str(client.last_sent())           # 保存请求报文,因为返回的是一个实例,所以要转换成str
    # response = str(client.last_received())  # 保存返回报文,返回的也是一个实例
    # print (req)       # 打印请求报文
    # print (response)  # 打印返回报文

if __name__ == '__main__':
    say_hello_test(wsdl_url, 'Milton', 2)
接口测试
启动服武器

执行客户端

客户端结果如下
(stringArray){
   string[] =
      "Hello, Milton",
      "Hello, Milton",
 }
> 代码实例–(结构2)
目录结构
webservice
	client
		client.py
	server
		app.py
		service.py
使用Python实现服务端
service.py 服务端启动文件
# -*- coding: utf-8 -*-

"""
preference:
    http://spyne.io/docs/2.10/index.html
    https://github.com/arskom/spyne/blob/master/examples/helloworld_soap.py

This is a simple HelloWorld example to show the basics of writing
a webservice using spyne, starting a server, and creating a service
client.
Here's how to call it using suds:

#>>> from suds.client import Client
#>>> hello_client = Client('http://localhost:8000/?wsdl')
#>>> hello_client.service.say_hello('punk', 5)
(stringArray){
   string[] =
      "Hello, punk",
      "Hello, punk",
      "Hello, punk",
      "Hello, punk",
      "Hello, punk",
 }
#>>>

"""
import json
import os

# Application is the glue between one or more service definitions, interface and protocol choices.
# 应用程序是一个或多个服务定义、接口和协议选择之间的粘合剂
from spyne import Application
# @rpc decorator exposes methods as remote procedure calls 装饰器将方法公开为远程过程调用
# and declares the data types it accepts and returns 并声明它接受和返回的数据类型
from spyne import rpc
# spyne.service.ServiceBase is the base class for all service definitions.
from spyne import ServiceBase
# The names of the needed types for implementing this service should be self-explanatory.
# 实现该服务所需类型的名称应该是不言自明的
from spyne import Iterable, Integer, Unicode

from spyne.protocol.soap import Soap11
# Our server is going to use HTTP as transport, It’s going to wrap the Application instance.
from spyne.server.wsgi import WsgiApplication

from app import PyWebService    #注意:此处引用app.py文件内的PyWebService类


#step1: Defining a Spyne Service
# class PyWebService(ServiceBase):

#     @rpc(Unicode, Integer, _returns=Iterable(Unicode))
#     def say_hello(self, name, times):
#         """Docstrings for service methods appear as documentation in the wsdl.
#         <b>What fun!</b>
#         @param name: the name to say hello to
#         @param times: the number of times to say hello
#         @return  When returning an iterable, you can use any type of python iterable. Here, we chose to use generators.
#         """

#         for i in range(times):
#             return u'Hello, %s' % name


# step2: Glue the service definition, input and output protocols
soap_app = Application([PyWebService], 'PyWebService',
                       in_protocol=Soap11(validator='lxml'),
                       out_protocol=Soap11())

# step3: Wrap the Spyne application with its wsgi wrapper
wsgi_app = WsgiApplication(soap_app)

if __name__ == '__main__':
    import logging

    from wsgiref.simple_server import make_server

    # configure the python logger to show debugging output
    # logging.basicConfig(level=logging.DEBUG)
    # logging.getLogger('spyne.protocol.xml').setLevel(logging.DEBUG)

    # logging.info("listening to http://127.0.0.1:8000")
    # logging.info("wsdl is at: http://localhost:8000/?wsdl")

    host = "127.0.0.1"
    port = 8000

    # step4:Deploying the service using Soap via Wsgi
    # register the WSGI application as the handler to the wsgi server, and run the http server
    server = make_server(host, port, wsgi_app)
    print('WebService Started')
    print('http://' + host + ':' + str(port) + '/?wsdl')
    server.serve_forever()
app.py webservice接口
# -*- coding: utf-8 -*-
import json

from spyne import ServiceBase, rpc, Double
from spyne import Integer, Unicode, String, Iterable

class User(object):
    def __init__(self, age, user_name):
        self.age = age
        self.user_name = user_name
        self.sex = 0

    def get_user_list(self, current_page, page_size):
        l = []
        for i in range(10):
            l.append({'age': self.age, 'sex': self.sex, 'user_name': self.user_name})
        return l


user_mgr = User(18, 'Tom')


class PyWebService(ServiceBase):
    ...

    @rpc(Unicode, Integer, _returns=Iterable(Unicode))
    def say_hello(self, name, times):
        """Docstrings for service methods appear as documentation in the wsdl.
        <b>What fun!</b>
        @param name: the name to say hello to
        @param times: the number of times to say hello
        @return  When returning an iterable, you can use any type of python iterable. Here, we chose to use generators.
        """
        for i in range(times):
            return u'Hello, %s' % name

    @rpc(_returns=Unicode)
    def get_version(self):
        """
        获取系统版本
        :return:
        """
        return json.dumps({'version': 1.0})

    @rpc(Integer, Integer, _returns=Unicode)
    def get_user_list(self, current_page, page_size):
        """
        获取用户列表
        :return:
        """
        return json.dumps(user_mgr.get_user_list(current_page, page_size))
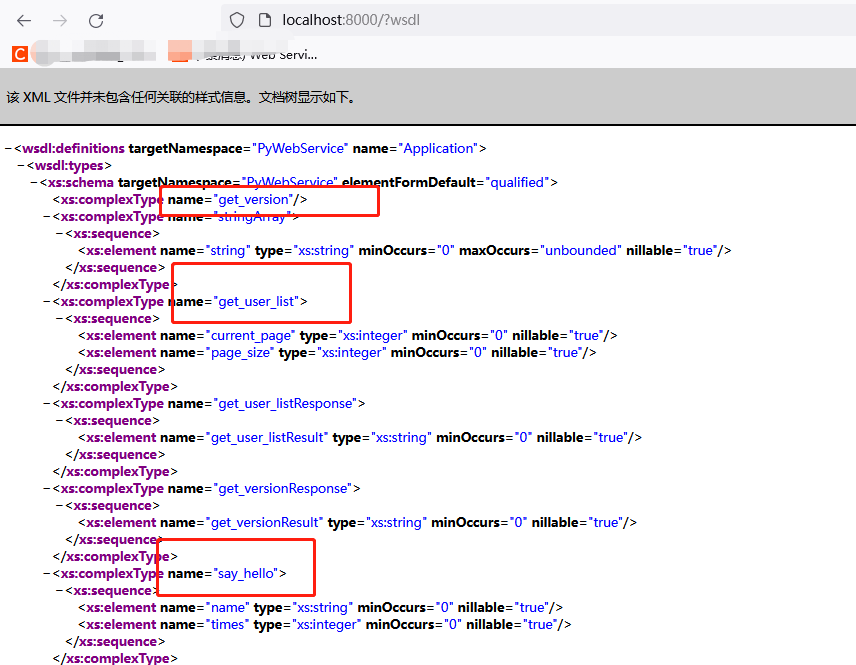
检查服务
服务端运行后,
访问浏览器检查服务 http://localhost:8000/?wsdl
浏览器中输出wsdl文件:
使用Python实现客户端
client.py 客户端接口
# -*- coding: utf-8 -*-
import json
from suds.client import Client  # 导入suds.client 模块下的Client类

wsdl_url = "http://localhost:8000/?wsdl"

def client_operation(url, name, times):
    client = Client(url)                    # 创建一个webservice接口对象
    print(client) #查看定义的所有方法与请求所需携带的参数,返回的Methods中即定义的方法,包括请求所需携带的参数与参数类型。

    resp = client.service.get_version()  # 调用这个接口下的get_version方法,无参数
    print(json.loads(resp))

    resp1 = client.service.say_hello(name, times)   # 调用这个接口下的getMobileCodeInfo方法,并传入参数
    print(str(resp1))

    resp2 = client.service.get_user_list(3,4)
    print(json.loads(resp2))

if __name__ == '__main__':
    client_operation(wsdl_url, 'Milton', 2)
接口测试
启动服武器

执行客户端
客户端结果如下
Suds ( https://fedorahosted.org/suds/ )  version: 1.1.1

Service ( PyWebService ) tns="PyWebService"
   Prefixes (1)
      ns0 = "PyWebService"
   Ports (1):
      (Application)
         Methods (3):
            get_user_list(xs:integer current_page, xs:integer page_size)
            get_version()
            say_hello(xs:string name, xs:integer times)
         Types (7):
            get_user_list
            get_user_listResponse
            get_version
            get_versionResponse
            say_hello
            say_helloResponse
            stringArray


{'version': 1.0}
(stringArray){
   string[] =
      "H",
      "e",
      "l",
      "l",
      "o",
      ",",
      " ",
      "M",
      "i",
      "l",
      "t",
      "o",
      "n",
 }
[{'age': 18, 'sex': 0, 'user_name': 'Tom'}, {'age': 18, 'sex': 0, 'user_name': 'Tom'}, {'age': 18, 'sex': 0, 'user_name': 'Tom'}, {'age': 18, 'sex': 0, 'user_name': 'Tom'}, {'age': 18, 'sex': 0, 'user_name': 'Tom'}, {'age': 18, 'sex': 0, 'user_name': 'Tom'}, {'age': 18, 'sex': 0, 'user_name': 'Tom'}, {'age': 18, 'sex': 0, 'user_name': 'Tom'}, {'age': 18, 'sex': 0, 'user_name': 'Tom'}, {'age': 18, 'sex': 0, 'user_name': 'Tom'}]
参考连接:
http://47.106.68.247/ycsyth/webservices/ycsbizService?wsdl
https://blog.csdn.net/qq_33196814/article/details/122303882
https://www.cnblogs.com/guanfuchang/p/5985070.html
本文内容由网友自发贡献,版权归原作者所有,本站不承担相应法律责任。如您发现有涉嫌抄袭侵权的内容,请联系:hwhale#tublm.com(使用前将#替换为@)