目录
- 前言
- 一、硬件准备
- 二、硬件接线说明
-
- 三、软件搭建及测试
- 1、使用Arduino IDE编译教程
- 2、使用vsCode+Arduino教程
- 2.1 在vsCode上使用Arduino的环境搭建
- 2.2 配置烧录和测试
- 3、使用vsCode+PlatformIO编译教程
- 四、源代码
-
- 五:常见问题
前言
此文档介绍了北醒系列激光雷达在ESP32 DEVKIT_V1开发板上的运用,其中包含了
- 两种雷达的接口 TTL和IIC
- 三种编译方式 通过Arduino IDE \ vsCode+Arduino \ vsCode+PlatformIO
此文档的编译代码可以在Github上下载:https://github.com/benewake-zoran/ESP32-DEVKIT_V1
一、硬件准备
- 北醒TF系列雷达一台(相关可参考论坛首页产品介绍)https://blog.csdn.net/zoran_wu/article/details/109445751
- ESP32 DEVKIT_V1开发板一块
- MicroUSB数据线一条
- 杜邦线若干
二、硬件接线说明
串口接线示意图:
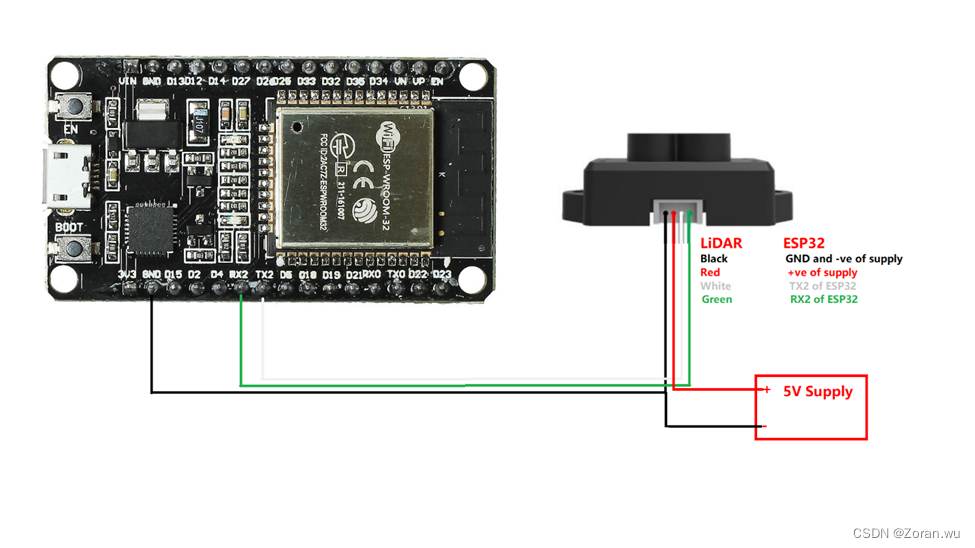
I2C接先示意图
待添加
三、软件搭建及测试
1、使用Arduino IDE编译教程
环境搭建:关于ESP32 DEVKIT_V1板子资料及环境搭建可以参考
https://blog.csdn.net/zoran_wu/article/details/123224154
2、使用vsCode+Arduino教程
2.1 在vsCode上使用Arduino的环境搭建
参考:【vsCode + Arduino】在Visual Studio Code编译Arduino项目
https://blog.csdn.net/zoran_wu/article/details/127630939
2.2 配置烧录和测试
步骤一: 使用vsCode打开Arduino建好的ino,项目文件,选择对应的开发板DOIT DEVKIT_V1
步骤二: 选择对应的编译器
步骤三: 选择对应COM口并编译,如果COM口正常(以下COM口处理略过)
如果没有COM口,请确认板子是否已经正常连接,对应驱动是否已经正常安装,此处可以参考
关于ESP32 DEVKIT_V1板子资料及环境搭建可以参考
https://blog.csdn.net/zoran_wu/article/details/123224154
步骤四: 此处一般会出现一个编译警告,如下图,通过更改json来避免此警告,并加速编译(此处参考待添加)
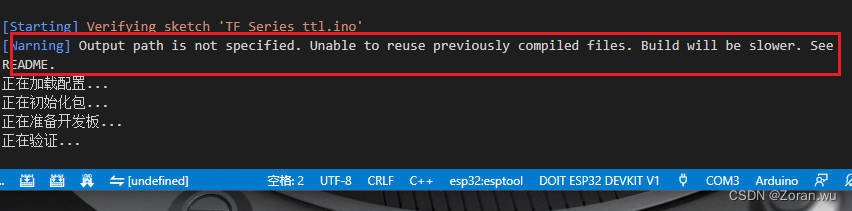
添加一句"output": “./Arduino/build”,如下所示
步骤五: 编译后进行烧录
烧录方式:先按住BOOT键点烧录,待出现正在上传时可以放开并开始烧录
步骤六: 测试
此处手动打开串口监控器,开始打印雷达数据
3、使用vsCode+PlatformIO编译教程
参考:【vsCode + PlatformIO】在Visual Studio Code编译Arduino项目
https://blog.csdn.net/BX_Zoran/article/details/123707123
四、源代码
串口版本源代码:
#define RXD2 16
#define TXD2 17
int dist;
int strength;
float temprature;
unsigned char check;
int i;
unsigned char uart[9];
const int HEADER = 0x59;
int rec_debug_state = 0x01;
void Get_Lidar_data();
void setup()
{
delay(2000);
Serial.begin(115200);
Serial.println("\nBenewake TFmini-S UART LiDAR Program");
Serial2.begin(115200);
}
void loop()
{
Get_Lidar_data();
}
void Get_Lidar_data()
{
if (Serial2.available())
{
if (rec_debug_state == 0x01)
{
uart[0] = Serial2.read();
if (uart[0] == 0x59)
{
check = uart[0];
rec_debug_state = 0x02;
}
}
else if (rec_debug_state == 0x02)
{
uart[1] = Serial2.read();
if (uart[1] == 0x59)
{
check += uart[1];
rec_debug_state = 0x03;
}
else
{
rec_debug_state = 0x01;
}
}
else if (rec_debug_state == 0x03)
{
uart[2] = Serial2.read();
check += uart[2];
rec_debug_state = 0x04;
}
else if (rec_debug_state == 0x04)
{
uart[3] = Serial2.read();
check += uart[3];
rec_debug_state = 0x05;
}
else if (rec_debug_state == 0x05)
{
uart[4] = Serial2.read();
check += uart[4];
rec_debug_state = 0x06;
}
else if (rec_debug_state == 0x06)
{
uart[5] = Serial2.read();
check += uart[5];
rec_debug_state = 0x07;
}
else if (rec_debug_state == 0x07)
{
uart[6] = Serial2.read();
check += uart[6];
rec_debug_state = 0x08;
}
else if (rec_debug_state == 0x08)
{
uart[7] = Serial2.read();
check += uart[7];
rec_debug_state = 0x09;
}
else if (rec_debug_state == 0x09)
{
uart[8] = Serial2.read();
if (uart[8] == check)
{
dist = uart[2] + uart[3] * 256;
strength = uart[4] + uart[5] * 256;
temprature = uart[6] + uart[7] * 256;
temprature = temprature / 8 - 256;
Serial.print("dist = ");
Serial.print(dist);
Serial.print('\n');
Serial.print("strength = ");
Serial.print(strength);
Serial.print('\n');
Serial.print("\t Chip Temprature = ");
Serial.print(temprature);
Serial.println(" celcius degree");
while (Serial2.available())
{
Serial2.read();
}
delay(100);
}
rec_debug_state = 0x01;
}
}
}
I2C版本原代码
五:常见问题
本文内容由网友自发贡献,版权归原作者所有,本站不承担相应法律责任。如您发现有涉嫌抄袭侵权的内容,请联系:hwhale#tublm.com(使用前将#替换为@)