简单记录一下这个过程。
一、自定义uORB消息
这一步比较简单,首先在msg/中新建ca_trajectory.msg文件
uint64 timestamp		# time since system start (microseconds)

uint64 time_start_usec
uint64 time_stop_usec
uint32 coefficients
uint16 seq_id
在CMakeList.txt中加入

经过编译,生成了/uORB/topics/ca_trajectory.h,具体路径是/Firmware/build/px4_fmu-v2_default/uORB/topics/ca_trajectory.h
具体路径取决于你的编译命令
二、自定义MAVLink消息
新建custom_messages.xml
内容:(不需要引用common.xml)
<?xml version="1.0"?>
<mavlink>
    <include>common.xml</include>
    <!-- NOTE: If the included file already contains a version tag, remove the version tag here, else uncomment to enable. -->
    <!--<version>3</version>-->
    <enums>
    </enums>
    <messages>
        <message id="315" name="CA_TRAJECTORY">
            <description>This message encodes all of the raw rudder sensor data from the USV.</description>
            <field type="uint64_t" name="timestamp">Timestamp in milliseconds since system boot</field>
            <field type="uint64_t" name="time_start_usec">start time, unit usec.</field>
            <field type="uint64_t" name="time_stop_usec">stop time, unit usec.</field>
            <field type="uint32_t" name="coefficients">as it says.</field>
            <field type="uint16_t" name="seq_id">can not cheat any more.</field>
        </message>
    </messages>
</mavlink>
使用python -m mavgenerate 打开,生成文件
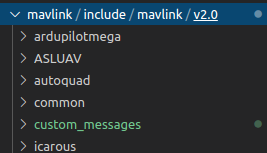
 将custom_messages文件夹拷入下图所示
这样按照官网后面的操作就可以了
不过在官网介绍中
#include <uORB/topics/ca_trajectory.h>
#include <v2.0/custom_messages/mavlink.h>
会出现引用错误,我就直接这样搞了
#include <uORB/topics/ca_trajectory.h>
#include <v2.0/custom_messages/mavlink_msg_ca_trajectory.h>
#include <v2.0/custom_messages/mavlink.h>
这样再编译,可能还有小错误,但是很简单改个变量名就好了。
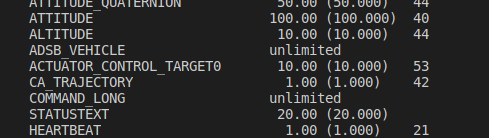
因为没有硬件,我在jMAVSim中看了一下
更详细的步骤参考:
FatasyJXF
https://blog.csdn.net/oqqENvY12/article/details/56849572 Pixhawk原生固件PX4之自定义MAVLink消息
以及想学技术的萌新 https://blog.csdn.net/weixin_43485969/article/details/104136205 这篇文章
本文内容由网友自发贡献,版权归原作者所有,本站不承担相应法律责任。如您发现有涉嫌抄袭侵权的内容,请联系:hwhale#tublm.com(使用前将#替换为@)