视觉传感器类型
http://www.coppeliarobotics.com/helpFiles/index.html
-
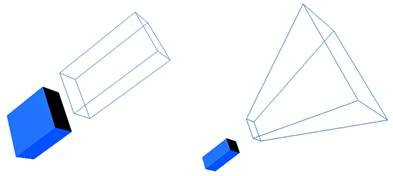
Orthographic projection-type: the field of view of orthographic projection-type vision sensors is rectangular. They are well suited for close-range infrared sensors, or laser range finders.
正交投影:适用于红外传感器或激光传感器
-
Perspective projection-type: the field of view of perspective projection-type vision sensors is trapezoidal. They are well suited for camera-type sensors.
透视投影:适用于摄像头
基本操作
menu bar--> Add --> Vision sensor
添加图像的窗口
场景中右键--> Add--> Floating View
选中Vision Sensor
Floating View中右键--> View-->Associate View with selected vision sensor
运行即可
属性参数
http://www.coppeliarobotics.com/helpFiles/en/visionSensorPropertiesDialog.htm
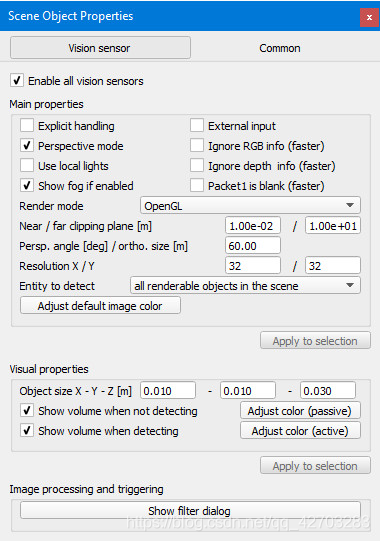
[Vision sensor dialog]
- Enable all vision sensors: turns the vision sensor functionality on and off for all vision sensors.
是否启用摄像头 - Explicit handling: indicates whether the sensor should be explicitely(明确的) handled. If checked, the sensor will not be handled when
sim.handleVisionSensor(sim.handle_all_except_explicit) is called, but only if sim.handleVisionSensor(sim.handle_all) or sim.handleVisionSensor(visionSensorHandle) is called.
勾选后将传感器将不会被上述函数调用
This is useful if the user wishes to handle the sensor in a child script rather than in the main script (if not checked the sensor will be handled twice, once when sim.handleVisionSensor(sim.handle_all_except_explicit)is called in the main script, and once whensim.handleVisionSensor(visionSensorHandle) is called in the child script). Refer also to the section on explicit and non-explicit calls.
在需要给传感器单独写子脚本时有用,避免被重复处理 - External input: when selected, then the vision sensor’s normal operation will be altered so as to be able to treat and filter external images instead (e.g. video images).
采用外部输入 - Perspective mode: allows selecting between the perspective projection type and the orthogonal projection type vision sensor.
切换传感器模式:正交投影or透视投影 - Ignore RGB info (faster): if selected, the RGB information of the sensor (i.e. the color) will be ignored so that it can operate faster. Use this option if you only rely on the depth information of the sensor.
屏蔽RGB信息 - Ignore depth info (faster): if selected, the depth information of the sensor will be ignored so that it can operate faster. Use this option if you do not intend to use the depth information of the sensor.
屏蔽深度信息 - Packet1 is blank (faster): if selected, then V-REP won’t automatically extract specific information from acquired images, so that it can operate faster. Use this option if you do not intend to use the first packet of auxiliary(辅助的) values returned by API functions
sim.readVisionSensor orsim.handleVisionSensor. - Use local lights: if enabled, then only local lights parented with this vision sensor (i.e. built on top of this vision sensor) will be activated when displaying this vision sensor’s image content. Lights can be made local in the light properties.
是否显示环境光 - Show fog if enabled: if disabled, then this vision sensor won’t see any fog if fog is enabled. Also refer to the environment dialog.
是否显示雾 - Render(给予) mode: three modes are currently available:
- OpenGL (default): renders the visible color channels of objects.
- OpenGL, auxiliary channels: renders the auxiliary color channels of objects. The auxiliary channels red, green and blue colors are meant to be used in following way: red is the temperature channel (0.5 is the ambient(周围的) temperature), green is the user defined channel, and blue is the active light emitter channel.
- OpenGL, color coded handles: renders the objects by coding their handles into the colors. The first data packet returned by the
sim.readVisionSensor or sim.handleVisionSensor API functions represent the detected object handles (round the values down). - POV-Ray: uses the POV-Ray plugin to render images, allowing for shadows (also soft shadows) and material effects (much slower). The plugin source code is located here.
- External renderer: uses an external renderer implemented via a plugin. The current external renderer source code is located here.
- External renderer, windowed: uses an external renderer implemented via a plugin, and displays the image in an external window (during simulation only). The current external renderer source code is located here.
- OpenGL3: uses the OpenGL3 renderer plugin, courtesy of Stephen James. The plugin offers shadow casting, which is currently not possible natively, in V-REP. Light projection and shadows can be adjusted for each light, via the object’s extension string, e.g. openGL3 {lightProjection {nearPlane {0.1} farPlane {10} orthoSize {8} bias {0.001} normalBias {0.005} shadowTextureSize {2048}}}
OpenGL3, windowed: same as above, but windowed.
- Near / far clipping plane: the minimum / maximum distance from which the sensor will be able to detect.
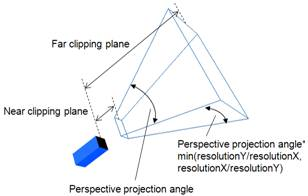
设定传感器的最小和最大视距 - Perspective angle: the maximum opening angle of the detection volume when the sensor is in perspective mode.
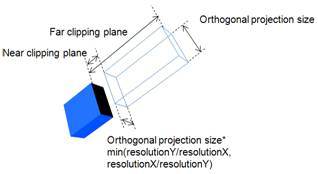
设定透视视野 - Orthographic size: the maximum size (along x or y) of the detection volume when the sensor is not in perspective mode.
设定正交范围x和y
[Detection value parameters of the orthographic-type vision sensor]
[Detection value parameters of the perspective-type vision sensor] - Resolution X / Y: desired x- / y-resolution of the image captured by the vision sensor. Carefully chose the resolution depending on your application (high resolution will result in slower operation). With older graphic card models, the actual resolution might be different from what is indicated here (old graphic card models only support resolutions at 2^n, where n is 0, 1, 2, etc.).
分辨率 - Entity to detect: allows specifying what entity should be rendered.
- Adjust default image color: allows specifying the color that should be used in areas where nothing was rendered. By default, the environment fog color is used.
- Object size X / Y / Z: size of the body-part of the vision sensor. This has no functional effect.
设置传感器大小哦 - Show volume when not detecting: if selected, the detection volume is shown when the sensor didn’t trigger.
没启用时显示传感器 - Show volume when detecting: if selected, the detection volume is shown when the sensor triggered.
启用时显示传感器 - Object colors: allows adjusting the various colors of a vision sensor.
调节传感器颜色 - Show filter dialog: toggles the vision sensor filter dialog. That dialog allows specifying filters to apply to captured images.
滤镜选项
Filter or Image processing
在旧版vrep中image processing 部分有专门的GUI,但在新版coppeliasim中删去了GUI而只能通过lua code进行处理
一般会在传感器上添加一个customation script进行图像处理如下

代码如下
function sysCall_init()
end

function sysCall_vision(inData)
    -- callback function automatically added for backward compatibility
    -- (vision sensor have no filters anymore, but rather a callback function where image processing can be performed)
    local retVal={}
    retVal.trigger=false
    retVal.packedPackets={}
    simVision.sensorDepthMapToWorkImg(inData.handle)
    local trig,packedPacket=simVision.coordinatesFromWorkImg(inData.handle,{256,1},false) if trig then retVal.trigger=true end if packedPacket then retVal.packedPackets[#retVal.packedPackets+1]=packedPacket end
    simVision.workImgToSensorImg(inData.handle)
    return retVal
end
http://www.coppeliarobotics.com/helpFiles/index.html
相关函数:
http://www.coppeliarobotics.com/helpFiles/en/visionPlugin-imageProcessing.htm
API
http://www.coppeliarobotics.com/helpFiles/en/apiFunctionListCategory.htm#visionSensor
可以从官方例程rosInterfaceTopicPublisherAndSubscriber.ttt里得代码
-- This illustrates how to publish and subscribe to an image using the ROS Interface.
-- An alternate version using image transport can be created with following functions:
--
-- simROS.imageTransportAdvertise
-- simROS.imageTransportPublish
-- simROS.imageTransportShutdownPublisher
-- simROS.imageTransportShutdownSubscriber
-- simROS.imageTransportSubscribe

function sysCall_init()

    -- Get some handles:
    -- 转臂上的摄像头
    activeVisionSensor=sim.getObjectHandle('Vision_sensor')
    -- 世界上的摄像头
    passiveVisionSensor=sim.getObjectHandle('PassiveVision_sensor')

    -- Enable an image publisher and subscriber:
    -- 类似pub=n.advertise<sensor_msgs::Image>("/image",1);
    pub=simROS.advertise('/image', 'sensor_msgs/Image')
    -- 对发布器进行格式转换,使得数组转换为字符串,使通讯更快
    simROS.publisherTreatUInt8ArrayAsString(pub) -- treat uint8 arrays as strings (much faster, tables/arrays are kind of slow in Lua)
    -- 类似sub=n.subscriber("/image",1,imageMessage_callback);
    sub=simROS.subscribe('/image', 'sensor_msgs/Image', 'imageMessage_callback')
    -- 对发布器进行格式转换,使得数组转换为字符串,使通讯更快
    simROS.subscriberTreatUInt8ArrayAsString(sub) -- treat uint8 arrays as strings (much faster, tables/arrays are kind of slow in Lua)

end
-- 订阅者sub的回调函数
function imageMessage_callback(msg)
    -- Apply the received image to the passive vision sensor that acts as an image container
    sim.setVisionSensorCharImage(passiveVisionSensor,msg.data)
end

-- 摄像头的回调函数
function sysCall_sensing()
    -- Publish the image of the active vision sensor:
    local data,w,h=sim.getVisionSensorCharImage(activeVisionSensor)
    -- 生成tables/arrays类型的数据类型,tables/arrays只要数据中的成员与希望的数据类型一致即可作成任何类型的数据类型。
    -- 因此可以将tables/arrays类型看作数据载体
    d={}
    d['header']={seq=0,stamp=simROS.getTime(), frame_id="a"}
    d['height']=h
    d['width']=w
    d['encoding']='rgb8'
    d['is_bigendian']=1
    d['step']=w*3
    d['data']=data
    simROS.publish(pub,d)
end

function sysCall_cleanup()
    -- Shut down publisher and subscriber. Not really needed from a simulation script (automatic shutdown)
    simROS.shutdownPublisher(pub)
    simROS.shutdownSubscriber(sub)
end
本文内容由网友自发贡献,版权归原作者所有,本站不承担相应法律责任。如您发现有涉嫌抄袭侵权的内容,请联系:hwhale#tublm.com(使用前将#替换为@)