ReportLab也是一个用于处理PDF文件的Python库。特别是该库的 Canvas 类在创建 PDF 文件时非常方便。我们使用以下 pip 命令安装它:
pip install reportlab
endesive 是一个 Python 库,用于对邮件、PDF 和 XML 文档中的数字签名进行数字签名和验证。我们使用以下 pip 命令安装它:
pip install endesive
提取文本
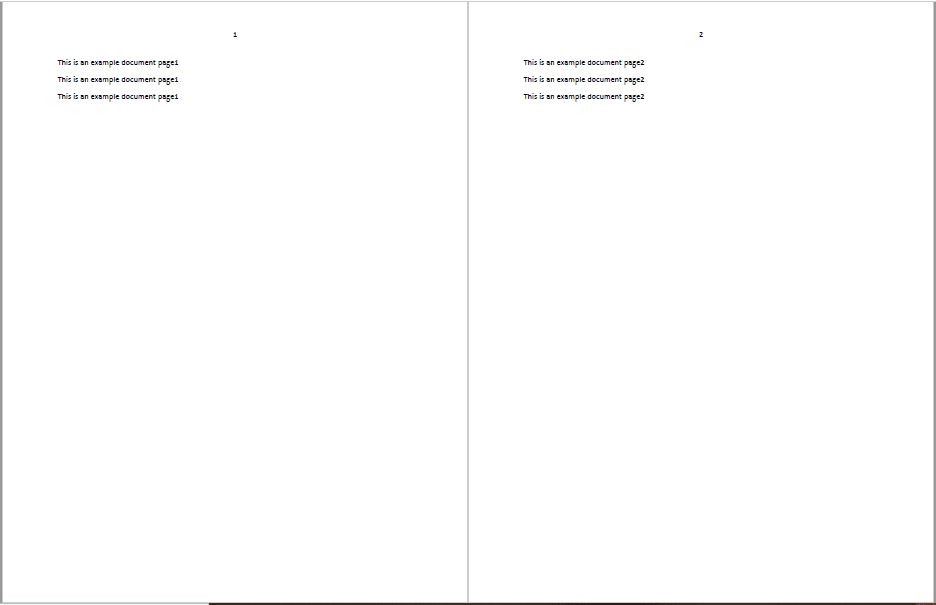
Sometimes, we need to extract text from PDF files and process it. For example, we have the following two-pages in the Example.PDF file with plain text in it:
We save this file in the same directory where our Python file is saved.
To extract the text from the pages for processing, we will use the PyPDF2 library as follows:
from PyPDF2 import PdfFileReader as pfr
with open('pdf_file', 'mode_of_opening') as file:
    pdfReader = pfr(file)
    page = pdfReader.getPage(0)
    print(page.extractText())
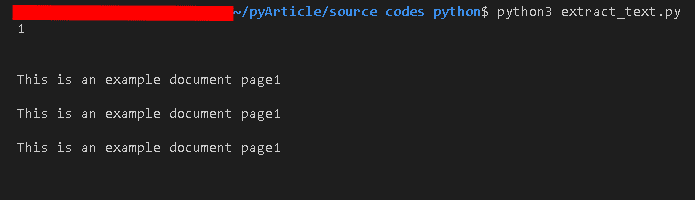
在我们的代码中,我们首先从 PyPDF2 导入 PdfFileReader 作为 pfr。然后我们以“rb”(读和写)模式打开 PDF 文件。接下来,我们为该文件创建一个 pdfFileReader 对象。
from PyPDF2 import PdfFileReader as pfr
with open('Example.pdf', 'rb') as file:
    pdfReader = pfr(file)
    page = pdfReader.getPage(0)
    print(page.extractText())
Running this code, we get the following result which is the plain text of the page in string format:
提取图像
在本节中,我们将解析 PDF 文件以将其中的图像保存到本地计算机。为此,我们使用 PyMuPDF 库从 PDF 文件中获取它,并使用 Pillow 将其保存到本地计算机。
To demonstrate this, we create a sample PDF file with images called ExtractImage.pdf and place it next to our Python file:
Now, let’s have a look at the code below which retrieves the images from our PDF file and saves them in the current directory.
import fitz
import io
from PIL import Image
file_in_pdf_format = fitz.open("ExtractImage.pdf")
for page_number in range(len(file_in_pdf_format)):
    page = file_in_pdf_format[page_number]
    img_list = page.get_images()
    if len(img_list) == 0:
        print("There is no image on page ", page_number)
        pass
    for img_index, img in enumerate(page.get_images(), start=1):
        xref = img[0]
        base_img = file_in_pdf_format.extract_image(xref)
        img_bytes = base_img["image"]
        img_ext = base_img["ext"]
        image = Image.open(io.BytesIO(img_bytes))
        image.save(open(f"image{page_number + 1}_{img_index}.{img_ext}", "wb"))
PIL helps create an object of the image, and io helps us interact with the operating system to get the size of our file.
Running this piece of code, we get the following result:
The above image shows that after running the code, we get the images saved in the same directory. And the name of the images indicates the page where the image was found on, and its order.
提取一个表
有时我们的 PDF 文件中有表格。为了处理它们,我们需要从 PDF 文件中提取它们并将它们转换为熊猫数据框。为此,我们使用 tabula-py 从名为的文件中提取数据提取表.pdf,以及 pandas 来进一步处理它。
import tabula
tables = tabula.read_pdf("ExtractTable.pdf",pages="all")
print(tables)
从上面的代码片段可以看出,处理 PDF 文件中的表格非常简单。我们通过指定页码来读取它。
It returns the table as a pandas dataframe that we can further use and manipulate.
Running the above code on ExtractTable.pdf, we get this result:
提取网址
还可以在 PDF 文件中检测 URL 或超链接。为了在 PDF 文件中检测它们,我们使用 re 和 PyPDF2 库。
import PyPDF2
import re
def url_finder(page_content):
   regex = r"(https?://\S+)"
   url = re.findall(regex,page_content)
   return url
with open("ExtractURLs.pdf", 'rb') as file:
    readPDF = PyPDF2.PdfFileReader(file)
    for page_no in range(readPDF.numPages):
        page=readPDF.getPage(page_no)
        text = page.extractText()
        print(f"URLS of page {page_no}: "+str(url_finder(text)))
    file.close()
In the code above, our regular expression “https?://\S+” first selects all of the strings that start with http or https (the question mark means the s is optional) till it finds white space which means the URL is ended.
Running the above code, we get the following result:
As we can see, our code returns the URLs of each page in a list.
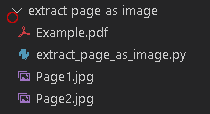
from pdf2image import convert_from_path
imgs = convert_from_path('Example.pdf')
for i in range(len(imgs)):
    imgs[i].save('Page'+ str(i+1) +'.jpg', 'JPEG')
Running the above code, we get the images saved in our working directory as JPEG images.
创建 PDF
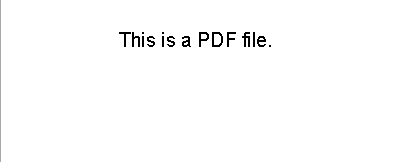
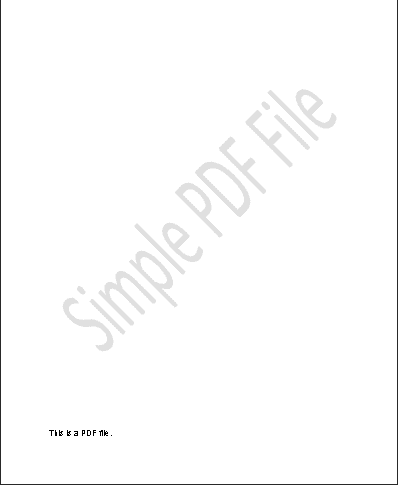
为了创建 PDF 文件,我们可以使用 reportlab 库的 Canvas 类。我们首先创建一个 Canvas 类的对象,并以参数作为 PDF 文件的名称,pdf文件.pdf.
from reportlab.pdfgen.canvas import Canvas
canv = Canvas("pdffile.pdf")
canv.drawString(72,72,"This is a PDF file.")
canv.save()
Here is the result of running our create_pdf.py file.
Add text
As seen in the above section, we pass our text as an argument to drawString and specify its place. The location identifier tells the distance from the left bottom. It specifies the beginning of the string.
As seen above, this is how our text will be displayed on the page in our file pdffile.pdf.
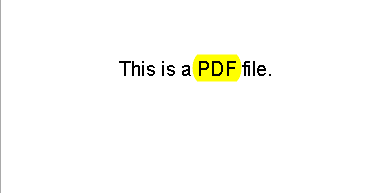
突出显示文本
为了突出显示 PDF 文件中的文本,我们使用 PyMuPDF 库。首先,我们打开我们的PDF文件pdf文件.pdf使用 PyMuPDF 库。然后我们遍历页面以突出显示指定的字符序列。
import fitz
pdf_file = fitz.open("pdffile.pdf")
for page in pdf_file:
    text_to_be_highlighted = "PDF"
    highlight = p.searchFor(text_to_be_highlighted)
    for inst in highlight:
        highlight = page.addHighlightAnnot(inst)
        highlight.update()
pdf_file.save("output.pdf", garbage=4, deflate=True, clean=True)
The PDF file before highlighting.
The PDF file after highlighting.
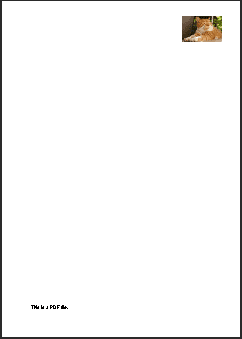
添加图像
要将图像添加到 PDF 文件,我们使用 PyMuPDF 库。为此,我们选择当前文件pdf文件.pdf, 目标文件pdf文件与图像.pdf,以及要插入的图像:
As seen above, using the Rect method, we create a rectangle where we want to fit our image. Running the above code, we see the following in our PDF file.
PDF file without image
PDF file after an image is inserted.
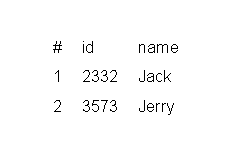
添加表格
要将表格添加到 PDF 文件,我们使用 reportlab 库。下面的代码导入所有必需的模块并创建一个名为 table_pdf.pdf 的 PDF 文件。
from reportlab.lib.pagesizes import A4
from reportlab.platypus import SimpleDocTemplate, Table, TableStyle
doc = SimpleDocTemplate("table.pdf", pagesize=A4)
members = []
frame= [['#', 'id', 'name'],['1', '2332', 'Jack'],['2', '3573', 'Jerry']]
table=Table(frame)
members.append(table)
doc.build(members)
如上所示,从库中导入所有必要的模块后,我们将创建一个对象,以 PDF 文件的名称及其页面大小作为参数。
然后,我们将行添加到新列表中,并将其作为参数传递给 Table 类。
After that, we append the result to our ‘members’ list, and finally, to save it on our doc, we call the build method on our doc with members as an argument to it, and it will be saved in our PDF file.
This is the final PDF table_pdf.pdf, with a page that contains lists of frame as its rows.
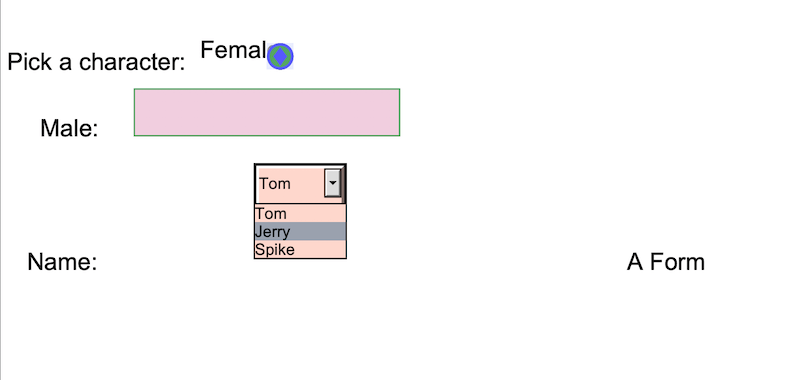
创建表格
为了在我们的PDF文件中创建表单,我们主要使用reportlab库的canvas模块。与其他类型的表单类似,我们的 PDF 表单也包含文本字段、单选按钮、多项选择和复选框。
Now for putting strings to our pdf file, we use the object of our Canvas class, and for defining our form, we use the variable ‘form’. After running the above code, we get the following PDF form.
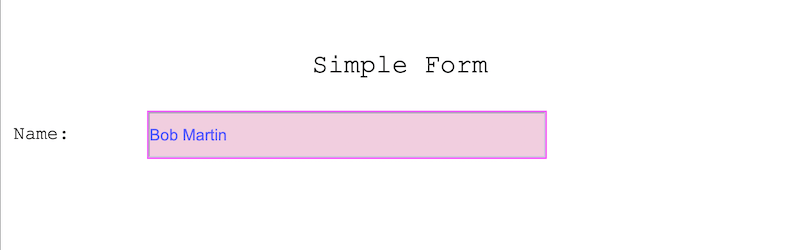
填写表格
为了使用 Python 填写表单,我们使用 pdfrw 库。在我们的 PDF 表格中表格_pdf.pdf,我们有一个字段作为 fname,我们应该把 Bob Martin 放在那里。
为此,我们首先打开输入文件,读取它并解析页面。然后我们将填充的数据定义为字典。最后,我们将它与 data_dict 和 pdf 输出一起作为参数传递给 fill_pdf 函数。
import pdfrw
source = "form_pdf.pdf"
destination = "output.pdf"
myTemplate = pdfrw.PdfReader(source)
MYKEY = '/Annots'
FIELDKEY = '/T'
VALUE_KEY = '/V'
RECTKEY = '/Rect'
SUB_KEY = '/Subtype'
WIDGET= '/Widget'
data = {
    'fname': 'Bob Martin'
}
def fill_form(source, dest, data):
    myTemplate = pdfrw.PdfReader(source)
    for pg_number in myTemplate.pages:
        annots = pg_number[MYKEY]
        for annot in annots:
            if annot[SUB_KEY] == WIDGET:
                if annot[FIELDKEY]:
                    key = annot[FIELDKEY][1:-1]
                    if key in data.keys():
                        if type(data[key]) == bool:
                            if data[key] == True:
                                annot.update(pdfrw.PdfDict(AS=pdfrw.PdfName('Yes')))
                        else:
                            annot.update(pdfrw.PdfDict(V='{}'.format(data[key])))
                            annot.update(pdfrw.PdfDict(AP=''))
    pdfrw.PdfWriter().write(dest, myTemplate)
fill_form(source, destination, data)
After running the above code, we will get the name in the field as shown below:
调整页面大小
有时我们需要调整 PDF 文件的大小。为此,我们可以使用 PyPDF2。在下面的代码中,我们调整文件大小pdf文件.pdf到“resizedpdffile.pdf”。
Then we merge the watermark file on the PDF file and write the result to our final file. In the end, we close all our files.
Our PDF file.
Our watermark file.
Our watermarked PDF file.
PDF 元数据(读取和编辑)
为了更好地维护我们的PDF文件,我们应该向它添加元数据。在下面的示例中,我们将元数据添加到 PDF 文件中pdf文件与图像.pdf使用 pdfrw 库。