一、环境准备
1、创建一个maven 项目,其POM文件如下:
<?xml version="1.0" encoding="UTF-8"?>
<project xmlns="http://maven.apache.org/POM/4.0.0" xmlns:xsi="http://www.w3.org/2001/XMLSchema-instance"
         xsi:schemaLocation="http://maven.apache.org/POM/4.0.0 https://maven.apache.org/xsd/maven-4.0.0.xsd">
    <modelVersion>4.0.0</modelVersion>
    <parent>
        <groupId>org.springframework.boot</groupId>
        <artifactId>spring-boot-starter-parent</artifactId>
        <version>2.2.6.RELEASE</version>
        <relativePath/> <!-- lookup parent from repository -->
    </parent>
    <groupId>cn.szyrm</groupId>
    <artifactId>mybatis-spring-boot-test</artifactId>
    <version>0.0.1-SNAPSHOT</version>
    <name>mybatis-spring-boot-test</name>
    <description>Demo project for Spring Boot</description>

    <properties>
        <java.version>1.8</java.version>
    </properties>

    <dependencies>
        <dependency>
            <groupId>org.mybatis.spring.boot</groupId>
            <artifactId>mybatis-spring-boot-starter</artifactId>
            <version>2.1.2</version>
        </dependency>
        <dependency>
            <groupId>org.springframework.boot</groupId>
            <artifactId>spring-boot-starter-web</artifactId>
        </dependency>

        <dependency>
            <groupId>mysql</groupId>
            <artifactId>mysql-connector-java</artifactId>
            <scope>runtime</scope>
        </dependency>
        <dependency>
            <groupId>org.springframework.boot</groupId>
            <artifactId>spring-boot-starter-test</artifactId>
            <scope>test</scope>
            <exclusions>
                <exclusion>
                    <groupId>org.junit.vintage</groupId>
                    <artifactId>junit-vintage-engine</artifactId>
                </exclusion>
            </exclusions>
        </dependency>
    </dependencies>

    <build>
        <plugins>
            <plugin>
                <groupId>org.springframework.boot</groupId>
                <artifactId>spring-boot-maven-plugin</artifactId>
            </plugin>
        </plugins>
    </build>

</project>
2、配置数据源信息
在使用spring-boot的时候,如果我们没有手动配置数据源。那么org.springframework.boot.autoconfigure.jdbc.DataSourceAutoConfiguration 会自动配置数据源。配置部分源码如下,默认配置的数据为:
@Configuration(proxyBeanMethods = false)
@ConditionalOnClass({ DataSource.class, EmbeddedDatabaseType.class })
@EnableConfigurationProperties(DataSourceProperties.class)
@Import({ DataSourcePoolMetadataProvidersConfiguration.class, DataSourceInitializationConfiguration.class })
public class DataSourceAutoConfiguration {
从上可以看出,这个自动配置类会激活DataSourceProperties 的属性配置。
	@Bean
		@ConfigurationProperties(prefix = "spring.datasource.hikari")
		HikariDataSource dataSource(DataSourceProperties properties) {
			HikariDataSource dataSource = createDataSource(properties, HikariDataSource.class);
			if (StringUtils.hasText(properties.getName())) {
				dataSource.setPoolName(properties.getName());
			}
			return dataSource;
		}
从上面的源码可以看出,我们只需要配置好org.springframework.boot.autoconfigure.jdbc.DataSourceProperties 对象。其源码的定义部分如下:
@ConfigurationProperties(prefix = "spring.datasource")
public class DataSourceProperties implements BeanClassLoaderAware, InitializingBean {
通过上述的分析,我们发现,只需要在属性文件中配置好如下属性即可:
spring.datasource.driverClassName=com.mysql.cj.jdbc.Driver
#spring.datasource.url=jdbc:mysql://192.168.100.76:3306/test?useSSL=false
spring.datasource.url=jdbc:mysql://192.168.100.76:3306/possecu_mpmt_1?useUnicode=true&characterEncoding=utf8&zeroDateTimeBehavior=convertToNull&allowMultiQueries=true
spring.datasource.username=root
spring.datasource.password=root
url:指向mysql 数据的连接地址
二、测试环境搭建
1、新建一个mapper类,代码如下:
@Mapper
public interface IUserMapper {
    @Select("SELECT f_id AS id,f_name AS name FROM t_user WHERE f_id = #{id}")
    Map<String,String> select(@Param("id") Long id );
}
2、创建测试类
@SpringBootTest
class MybatisSpringBootTestApplicationTests {

    @Resource
    private IUserMapper userMapper;

    @Test
    void contextLoads() {
    }

    @Test
    public void testUserMap(){
        Map<String, String> select = userMapper.select(1L);
        System.out.println("....");
    }
}
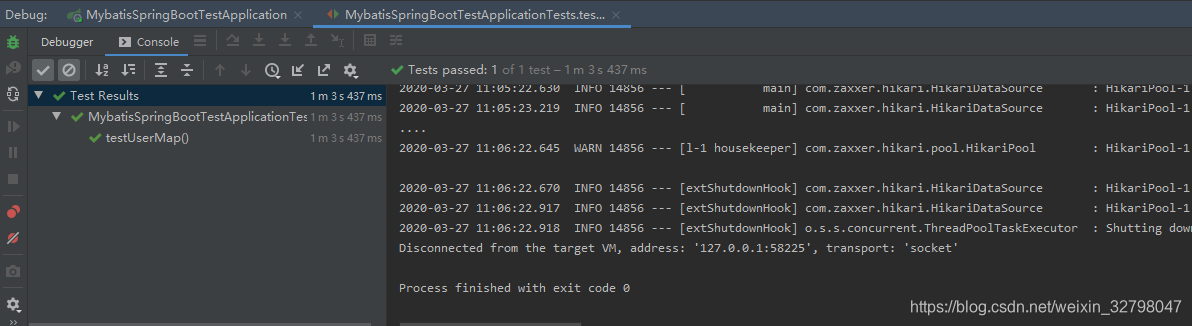
3、运行testUserMap 方法,发现测试正常通过。
三、mapper注入原理分析
1、依赖分析,我们主要引入的依赖为:
     <dependency>
            <groupId>org.mybatis.spring.boot</groupId>
            <artifactId>mybatis-spring-boot-starter</artifactId>
            <version>2.1.2</version>
        </dependency>
查看其所依赖的jar包:

可以看出,其主要依赖的jar包为mybatis:3.5.4 (mybatis 的核心包)、mybatis-spring:2.0.4 (spring 与mybatis 的整合包)及mybatis-spring-boot-autoConfigure:2.1.2 (mybatis 在spring boot中的自动配置包)
2、入口探寻
由于spring boot 自动配置的原理,我们可以知道mybatis-spring-boot-autoConfigure 包下的META-INFO文件下一定有一个spring.factories 文件,该文件会在spring boot启动的时候自动进行加载。
# Auto Configure
org.springframework.boot.autoconfigure.EnableAutoConfiguration=\
org.mybatis.spring.boot.autoconfigure.MybatisLanguageDriverAutoConfiguration,\
org.mybatis.spring.boot.autoconfigure.MybatisAutoConfiguration
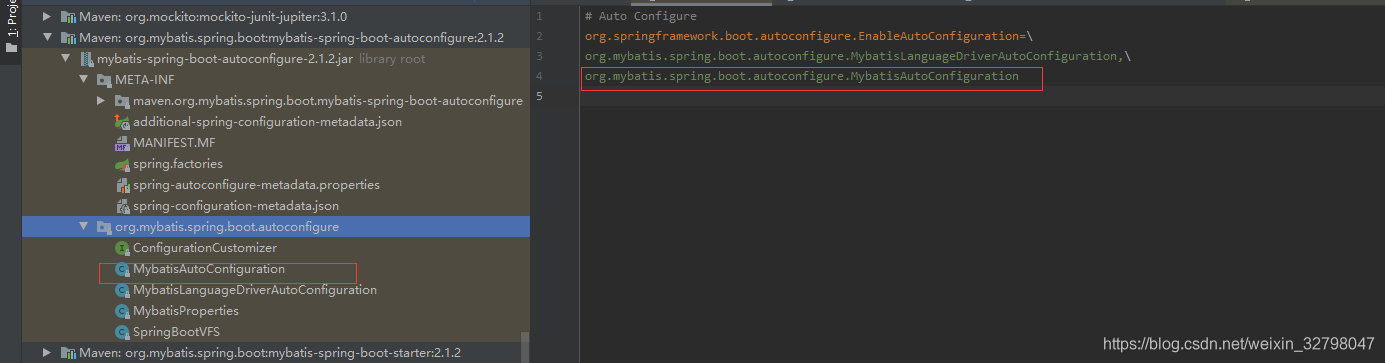
经过上述的分析,我们可以发现自动配置的入口类为:org.mybatis.spring.boot.autoconfigure.MybatisAutoConfiguration
主要进行的配置如下:
1、配置了SqlSessionFactory
  @Bean
  @ConditionalOnMissingBean
  public SqlSessionFactory sqlSessionFactory(DataSource dataSource) throws Exception {
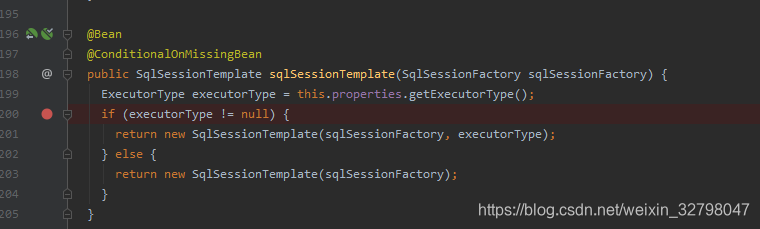
2、配置了SqlSessionTemplate
  @Bean
  @ConditionalOnMissingBean
  public SqlSessionTemplate sqlSessionTemplate(SqlSessionFactory sqlSessionFactory) {
    ExecutorType executorType = this.properties.getExecutorType();
    if (executorType != null) {
      return new SqlSessionTemplate(sqlSessionFactory, executorType);
    } else {
      return new SqlSessionTemplate(sqlSessionFactory);
    }
  }
3、配置了AutoConfiguredMapperScannerRegistrar
  @org.springframework.context.annotation.Configuration
  @Import(AutoConfiguredMapperScannerRegistrar.class)
  @ConditionalOnMissingBean({ MapperFactoryBean.class, MapperScannerConfigurer.class })
  public static class MapperScannerRegistrarNotFoundConfiguration implements InitializingBean {

    @Override
    public void afterPropertiesSet() {
      logger.debug(
          "Not found configuration for registering mapper bean using @MapperScan, MapperFactoryBean and MapperScannerConfigurer.");
    }

  }

}
四、mapper注入的源码分析
1、初始配置代码分析
此处生效需要没有在任何的配置类上添加@MapperScanner注解。
从上述的源码我们可以推断的出来,如果我们没有在配置类上使用@MapperScan 注解,那么就会自动导入AutoConfiguredMapperScannerRegistrar 配置类。该类的主要作用是将项目的主包(spring boot 的启动类所在包)下所有使用@Mapper注释的接口添加到注册到spring 容器中。对应源码如下:
 //org.mybatis.spring.boot.autoconfigure.MybatisAutoConfiguration.AutoConfiguredMapperScannerRegistrar#registerBeanDefinitions
@Override
    public void registerBeanDefinitions(AnnotationMetadata importingClassMetadata, BeanDefinitionRegistry registry) {

      if (!AutoConfigurationPackages.has(this.beanFactory)) {
        logger.debug("Could not determine auto-configuration package, automatic mapper scanning disabled.");
        return;
      }

      logger.debug("Searching for mappers annotated with @Mapper");

      List<String> packages = AutoConfigurationPackages.get(this.beanFactory);
      if (logger.isDebugEnabled()) {
        packages.forEach(pkg -> logger.debug("Using auto-configuration base package '{}'", pkg));
      }

      BeanDefinitionBuilder builder = BeanDefinitionBuilder.genericBeanDefinition(MapperScannerConfigurer.class);
      builder.addPropertyValue("processPropertyPlaceHolders", true);
      builder.addPropertyValue("annotationClass", Mapper.class);
      builder.addPropertyValue("basePackage", StringUtils.collectionToCommaDelimitedString(packages));
      BeanWrapper beanWrapper = new BeanWrapperImpl(MapperScannerConfigurer.class);
      Stream.of(beanWrapper.getPropertyDescriptors())
          // Need to mybatis-spring 2.0.2+
          .filter(x -> x.getName().equals("lazyInitialization")).findAny()
          .ifPresent(x -> builder.addPropertyValue("lazyInitialization", "${mybatis.lazy-initialization:false}"));
      registry.registerBeanDefinition(MapperScannerConfigurer.class.getName(), builder.getBeanDefinition());
    }
以上的源码向spring 容器中注入了MapperScannerConfigurer 类,并且为以下的属性赋值如下
| 属性名 |
属性值 |
| processPropertyPlaceHolders |
true |
| annotationClass |
Mapper.class |
|
|
| basePackage |
启动类所在的包 |
2、扫描basePackage 的下所有标注有@Mapper注解的接口,然后将其注入到spring 容器中。
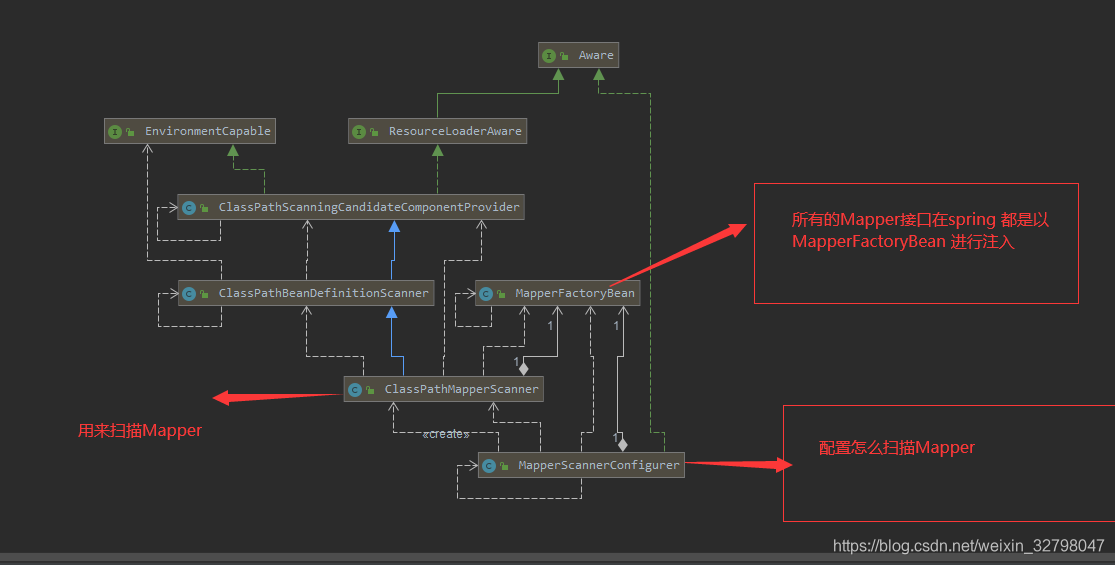
MapperScannerConfigurer 类的UML 图如下:

其中进行Bean注册代码如下:
 //org.mybatis.spring.mapper.MapperScannerConfigurer#postProcessBeanDefinitionRegistry
@Override
  public void postProcessBeanDefinitionRegistry(BeanDefinitionRegistry registry) {
    if (this.processPropertyPlaceHolders) {
      processPropertyPlaceHolders();
    }

    ClassPathMapperScanner scanner = new ClassPathMapperScanner(registry);
    scanner.setAddToConfig(this.addToConfig);
    scanner.setAnnotationClass(this.annotationClass);
    scanner.setMarkerInterface(this.markerInterface);
    scanner.setSqlSessionFactory(this.sqlSessionFactory);
    scanner.setSqlSessionTemplate(this.sqlSessionTemplate);
    scanner.setSqlSessionFactoryBeanName(this.sqlSessionFactoryBeanName);
    scanner.setSqlSessionTemplateBeanName(this.sqlSessionTemplateBeanName);
    scanner.setResourceLoader(this.applicationContext);
    scanner.setBeanNameGenerator(this.nameGenerator);
    scanner.setMapperFactoryBeanClass(this.mapperFactoryBeanClass);
    if (StringUtils.hasText(lazyInitialization)) {
      scanner.setLazyInitialization(Boolean.valueOf(lazyInitialization));
    }
    scanner.registerFilters();
      //最终 调用ClassPathMapperScanner 的scanner方法 来进行扫描及注册
    scanner.scan(
        StringUtils.tokenizeToStringArray(this.basePackage, ConfigurableApplicationContext.CONFIG_LOCATION_DELIMITERS));
  }
3、ClassPathMapperScanner 扫描 所有符合条件的Mapper接口
UML 类图如下:
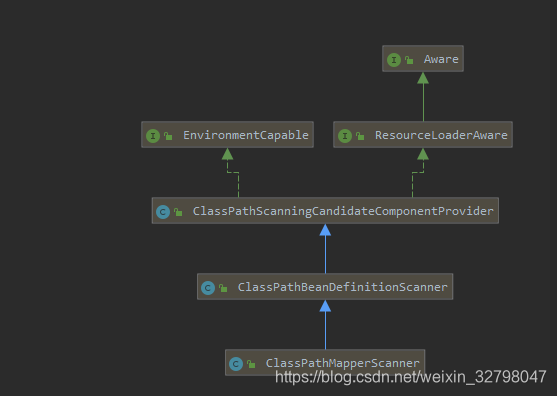
首先调用的是 ClassPathBeanDefinitionScanner#scan 方法。
//org.springframework.context.annotation.ClassPathBeanDefinitionScanner#scan
/**
	 * Perform a scan within the specified base packages.
	 * @param basePackages the packages to check for annotated classes
	 * @return number of beans registered
	 */
	public int scan(String... basePackages) {
		int beanCountAtScanStart = this.registry.getBeanDefinitionCount();

		doScan(basePackages);

		// Register annotation config processors, if necessary.
		if (this.includeAnnotationConfig) {
			AnnotationConfigUtils.registerAnnotationConfigProcessors(this.registry);
		}

		return (this.registry.getBeanDefinitionCount() - beanCountAtScanStart);
	}
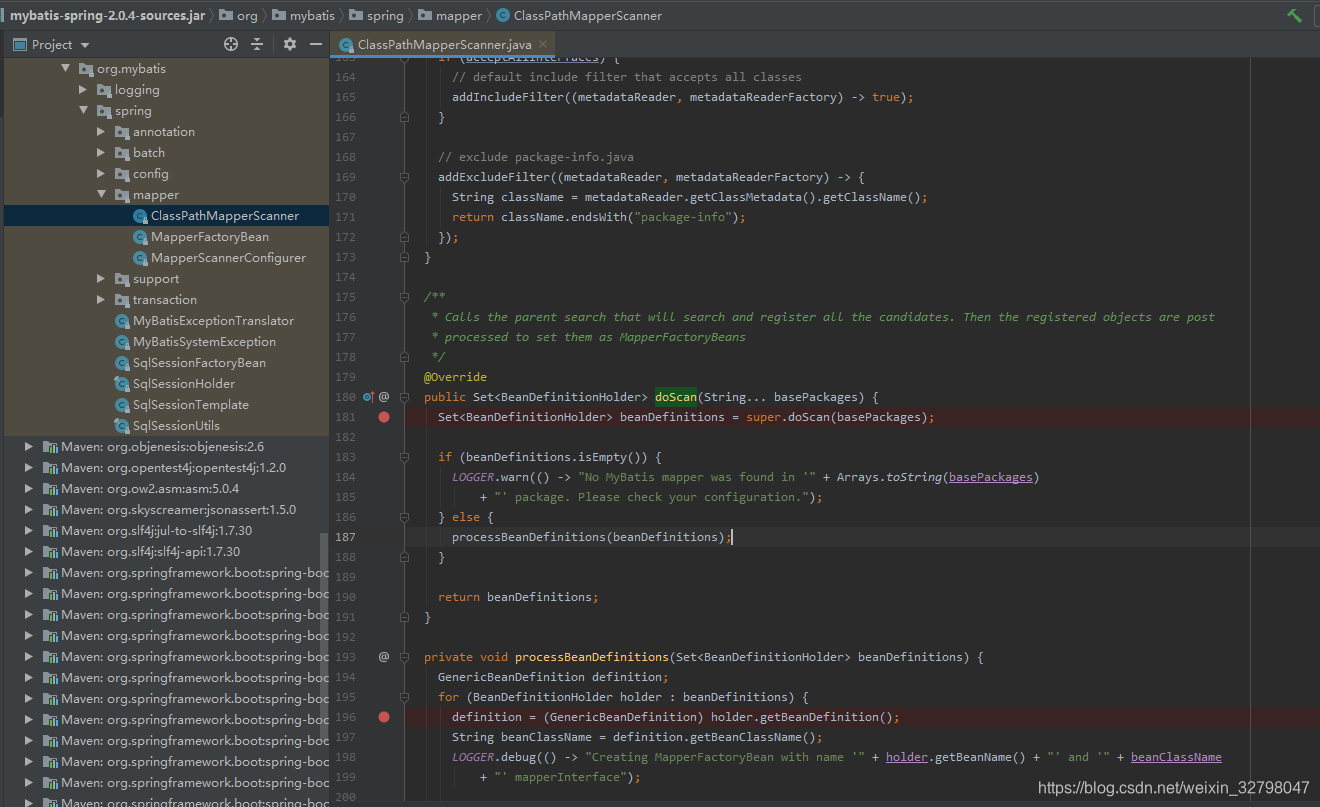
而子类ClassPathMapperScanner 复写了ClassPathBeanDefinitionScanner 方法。首先调用了父类的doScan获取候选的类注入到容器中,最后如果扫描到的候选类如果不为空,那么就修改其中的Bean的定义。
 //
@Override
  public Set<BeanDefinitionHolder> doScan(String... basePackages) {
    Set<BeanDefinitionHolder> beanDefinitions = super.doScan(basePackages);

    if (beanDefinitions.isEmpty()) {
      LOGGER.warn(() -> "No MyBatis mapper was found in '" + Arrays.toString(basePackages)
          + "' package. Please check your configuration.");
    } else {
      processBeanDefinitions(beanDefinitions);
    }

    return beanDefinitions;
  }
 //org.mybatis.spring.mapper.ClassPathMapperScanner#processBeanDefinitions
private void processBeanDefinitions(Set<BeanDefinitionHolder> beanDefinitions) {
    GenericBeanDefinition definition;
    for (BeanDefinitionHolder holder : beanDefinitions) {
      definition = (GenericBeanDefinition) holder.getBeanDefinition();
      String beanClassName = definition.getBeanClassName();
      LOGGER.debug(() -> "Creating MapperFactoryBean with name '" + holder.getBeanName() + "' and '" + beanClassName
          + "' mapperInterface");

      // the mapper interface is the original class of the bean
      // but, the actual class of the bean is MapperFactoryBean
      definition.getConstructorArgumentValues().addGenericArgumentValue(beanClassName); // issue #59
        //将Bean的定义信息修改为  MapperFactoryBean.class
      definition.setBeanClass(this.mapperFactoryBeanClass);

      definition.getPropertyValues().add("addToConfig", this.addToConfig);

      boolean explicitFactoryUsed = false;
      if (StringUtils.hasText(this.sqlSessionFactoryBeanName)) {
        definition.getPropertyValues().add("sqlSessionFactory",
            new RuntimeBeanReference(this.sqlSessionFactoryBeanName));
        explicitFactoryUsed = true;
      } else if (this.sqlSessionFactory != null) {
        definition.getPropertyValues().add("sqlSessionFactory", this.sqlSessionFactory);
        explicitFactoryUsed = true;
      }

      if (StringUtils.hasText(this.sqlSessionTemplateBeanName)) {
        if (explicitFactoryUsed) {
          LOGGER.warn(
              () -> "Cannot use both: sqlSessionTemplate and sqlSessionFactory together. sqlSessionFactory is ignored.");
        }
        definition.getPropertyValues().add("sqlSessionTemplate",
            new RuntimeBeanReference(this.sqlSessionTemplateBeanName));
        explicitFactoryUsed = true;
      } else if (this.sqlSessionTemplate != null) {
        if (explicitFactoryUsed) {
          LOGGER.warn(
              () -> "Cannot use both: sqlSessionTemplate and sqlSessionFactory together. sqlSessionFactory is ignored.");
        }
        definition.getPropertyValues().add("sqlSessionTemplate", this.sqlSessionTemplate);
        explicitFactoryUsed = true;
      }

      if (!explicitFactoryUsed) {
        LOGGER.debug(() -> "Enabling autowire by type for MapperFactoryBean with name '" + holder.getBeanName() + "'.");
        definition.setAutowireMode(AbstractBeanDefinition.AUTOWIRE_BY_TYPE);
      }
      definition.setLazyInit(lazyInitialization);
    }
  }
从 definition.setBeanClass(this.mapperFactoryBeanClass); 该代码可以看出,最终将bean的定义的接口类型修改为MapperFactoryBean类型。
4、MapperFactoryBean的实例化跟踪
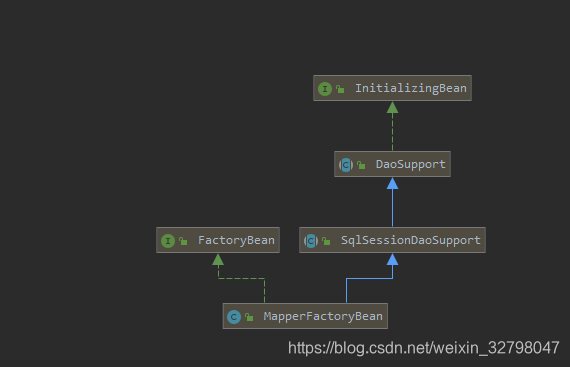
可以看出MapperFactoryBean是一个工厂Bean,在需要的时候会通过调用getObject 方法来获取实例。
  @Override
  public T getObject() throws Exception {
    return getSqlSession().getMapper(this.mapperInterface);
  }
每一个getSqlSession() 方法会返回一个sqlSessionTemplate 。这个sqlSessionTemplate 的是所有的Mapper进行公用的。
由于MapperFactoryBean 的实现了InitializingBean ,所以MapperFactoryBean被实例化后会调用org.springframework.dao.support.DaoSupport#afterPropertiesSet 方法,最终会调用子类中的checkDaoConfig 方法
 //org.mybatis.spring.mapper.MapperFactoryBean#checkDaoConfig
@Override
  protected void checkDaoConfig() {
    super.checkDaoConfig();

    notNull(this.mapperInterface, "Property 'mapperInterface' is required");

    Configuration configuration = getSqlSession().getConfiguration();
      // 当前的Mapper没有添加配置类中,就将其加入
    if (this.addToConfig && !configuration.hasMapper(this.mapperInterface)) {
      try {
        configuration.addMapper(this.mapperInterface);
      } catch (Exception e) {
        logger.error("Error while adding the mapper '" + this.mapperInterface + "' to configuration.", e);
        throw new IllegalArgumentException(e);
      } finally {
        ErrorContext.instance().reset();
      }
    }
  }
上述的方法检测是否已经将当前mapper添加到configuration中,没有则进行添加。
五、代码调试
根据上述的分析,我们进行断点调试
1、根据注册MapperFactoryBean代码
我们必然会调用 org.mybatis.spring.mapper.ClassPathMapperScanner#doScan 来扫描项目中的Mapper接口。故在如下地方设置断点
2、自动配置的SqlSessionFactory 及sqlSessionTemplate

3、MapperFactoryBean的实例化即Mapper的实例化

4、启动测试类,查看效果
请务必自行调试,以加深印象。
六、总结
总上分析,我们可以得出mybatis-spring-boot-start 是采用:
- 1、
org.mybatis.spring.mapper.ClassPathMapperScanner 类来对Mapper进行扫描,如果有使用@MapperScan注解,就扫描注解 basePackages 对应的包(及子包)中Mapper接口。如果没有,则扫描启动类所在的包(及子包)下面使用@Mapper注释的接口。
- 2、将第一步中获取的Mapper类,使用Bean的类型为MapperFactoryBean注入到spring 容器中
- 3、在需要获取Mapper 对应的Bean时,调用该工厂bean对应的Bean