1.Spring Security简介
Spring Security 是一个基于 Spring 框架,提供了一套 Web 应用安全性的完整解决方案。一般来说,Web 应用的安全性包括用户认证(Authentication)和用户授权(Authorization)两个部分。用户认证指的是验证某个用户是否为系统中的合法主体,也就是说用户能否访问该系统。用户认证一般要求用户提供用户名和密码。系统通过校验用户名和密码来完成认证过程。用户授权指的是验证某个用户是否有权限执行某个操作。在一个系统中,不同用户所具有的权限是不同的。比如对一个文件来说,有的用户只能进行读取,而有的用户可以进行修改。一般来说,系统会为不同的用户分配不同的角色,而每个角色则对应一系列的权限。
2.使用Spring Boot 的Security
1.在pom.xml 中添加
<!--添加Spring Security的Spring Boot 默认依赖-->
<dependency>
   <groupId>org.springframework.boot</groupId>
   <artifactId>spring-boot-starter-security</artifactId>
</dependency>
2.重启应用
这个时候访问应用你就会发现
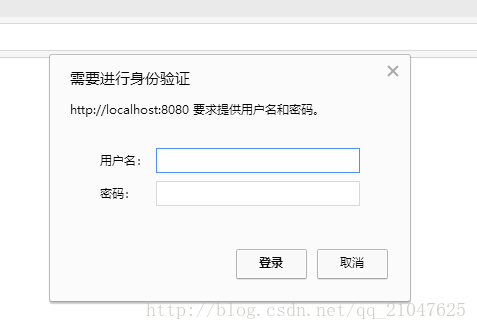
我没有配置用户名密码呀,那么它的用户名和密码是什么呢?
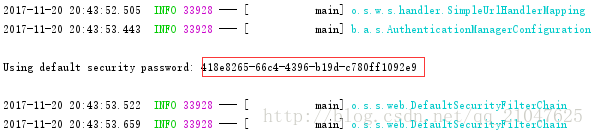
原来这里Spring Boot 又发挥了它的自动配置,他给你设置了默认的用户名和密码,用户名默认是user 密码是在你的启动日志中,你的启动日志里会有下面这个东西,这就是你的密码
到这里你可能会感觉这么简单, 但是有没有感觉很不爽, 大哥你给的这是什么玩意儿, 界面就一个弹出框难看的一逼也就算了, 用户名密码都不能自己搞, 也太难用了点.
好吧要定义自己的用户名密码,这个时候通过application.properties来配置
security.user.name=user # 默认用户名
security.user.password=123456 # 默认用户名密码
但是我想要一个炫酷的验证界面怎么办?这个时候就要覆盖Spring Boot的自动配置了
2.覆盖Spring Boot的security(两种方式)
本次代码依赖于第一章的程序
这次只是做一个登陆的简单案例,具体的会在接下来的讲.
针对自定义有两种方案, 一种是基于Spring Boot的重写覆盖,另一种是通过XML来覆盖配置.
2.1先看第一种方法
package com.hand.security;

import org.springframework.beans.factory.annotation.Autowired;
import org.springframework.context.annotation.Configuration;
import org.springframework.security.config.annotation.authentication.builders.AuthenticationManagerBuilder;
import org.springframework.security.config.annotation.web.builders.HttpSecurity;
import org.springframework.security.config.annotation.web.configuration.EnableWebSecurity;
import org.springframework.security.config.annotation.web.configuration.WebSecurityConfigurerAdapter;

/**
 * Created by JQY on 2017/11/21.
 */
@Configuration
@EnableWebSecurity
public class WebSecurityConfig extends WebSecurityConfigurerAdapter
{
    @Override
    protected void configure(HttpSecurity http) throws Exception {
        http
                .authorizeRequests()
                .antMatchers("/","/styles/**","/scripts/**").permitAll() //指定那些URL不要被保护
                .anyRequest().authenticated()
                .and()
                .formLogin()
                .loginPage("/login") //登录的时候你要跳转到哪里
                .failureUrl("/login?error") //失败页面
                .permitAll() //登录任意访问
                .and()
                .rememberMe() //rememberMe
                .and() //注销行为任意访问
                .logout()
                .permitAll()
                .and()
                .csrf() //关闭csrf 不然不支持post
                .disable();
    }
    @Autowired
    public void configureGlobal(AuthenticationManagerBuilder auth) throws Exception {
        auth
                .inMemoryAuthentication()
                //用户名密码和角色
                .withUser("jyq").password("123456").roles("USER");
    }
}
2.1.2上面写了跳向login, 接下来写login的controller
package com.hand.sys.controller;

import com.hand.demo.model.ResouceTable;
import org.springframework.stereotype.Controller;
import org.springframework.ui.Model;
import org.springframework.web.bind.annotation.RequestMapping;

/**
 * Created by JQY on 2017/11/21.
 */
@Controller
public class LoginController
{
    @RequestMapping("login")
    public String login(Model model)
    {
        return "/sys/login";
    }
}
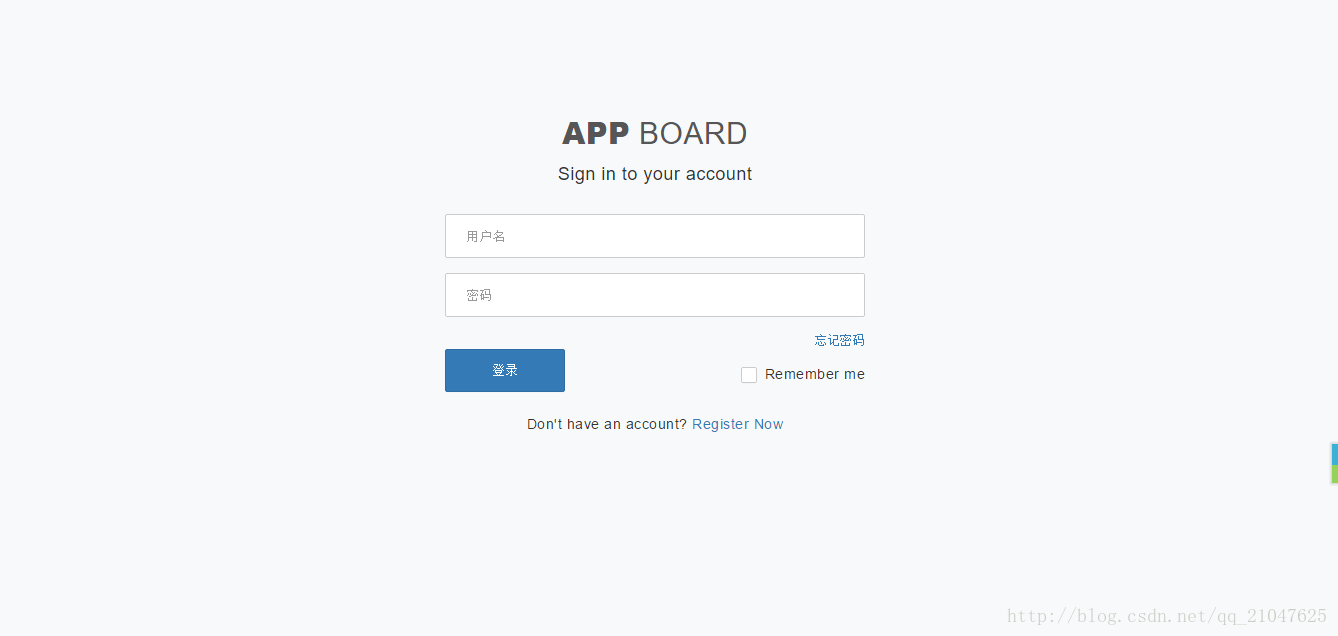
2.1.3接下来麻烦一点了,要写一个炫酷的界面
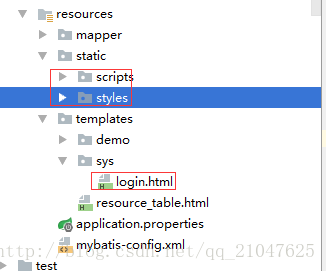
要炫酷就要把前端的样式表加上
拷一个页面过来,同时拷贝样式表和js
样式表和CSShttps://github.com/masterjyq/Spring-Boot.git
页面和样式表的位置如下:
页面代码修改form的action, 和input 的name 最终如下:
<!DOCTYPE html>
<html xmlns:th="http://www.thymeleaf.org">
<head>
<meta charset="utf-8">
<meta name="viewport" content="width=device-width, initial-scale=1, maximum-scale=1">
<meta name="description" content="Appboard - Admin Template with Angularjs">
<meta name="keywords" content="appboard, webapp, admin, dashboard, template, ui">
<meta name="author" content="solutionportal">
<!-- <base href="/"> -->
<title>Appboard - Admin Template</title>
<link href='http://fonts.googleapis.com/css?family=Open+Sans:400,300,600,700,800' rel='stylesheet' type='text/css'/>
<!-- Icons -->
<link rel="stylesheet" type="text/css" href="http://www.jq22.com/jquery/font-awesome.4.6.0.css"/>
<!-- Set this in dist folder in index.html file -->
<link rel="stylesheet" type="text/css" href="http://www.jq22.com/jquery/bootstrap-3.3.4.css"/>
<link rel="stylesheet" th:href="@{{path}/styles/main.min.css(path=${contextPath})}"/>
<!-- Match Media polyfill for IE9 -->
<!--[if IE 9]><!-->
<script type="application/javascript" th:src="@{{path}/scripts/ie/matchMedia.js(path=${contextPath})}"></script>
<!--<![endif]-->
</head>
<body ng-app="app" id="app" class="app {{themeActive}}" custom-page ng-controller="AppCtrl">
<div class="page page-auth clearfix">
<div class="auth-container">
<!-- site logo -->
<h1 class="site-logo h2 mb15"><a href="/"><span>App</span> Board</a></h1>
<h3 class="text-normal h4 text-center">Sign in to your account</h3>
<div class="form-container">
<form class="form-horizontal" th:action="@{/login}" method="post">
<div class="form-group form-group-lg">
<input name="username" class="form-control" type="text" placeholder="用户名" value="">
</div>
<div class="form-group form-group-lg">
<input name="password" class="form-control" type="password" placeholder="密码">
</div>
<div class="clearfix"><a href="#/pages/forget-pass" class="right small">忘记密码</a>
</div>
<div class="clearfix mb15">
<button type="submit" class="btn btn-lg btn-w120 btn-primary text-uppercase">登录</button>
<div class="ui-checkbox ui-checkbox-primary mt15 right">
<label>
<input type="checkbox" id="keep-login" name="remember-me">
<span>Remember me</span>
</label>
</div>
</div>
<div class="clearfix text-center">
<p>Don't have an account? <a href="#/pages/register">Register Now</a>
</p>
</div>
</form>
<div th:if="${param.error}">
<span style="color: red">用户名或密码错误</span>
</div>
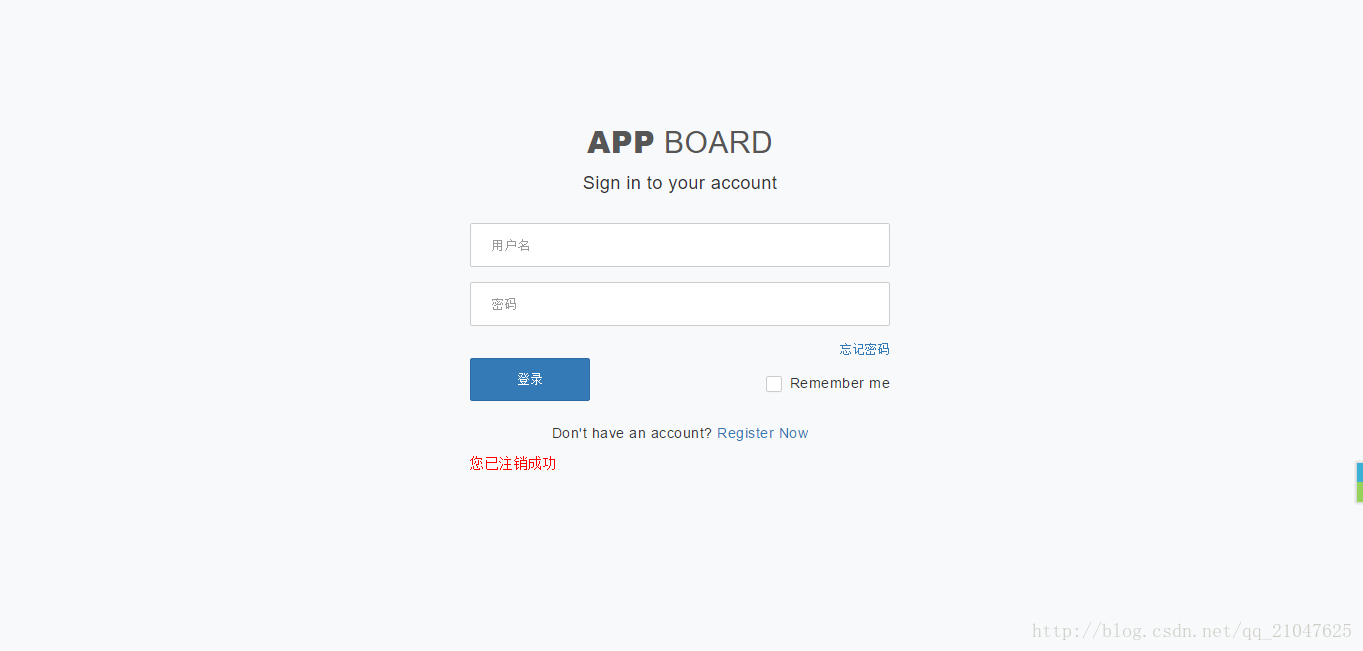
<div th:if="${param.logout}">
<span style="color: red">您已注销成功</span>
</div>
</div>
</div>
<!-- ##end auth-wrap -->
</div>
<!-- Set this in dist index.html -->
<script type="application/javascript" th:src="@{{path}/scripts/vendors.js(path=${contextPath})}"></script>
<script type="application/javascript" th:src="@{{path}/scripts/plugins.js(path=${contextPath})}"></script>
<script type="application/javascript" th:src="@{{path}/scripts/app.js(path=${contextPath})}"></script>
<!-- !End -->
</body>
</html>
弄好了先测试一下页面, 有错误,

是 thymeleaf强制校验页面元素的原因,不想修改页面就去掉强制校验
pom.xml里添加
<!--取消thymeleaf对页面的强制校验-->
<dependency>
   <groupId>net.sourceforge.nekohtml</groupId>
   <artifactId>nekohtml</artifactId>
   <version>1.9.22</version>
</dependency>
在application.properties里修改 thymeleaf配置文件如下
#spring.thymeleaf.mode=HTML5

#取消thymeleaf对页面的强制校验
spring.thymeleaf.mode=LEGACYHTML5
现在你来访问login就成功了
接下来在第一章节做resource_table.html 中加一个登出的按钮
<form th:action="@{/logout}" method="post">
    <input type="submit" value="注销"/>
</form>
到这里使用配置类实现的自定义界面就完成了
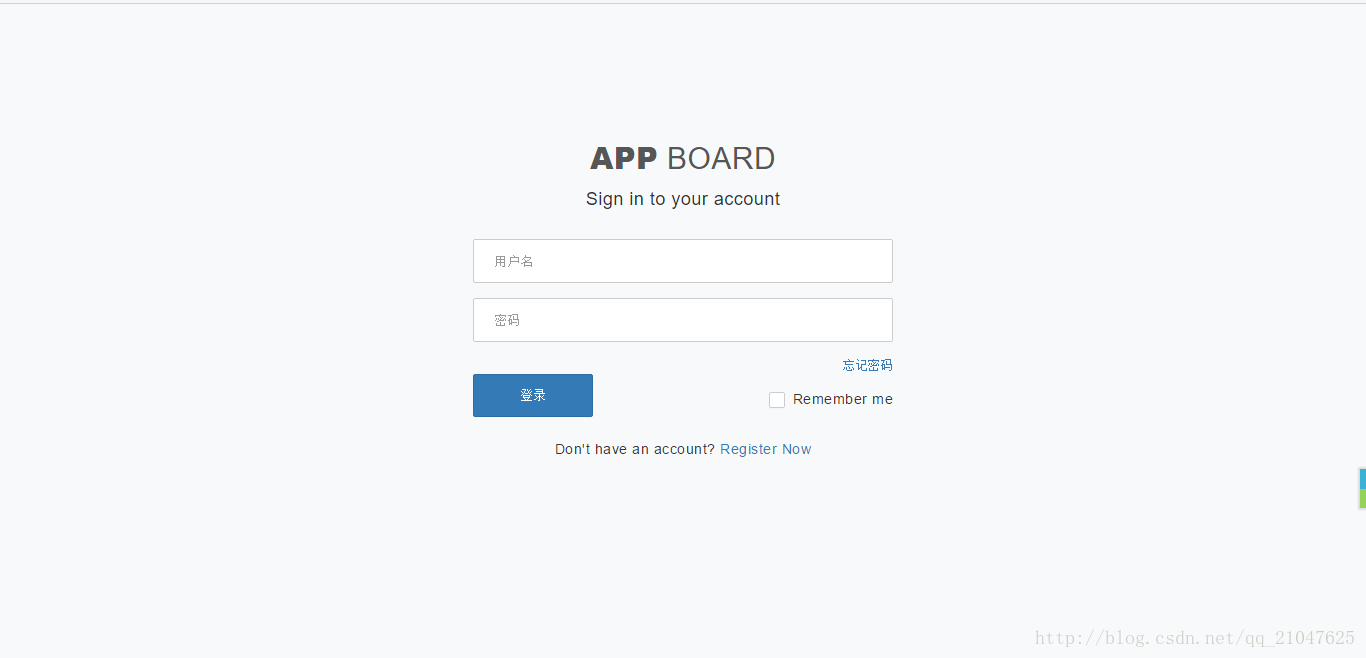
就会自动跳转到登录界面,输入你配置的 jyq/123456 ,就到我们第一章做的那个页面了
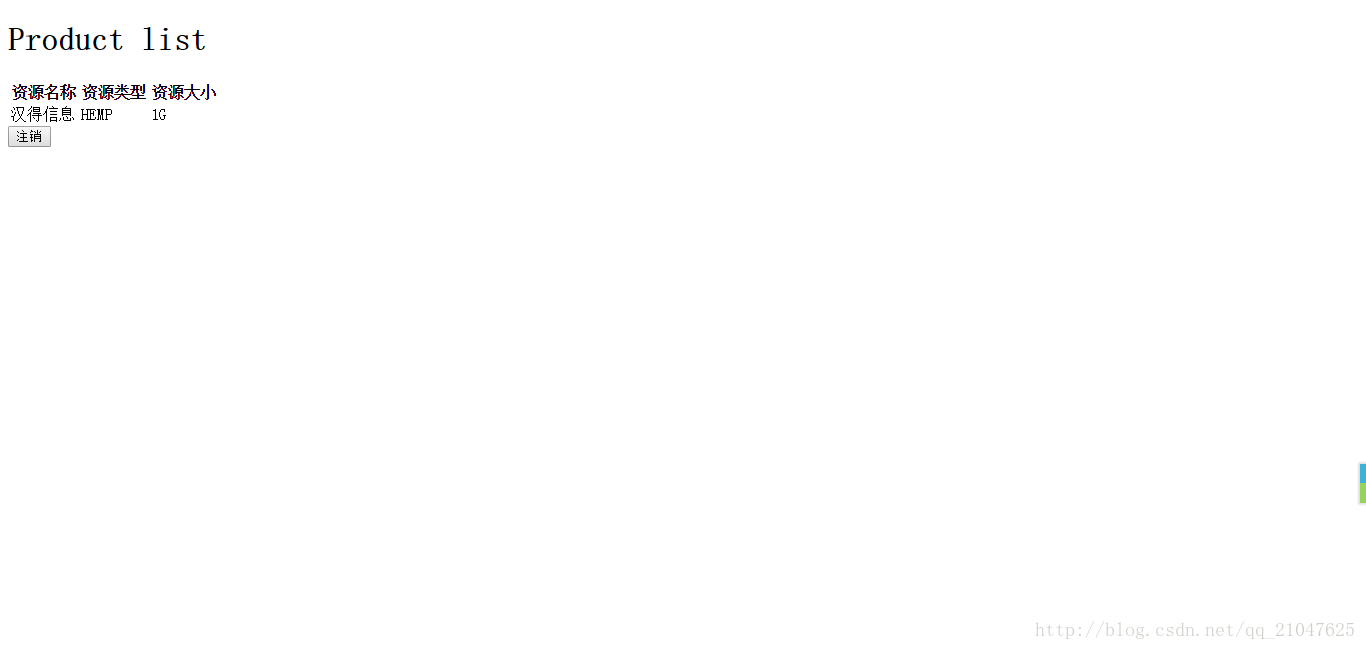
点击一下注销就会回到登录页面
2.2 接下来使用XML方式实现上述的功能
使用XML的配置和刚刚基本一样,就是把配置类换成XML配置文件
既然要使用XML那么就要干掉刚刚的配置类了,不用删除, 直接把注解去除就行了, 这样就不会扫描到这个类添加到配置里面了

不用配置类那么你就要写一个配置文件了.位置如下
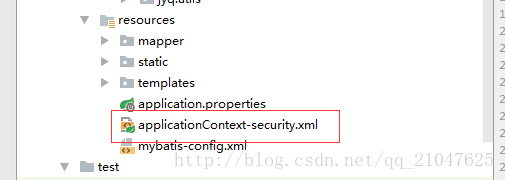
代码如下
<?xml version="1.0" encoding="UTF-8"?>
<beans xmlns="http://www.springframework.org/schema/beans"
       xmlns:xsi="http://www.w3.org/2001/XMLSchema-instance"
       xmlns:sec="http://www.springframework.org/schema/security"
       xsi:schemaLocation="http://www.springframework.org/schema/beans
                           http://www.springframework.org/schema/beans/spring-beans.xsd
                           http://www.springframework.org/schema/security
                           http://www.springframework.org/schema/security/spring-security-4.2.xsd">

    <!--拦截器过滤配置-->
    <sec:http auto-config="true">
        <!--开启remember-me-->
        <sec:remember-me />
        <!--关闭csrf-->
        <sec:csrf disabled="true"/>
        <!--静态资源的URL-->
        <sec:intercept-url pattern="/scripts/**" access="hasRole('ROLE_ANONYMOUS')"/>
        <sec:intercept-url pattern="/styles/**" access="hasRole('ROLE_ANONYMOUS')"/>

        <!--登录界面不要拦截-->
        <sec:intercept-url pattern="/login" access="hasRole('ROLE_ANONYMOUS')"/>

        <!--具体页面拦截规则-->
        <sec:intercept-url pattern="/**" access="hasRole('ROLE_ADMIN')"/>

        <!--自定义页面-->
        <sec:form-login login-page="/login"   authentication-failure-url="/login?error"
                        default-target-url="/login"/>

    </sec:http>

    <!--配置用户-->
    <sec:authentication-manager>
        <sec:authentication-provider>
            <sec:user-service >
                <sec:user name="jyq" password="123456" authorities="ROLE_ADMIN"/>
            </sec:user-service>
        </sec:authentication-provider>
    </sec:authentication-manager>
</beans>
配置文件写完你就应该想了, Spring Boot 里面没有web.xml 怎么把读取配置文件注入Bean呢? Spring Boot 给了我们一种另外的xml注入的方式. 这个时候只要在应用的引导类,就是本应用的DemoApplication里使用 @ImportResource 来解决,如下
package com.hand;
import org.springframework.boot.SpringApplication;
import org.springframework.boot.autoconfigure.SpringBootApplication;
import org.springframework.context.annotation.ImportResource;

@SpringBootApplication
@ImportResource(locations={"classpath:applicationContext-security.xml"})
public class DemoApplication {

   public static void main(String[] args) {
      SpringApplication.run(DemoApplication.class, args);
   }
}
好了到这里你就成功的干掉了配置类,使用xml来配置. 至于controller ,页面这些和配置类一样,不用修改.
可以在重启应用试试了.
到这里, 用户名密码还是我们写在配置文件里,要想从数据库中读取怎么办呢? 要想实现用户,角色的控制全部在数据库里维护该怎么做呢? 下面的将会探讨这些.